



NIO Introduction
In the traditional Java I/O model (BIO), I/O operations are performed in a blocking manner. That is, when a thread executes an I/O operation, it is blocked until the operation completes. This blocking model can become a performance bottleneck when handling many concurrent connections, because a thread must be created for each connection, and thread creation and context switching incur overhead.
To address this problem, a new I/O model was introduced in Java 1.4 — NIO (New IO, also known as Non-blocking IO). NIO fills the gap of synchronous blocking I/O; it provides non-blocking, buffer-oriented, channel-based I/O in standard Java code, enabling a small number of threads to handle multiple connections and greatly improving I/O efficiency and concurrency.
- BIO: blocks until the operation completes
- NIO: Selector monitors multiple channels, non-blocking
- AIO: notification callbacks
Note: Using NIO does not necessarily guarantee high performance. Its performance advantages are most noticeable in highly concurrent and high-latency network environments. When the number of connections is small, concurrency is low, or network throughput is high, NIO may not outperform traditional BIO.
NIO Core Components
NIO mainly includes the following three core components:
- Buffer: NIO reads and writes data through buffers. When reading, data from the Channel is filled into the Buffer; when writing, data from the Buffer is written to the Channel.
- Channel: A Channel is a bidirectional, readable/writable data transfer conduit. NIO uses Channels to perform input and output. A Channel is an abstract concept that can represent connections between files, sockets, or other data sources.
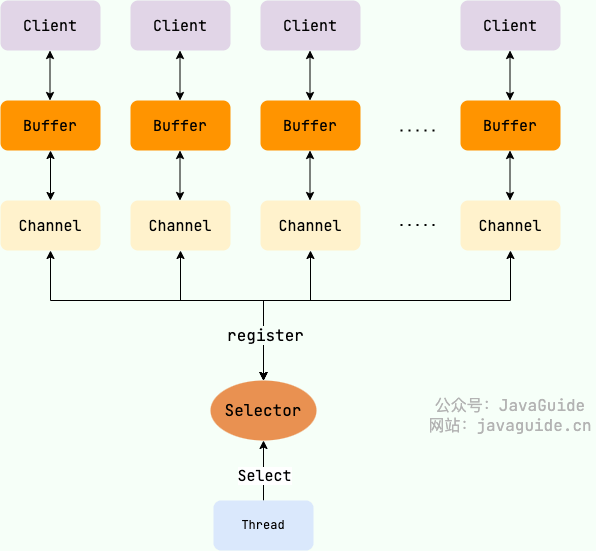
- Selector: Allows a single thread to handle multiple Channels, based on an event-driven I/O multiplexing model. All Channels can be registered to a Selector, which allocates threads to handle events.
The relationship among the three is depicted in the following diagram:
Buffer
In traditional BIO, data I/O is stream-oriented, divided into byte streams and character streams.
In Java 1.4’s NIO library, all data is handled with buffers. This is an important difference from the previous BIO, somewhat similar to buffered streams in BIO. NIO reads data directly into the Buffer during read operations and writes data into the Buffer during write operations. When using NIO, reading and writing data is always done through buffers.
Among the subclasses of Buffer, the most commonly used is ByteBuffer, which can store and operate on byte data.
You can think of a Buffer as an array; IntBuffer, FloatBuffer, CharBuffer, etc., correspond to int[], float[], char[], etc.
To better understand buffers, let’s briefly look at the four member variables defined in the Buffer class:
public abstract class Buffer { // Invariants: mark <= position <= limit <= capacity private int mark = -1; private int position = 0; private int limit; private int capacity;}The specific meanings of these four member variables are as follows:
- Capacity: The maximum amount of data the Buffer can store; set when the Buffer is created and cannot be changed.
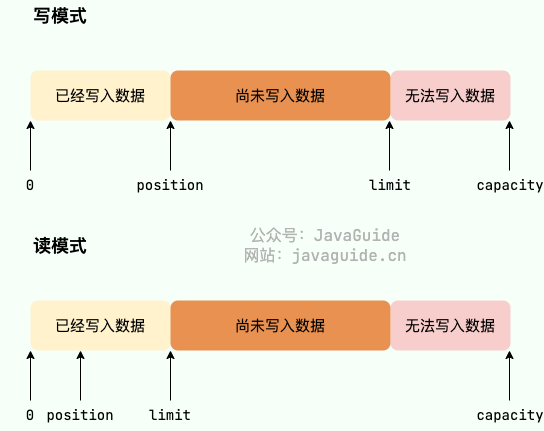
- Limit: The boundary for reading/writing data in the Buffer. In write mode,
limitrepresents the maximum writable data, usually equal tocapacity(can be set vialimit(int newLimit)); in read mode,limitequals the amount of data actually written into the Buffer. - Position: The index of the next element to be read or written. When switching from write mode to read mode (flip),
positionis reset to zero so you can read/write from the start. - Mark: Buffer allows you to set the position to a marked point; this is optional.
And these variables satisfy the relation: 0 <= mark <= position <= limit <= capacity.
Additionally, Buffer has two modes: read mode and write mode, used to read data from the Buffer or write data into the Buffer. After a Buffer is created, it defaults to write mode. Calling flip() switches to read mode. To switch back to write mode, you can call clear() or compact().
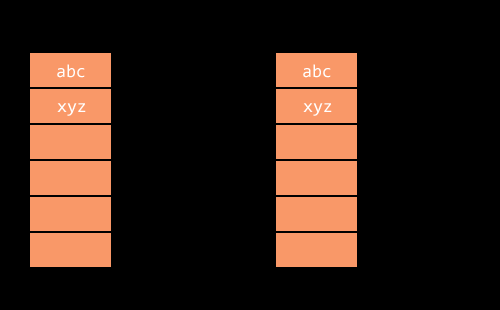
Buffer objects cannot be created with new; they must be instantiated via static methods.
Here we use ByteBuffer as an example:
// Allocate heap memorypublic static ByteBuffer allocate(int capacity);// Allocate direct memorypublic static ByteBuffer allocateDirect(int capacity);Buffer’s two most core methods:
get: reads data from the bufferput: writes data into the buffer
Besides these two methods, other important methods:
flip: switches the buffer from write mode to read mode; it setslimitto the currentpositionvalue and setspositionto 0.clear: clears the buffer, switches from read mode to write mode, and setspositionto 0 andlimittocapacity.- ……
Buffer data flow:
import java.nio.*;
public class CharBufferDemo { public static void main(String[] args) { // Allocate a CharBuffer with capacity 8 CharBuffer buffer = CharBuffer.allocate(8); System.out.println("Initial state:"); printState(buffer);
// Write 3 characters to the buffer buffer.put('a').put('b').put('c'); System.out.println("State after writing 3 characters:"); printState(buffer);
// Call flip() to prepare reading: position becomes 0, limit becomes 3 buffer.flip(); System.out.println("State after calling flip():"); printState(buffer);
// Read characters while (buffer.hasRemaining()) { System.out.print(buffer.get()); }
// Call clear() to clear the buffer: position becomes 0, limit becomes capacity buffer.clear(); System.out.println("State after calling clear():"); printState(buffer);
}
// Print capacity, limit, position, and mark of the buffer private static void printState(CharBuffer buffer) { System.out.print("capacity: " + buffer.capacity()); System.out.print(", limit: " + buffer.limit()); System.out.print(", position: " + buffer.position()); System.out.print(", mark 开始读取的字符: " + buffer.mark()); System.out.println("\\n"); }}Output:
初始状态:capacity: 8, limit: 8, position: 0
写入3个字符后的状态:capacity: 8, limit: 8, position: 3
准备读取buffer中的数据!
调用flip()方法后的状态:capacity: 8, limit: 3, position: 0
读取到的数据:abc
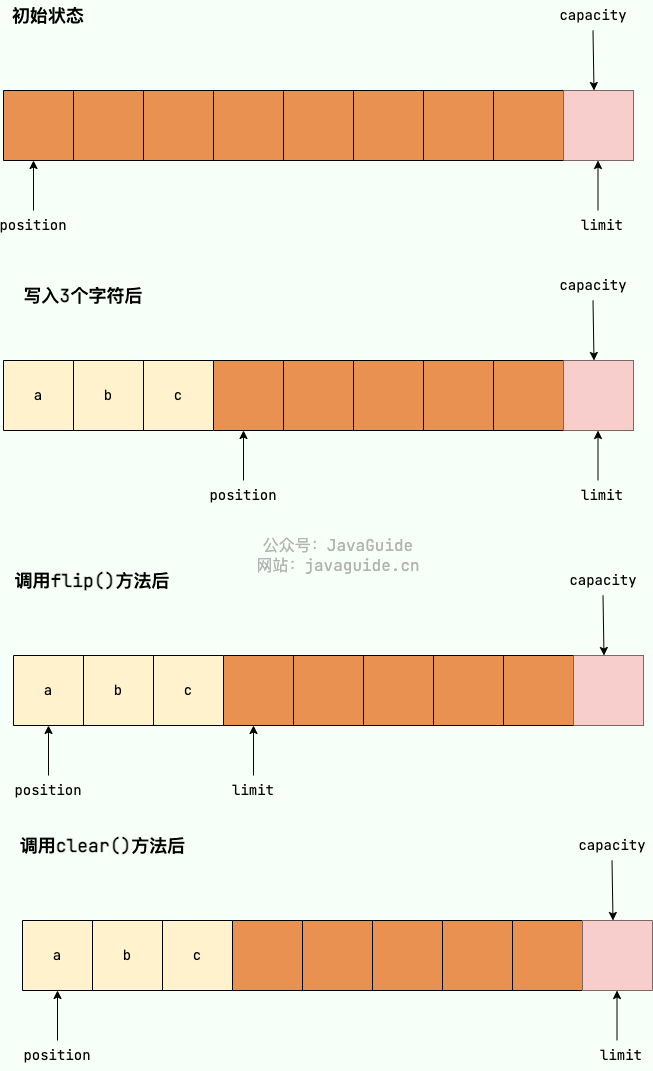
调用clear()方法后的状态:capacity: 8, limit: 8, position: 0To make this easier to understand, I drew a diagram showing how capacity, limit, and position change at each stage.
Channel
A Channel is a conduit that establishes a connection with a data source (such as a file, network socket, etc.). We can use it to read and write data, as if opening a water pipe through which data flows freely in the Channel.
In BIO, streams are unidirectional, categorized as various InputStream (input streams) and OutputStream (output streams); data only transfers in one direction. The difference between channels and streams is that channels are bidirectional and can be used for reading, writing, or both simultaneously.
Channel interacts with the Buffers as introduced above: during read, data from the Channel is filled into the Buffer, and during write, data from the Buffer is written into the Channel.
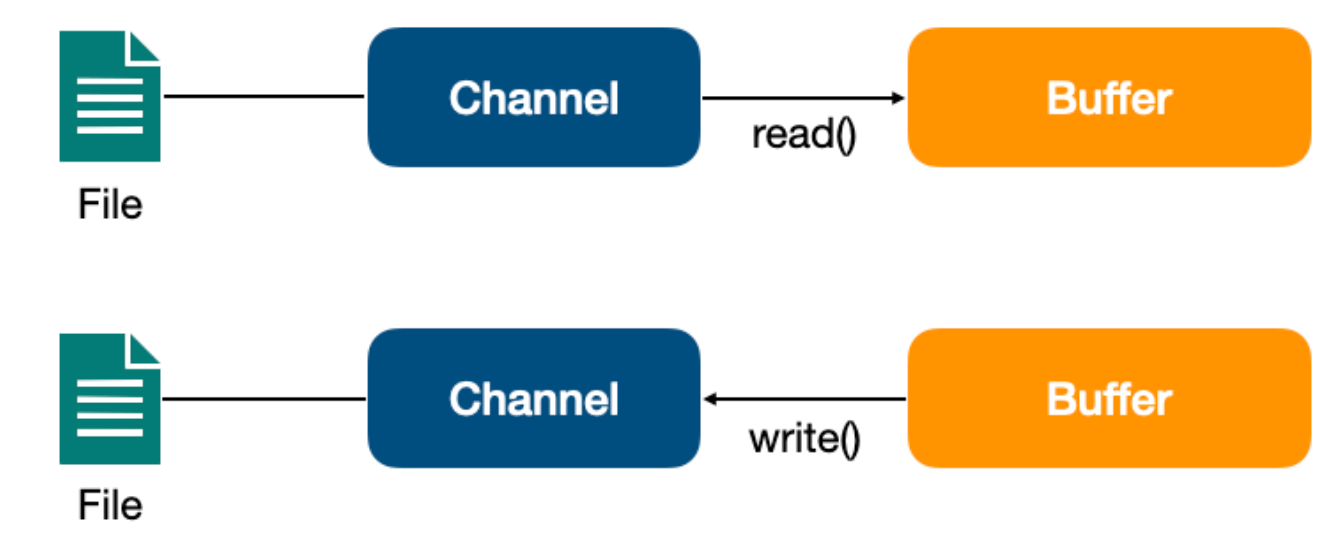
Additionally, because a Channel is full-duplex, it can map better to the underlying OS APIs. In particular, in the UNIX network programming model, the OS channels are full-duplex and support both read and write operations.
Among the subclasses of Channel, the most commonly used are the following types:
FileChannel: file access channel;SocketChannel,ServerSocketChannel: TCP communication channels;DatagramChannel: UDP communication channel;
Two core methods of Channel:
read: reads data and writes it into a Buffer.write: writes data from the Buffer into the Channel.
Here we use FileChannel as an example to demonstrate reading file data.
RandomAccessFile reader = new RandomAccessFile("test_read.in", "r"))FileChannel channel = reader.getChannel();ByteBuffer buffer = ByteBuffer.allocate(1024);channel.read(buffer);Selector
Selector is a key component in NIO that allows a single thread to handle multiple Channels. Selector is based on an event-driven I/O multiplexing model, with the main operating principle: by registering channel events with the Selector, the Selector will continuously poll the Channels registered on it.
When events occur, such as a Channel having a new TCP connection, or read and write events, the Channel becomes ready and will be selected by the Selector. The Selector will add the relevant Channels to the ready set. Through SelectionKey you can obtain the set of ready Channels and perform the corresponding I/O operations on these ready Channels.
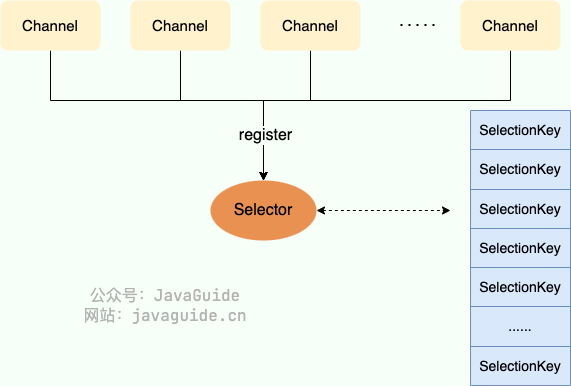
A multiplexer, Selector, can poll multiple Channels simultaneously. Because the JDK uses epoll() instead of the traditional select implementation, there is no fixed limit like maximum connections 1024/2048. This means a single thread can handle the Selector’s polling and connect thousands of clients.
Selector can monitor the following four event types:
SelectionKey.OP_ACCEPT: indicates a channel accepting connections; this is typically used withServerSocketChannel.SelectionKey.OP_CONNECT: indicates a channel has completed connection; typically used withSocketChannel.SelectionKey.OP_READ: indicates a channel is ready for reading, i.e., there is data to read.SelectionKey.OP_WRITE: indicates a channel is ready for writing, i.e., data can be written.
Selector is an abstract class and can be instantiated by calling its static method open(). A Selector can monitor the IO status of multiple SelectableChannels and is the core of non-blocking IO.
A Selector instance has three SelectionKey collections:
- All
SelectionKeycollection: Represents the Channels registered on this Selector; this set can be obtained via thekeys()method. - Selected
SelectionKeycollection: Represents all Channels available via theselect()method that require IO processing; this set can be returned byselectedKeys(). - Cancelled
SelectionKeycollection: Represents all Channels whose registration has been cancelled; on the next invocation ofselect(), the correspondingSelectionKeys will be removed. Programs usually do not access this collection directly, and there is no exposed accessor.
A simple demonstration of iterating over the selected SelectionKey set and handling it:
Set<SelectionKey> selectedKeys = selector.selectedKeys();Iterator<SelectionKey> keyIterator = selectedKeys.iterator();while (keyIterator.hasNext()) { SelectionKey key = keyIterator.next(); if (key != null) { if (key.isAcceptable()) { // ServerSocketChannel accepted a new connection } else if (key.isConnectable()) { // A new connection established } else if (key.isReadable()) { // Channel has data ready to read } else if (key.isWritable()) { // Channel is ready for writing } } keyIterator.remove();}Selector also provides a series of methods related to select():
int select(): Monitors all registeredChannels; when any require IO processing, this method returns and the correspondingSelectionKeys are added to the selected set; this method returns the number of Channels.int select(long timeout): Aselect()operation with a timeout.int selectNow(): Performs an immediate-returnselect()operation; unlike the parameterlessselect(), this method does not block.Selector wakeup(): Causes aselect()that is currently blocking to return immediately.- …
Using Selector to implement network I/O:
import java.io.IOException;import java.net.InetSocketAddress;import java.nio.ByteBuffer;import java.nio.channels.SelectionKey;import java.nio.channels.Selector;import java.nio.channels.ServerSocketChannel;import java.nio.channels.SocketChannel;import java.util.Iterator;import java.util.Set;
public class NioSelectorExample {
public static void main(String[] args) { try { ServerSocketChannel serverSocketChannel = ServerSocketChannel.open(); serverSocketChannel.configureBlocking(false); serverSocketChannel.socket().bind(new InetSocketAddress(8080));
Selector selector = Selector.open(); // Register the ServerSocketChannel with the Selector to listen for OP_ACCEPT serverSocketChannel.register(selector, SelectionKey.OP_ACCEPT);
while (true) { int readyChannels = selector.select();
if (readyChannels == 0) { continue; }
Set<SelectionKey> selectedKeys = selector.selectedKeys(); Iterator<SelectionKey> keyIterator = selectedKeys.iterator();
while (keyIterator.hasNext()) { SelectionKey key = keyIterator.next();
if (key.isAcceptable()) { // Handle connection event ServerSocketChannel server = (ServerSocketChannel) key.channel(); SocketChannel client = server.accept(); client.configureBlocking(false);
// Register client channel with the Selector to listen for OP_READ client.register(selector, SelectionKey.OP_READ); } else if (key.isReadable()) { // Handle read event SocketChannel client = (SocketChannel) key.channel(); ByteBuffer buffer = ByteBuffer.allocate(1024); int bytesRead = client.read(buffer);
if (bytesRead > 0) { buffer.flip(); System.out.println("收到数据:" +new String(buffer.array(), 0, bytesRead)); // Register client channel with the Selector to listen for OP_WRITE client.register(selector, SelectionKey.OP_WRITE); } else if (bytesRead < 0) { // Client disconnected client.close(); } } else if (key.isWritable()) { // Handle write event SocketChannel client = (SocketChannel) key.channel(); ByteBuffer buffer = ByteBuffer.wrap("Hello, Client!".getBytes()); client.write(buffer);
// Register client channel with the Selector to listen for OP_READ client.register(selector, SelectionKey.OP_READ); }
keyIterator.remove(); } } } catch (IOException e) { e.printStackTrace(); } }}In the example, we create a simple server that listens on port 8080 and uses a Selector to handle connection, read, and write events. When data is received from a client, the server reads the data and prints it to the console, then replies to the client with “Hello, Client!”.
NIO Zero-Copy
Zero-copy is a common technique to improve IO performance, and top open-source projects like ActiveMQ, Kafka, RocketMQ, QMQ, Netty, etc., use zero-copy.
Zero-copy means that when the computer performs IO operations, the CPU does not need to copy data from one storage area to another, reducing context switches and CPU copying time. In other words, zero-copy mainly solves the problem of frequent data copying by the operating system when handling I/O operations. Common zero-copy implementations include: mmap+write, sendfile, and sendfile + DMA gather copy.
The following diagram compares various zero-copy techniques:
| CPU copy | DMA copy | System calls | Context switches | |
|---|---|---|---|---|
| Traditional method | 2 | 2 | read+write | 4 |
| mmap+write | 1 | 2 | mmap+write | 4 |
| sendfile | 1 | 2 | sendfile | 2 |
| sendfile + DMA gather copy | 0 | 2 | sendfile | 2 |
As can be seen, whether using traditional I/O or after introducing zero-copy, two DMA (Direct Memory Access) copies are unavoidable. Because both DMAs are hardware-dependent. Zero-copy mainly reduces CPU copying and context switching.
Java’s support for zero-copy:
-
MappedByteBufferis an implementation of zero-copy based on memory-mapped IO (mmap); under the hood it uses the Linux kernel’smmapsystem call. It can map a file or a portion of a file into memory, forming a virtual memory file, so you can operate on in-memory data directly without needing system calls to read/write the file. -
FileChannel’stransferTo()/transferFrom()are an implementation of zero-copy in NIO based on sending files (sendfile); underneath it calls the Linux kernel’ssendfilesystem call. It can directly send file data from disk to the network without going through user-space buffers.Code example:
private void loadFileIntoMemory(File xmlFile) throws IOException {FileInputStream fis = new FileInputStream(xmlFile);// Create FileChannelFileChannel fc = fis.getChannel();// FileChannel.map() maps the file into direct memory and returns a MappedByteBufferMappedByteBuffer mmb = fc.map(FileChannel.MapMode.READ_ONLY, 0, fc.size());xmlFileBuffer = new byte[(int)fc.size()];mmb.get(xmlFileBuffer);fis.close();}
Summary
This article mainly introduces the core concepts of NIO, including its core components and zero-copy.
If we need to build network programs with NIO, it is not recommended to use raw NIO directly; the programming is complex and its functionality is limited. It is recommended to use mature NIO-based networking frameworks such as Netty. Netty builds on top of NIO with optimizations and extensions, such as support for multiple protocols and SSL/TLS, etc.
If this article helped you, please share it with others!
Some information may be outdated