


NIO 简介
在传统的 Java I/O 模型(BIO)中,I/O 操作是以阻塞的方式进行的。也就是说,当一个线程执行一个 I/O 操作时,它会被阻塞直到操作完成。这种阻塞模型在处理多个并发连接时可能会导致性能瓶颈,因为需要为每个连接创建一个线程,而线程的创建和切换都是有开销的。
为了解决这个问题,在 Java1.4 版本引入了一种新的 I/O 模型 — NIO (New IO,也称为 Non-blocking IO) 。NIO 弥补了同步阻塞 I/O 的不足,它在标准 Java 代码中提供了非阻塞、面向缓冲、基于通道的 I/O,可以使用少量的线程来处理多个连接,大大提高了 I/O 效率和并发。
- BIO:阻塞直到处理完成
- NIO
监听多个channel,非阻塞 - AIO:通知回调
注意:使用 NIO 并不一定意味着高性能,它的性能优势主要体现在高并发和高延迟的网络环境下。当连接数较少、并发程度较低或者网络传输速度较快时,NIO 的性能并不一定优于传统的 BIO 。
NIO 核心组件
NIO 主要包括以下三个核心组件:
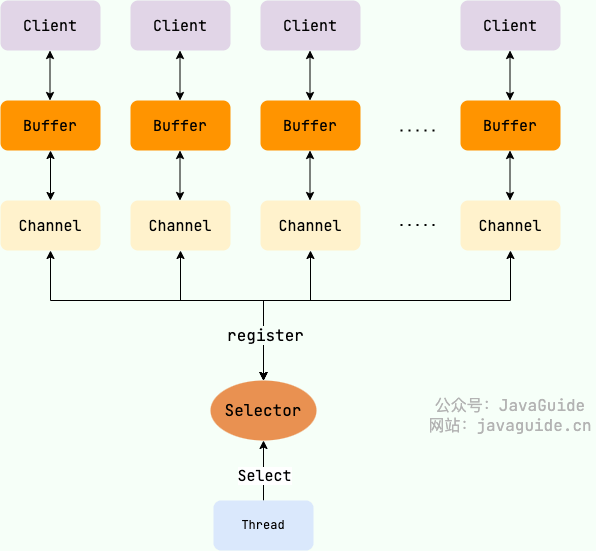
- Buffer(缓冲区):NIO 读写数据都是通过缓冲区进行操作的。读操作的时候将 Channel 中的数据填充到 Buffer 中,而写操作时将 Buffer 中的数据写入到 Channel 中。
- Channel(通道):Channel 是一个双向的、可读可写的数据传输通道,NIO 通过 Channel 来实现数据的输入输出。通道是一个抽象的概念,它可以代表文件、套接字或者其他数据源之间的连接。
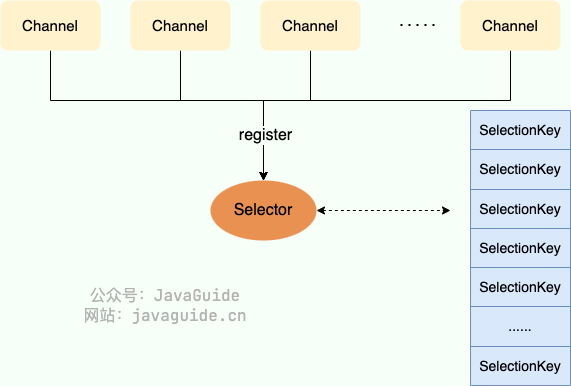
- Selector(选择器):允许一个线程处理多个 Channel,基于事件驱动的 I/O 多路复用模型。所有的 Channel 都可以注册到 Selector 上,由 Selector 来分配线程来处理事件。
三者的关系如下图所示:
Buffer(缓冲区)
在传统的 BIO 中,数据的读写是面向流的, 分为字节流和字符流。
在 Java 1.4 的 NIO 库中,所有数据都是用缓冲区处理的,这是新库和之前的 BIO 的一个重要区别,有点类似于 BIO 中的缓冲流。NIO 在读取数据时,它是直接读到缓冲区中的。在写入数据时,写入到缓冲区中。 使用 NIO 在读写数据时,都是通过缓冲区进行操作。
Buffer 的子类中,最常用的是 ByteBuffer,它可以用来存储和操作字节数据。
你可以将 Buffer 理解为一个数组,IntBuffer、FloatBuffer、CharBuffer 等分别对应 int[]、float[]、char[] 等。
为了更清晰地认识缓冲区,我们来简单看看Buffer 类中定义的四个成员变量:
public abstract class Buffer { // Invariants: mark <= position <= limit <= capacity private int mark = -1; private int position = 0; private int limit; private int capacity;}这四个成员变量的具体含义如下:
- 容量(
capacity):Buffer可以存储的最大数据量,Buffer创建时设置且不可改变; - 界限(
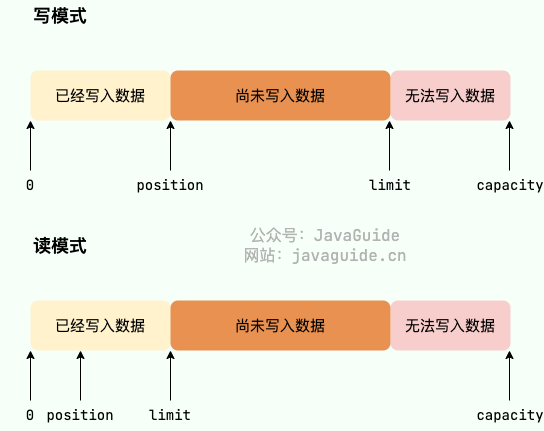
limit):Buffer中可以读/写数据的边界。写模式下,limit代表最多能写入的数据,一般等于capacity(可以通过limit(int newLimit)方法设置);读模式下,limit等于 Buffer 中实际写入的数据大小。 - 位置(
position):下一个可以被读写的数据的位置(索引)。从写操作模式到读操作模式切换的时候(flip),position都会归零,这样就可以从头开始读写了。 - 标记(
mark):Buffer允许将位置直接定位到该标记处,这是一个可选属性;
并且,上述变量满足如下的关系:0 <= mark <= position <= limit <= capacity 。
另外,Buffer 有读模式和写模式这两种模式,分别用于从 Buffer 中读取数据或者向 Buffer 中写入数据。Buffer 被创建之后默认是写模式,调用 flip() 可以切换到读模式。如果要再次切换回写模式,可以调用 clear() 或者 compact() 方法。
Buffer 对象不能通过 new 调用构造方法创建对象 ,只能通过静态方法实例化 Buffer。
这里以 ByteBuffer为例进行介绍:
// 分配堆内存public static ByteBuffer allocate(int capacity);// 分配直接内存public static ByteBuffer allocateDirect(int capacity);Buffer 最核心的两个方法:
get: 读取缓冲区的数据put:向缓冲区写入数据
除上述两个方法之外,其他的重要方法:
flip:将缓冲区从写模式切换到读模式,它会将limit的值设置为当前position的值,将position的值设置为 0。clear: 清空缓冲区,将缓冲区从读模式切换到写模式,并将position的值设置为 0,将limit的值设置为capacity的值。- ……
Buffer 中数据变化的过程:
import java.nio.*;
public class CharBufferDemo { public static void main(String[] args) { // 分配一个容量为8的CharBuffer CharBuffer buffer = CharBuffer.allocate(8); System.out.println("初始状态:"); printState(buffer);
// 向buffer写入3个字符 buffer.put('a').put('b').put('c'); System.out.println("写入3个字符后的状态:"); printState(buffer);
// 调用flip()方法,准备读取buffer中的数据,将 position 置 0,limit 的置 3 buffer.flip(); System.out.println("调用flip()方法后的状态:"); printState(buffer);
// 读取字符 while (buffer.hasRemaining()) { System.out.print(buffer.get()); }
// 调用clear()方法,清空缓冲区,将 position 的值置为 0,将 limit 的值置为 capacity 的值 buffer.clear(); System.out.println("调用clear()方法后的状态:"); printState(buffer);
}
// 打印buffer的capacity、limit、position、mark的位置 private static void printState(CharBuffer buffer) { System.out.print("capacity: " + buffer.capacity()); System.out.print(", limit: " + buffer.limit()); System.out.print(", position: " + buffer.position()); System.out.print(", mark 开始读取的字符: " + buffer.mark()); System.out.println("\\n"); }}输出:
初始状态:capacity: 8, limit: 8, position: 0
写入3个字符后的状态:capacity: 8, limit: 8, position: 3
准备读取buffer中的数据!
调用flip()方法后的状态:capacity: 8, limit: 3, position: 0
读取到的数据:abc
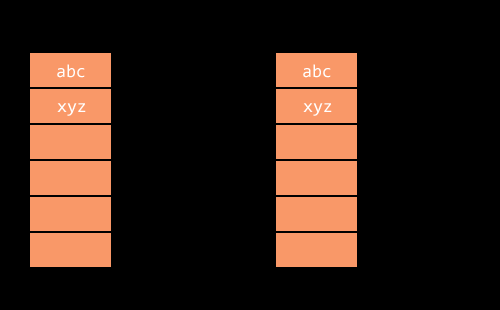
调用clear()方法后的状态:capacity: 8, limit: 8, position: 0为了帮助理解,我绘制了一张图片展示 capacity、limit和position每一阶段的变化。

Channel(通道)
Channel 是一个通道,它建立了与数据源(如文件、网络套接字等)之间的连接。我们可以利用它来读取和写入数据,就像打开了一条自来水管,让数据在 Channel 中自由流动。
BIO 中的流是单向的,分为各种 InputStream(输入流)和 OutputStream(输出流),数据只是在一个方向上传输。通道与流的不同之处在于通道是双向的,它可以用于读、写或者同时用于读写。
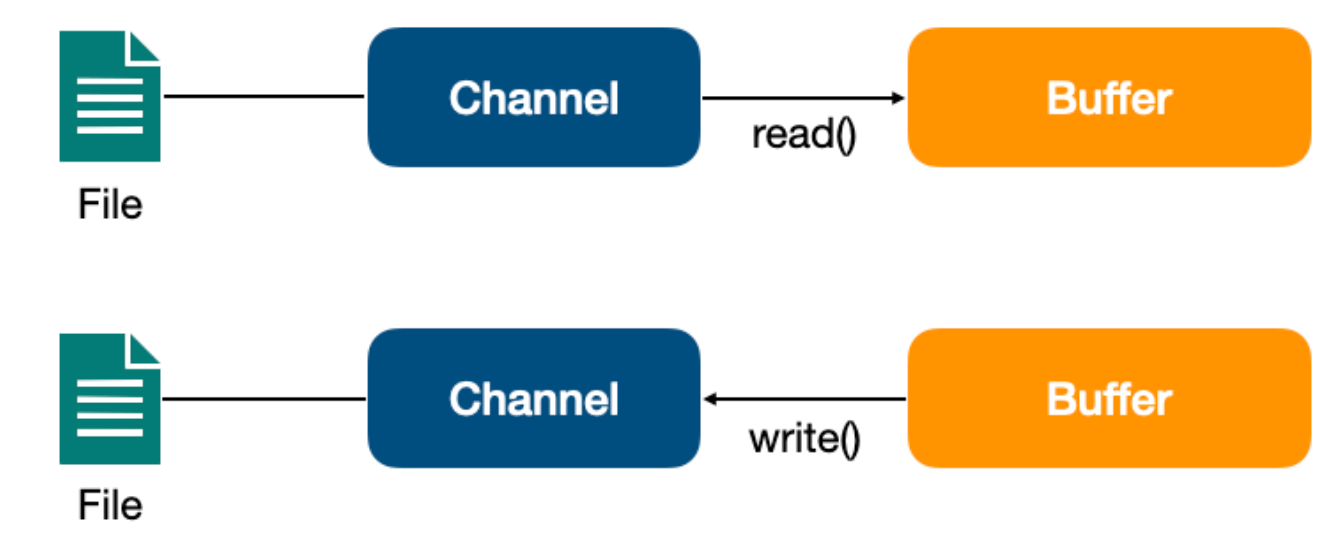
Channel 与前面介绍的 Buffer 打交道,读操作的时候将 Channel 中的数据填充到 Buffer 中,而写操作时将 Buffer 中的数据写入到 Channel 中。
另外,因为 Channel 是全双工的,所以它可以比流更好地映射底层操作系统的 API。特别是在 UNIX 网络编程模型中,底层操作系统的通道都是全双工的,同时支持读写操作。
Channel 的子类中,最常用的是以下几种类型的通道:
FileChannel:文件访问通道;SocketChannel、ServerSocketChannel:TCP 通信通道;DatagramChannel:UDP 通信通道;
Channel 最核心的两个方法:
read:读取数据并写入到 Buffer 中。write:将 Buffer 中的数据写入到 Channel 中。
这里我们以 FileChannel 为例演示一下是读取文件数据的。
RandomAccessFile reader = new RandomAccessFile("test_read.in", "r"))FileChannel channel = reader.getChannel();ByteBuffer buffer = ByteBuffer.allocate(1024);channel.read(buffer);Selector(选择器)
Selector(选择器) 是 NIO 中的一个关键组件,它允许一个线程处理多个 Channel。Selector 是基于事件驱动的 I/O 多路复用模型,主要运作原理是:通过 Selector 注册通道的事件,Selector 会不断地轮询注册在其上的 Channel。
当事件发生时,比如:某个 Channel 上面有新的 TCP 连接接入、读和写事件,这个 Channel 就处于就绪状态,会被 Selector 轮询出来。Selector 会将相关的 Channel 加入到就绪集合中。通过 SelectionKey 可以获取就绪 Channel 的集合,然后对这些就绪的 Channel 进行响应的 I/O 操作。
一个多路复用器 Selector 可以同时轮询多个 Channel,由于 JDK 使用了 epoll() 代替传统的 select 实现,所以它并没有最大连接句柄 1024/2048 的限制。这也就意味着只需要一个线程负责 Selector 的轮询,就可以接入成千上万的客户端。
Selector 可以监听以下四种事件类型:
SelectionKey.OP_ACCEPT:表示通道接受连接的事件,这通常用于ServerSocketChannel。SelectionKey.OP_CONNECT:表示通道完成连接的事件,这通常用于SocketChannel。SelectionKey.OP_READ:表示通道准备好进行读取的事件,即有数据可读。SelectionKey.OP_WRITE:表示通道准备好进行写入的事件,即可以写入数据。
Selector是抽象类,可以通过调用此类的 open() 静态方法来创建 Selector 实例。Selector 可以同时监控多个 SelectableChannel 的 IO 状况,是非阻塞 IO 的核心。
一个 Selector 实例有三个 SelectionKey 集合:
- 所有的
SelectionKey集合:代表了注册在该 Selector 上的Channel,这个集合可以通过keys()方法返回。 - 被选择的
SelectionKey集合:代表了所有可通过select()方法获取的、需要进行IO处理的 Channel,这个集合可以通过selectedKeys()返回。 - 被取消的
SelectionKey集合:代表了所有被取消注册关系的Channel,在下一次执行select()方法时,这些Channel对应的SelectionKey会被彻底删除,程序通常无须直接访问该集合,也没有暴露访问的方法。
简单演示一下如何遍历被选择的 SelectionKey 集合并进行处理:
Set<SelectionKey> selectedKeys = selector.selectedKeys();Iterator<SelectionKey> keyIterator = selectedKeys.iterator();while (keyIterator.hasNext()) { SelectionKey key = keyIterator.next(); if (key != null) { if (key.isAcceptable()) { // ServerSocketChannel 接收了一个新连接 } else if (key.isConnectable()) { // 表示一个新连接建立 } else if (key.isReadable()) { // Channel 有准备好的数据,可以读取 } else if (key.isWritable()) { // Channel 有空闲的 Buffer,可以写入数据 } } keyIterator.remove();}Selector 还提供了一系列和 select() 相关的方法:
int select():监控所有注册的Channel,当它们中间有需要处理的IO操作时,该方法返回,并将对应的SelectionKey加入被选择的SelectionKey集合中,该方法返回这些Channel的数量。int select(long timeout):可以设置超时时长的select()操作。int selectNow():执行一个立即返回的select()操作,相对于无参数的select()方法而言,该方法不会阻塞线程。Selector wakeup():使一个还未返回的select()方法立刻返回。- ……
使用 Selector 实现网络读写的简单示例:
import java.io.IOException;import java.net.InetSocketAddress;import java.nio.ByteBuffer;import java.nio.channels.SelectionKey;import java.nio.channels.Selector;import java.nio.channels.ServerSocketChannel;import java.nio.channels.SocketChannel;import java.util.Iterator;import java.util.Set;
public class NioSelectorExample {
public static void main(String[] args) { try { ServerSocketChannel serverSocketChannel = ServerSocketChannel.open(); serverSocketChannel.configureBlocking(false); serverSocketChannel.socket().bind(new InetSocketAddress(8080));
Selector selector = Selector.open(); // 将 ServerSocketChannel 注册到 Selector 并监听 OP_ACCEPT 事件 serverSocketChannel.register(selector, SelectionKey.OP_ACCEPT);
while (true) { int readyChannels = selector.select();
if (readyChannels == 0) { continue; }
Set<SelectionKey> selectedKeys = selector.selectedKeys(); Iterator<SelectionKey> keyIterator = selectedKeys.iterator();
while (keyIterator.hasNext()) { SelectionKey key = keyIterator.next();
if (key.isAcceptable()) { // 处理连接事件 ServerSocketChannel server = (ServerSocketChannel) key.channel(); SocketChannel client = server.accept(); client.configureBlocking(false);
// 将客户端通道注册到 Selector 并监听 OP_READ 事件 client.register(selector, SelectionKey.OP_READ); } else if (key.isReadable()) { // 处理读事件 SocketChannel client = (SocketChannel) key.channel(); ByteBuffer buffer = ByteBuffer.allocate(1024); int bytesRead = client.read(buffer);
if (bytesRead > 0) { buffer.flip(); System.out.println("收到数据:" +new String(buffer.array(), 0, bytesRead)); // 将客户端通道注册到 Selector 并监听 OP_WRITE 事件 client.register(selector, SelectionKey.OP_WRITE); } else if (bytesRead < 0) { // 客户端断开连接 client.close(); } } else if (key.isWritable()) { // 处理写事件 SocketChannel client = (SocketChannel) key.channel(); ByteBuffer buffer = ByteBuffer.wrap("Hello, Client!".getBytes()); client.write(buffer);
// 将客户端通道注册到 Selector 并监听 OP_READ 事件 client.register(selector, SelectionKey.OP_READ); }
keyIterator.remove(); } } } catch (IOException e) { e.printStackTrace(); } }}在示例中,我们创建了一个简单的服务器,监听 8080 端口,使用 Selector 处理连接、读取和写入事件。当接收到客户端的数据时,服务器将读取数据并将其打印到控制台,然后向客户端回复 “Hello, Client!”。
NIO 零拷贝
零拷贝是提升 IO 操作性能的一个常用手段,像 ActiveMQ、Kafka 、RocketMQ、QMQ、Netty 等顶级开源项目都用到了零拷贝。
零拷贝是指计算机执行 IO 操作时,CPU 不需要将数据从一个存储区域复制到另一个存储区域,从而可以减少上下文切换以及 CPU 的拷贝时间。也就是说,零拷贝主主要解决操作系统在处理 I/O 操作时频繁复制数据的问题。零拷贝的常见实现技术有: mmap+write、sendfile和 sendfile + DMA gather copy 。
下图展示了各种零拷贝技术的对比图:
| CPU 拷贝 | DMA 拷贝 | 系统调用 | 上下文切换 | |
|---|---|---|---|---|
| 传统方法 | 2 | 2 | read+write | 4 |
| mmap+write | 1 | 2 | mmap+write | 4 |
| sendfile | 1 | 2 | sendfile | 2 |
| sendfile + DMA gather copy | 0 | 2 | sendfile | 2 |
可以看出,无论是传统的 I/O 方式,还是引入了零拷贝之后,2 次 DMA(Direct Memory Access) 拷贝是都少不了的。因为两次 DMA 都是依赖硬件完成的。零拷贝主要是减少了 CPU 拷贝及上下文的切换。
Java 对零拷贝的支持:
-
MappedByteBuffer是 NIO 基于内存映射(mmap)这种零拷⻉⽅式的提供的⼀种实现,底层实际是调用了 Linux 内核的mmap系统调用。它可以将一个文件或者文件的一部分映射到内存中,形成一个虚拟内存文件,这样就可以直接操作内存中的数据,而不需要通过系统调用来读写文件。 -
FileChannel的transferTo()/transferFrom()是 NIO 基于发送文件(sendfile)这种零拷贝方式的提供的一种实现,底层实际是调用了 Linux 内核的sendfile系统调用。它可以直接将文件数据从磁盘发送到网络,而不需要经过用户空间的缓冲区。代码示例:
private void loadFileIntoMemory(File xmlFile) throws IOException {FileInputStream fis = new FileInputStream(xmlFile);// 创建 FileChannel 对象FileChannel fc = fis.getChannel();// FileChannel.map() 将文件映射到直接内存并返回 MappedByteBuffer 对象MappedByteBuffer mmb = fc.map(FileChannel.MapMode.READ_ONLY, 0, fc.size());xmlFileBuffer = new byte[(int)fc.size()];mmb.get(xmlFileBuffer);fis.close();}
总结
这篇文章我们主要介绍了 NIO 的核心知识点,包括 NIO 的核心组件和零拷贝。
如果我们需要使用 NIO 构建网络程序的话,不建议直接使用原生 NIO,编程复杂且功能性太弱,推荐使用一些成熟的基于 NIO 的网络编程框架比如 Netty。Netty 在 NIO 的基础上进行了一些优化和扩展比如支持多种协议、支持 SSL/TLS 等等。
NIO Introduction
In the traditional Java I/O model (BIO), I/O operations are performed in a blocking manner. That is, when a thread executes an I/O operation, it is blocked until the operation completes. This blocking model can become a performance bottleneck when handling many concurrent connections, because a thread must be created for each connection, and thread creation and context switching incur overhead.
To address this problem, a new I/O model was introduced in Java 1.4 — NIO (New IO, also known as Non-blocking IO). NIO fills the gap of synchronous blocking I/O; it provides non-blocking, buffer-oriented, channel-based I/O in standard Java code, enabling a small number of threads to handle multiple connections and greatly improving I/O efficiency and concurrency.
- BIO: blocks until the operation completes
- NIO: Selector monitors multiple channels, non-blocking
- AIO: notification callbacks
Note: Using NIO does not necessarily guarantee high performance. Its performance advantages are most noticeable in highly concurrent and high-latency network environments. When the number of connections is small, concurrency is low, or network throughput is high, NIO may not outperform traditional BIO.
NIO Core Components
NIO mainly includes the following three core components:
- Buffer: NIO reads and writes data through buffers. When reading, data from the Channel is filled into the Buffer; when writing, data from the Buffer is written to the Channel.
- Channel: A Channel is a bidirectional, readable/writable data transfer conduit. NIO uses Channels to perform input and output. A Channel is an abstract concept that can represent connections between files, sockets, or other data sources.
- Selector: Allows a single thread to handle multiple Channels, based on an event-driven I/O multiplexing model. All Channels can be registered to a Selector, which allocates threads to handle events.
The relationship among the three is depicted in the following diagram:
Buffer
In traditional BIO, data I/O is stream-oriented, divided into byte streams and character streams.
In Java 1.4’s NIO library, all data is handled with buffers. This is an important difference from the previous BIO, somewhat similar to buffered streams in BIO. NIO reads data directly into the Buffer during read operations and writes data into the Buffer during write operations. When using NIO, reading and writing data is always done through buffers.
Among the subclasses of Buffer, the most commonly used is ByteBuffer, which can store and operate on byte data.
You can think of a Buffer as an array; IntBuffer, FloatBuffer, CharBuffer, etc., correspond to int[], float[], char[], etc.
To better understand buffers, let’s briefly look at the four member variables defined in the Buffer class:
public abstract class Buffer { // Invariants: mark <= position <= limit <= capacity private int mark = -1; private int position = 0; private int limit; private int capacity;}The specific meanings of these four member variables are as follows:
- Capacity: The maximum amount of data the Buffer can store; set when the Buffer is created and cannot be changed.
- Limit: The boundary for reading/writing data in the Buffer. In write mode,
limitrepresents the maximum writable data, usually equal tocapacity(can be set vialimit(int newLimit)); in read mode,limitequals the amount of data actually written into the Buffer. - Position: The index of the next element to be read or written. When switching from write mode to read mode (flip),
positionis reset to zero so you can read/write from the start. - Mark: Buffer allows you to set the position to a marked point; this is optional.
And these variables satisfy the relation: 0 <= mark <= position <= limit <= capacity.
Additionally, Buffer has two modes: read mode and write mode, used to read data from the Buffer or write data into the Buffer. After a Buffer is created, it defaults to write mode. Calling flip() switches to read mode. To switch back to write mode, you can call clear() or compact().
Buffer objects cannot be created with new; they must be instantiated via static methods.
Here we use ByteBuffer as an example:
// Allocate heap memorypublic static ByteBuffer allocate(int capacity);// Allocate direct memorypublic static ByteBuffer allocateDirect(int capacity);Buffer’s two most core methods:
get: reads data from the bufferput: writes data into the buffer
Besides these two methods, other important methods:
flip: switches the buffer from write mode to read mode; it setslimitto the currentpositionvalue and setspositionto 0.clear: clears the buffer, switches from read mode to write mode, and setspositionto 0 andlimittocapacity.- ……
Buffer data flow:
import java.nio.*;
public class CharBufferDemo { public static void main(String[] args) { // Allocate a CharBuffer with capacity 8 CharBuffer buffer = CharBuffer.allocate(8); System.out.println("Initial state:"); printState(buffer);
// Write 3 characters to the buffer buffer.put('a').put('b').put('c'); System.out.println("State after writing 3 characters:"); printState(buffer);
// Call flip() to prepare reading: position becomes 0, limit becomes 3 buffer.flip(); System.out.println("State after calling flip():"); printState(buffer);
// Read characters while (buffer.hasRemaining()) { System.out.print(buffer.get()); }
// Call clear() to clear the buffer: position becomes 0, limit becomes capacity buffer.clear(); System.out.println("State after calling clear():"); printState(buffer);
}
// Print capacity, limit, position, and mark of the buffer private static void printState(CharBuffer buffer) { System.out.print("capacity: " + buffer.capacity()); System.out.print(", limit: " + buffer.limit()); System.out.print(", position: " + buffer.position()); System.out.print(", mark 开始读取的字符: " + buffer.mark()); System.out.println("\\n"); }}Output:
初始状态:capacity: 8, limit: 8, position: 0
写入3个字符后的状态:capacity: 8, limit: 8, position: 3
准备读取buffer中的数据!
调用flip()方法后的状态:capacity: 8, limit: 3, position: 0
读取到的数据:abc
调用clear()方法后的状态:capacity: 8, limit: 8, position: 0To make this easier to understand, I drew a diagram showing how capacity, limit, and position change at each stage.
Channel
A Channel is a conduit that establishes a connection with a data source (such as a file, network socket, etc.). We can use it to read and write data, as if opening a water pipe through which data flows freely in the Channel.
In BIO, streams are unidirectional, categorized as various InputStream (input streams) and OutputStream (output streams); data only transfers in one direction. The difference between channels and streams is that channels are bidirectional and can be used for reading, writing, or both simultaneously.
Channel interacts with the Buffers as introduced above: during read, data from the Channel is filled into the Buffer, and during write, data from the Buffer is written into the Channel.
Additionally, because a Channel is full-duplex, it can map better to the underlying OS APIs. In particular, in the UNIX network programming model, the OS channels are full-duplex and support both read and write operations.
Among the subclasses of Channel, the most commonly used are the following types:
FileChannel: file access channel;SocketChannel,ServerSocketChannel: TCP communication channels;DatagramChannel: UDP communication channel;
Two core methods of Channel:
read: reads data and writes it into a Buffer.write: writes data from the Buffer into the Channel.
Here we use FileChannel as an example to demonstrate reading file data.
RandomAccessFile reader = new RandomAccessFile("test_read.in", "r"))FileChannel channel = reader.getChannel();ByteBuffer buffer = ByteBuffer.allocate(1024);channel.read(buffer);Selector
Selector is a key component in NIO that allows a single thread to handle multiple Channels. Selector is based on an event-driven I/O multiplexing model, with the main operating principle: by registering channel events with the Selector, the Selector will continuously poll the Channels registered on it.
When events occur, such as a Channel having a new TCP connection, or read and write events, the Channel becomes ready and will be selected by the Selector. The Selector will add the relevant Channels to the ready set. Through SelectionKey you can obtain the set of ready Channels and perform the corresponding I/O operations on these ready Channels.
A multiplexer, Selector, can poll multiple Channels simultaneously. Because the JDK uses epoll() instead of the traditional select implementation, there is no fixed limit like maximum connections 1024/2048. This means a single thread can handle the Selector’s polling and connect thousands of clients.
Selector can monitor the following four event types:
SelectionKey.OP_ACCEPT: indicates a channel accepting connections; this is typically used withServerSocketChannel.SelectionKey.OP_CONNECT: indicates a channel has completed connection; typically used withSocketChannel.SelectionKey.OP_READ: indicates a channel is ready for reading, i.e., there is data to read.SelectionKey.OP_WRITE: indicates a channel is ready for writing, i.e., data can be written.
Selector is an abstract class and can be instantiated by calling its static method open(). A Selector can monitor the IO status of multiple SelectableChannels and is the core of non-blocking IO.
A Selector instance has three SelectionKey collections:
- All
SelectionKeycollection: Represents the Channels registered on this Selector; this set can be obtained via thekeys()method. - Selected
SelectionKeycollection: Represents all Channels available via theselect()method that require IO processing; this set can be returned byselectedKeys(). - Cancelled
SelectionKeycollection: Represents all Channels whose registration has been cancelled; on the next invocation ofselect(), the correspondingSelectionKeys will be removed. Programs usually do not access this collection directly, and there is no exposed accessor.
A simple demonstration of iterating over the selected SelectionKey set and handling it:
Set<SelectionKey> selectedKeys = selector.selectedKeys();Iterator<SelectionKey> keyIterator = selectedKeys.iterator();while (keyIterator.hasNext()) { SelectionKey key = keyIterator.next(); if (key != null) { if (key.isAcceptable()) { // ServerSocketChannel accepted a new connection } else if (key.isConnectable()) { // A new connection established } else if (key.isReadable()) { // Channel has data ready to read } else if (key.isWritable()) { // Channel is ready for writing } } keyIterator.remove();}Selector also provides a series of methods related to select():
int select(): Monitors all registeredChannels; when any require IO processing, this method returns and the correspondingSelectionKeys are added to the selected set; this method returns the number of Channels.int select(long timeout): Aselect()operation with a timeout.int selectNow(): Performs an immediate-returnselect()operation; unlike the parameterlessselect(), this method does not block.Selector wakeup(): Causes aselect()that is currently blocking to return immediately.- …
Using Selector to implement network I/O:
import java.io.IOException;import java.net.InetSocketAddress;import java.nio.ByteBuffer;import java.nio.channels.SelectionKey;import java.nio.channels.Selector;import java.nio.channels.ServerSocketChannel;import java.nio.channels.SocketChannel;import java.util.Iterator;import java.util.Set;
public class NioSelectorExample {
public static void main(String[] args) { try { ServerSocketChannel serverSocketChannel = ServerSocketChannel.open(); serverSocketChannel.configureBlocking(false); serverSocketChannel.socket().bind(new InetSocketAddress(8080));
Selector selector = Selector.open(); // Register the ServerSocketChannel with the Selector to listen for OP_ACCEPT serverSocketChannel.register(selector, SelectionKey.OP_ACCEPT);
while (true) { int readyChannels = selector.select();
if (readyChannels == 0) { continue; }
Set<SelectionKey> selectedKeys = selector.selectedKeys(); Iterator<SelectionKey> keyIterator = selectedKeys.iterator();
while (keyIterator.hasNext()) { SelectionKey key = keyIterator.next();
if (key.isAcceptable()) { // Handle connection event ServerSocketChannel server = (ServerSocketChannel) key.channel(); SocketChannel client = server.accept(); client.configureBlocking(false);
// Register client channel with the Selector to listen for OP_READ client.register(selector, SelectionKey.OP_READ); } else if (key.isReadable()) { // Handle read event SocketChannel client = (SocketChannel) key.channel(); ByteBuffer buffer = ByteBuffer.allocate(1024); int bytesRead = client.read(buffer);
if (bytesRead > 0) { buffer.flip(); System.out.println("收到数据:" +new String(buffer.array(), 0, bytesRead)); // Register client channel with the Selector to listen for OP_WRITE client.register(selector, SelectionKey.OP_WRITE); } else if (bytesRead < 0) { // Client disconnected client.close(); } } else if (key.isWritable()) { // Handle write event SocketChannel client = (SocketChannel) key.channel(); ByteBuffer buffer = ByteBuffer.wrap("Hello, Client!".getBytes()); client.write(buffer);
// Register client channel with the Selector to listen for OP_READ client.register(selector, SelectionKey.OP_READ); }
keyIterator.remove(); } } } catch (IOException e) { e.printStackTrace(); } }}In the example, we create a simple server that listens on port 8080 and uses a Selector to handle connection, read, and write events. When data is received from a client, the server reads the data and prints it to the console, then replies to the client with “Hello, Client!”.
NIO Zero-Copy
Zero-copy is a common technique to improve IO performance, and top open-source projects like ActiveMQ, Kafka, RocketMQ, QMQ, Netty, etc., use zero-copy.
Zero-copy means that when the computer performs IO operations, the CPU does not need to copy data from one storage area to another, reducing context switches and CPU copying time. In other words, zero-copy mainly solves the problem of frequent data copying by the operating system when handling I/O operations. Common zero-copy implementations include: mmap+write, sendfile, and sendfile + DMA gather copy.
The following diagram compares various zero-copy techniques:
| CPU copy | DMA copy | System calls | Context switches | |
|---|---|---|---|---|
| Traditional method | 2 | 2 | read+write | 4 |
| mmap+write | 1 | 2 | mmap+write | 4 |
| sendfile | 1 | 2 | sendfile | 2 |
| sendfile + DMA gather copy | 0 | 2 | sendfile | 2 |
As can be seen, whether using traditional I/O or after introducing zero-copy, two DMA (Direct Memory Access) copies are unavoidable. Because both DMAs are hardware-dependent. Zero-copy mainly reduces CPU copying and context switching.
Java’s support for zero-copy:
-
MappedByteBufferis an implementation of zero-copy based on memory-mapped IO (mmap); under the hood it uses the Linux kernel’smmapsystem call. It can map a file or a portion of a file into memory, forming a virtual memory file, so you can operate on in-memory data directly without needing system calls to read/write the file. -
FileChannel’stransferTo()/transferFrom()are an implementation of zero-copy in NIO based on sending files (sendfile); underneath it calls the Linux kernel’ssendfilesystem call. It can directly send file data from disk to the network without going through user-space buffers.Code example:
private void loadFileIntoMemory(File xmlFile) throws IOException {FileInputStream fis = new FileInputStream(xmlFile);// Create FileChannelFileChannel fc = fis.getChannel();// FileChannel.map() maps the file into direct memory and returns a MappedByteBufferMappedByteBuffer mmb = fc.map(FileChannel.MapMode.READ_ONLY, 0, fc.size());xmlFileBuffer = new byte[(int)fc.size()];mmb.get(xmlFileBuffer);fis.close();}
Summary
This article mainly introduces the core concepts of NIO, including its core components and zero-copy.
If we need to build network programs with NIO, it is not recommended to use raw NIO directly; the programming is complex and its functionality is limited. It is recommended to use mature NIO-based networking frameworks such as Netty. Netty builds on top of NIO with optimizations and extensions, such as support for multiple protocols and SSL/TLS, etc.
NIO の概要
従来の Java I/O モデル(BIO)では、I/O 操作はブロックされる方式で実行されます。つまり、1つのスレッドが I/O 操作を実行している間、その操作が完了するまでブロックされます。このブロックモデルは複数の同時接続を処理する際に性能ボトルネックになる可能性があり、各接続ごとにスレッドを作成する必要があり、スレッドの作成と切り替えにはオーバーヘッドがあります。
この問題を解決するため、Java 1.4 で新しい I/O モデル—NIO(New IO、別名 Non-blocking IO)— が導入されました。NIO は同期ブロッキング I/O の不足を補い、標準の Java コードで非ブロック、バッファ指向、チャンネルベースの I/O を提供します。少ないスレッドで複数の接続を処理でき、I/O 効率と同時処理を大幅に向上させます。
- BIO:処理が完了するまでブロック
- NIO: Selector が複数の Channel を監視、非ブロック
- AIO: コールバック通知
注意事項:NIO の使用が必ずしも高性能を意味するわけではありません。主な性能利点は高い同時接続数と高遅延のネットワーク環境で発揮されます。接続数が少ない、同時処理が低い、またはネットワーク転送速度が速い場合には、NIO の性能は従来の BIO より優れているとは限りません。
NIO の核心コンポーネント
NIO は主に以下の3つの核心コンポーネントで構成されます。
- Buffer(バッファ):NIO のデータの読み書きはすべてバッファを介して行われます。読み取り時には Channel から Buffer にデータが詰められ、書き込み時には Buffer から Channel にデータが書き込まれます。
- Channel(チャネル):Channel は双方向の、読み書き可能なデータ転送チャネルで、NIO は Channel を通じてデータの入出力を実現します。チャネルは抽象概念で、ファイル、ソケット、またはその他のデータソース間の接続を表すことができます。
- Selector(セレクター):1つのスレッドが複数の Channel を処理できる、イベント駆動型の I/O 多重化モデルです。すべての Channel は Selector に登録され、Selector がイベントを処理するスレッドを割り当てます。
三者の関係は以下の図のとおりです:
Buffer(バッファ)
従来の BIO では、データの読み書きはストリーム指向で、バイトストリームとキャラクターストリームに分かれます。
Java 1.4 の NIO ライブラリでは、すべてのデータはバッファで処理されます。これは新しいライブラリと従来の BIO との重要な違いで、BIO のバッファドリブンに似ています。NIO はデータを読む時にバッファへ直接読み込み、書く時にはバッファから書き込みます。NIO を使ってデータを読み書きする際は、すべてバッファを介して操作します。
Buffer のサブクラスで最もよく使われるのは ByteBuffer で、バイトデータの格納と操作に用いられます。
Buffer は配列として理解でき、IntBuffer、FloatBuffer、CharBuffer などはそれぞれ int[]、float[]、char[] に対応します。
より分かりやすくするため、Buffer クラスに定義されている4つのメンバー変数を簡単に見てみましょう:
public abstract class Buffer { // Invariants: mark <= position <= limit <= capacity private int mark = -1; private int position = 0; private int limit; private int capacity;}これら4つのメンバーの具体的な意味は以下のとおりです:
- 容量(
capacity):Bufferが格納できる最大データ量。作成時に設定され、変更不可。 - 界限(
limit):Buffer内で読み/書きデータの境界。書き込みモードでは、limitは書き込めるデータの最大量を表し、一般にcapacityと等しい(limit(int newLimit)で設定可能)。読み取りモードでは、limitは Buffer に実際に書き込まれたデータのサイズに等しい。 - 位置(
position):次に読み書きできるデータの位置(インデックス)。書き込みモードから読み取りモードへ切替えるとき(flip)、positionはゼロに戻され、先頭から読み書きできるようになる。 - マーク(
mark):Bufferは位置をこのマークに直接設定することを許します。これは任意の属性です。
また、上記の変数は次の関係を満たします:0 <= mark <= position <= limit <= capacity
さらに、Buffer には読み取りモードと書き込みモードの2つのモードがあり、それぞれ Buffer からデータを読み取るか Buffer へデータを書き込むために使用されます。Buffer の作成後はデフォルトで書き込みモードとなり、flip() を呼ぶと読み取りモードへ切り替わります。再度書き込みモードへ切り替えるには、clear() または compact() を呼び出します。
Buffer オブジェクトは new で作成することはできず、静的メソッドを介してインスタンス化されます。
ここでは ByteBuffer を例に紹介します:
// 分配堆内存public static ByteBuffer allocate(int capacity);// 分配直接内存public static ByteBuffer allocateDirect(int capacity);Buffer の最も核心的な2つのメソッド:
get:バッファのデータを読み取るput:バッファへデータを書き込む
上記の2つのメソッド以外にも、重要なメソッドは次のとおりです:
flip:バッファを写し込みモードから読み取りモードへ切り替え、limitを現在のpositionに設定し、positionを 0 に設定します。clear:バッファをクリアし、読み取りモードから書き込みモードへ切り替え、positionを 0 に、limitをcapacityの値に設定します。- ……
Buffer 内のデータの変化過程は以下の通りです:
import java.nio.*;
public class CharBufferDemo { public static void main(String[] args) { // 分配一个容量为8的CharBuffer CharBuffer buffer = CharBuffer.allocate(8); System.out.println("初始状态:"); printState(buffer);
// 向buffer写入3个字符 buffer.put('a').put('b').put('c'); System.out.println("写入3个字符后的状态:"); printState(buffer);
// 调用flip()方法,准备读取buffer中的数据,将 position 置 0,limit 的置 3 buffer.flip(); System.out.println("调用flip()方法后的状态:"); printState(buffer);
// 读取字符 while (buffer.hasRemaining()) { System.out.print(buffer.get()); }
// 调用clear()方法,清空缓冲区,将 position 的值置为 0,将 limit 的值置为 capacity 的值 buffer.clear(); System.out.println("调用clear()方法后的状态:"); printState(buffer);
}
// 打印buffer的capacity、limit、position、mark的位置 private static void printState(CharBuffer buffer) { System.out.print("capacity: " + buffer.capacity()); System.out.print(", limit: " + buffer.limit()); System.out.print(", position: " + buffer.position()); System.out.print(", mark 开始读取的字符: " + buffer.mark()); System.out.println("\\n"); }}输出如下:
初始状态:capacity: 8, limit: 8, position: 0
写入3个字符后的状态:capacity: 8, limit: 8, position: 3
准备读取buffer中的数据!
调用flip()方法后的状态:capacity: 8, limit: 3, position: 0
读取到的数据:abc
调用clear()方法后的状态:capacity: 8, limit: 8, position: 0理解を助けるため、私は capacity、limit、position の各段階の変化を示す図を描きました。
Channel(チャネル)
Channel はデータソース(ファイル、ネットワークソケットなど)との接続を確立するチャネルです。データの読み書きに利用でき、Channel はデータが自由に流れる水道のようなものです。
BIO のストリームは一方向ですが、Channel は双方向で、読み取り・書き込み、あるいは同時に両方を行えます。
Channel は前述の Buffer とやりとりします。読み取り時には Channel から Buffer にデータを詰め込み、書き込み時には Buffer のデータを Channel に書き込みます。
また、Channel は全二重であるため、ストリームよりも低レベルの OS の API へのマッピングがより適切です。特に UNIX のネットワークプログラミングモデルでは、OS のチャネルは全二重で、読み書き操作の両方を同時にサポートします。
Channel のサブクラスは以下のようなチャネルが最もよく使われます:
FileChannel:ファイルアクセスチャネルSocketChannel、ServerSocketChannel:TCP 通信チャネルDatagramChannel:UDP 通信チャネル
Channel の最も核心的な2つのメソッド:
read:データを読み取り、Buffer に書き込む。write:Buffer のデータを Channel に書き込む。
ここでは FileChannel を例に、ファイルデータの読み取りをデモします。
RandomAccessFile reader = new RandomAccessFile("test_read.in", "r"))FileChannel channel = reader.getChannel();ByteBuffer buffer = ByteBuffer.allocate(1024);channel.read(buffer);Selector(セレクター)
Selector(セレクター)は NIO の重要なコンポーネントで、1つのスレッドが複数の Channel を処理できるようにします。Selector はイベント駆動型の I/O 多重化モデルで、主な動作原理は次のとおりです:Selector にチャンネルのイベントを登録すると、Selector は登録された Channel を絶えずポーリングします。
イベントが発生したとき、例えばある Channel に新しい TCP 接続が来る、読み込み・書き込みイベントが発生する場合、その Channel は就位状態となり、Selector によって取り出されます。Selector は関連する Channel を就位集合に追加します。SelectionKey を介して就位 Channel の集合を取得し、それらの就位 Channel に対して対応する I/O 操作を実行します。
1つの Selector は同時に複数の Channel をポーリングできます。JDK が従来の select 実装の代わりに epoll() を使用しているため、最大接続ハンドルの制限(1024/2048)はありません。これにより、Selector のポーリングを担当するだけの1つのスレッドで、数千ものクライアントを接続できます。
Selector は以下の4種類のイベントを監視できます:
SelectionKey.OP_ACCEPT:チャネルが接続を受け付けるイベント。通常はServerSocketChannelで使用されます。SelectionKey.OP_CONNECT:チャネルが接続を完了したイベント。通常はSocketChannelで使用されます。SelectionKey.OP_READ:チャネルが読み取り準備完了のイベント。データを読めます。SelectionKey.OP_WRITE:チャネルが書き込み準備完了のイベント。データを書き込めます。
Selector は抽象クラサであり、open() という静的メソッドを呼び出すことで Selector のインスタンスを作成できます。Selector は複数の SelectableChannel の I/O 状況を同時に監視できる、ノンブロック I/O の核心です。
1つの Selector インスタンスには、3つの SelectionKey 集合があります:
- すべての
SelectionKey集合:この Selector に登録された Channel を表し、keys()メソッドで返されます。 - 選択された
SelectionKey集合:select()メソッドで取得可能な、IO 処理が必要な Channel を表します。selectedKeys()で返されます。 - 取消された
SelectionKey集合:登録解除された Channel を表し、次回のselect()実行時に対応するSelectionKeyが完全に削除されます。通常はこの集合へ直接アクセスする必要はなく、公開されていません。
以下は、選択された SelectionKey 集合を遍歴して処理する簡単なデモです:
Set<SelectionKey> selectedKeys = selector.selectedKeys();Iterator<SelectionKey> keyIterator = selectedKeys.iterator();while (keyIterator.hasNext()) { SelectionKey key = keyIterator.next(); if (key != null) { if (key.isAcceptable()) { // ServerSocketChannel が新しい接続を受け付けた } else if (key.isConnectable()) { // 新しい接続が確立したことを示す } else if (key.isReadable()) { // Channel に準備されたデータがあり、読み取れる } else if (key.isWritable()) { // Channel に空きのあるバッファがあり、データを書き込める } } keyIterator.remove();}Selector には select() に関連する一連のメソッドも用意されています:
int select():登録されたすべての Channel を監視し、処理すべき IO 操作があるときに戻ります。対応するSelectionKeyを就位集合に追加します。戻り値は、このように就位した Channel の数です。int select(long timeout):タイムアウトを設定できるselect()操作。int selectNow():瞬時に戻るselect()操作。引数なしのselect()よりもスレッドをブロックしません。Selector wakeup():まだ戻っていないselect()を即座に戻します。- ……
Selector を使ったネットワークの読み書きの簡単な例:
import java.io.IOException;import java.net.InetSocketAddress;import java.nio.ByteBuffer;import java.nio.channels.SelectionKey;import java.nio.channels.Selector;import java.nio.channels.ServerSocketChannel;import java.nio.channels.SocketChannel;import java.util.Iterator;import java.util.Set;
public class NioSelectorExample {
public static void main(String[] args) { try { ServerSocketChannel serverSocketChannel = ServerSocketChannel.open(); serverSocketChannel.configureBlocking(false); serverSocketChannel.socket().bind(new InetSocketAddress(8080));
Selector selector = Selector.open(); // 将 ServerSocketChannel 注册到 Selector 并监听 OP_ACCEPT 事件 serverSocketChannel.register(selector, SelectionKey.OP_ACCEPT);
while (true) { int readyChannels = selector.select();
if (readyChannels == 0) { continue; }
Set<SelectionKey> selectedKeys = selector.selectedKeys(); Iterator<SelectionKey> keyIterator = selectedKeys.iterator();
while (keyIterator.hasNext()) { SelectionKey key = keyIterator.next();
if (key.isAcceptable()) { // 处理连接事件 ServerSocketChannel server = (ServerSocketChannel) key.channel(); SocketChannel client = server.accept(); client.configureBlocking(false);
// 将客户端通道注册到 Selector 并监听 OP_READ 事件 client.register(selector, SelectionKey.OP_READ); } else if (key.isReadable()) { // 处理读事件 SocketChannel client = (SocketChannel) key.channel(); ByteBuffer buffer = ByteBuffer.allocate(1024); int bytesRead = client.read(buffer);
if (bytesRead > 0) { buffer.flip(); System.out.println("收到数据:" +new String(buffer.array(), 0, bytesRead)); // 将客户端通道注册到 Selector 并监听 OP_WRITE 事件 client.register(selector, SelectionKey.OP_WRITE); } else if (bytesRead < 0) { // 客户端断开连接 client.close(); } } else if (key.isWritable()) { // 处理写事件 SocketChannel client = (SocketChannel) key.channel(); ByteBuffer buffer = ByteBuffer.wrap("Hello, Client!".getBytes()); client.write(buffer);
// 将客户端通道注册到 Selector 并监听 OP_READ 事件 client.register(selector, SelectionKey.OP_READ); }
keyIterator.remove(); } } } catch (IOException e) { e.printStackTrace(); } }}この例では、8080 番ポートをリッスンするシンプルなサーバを作成し、Selector を使って接続、読み取り、書き込みイベントを処理します。クライアントからデータを受信すると、サーバはデータを読み取り、コンソールに表示し、クライアントへ「Hello, Client!」と返信します。
NIO のゼロコピー
ゼロコピーは I/O 操作の性能を向上させる一般的な手法で、ActiveMQ、Kafka、RocketMQ、QMQ、Netty などのトップクラスのオープンソースプロジェクトでも活用されています。
ゼロコピーとは、コンピュータが I/O 操作を実行する際に CPU がデータを1つのメモリ領域から別の領域へコピーする必要がなくなる、という意味で、コンテキストの切り替えと CPU のコピー時間を削減します。つまり、OS が I/O 操作を処理する際に頻繁にデータをコピーする問題を主に解決します。ゼロコピーの一般的な実装技術としては、mmap+write、sendfile、および sendfile + DMA gather copy があります。
下図は各種ゼロコピー技術の比較図です:
| CPU コピー | DMA コピー | システムコール | コンテキスト切替 | |
|---|---|---|---|---|
| 従来の方法 | 2 | 2 | read+write | 4 |
| mmap+write | 1 | 2 | mmap+write | 4 |
| sendfile | 1 | 2 | sendfile | 2 |
| sendfile + DMA gather copy | 0 | 2 | sendfile | 2 |
従来の I/O 方式であろうと、ゼロコピーを導入した後であろうと、2 回の DMA(Direct Memory Access)コピーは欠かせません。なぜなら、2 回の DMA はハードウェアの実装に依存して完了します。ゼロコピーは主に CPU のコピーとコンテキスト切替を削減します。
Java のゼロコピー対応:
-
MappedByteBufferは NIO のメモリマッピング(mmap)に基づくゼロコピーの実装の1つで、実際には Linux カーネルのmmapシステムコールを呼び出します。ファイル全体または一部をメモリにマッピングして仮想メモリファイルを作成し、直接メモリ内のデータを操作でき、ファイルをシステムコールで読み書きする必要がなくなります。 -
FileChannelのtransferTo()/transferFrom()は NIO のファイル送信(sendfile)をベースとしたゼロコピーの実装の1つで、実際には Linux カーネルのsendfileシステムコールを呼び出します。これにより、ファイルデータをディスクから直接ネットワークへ送信でき、ユーザ空間のバッファを経由する必要がなくなります。コード例:
private void loadFileIntoMemory(File xmlFile) throws IOException { FileInputStream fis = new FileInputStream(xmlFile); // 创建 FileChannel 对象 FileChannel fc = fis.getChannel(); // FileChannel.map() 将文件映射到直接内存并返回 MappedByteBuffer 对象 MappedByteBuffer mmb = fc.map(FileChannel.MapMode.READ_ONLY, 0, fc.size()); xmlFileBuffer = new byte[(int)fc.size()]; mmb.get(xmlFileBuffer); fis.close();}まとめ
この記事では NIO の核心知識、特に NIO のコアコンポーネントとゼロコピーについて紹介しました。
NIO を使ってネットワークプログラムを構築する場合、ネイティブ NIO を直接使うことは推奨されません。プログラミングが複雑で機能性が不足しがちだからです。Netty のような NIO ベースの成熟したネットワークフレームワークを使うことをおすすめします。Netty は NIO をベースに、プロトコルの多様性、SSL/TLS のサポートなど、いくつかの最適化と拡張を行っています。
部分信息可能已经过时