



Docker
What Is Docker?
Although microservices offer many advantages, splitting services often makes deployment much more difficult.
- Distributed systems depend on many components, and conflicts often occur when deploying different components.
- When deployment is repeated across hundreds or thousands of servers, inconsistent environments can cause various problems.
Application Deployment Environment Issues
Large projects have many components and complex runtime environments, which can cause problems during deployment:
- Complex dependencies can easily lead to compatibility issues.
- Development, testing, and production environments may differ.
For example, a project may depend on Node.js, Redis, RabbitMQ, MySQL, and other services. These services require different libraries and dependencies during deployment, and they may even conflict with one another. This makes deployment extremely difficult.
How Docker Resolves Dependency Compatibility Issues
Docker solves these problems in an ingenious way. How does Docker accomplish this?
Docker uses two approaches to resolve dependency compatibility issues:
- Package the application’s libraries (Libs), dependencies (Deps), configuration, and the application itself together.
- Run each application in an isolated container to prevent interference between applications.
The resulting application package contains both the application itself and its required libraries and dependencies. There is no need to install them separately on the operating system, naturally eliminating compatibility issues between different applications.
How Docker Resolves Differences Between Operating System Environments
To understand how differences between operating system environments can be resolved, you must first understand the structure of an operating system. Taking Ubuntu as an example, its structure includes:
- Computer hardware: such as the CPU, memory, and disks.
- System kernel: All Linux distributions, such as CentOS, Ubuntu, and Fedora, use the Linux kernel. The kernel interacts with computer hardware and provides kernel instructions for operating that hardware.
- System applications: Applications and libraries provided by the operating system itself. These libraries encapsulate kernel instructions, making them easier to use.
The interaction between an application and a computer works as follows:
-
The application calls operating system applications (libraries) to perform various functions.
-
The system libraries encapsulate the kernel instruction set and call kernel instructions.
-
The kernel instructions operate the computer hardware.
How does Docker resolve differences between operating system environments?
- Docker packages the user program together with the required system libraries, such as Ubuntu libraries.
- When Docker runs on different operating systems, it uses the packaged libraries and the operating system’s Linux kernel.
Docker is a technology for rapidly delivering and running applications. It offers the following advantages:
- Programs, dependencies, and runtime environments can be packaged together as an image that can be migrated to any Linux operating system.
- At runtime, a sandboxing mechanism creates isolated containers so that applications do not interfere with one another.
- Containers can be started or removed with a single command, making operations fast and convenient.
Differences Between Docker and Virtual Machines
Docker makes it easy to run an application on any operating system. A virtual machine can also run one operating system inside another, allowing it to support applications from the guest operating system.
- A virtual machine simulates hardware devices within an operating system and then runs another operating system. For example, you can run Ubuntu inside Windows and then run any Ubuntu application.
- Docker only packages libraries; it does not simulate a complete operating system.
| Feature | Docker | Virtual Machine |
| Performance | Near-native | Lower performance |
| Disk Usage | Usually measured in MB | Usually measured in GB |
| Startup Time | Seconds | Minutes |
Differences between Docker and virtual machines:
- Docker is a system process, while a virtual machine is an operating system running inside another operating system.
- Docker is small, starts quickly, and performs well, while virtual machines are large, start slowly, and offer average performance.
Docker Architecture
Images and Containers
Docker has several important concepts:
- Image: Docker packages an application together with its required dependencies, libraries, environment, configuration files, and other resources. This package is called an image.
- Container: The process created when the application in an image runs is called a container. Docker isolates container processes so that they are not visible externally.
All applications ultimately consist of code stored as files made up of bytes on a disk. Only when an application runs is it loaded into memory and turned into a process.
An image is a read-only package containing an application’s files, runtime environment, and some system library files.
A container loads the programs and functions in these files into memory and runs them as an isolated process. Therefore, a single image can be started multiple times to create multiple container processes.
Docker Hub
There are many open-source applications, and packaging them individually often results in duplicated work. To avoid this, people publish packaged application images, such as Redis and MySQL images, online for others to use, similar to sharing code on GitHub.
- Docker Hub: Docker Hub is the official platform for hosting Docker images. This type of platform is called a Docker Registry.
- Similar public services are also available in China, such as NetEase Cloud Image Service and Alibaba Cloud Container Registry.
We can publish our own images to Docker Hub and pull images from Docker Hub.
Docker Architecture
To use Docker to manage images and containers, Docker must first be installed.
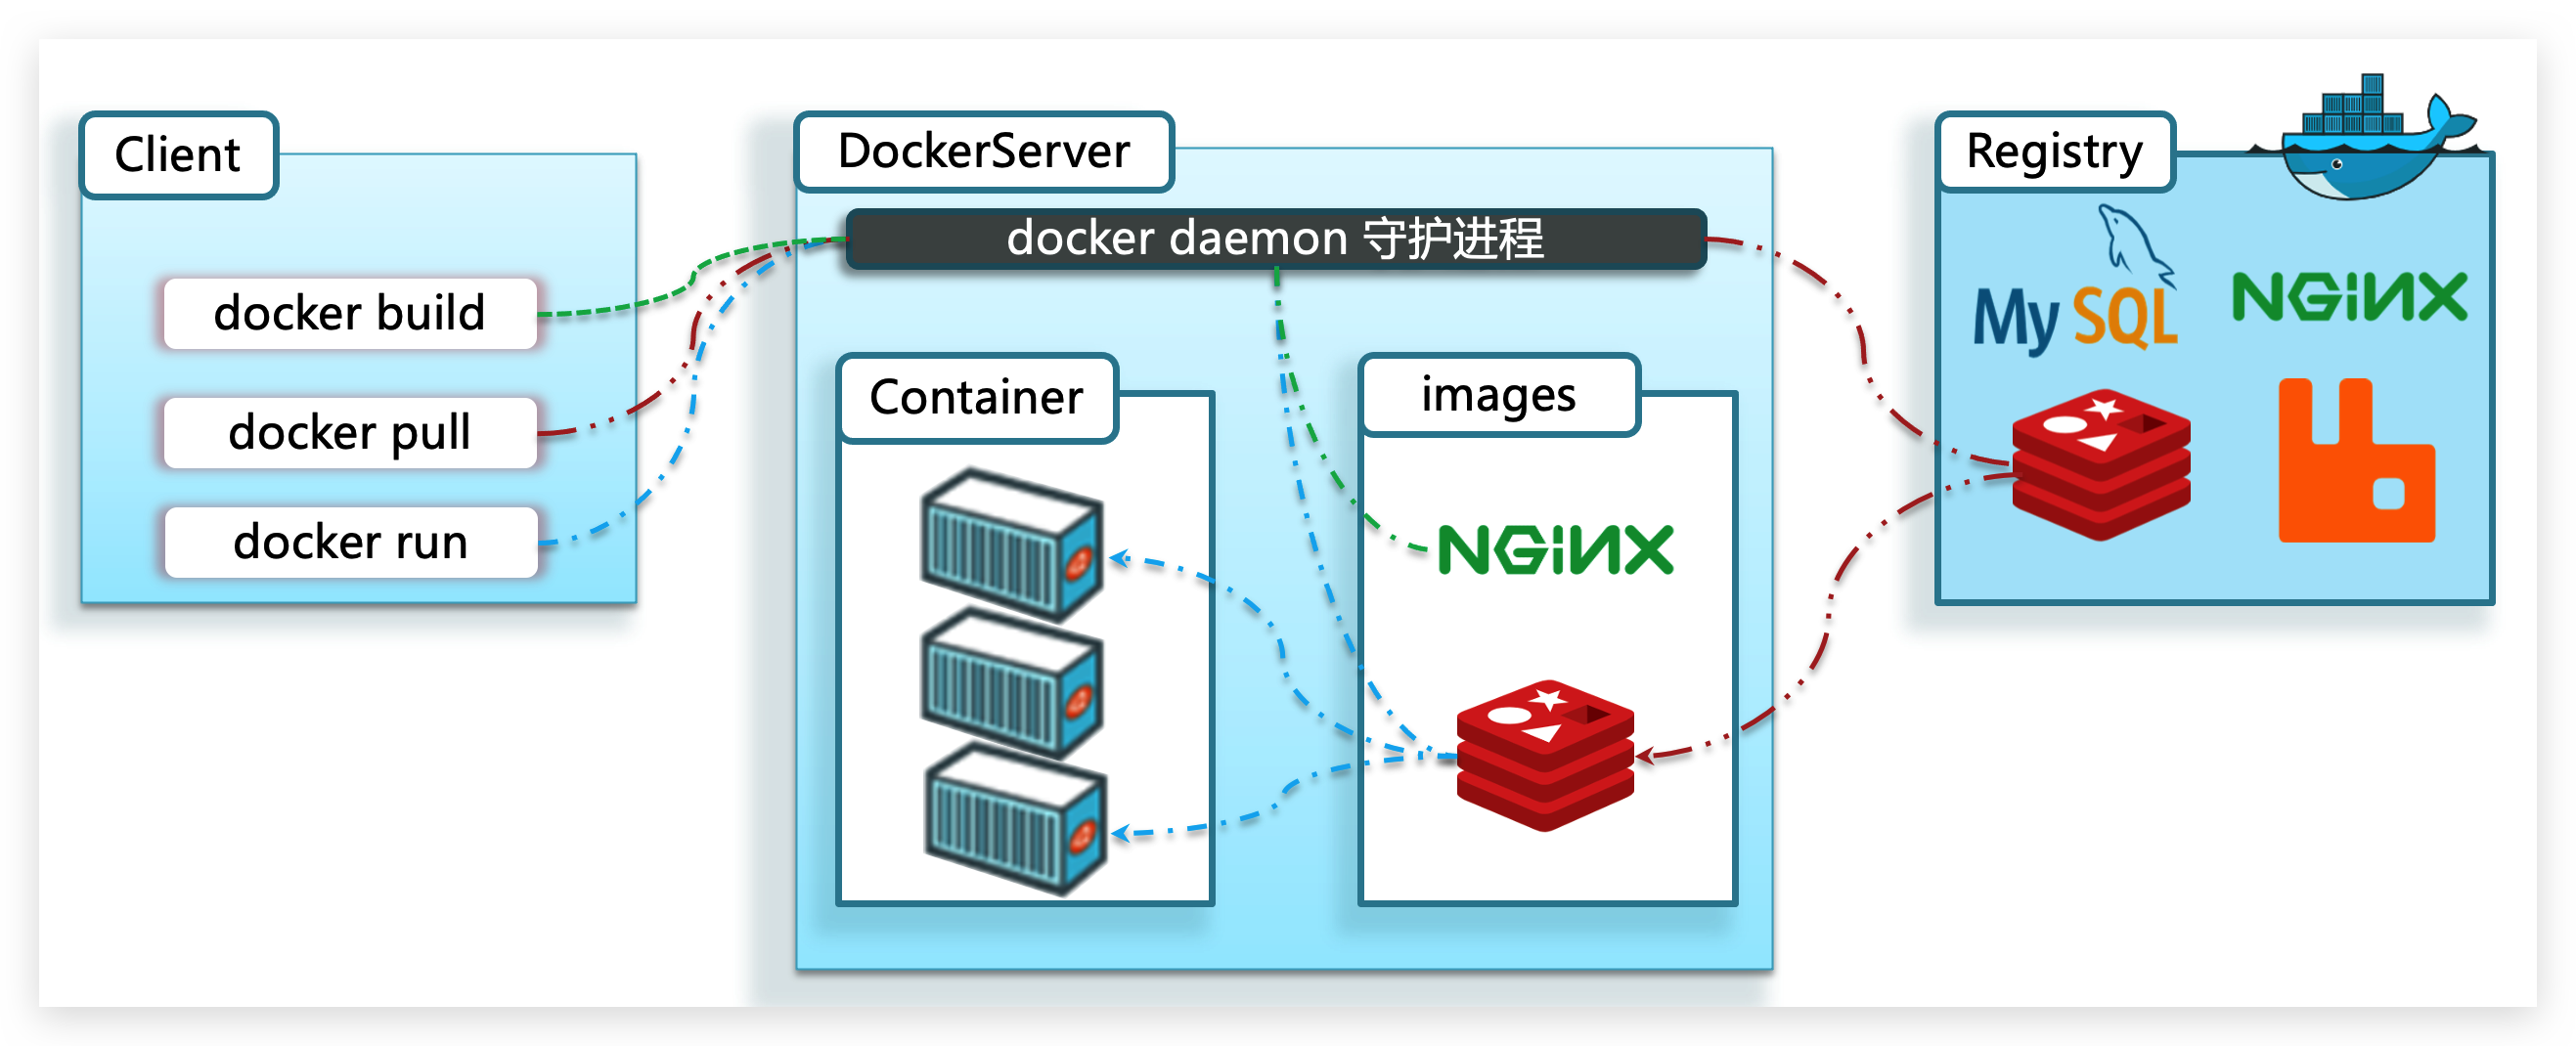
Docker uses a C/S architecture consisting of two parts:
- Server: The Docker daemon, which processes Docker instructions and manages images, containers, and other resources.
- Client: Sends instructions to the Docker server through commands or a REST API. Instructions can be sent to a local or remote server.
Basic Docker Operations
Image Operations
Image Names
First, let’s look at the structure of an image name:
- An image name generally consists of two parts: [repository]:[tag].
- If no tag is specified, the default is latest, which represents the latest version of the image.
Image Commands
Common image operation commands are shown below.
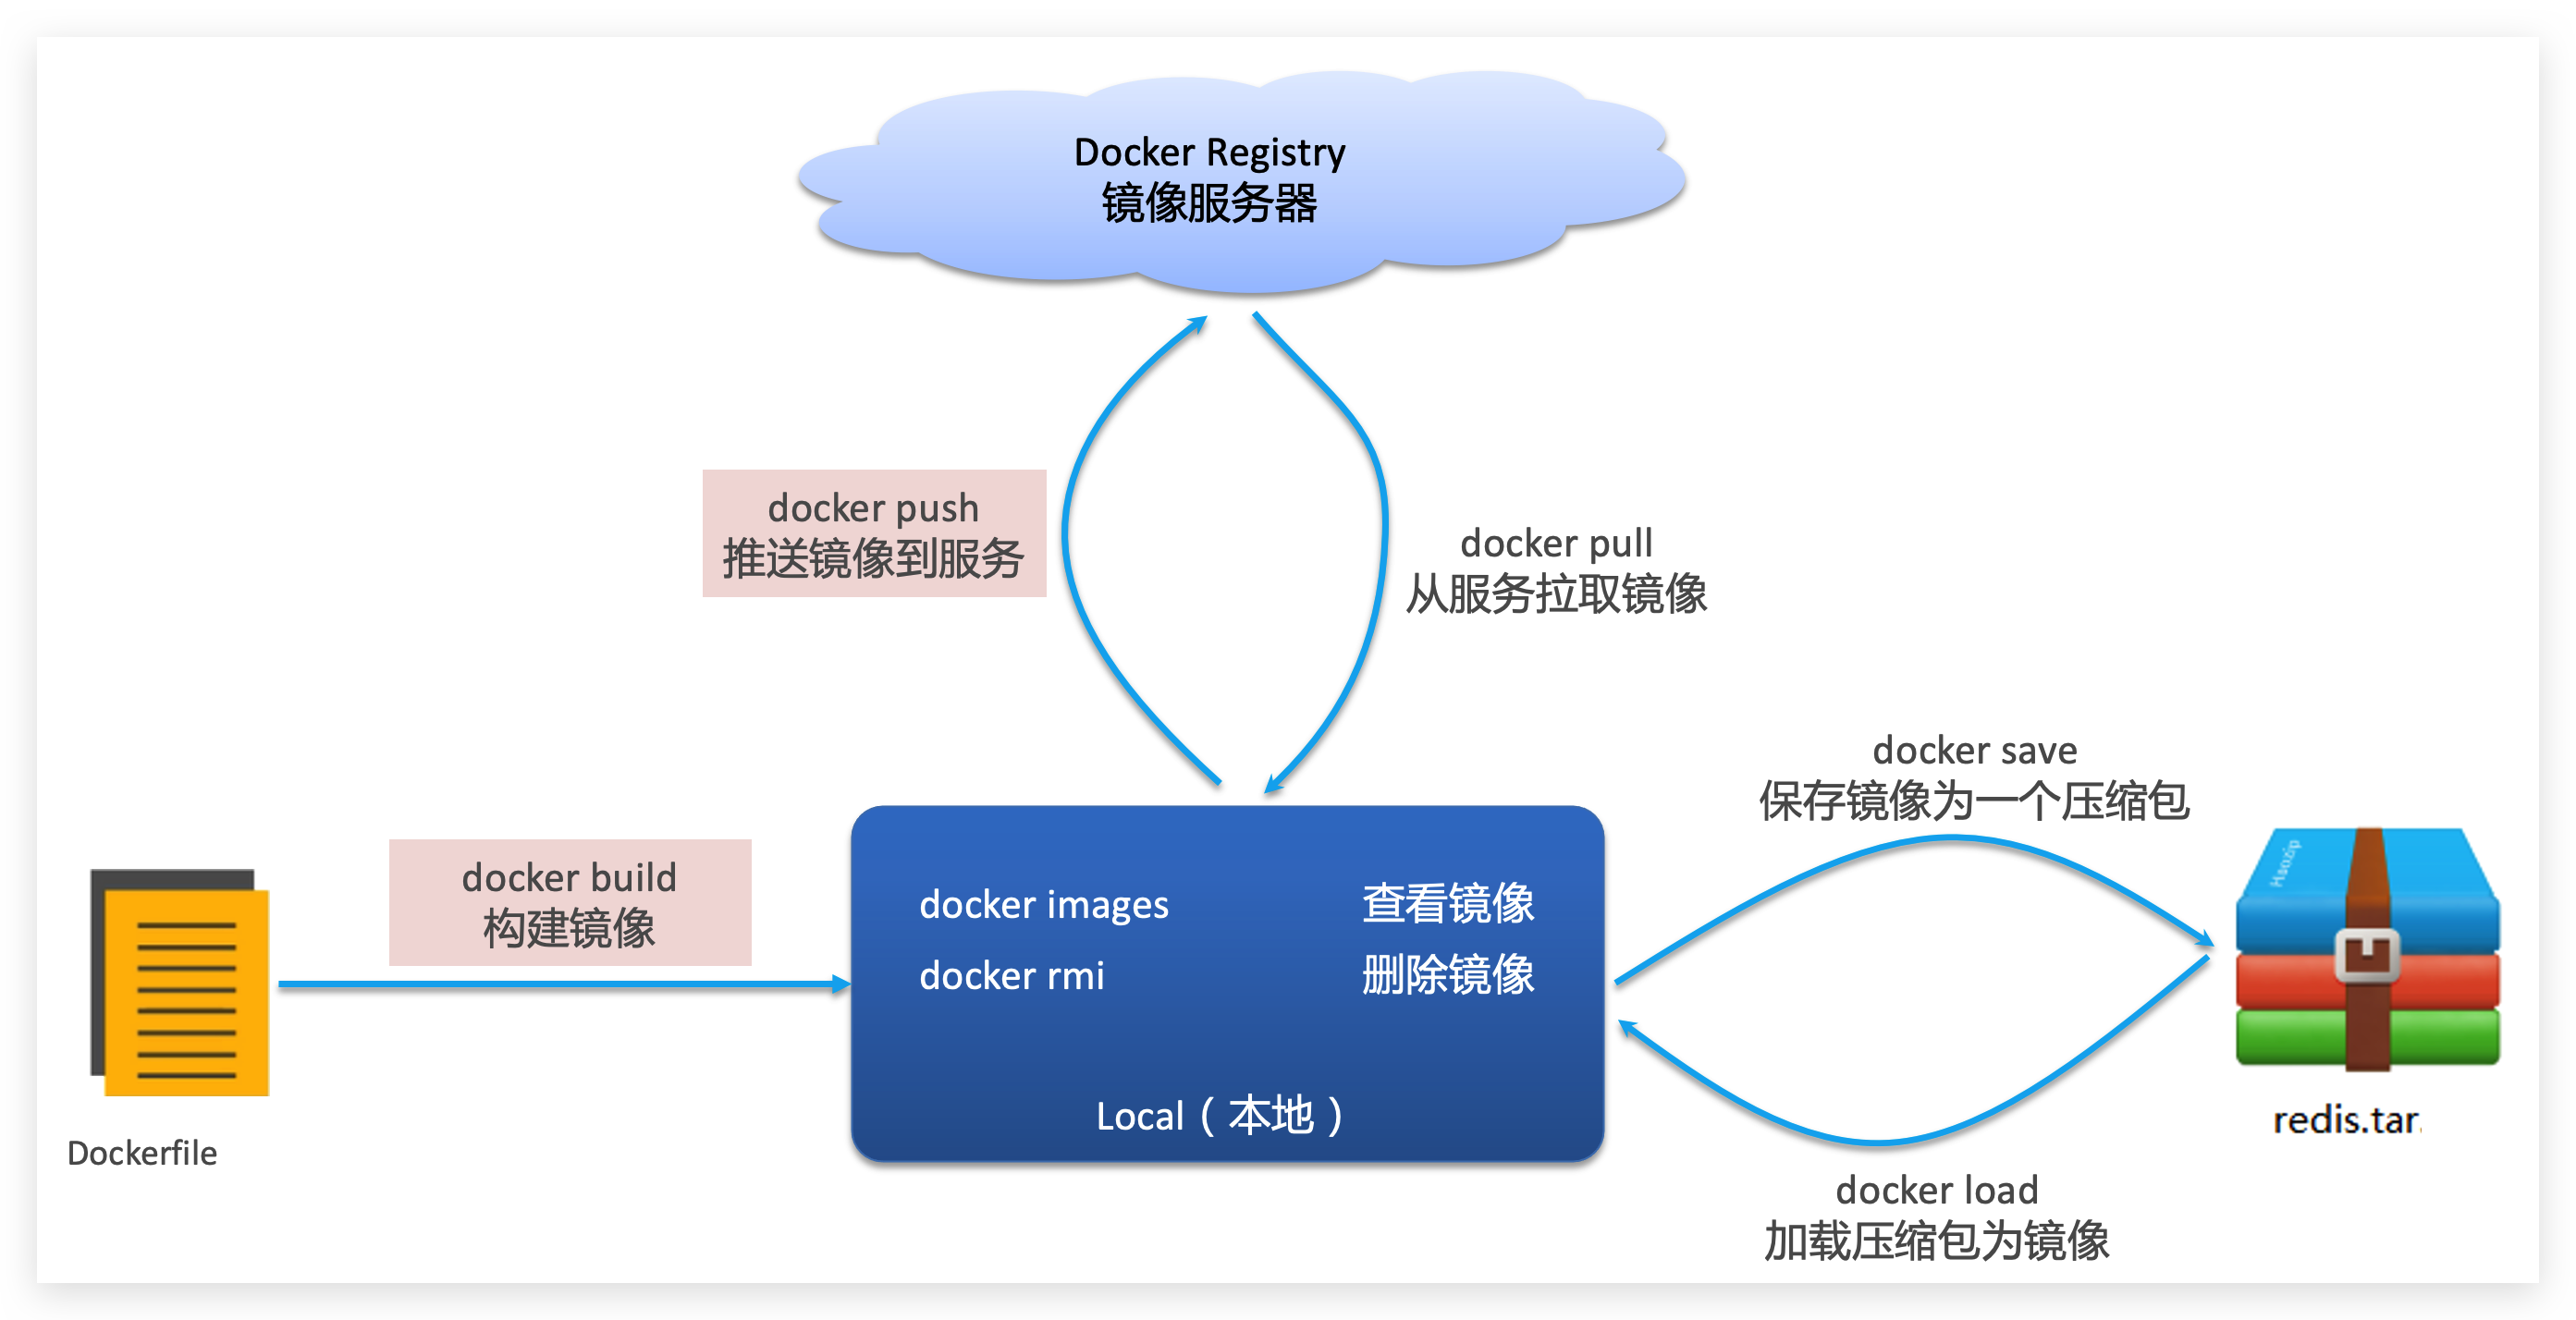
docker pull nginx # 拉取镜像docker images # 查看拉取的镜像
# docker save -o [保存的目标文件名称] [镜像名称]docker save -o nginx.tar nginx:latest # 保存镜像docker rmi nginx:latest # 删除镜像docker load -i nginx.tar # 加载镜像Container Operations
A container has three states:
- Running: The process is running normally.
- Paused: The process is paused and no longer uses the CPU, but its memory is not released.
- Stopped: The process is terminated, and resources such as memory and CPU are released.
Container-Related Commands
-
docker run: Creates and runs a container in the running state.
docker run --name containerName -p 80:80 -d nginx- docker run: Creates and runs a container.
- -name: Assigns a name to the container, such as mn.
- p: Maps a host port to a container port. The host port is on the left side of the colon, and the container port is on the right.
- d: Runs the container in the background.
- nginx: The image name, such as nginx.
-
docker pause: Pauses a running container.
-
docker unpause: Resumes a paused container.
-
docker stop: Stops a running container.
-
docker start: Restarts a stopped container.
-
docker rm: Deletes a container.
-
docker exec: Enters a container.
docker exec -it mn bash- docker exec: Enters the container and executes a command.
- it: Creates a standard input and output terminal for the container, allowing us to interact with it.
- mn: The name of the container to enter.
- bash: The command executed after entering the container. Bash is an interactive Linux terminal command.
The container simulates an independent Linux file system internally, making it appear like a Linux server.
Common parameters for the docker run command:
- -name: Specifies the container name.
- p: Specifies port mappings.
- d: Runs the container in the background.
Commands for viewing container logs:
- docker logs
- Add the -f parameter to continuously view logs.
Viewing container status:
- docker ps
- docker ps -a displays all containers, including stopped containers.
Data Volumes (Container Data Management)
In the previous nginx example, modifying the nginx HTML page required entering the nginx container. Modifying files was also inconvenient because no editor was available.
This is a consequence of coupling containers with their data—the files inside the containers.
To solve this problem, the data must be decoupled from the container. This is where data volumes are used.
What Is a Data Volume?
- *A data volume (volume)** is a virtual directory that points to a directory in the host file system.
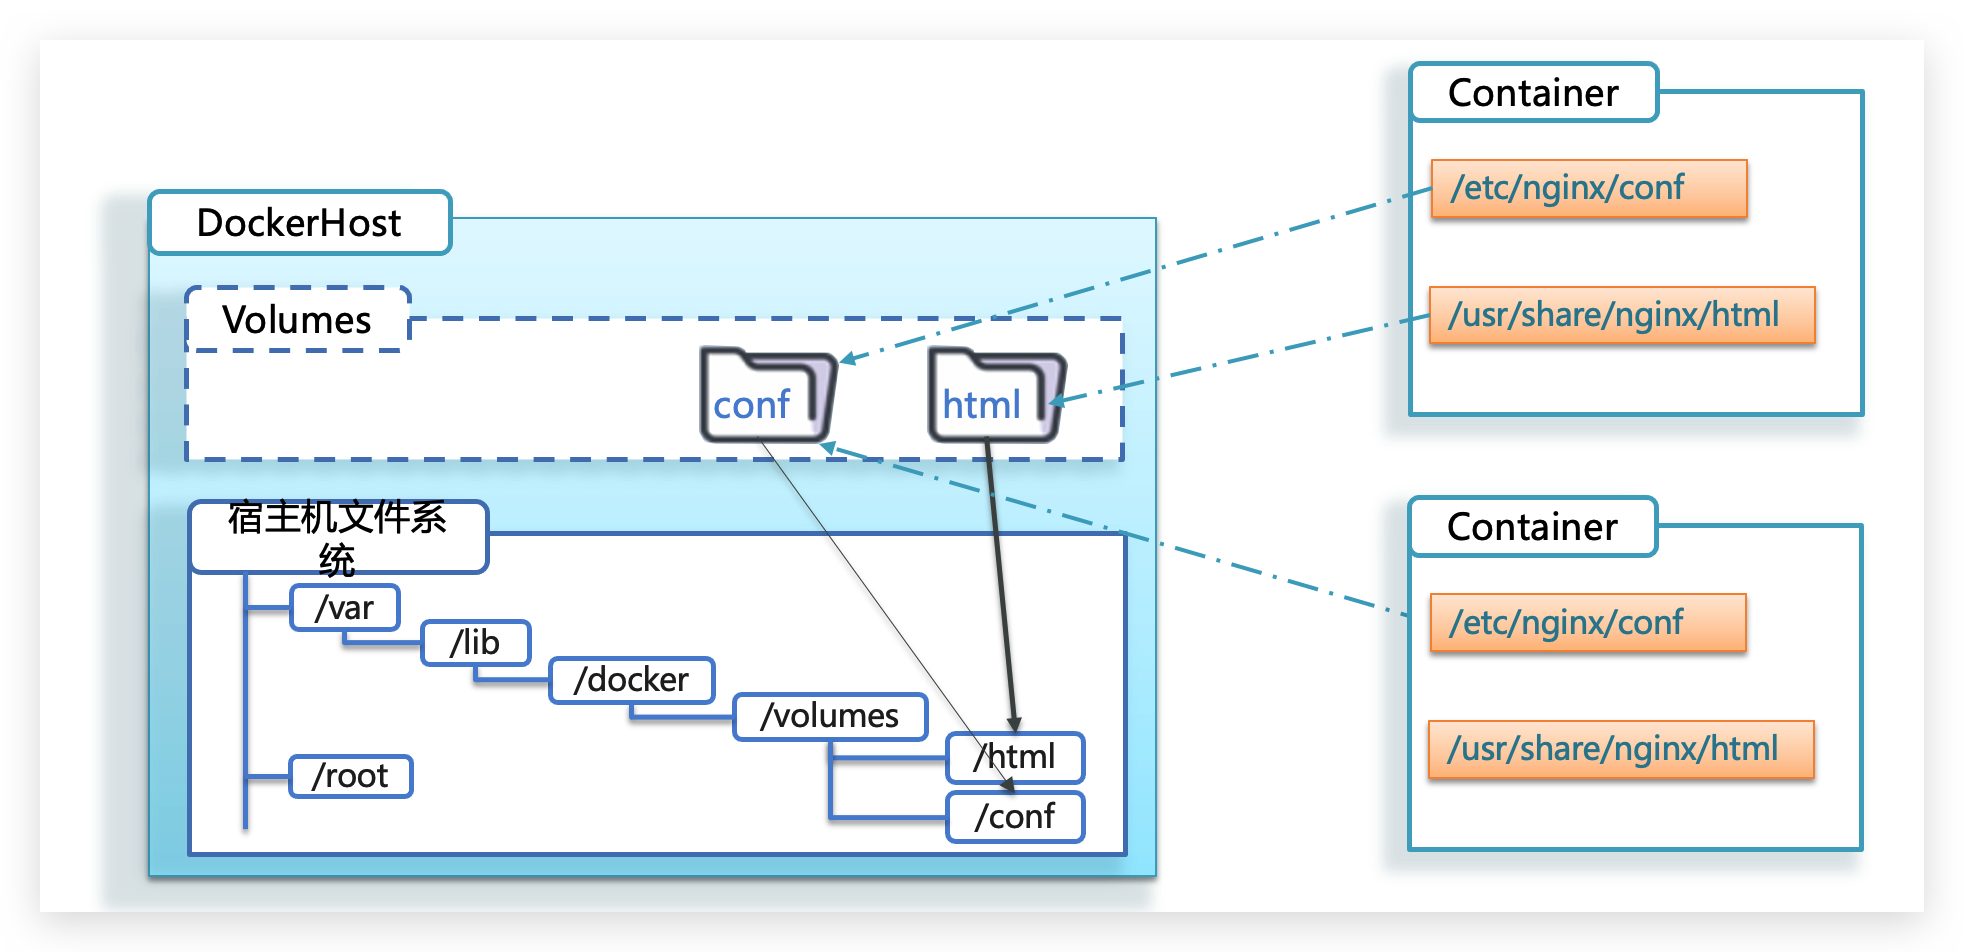
Once a data volume is mounted, all operations performed in the container affect the corresponding host directory.
Therefore, operating on the host’s /var/lib/docker/volumes/html directory is equivalent to operating on the container’s /usr/share/nginx/html directory.
Data Volume Commands
The basic syntax for data volume operations is as follows:
docker volume [COMMAND]The docker volume command manages data volumes. The command that follows it determines the operation to perform:
- create creates a volume.
- inspect displays information about one or more volumes.
- ls lists all volumes.
- prune deletes unused volumes.
- rm deletes one or more specified volumes.
Creating and Viewing Data Volumes
Requirement: Create a data volume and view its directory location on the host.
- Create the data volume.
docker volume create html- View all data volumes.
docker volume ls- View detailed information about the data volume.
docker volume inspect htmlThe created html data volume is associated with the host directory /var/lib/docker/volumes/html/_data.
Mounting a Data Volume
When creating a container, you can use the -v parameter to mount a data volume to a directory inside the container. The command format is as follows:
docker run \\ --name mn \\ -v html:/root/html \\ -p 8080:80 nginx \\Here, -v is the command for mounting the data volume:
v html:/root/htm: Mounts the html data volume to the /root/html directory inside the container.
A container can mount not only a data volume but also a host directory directly. The relationships are as follows:
- Data volume mode: host directory —> data volume ---> container directory
- Direct mount mode: host directory ---> container directory
Installing MySQL 5.7 with Docker:
# --privileged=true参数,让容器拥有真正的root权限docker run --privileged=true --name mysql5.7 -p 3307:3306 \\-e MYSQL_ROOT_PASSWORD=123456 -d \\-v /mydata/mysql/data:/var/lib/mysql \\-v /mydata/mysql/conf:/etc/mysql \\-v /mydata/mysql/log:/var/log/mysql \\mysql:5.7In the docker run command, the -v parameter mounts files or directories into the container:
- v volume name
directory - v host file
file - v host directory
directory
Differences between mounting data volumes and directly mounting directories:
- Data volume mounting has low coupling and lets Docker manage the directory, but the directory is deeply nested and difficult to locate.
- Direct directory mounting has high coupling and requires us to manage the directory ourselves, but the directory is easy to locate and inspect.
Building Custom Images with Dockerfile
Common images can be found on Docker Hub, but projects we develop ourselves must be built into images manually.
Before creating a custom image, we must first understand the structure of an image.
Image Structure
An image packages an application together with its required system libraries, environment, configuration, and dependencies.
Simply put, an image is a package built by adding application files, configuration files, dependencies, and other resources on top of system libraries and a runtime environment, and then including a startup script.
Building an image means implementing the packaging process described above.
Dockerfile Syntax
When building a custom image, you do not need to copy and package every file individually.
You only need to tell Docker what the image contains, which base image it requires, which files to copy, which dependencies to install, and which startup script to use. Docker will then build the image for you.
The file that describes this information is called a Dockerfile.
A Dockerfile is a text file containing a series of instructions that describe the operations required to build an image. Each instruction creates a layer.
| Instruction | Description | Example |
| FROM | Specifies the base image | FROM centos:6 |
| ENV | Sets an environment variable | ENV key value |
| COPY | Copies local files to a specified directory in the image | COPY ./mysql-5.7.rpm /tmp |
| RUN | Executes a Linux shell command | RUN yum install gcc |
| EXPOSE | Specifies the listening port for users of the image | EXPOSE 8080 |
| ENTRYPOINT | Specifies the application's startup command, which is invoked when the container runs | ENTRYPOINT java -jar xx.jar |
Building a Java Project
Build a Java project based on Java 8.
A Java project image can be built using a base image that already includes a JDK.
-
Create a Dockerfile:
- Use java<8-alpine> as the base image.
- Copy app.jar into the image.
- Expose the port.
- Define the ENTRYPOINT.
FROM java:8-alpineCOPY ./app.jar /tmp/app.jarEXPOSE 8090ENTRYPOINT java -jar /tmp/app.jar -
Use the docker build command to build the image.
-
Use docker run to create and run the container.
Docker Compose
Docker Compose can use a Compose file to rapidly deploy distributed applications without manually creating and running containers one by one.
Introduction to Docker Compose
A Compose file is a text file that uses directives to define how each container in a cluster runs. Its format is as follows:
version: "3.8" services: mysql: image: mysql:5.7.25 environment: MYSQL_ROOT_PASSWORD: 123 volumes: - "/tmp/mysql/data:/var/lib/mysql" - "/tmp/mysql/conf/hmy.cnf:/etc/mysql/conf.d/hmy.cnf" web: build: . ports: - "8090:8090"The Compose file above describes a project containing two containers:
- mysql: A container based on the
mysql:5.7.25image with two mounted directories. - web: A container based on an image temporarily built using
docker build, with port 8090 mapped.
A Docker Compose file can be regarded as multiple docker run commands written in a single file, although the syntax differs slightly.
Deploying a Microservices Cluster
Requirement: Deploy the previously introduced cloud-demo microservices cluster using Docker Compose.
Implementation approach:
-
Create a docker-compose file.
version: "3.2"services:nacos:image: nacos/nacos-serverenvironment:MODE: standaloneports:- "8848:8848"mysql:image: mysql:5.7.25environment:MYSQL_ROOT_PASSWORD: 123volumes:- "$PWD/mysql/data:/var/lib/mysql"- "$PWD/mysql/conf:/etc/mysql/conf.d/"userservice:build: ./user-serviceorderservice:build: ./order-servicegateway:build: ./gatewayports:- "10010:10010"This file contains five services:
nacos: Serves as the service registry and configuration center.image: nacos/nacos-server: Built from the nacos/nacos-server image.environment: Environment variables.MODE: standalone: Starts in standalone mode.
ports: Port mappings. Port 8848 is exposed here.
mysql: The database.image: mysql:5.7.25: Uses version mysql<5>.7.25 of the image.environment: Environment variables.MYSQL_ROOT_PASSWORD: 123: Sets the password of the database root account to 123.
volumes: Data volume mounts. The MySQL data and conf directories are mounted here and contain data prepared in advance.
userservice,orderservice, andgateway: All are temporarily built from Dockerfiles.
-
Modify the cloud-demo project so that the database and Nacos addresses use the service names defined in docker-compose.
Because the microservices will be deployed as Docker containers, communication between containers uses container names rather than IP addresses. Therefore, change the MySQL and Nacos addresses in the order-service, user-service, and gateway services to use container names.
spring:datasource:url: jdbc:mysql://mysql:3306/cloud_order?useSSL=falseusername: rootpassword: 123driver-class-name: com.mysql.jdbc.Driverapplication:name: orderservicecloud:nacos:server-addr: nacos:8848 # nacos服务地址 -
Use Maven to package each microservice in the project as app.jar.
Next, each microservice must be packaged. Because the JAR file in the Dockerfile is named app.jar, each microservice must use this name.
This can be done by changing the package name in pom.xml. Every microservice must be updated:
<build><!-- 服务打包的最终名称 --><finalName>app</finalName><plugins><plugin><groupId>org.springframework.boot</groupId><artifactId>spring-boot-maven-plugin</artifactId></plugin></plugins></build> -
Copy each packaged app.jar file into the corresponding subdirectory in cloud-demo.
-
Upload cloud-demo to the virtual machine and deploy it using
docker-compose up -d.
Docker Image Registry
Pushing and Pulling Images
Before pushing an image to a private image registry, it must first be tagged. The steps are as follows:
- Retag the local image using the private registry address as the name prefix: 192.168.150.101:8080/
docker tag nginx:latest 192.168.150.101:8080/nginx:1.0- Push the image.
docker push 192.168.150.101:8080/nginx:1.0- Pull the image.
docker pull 192.168.150.101:8080/nginx:1.0If this article helped you, please share it with others!
Some information may be outdated