



Understanding Microservices
Monolithic Architecture
Develop all business functionality in a single project and deploy as a single package.
Advantages:
- Simple architecture
- Low deployment cost
Disadvantages:
- High coupling (maintenance and upgrade are difficult)
Distributed Architecture
Split the system by business function, with each business function module developed as an independent project, called a service.
Advantages:
- Reduces service coupling
- Facilitates service upgrades and scalability
Disadvantages:
- The calling relationships between services become intricate
Although distributed architecture reduces service coupling, there are many questions to consider when partitioning services:
- How to define the granularity of service decomposition?
- How do services call each other?
- How to manage the calling relationships between services?
People need to establish a practical and effective set of standards to constrain distributed architectures.
Microservices
Characteristics of a microservice architecture:
- Single Responsibility: Microservice decomposition is smaller; each service corresponds to a unique business capability, achieving single responsibility
- Autonomy: Teams, technologies, and data are independent, with independent deployment and delivery
- Service-Oriented: Services provide standardized interfaces, independent of language and technology
- Strong isolation: Service calls are isolated, fault-tolerant, and degradable to avoid cascading issues
The above characteristics of microservices are essentially setting a standard for distributed architectures, further reducing coupling between services and providing independence and flexibility. Achieve high cohesion, low coupling.
Therefore, one can regard microservices as a well-architected distributed architecture solution.
SpringCloud
SpringCloud is currently the most widely used microservice framework in China. Official website: https://spring.io/projects/spring-cloud。
SpringCloud integrates various microservice functionality components and, based on SpringBoot, provides auto-configuration for these components, delivering a good out-of-the-box experience.
Components include:
- Service registration and discovery:
Eureka,Nacos,Consul - Remote service invocation:
OpenFeign,Dubbo - Service tracing/monitoring:
Zipkin,Sleuth - Unified configuration management:
SpringCloudConfig,Nacos - Unified gateway routing:
SpringCloudGateway,Zuul - Traffic control, degradation, protection:
Hystix,Sentinel
Service Decomposition and Remote Calls
Service decomposition principles:
- Different microservices should not duplicate the same business
- Microservice data should be independent; do not access other microservices’ databases
- A microservice can expose its own business as interfaces for other microservices to call
Inter-service Remote Calls
Implemented by calling RestTemplate
-
Register a RestTemplate instance in the startup item
@Beanpublic RestTemplate restTemplate() {return new RestTemplate();} -
Calls within services
@Autowiredprivate RestTemplate restTemplate;public Order queryOrderById(Long orderId) {// 1. Query the orderOrder order = orderMapper.findById(orderId);// 2. Remote query UserString url = "<http://localhost:8081/user/>" + order.getUserId();User user = restTemplate.getForObject(url, User.class);// 3. Put into orderorder.setUser(user);// 4. Returnreturn order;}
Providers and Consumers
In the service invocation relationship, there are two distinct roles:
Service Provider: In a business flow, the service that is called by other microservices. (Provides interfaces to other microservices)
Service Consumer: In a business flow, the service that calls other microservices. (Calls interfaces provided by other microservices)
Eureka Registry Center
Eureka Structure and Role
The registry center is used to solve the problem of consumers calling providers that have multiple instances deployed.
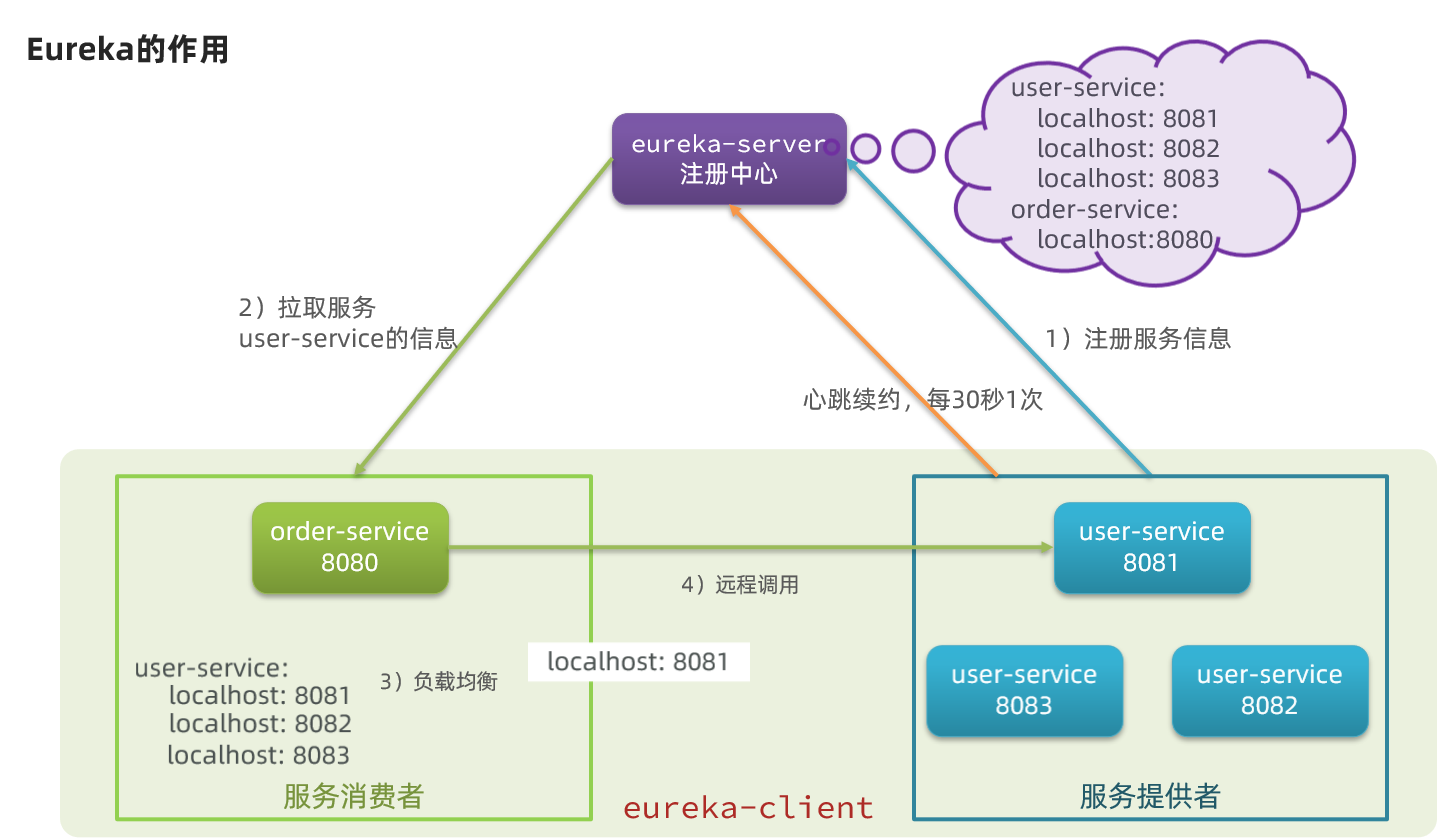
- Question 1: How does order-service know the instance addresses of user-service?
- After the user-service instance starts, it registers its information to the eureka-server (Eureka server). This is service registration.
- The eureka-server maintains a mapping from service names to the list of instance addresses.
- order-service pulls the instance address list by service name. This is service discovery or service pulling.
- Question 2: How does order-service pick a specific instance among multiple user-service instances?
- order-service uses a load-balancing algorithm on the instance list to select an address.
- It makes a remote call to that address.
- Question 3: How does order-service know whether a user-service instance is still healthy or down?
- The user-service sends heartbeats to the eureka-server at regular intervals (default every 30 seconds) to report its status.
- If heartbeats are not received for a certain period, the eureka-server marks the microservice instance as failed and removes it from the service list.
- When order-service pulls the service list, faulty instances are excluded.
Building Eureka-Server
- Create the Eureka-Server service
Create a submodule under the parent project, a Maven project
- Import Eureka dependency - server
<dependency> <groupId>org.springframework.cloud</groupId> <artifactId>spring-cloud-starter-netflix-eureka-server</artifactId></dependency>- Write the startup class
Add @EnableEurekaServer to enable Eureka registry center functionality
@SpringBootApplication@EnableEurekaServerpublic class EurekaApplication { public static void main(String[] args) { SpringApplication.run(EurekaApplication.class, args); }}- Write the configuration file
server: port: 10086spring: application: name: eureka-servereureka: client: service-url: defaultZone: <http://127.0.0.1:10086/eureka>- Start the service
Access the configured Eureka service path
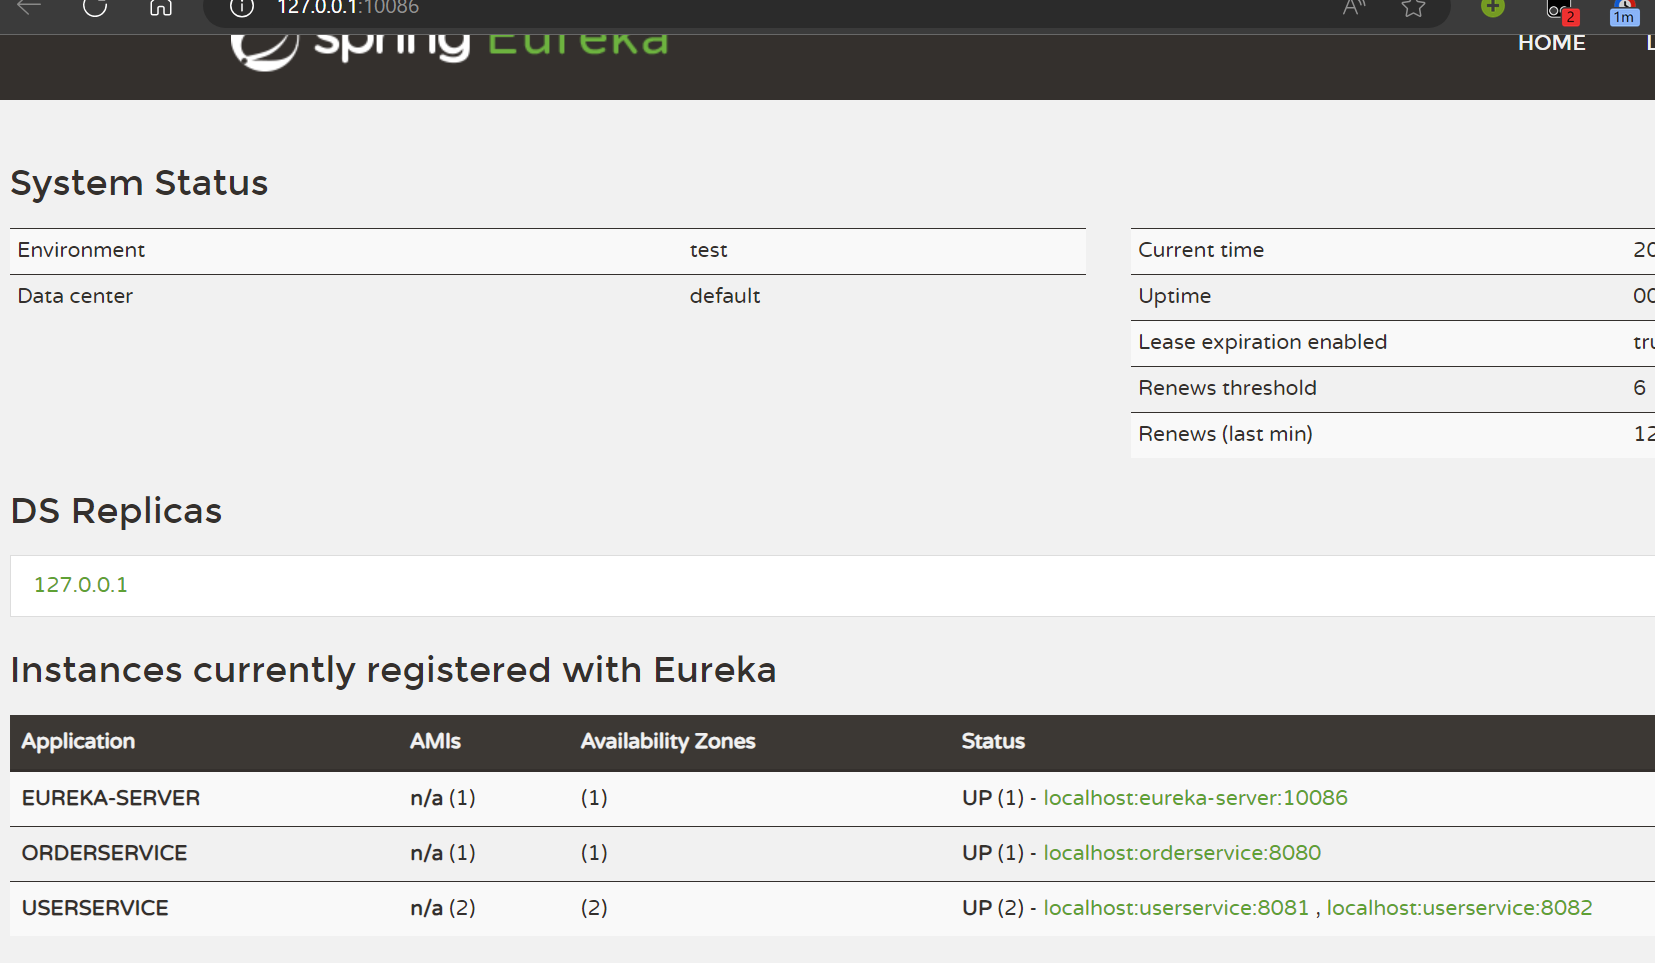
Service Registration
- Dependency import - client
<dependency> <groupId>org.springframework.cloud</groupId> <artifactId>spring-cloud-starter-netflix-eureka-client</artifactId></dependency>- Configuration file
spring: application: name: userserviceeureka: client: service-url: defaultZone: <http://127.0.0.1:10086/eureka>- Start multiple service instances
In SpringBoot, duplicate the startup configuration; configure -Dserver.port=8082 in VM options
Service Discovery
As a consumer, order-service follows the same first two steps as the provider.
- Service pulling and load balancing
Load balancing: simply add @LoadBalanced to the RestTemplate bean
@Bean@LoadBalancedpublic RestTemplate restTemplate(){ return new RestTemplate();}Getting the service:
public Order queryOrderById(Long orderId) { // 1. Query the order Order order = orderMapper.findById(orderId); // 2. Remote query User// String url = "<http://localhost:8081/user/>" + order.getUserId(); String url = "<http://userservice/user/>" + order.getUserId(); User user = restTemplate.getForObject(url, User.class); // 3. Put into order order.setUser(user); // 4. Return return order;}Spring will automatically help us fetch the instance list from the eureka-server side based on the service name userservice, and then perform load balancing.
Ribbon Load Balancing
Load Balancing Principle
Spring Cloud uses a component named Ribbon under the hood to implement load balancing.
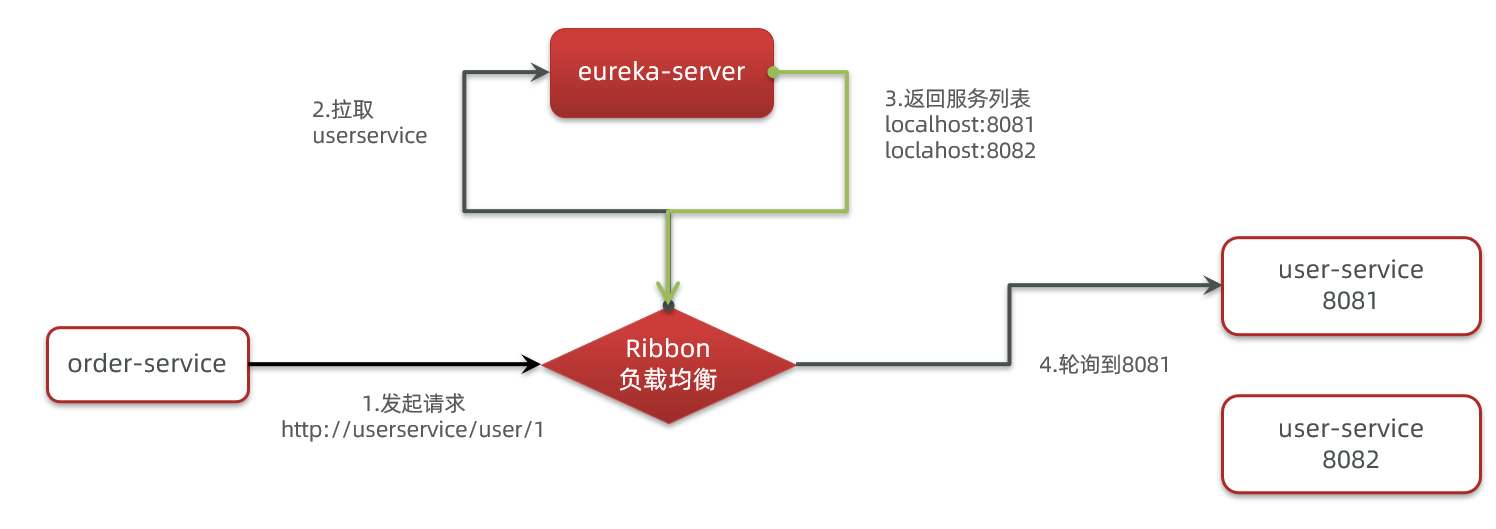
SpringCloud Implementation
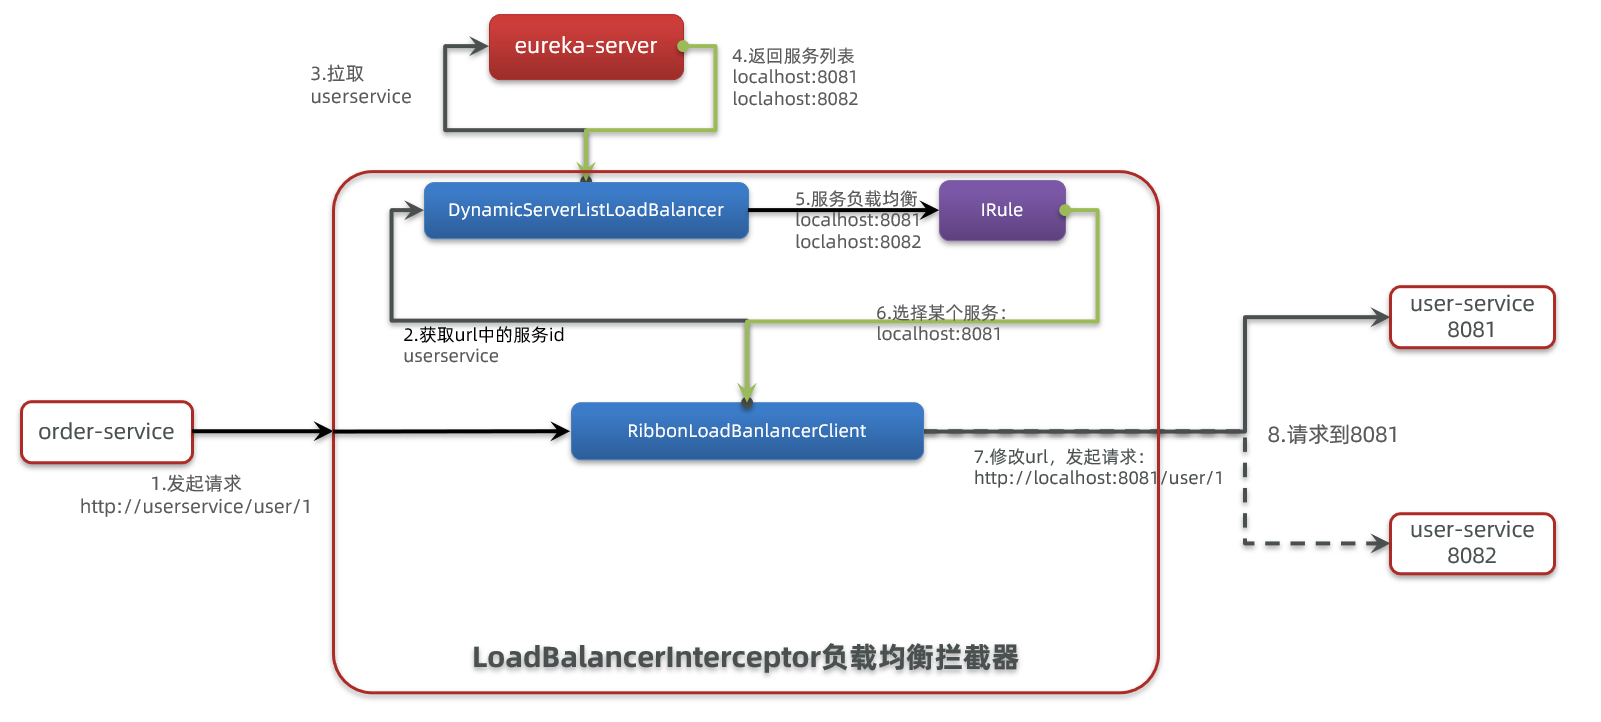
SpringCloudRibbon uses an interceptor that intercepts requests sent by RestTemplate and modifies the address.
Basic workflow:
- Intercept RestTemplate requests to http://userservice/user/1
RibbonLoadBalancerClientextracts the service name from the request URL, i.e. user-serviceDynamicServerListLoadBalancerpulls the service list from Eureka based on user-service- Eureka returns the list, e.g., localhost<8081>, localhost<8082>
IRuleuses built-in load balancing rules to select one from the list, e.g., localhost<8081>RibbonLoadBalancerClientrewrites the request URL, replacinguserservicewith localhost<8081>, yielding http://localhost:8081/user/1, and makes the real request
Load Balancing Strategies
The rules for load balancing are defined in the IRule interface, and there are many different implementations.
| Built-in load balancing rule classes | Description |
|---|---|
| RoundRobinRule | Simply round-robin over the service list. It is Ribbon’s default load balancing rule. |
| AvailabilityFilteringRule | Excludes servers that are down: (1) By default, if this server fails 3 times, it will be put into a “circuit” state. The circuit state lasts 30 seconds; if another failure occurs, the circuit duration increases geometrically. (2) Servers with too many concurrent connections. If a server’s concurrent connections are too high, clients configured with AvailabilityFilteringRule will also ignore it. The maximum concurrent connections can be configured via the client property |
| WeightedResponseTimeRule | Assigns a weight to each server. The longer a server’s response time, the smaller its weight. This rule randomly selects a server; the weight influences the choice. |
| ZoneAvoidanceRule | Choose servers based on zone availability. Classify servers by zone (e.g., a data center, a rack), then round-robin among multiple services within the zone. |
| BestAvailableRule | Ignores those in circuit state and selects the server with the lowest concurrency. |
| RandomRule | Randomly select an available server. |
| RetryRule | Logic for retry behavior |
Custom Load Balancing Policy
There are two ways to modify the load balancing rules by implementing IRule:
- Code approach: In the order-service’s
OrderApplicationclass, define a new IRule:
@Beanpublic IRule randomRule(){ return new RandomRule();}- Configuration file approach: In the order-service’s application.yml, add new configuration to modify the rule:
userservice: # Configure load balancing rule for a specific microservice ribbon: NFLoadBalancerRuleClassName: com.netflix.loadbalancer.RandomRule # Load balancing ruleHungry Loading
Ribbon defaults to lazy loading, meaning the LoadBalanceClient is created on first use, which can make the first request take longer.
Hungry loading creates the client at startup, reducing the latency of the first request. Enable hungry loading with the following config:
ribbon: eager-load: enabled: true clients: userserviceNacos Registry Center
Nacos is Alibaba’s product and is now a component in SpringCloud. It is more feature-rich than Eureka and is quite popular domestically.
Refer to the official docs Nacos Quick Start for installation.
Nacos is a component of SpringCloudAlibaba, and SpringCloudAlibaba also follows the service registration and discovery conventions defined in SpringCloud. Therefore using Nacos or Eureka has no fundamental difference for microservices.
Main differences:
- Different dependencies
- Different service addresses
Services registration to Nacos
Import dependencies
In the cloud-demo parent project’s pom.xml, under
<dependency> <groupId>com.alibaba.cloud</groupId> <artifactId>spring-cloud-alibaba-dependencies</artifactId> <version>2.2.6.RELEASE</version> <type>pom</type> <scope>import</scope></dependency>Then in the user-service and order-service pom files, import nacos-discovery dependency:
<dependency> <groupId>com.alibaba.cloud</groupId> <artifactId>spring-cloud-starter-alibaba-nacos-discovery</artifactId></dependency>Configure Nacos address
In the user-service and order-service application.yml, add the Nacos address:
spring: cloud: nacos: server-addr: localhost:8848Restart
After restarting the microservices, log in to the Nacos management page to see the microservice information.
Service Hierarchical Storage Model
A service can have multiple instances. If these instances are distributed across different data centers nationwide, Nacos groups the instances within the same data center into a cluster.
When microservices communicate with each other, they should try to access the same cluster’s instances as much as possible because local access is faster. If the current cluster is unavailable, access other clusters.
- Configuration
Modify application.yml to add cluster configuration:
spring: cloud: nacos: server-addr: localhost:8848 discovery: cluster-name: HZ # cluster nameNacos provides a NacosRule implementation that can prefer selecting instances from the same cluster.
userservice: ribbon: NFLoadBalancerRuleClassName: com.alibaba.cloud.nacos.ribbon.NacosRule # 负载均衡规则- Weight configuration
In actual deployments, you may encounter situations like:
Servers have different hardware performance; some machines are more capable, others less so. You want the higher-performing machines to handle more user requests.
But by default, NacosRule selects randomly within the same cluster and does not consider machine performance.
Therefore, Nacos provides weight configuration to control access frequency; higher weight means higher access frequency.
- Environment isolation
Nacos provides namespaces to achieve environment isolation.
-
nacos can have multiple namespaces
-
within a namespace there can be groups, services, etc.
-
different namespaces are isolated from each other; services in different namespaces are not visible to each other
-
Service instances
Nacos service instances come in two types:
- Ephemeral (temporary): If an instance goes down for a period, it will be removed from the service list; this is the default type.
- Non-ephemeral: If an instance goes down, it will not be removed from the service list and can be considered permanent.
Configure a service instance as non-ephemeral:
spring: cloud: nacos: discovery: ephemeral: false # set to non-ephemeralDifferences Between Nacos and Eureka
Nacos and Eureka have similar overall structures—service registration, service pulling, and heartbeat waiting—but there are some differences:
- Common points
- Both support service registration and service pulling
- Both support heartbeat-based health checks for service providers
- Differences
- Nacos supports server-side active monitoring of provider status: ephemeral instances use heartbeat mode; non-ephemeral instances use active checks
- Ephemeral instances with abnormal heartbeats will be removed; non-ephemeral instances will not be removed
- Nacos supports push-based notifications for service list changes, making updates more timely
- Nacos clusters default to AP; when non-ephemeral instances exist, CP mode is used; Eureka uses AP mode
Nacos Configuration Management
As microservice instances scale to dozens or hundreds, editing each microservice’s configuration individually becomes maddening and error-prone. We need a unified configuration management solution to centrally manage all instances’ configurations.
Nacos can centrally manage configurations and immediately notify microservices of configuration changes to enable hot updates.
Pulling Configuration from Microservices
Microservices pull configurations managed in Nacos and merge them with local application.yml configurations to complete startup.
But if application.yml has not yet been read, how to determine the Nacos address?
Therefore Spring introduces a new configuration file: bootstrap.yaml, which is read before application.yml.
- Importing nacos-config dependency
<!--nacos配置管理依赖--><dependency> <groupId>com.alibaba.cloud</groupId> <artifactId>spring-cloud-starter-alibaba-nacos-config</artifactId></dependency>- Add bootstrap.yml
spring: application: name: userservice # service name profiles: active: dev # development environment; here it's dev cloud: nacos: server-addr: localhost:8848 # Nacos address config: file-extension: yaml # file extensionHere the Nacos address will be obtained from spring.cloud.nacos.server-addr, and then
${spring.application.name}-${spring.profiles.active}.${spring.cloud.nacos.config.file-extension} is used as the file id to read configurations.
- Reading Nacos configuration
@Value("${pattern.dateformat}")private String dateformat;
@GetMapping("now")public String now(){ return LocalDateTime.now().format(DateTimeFormatter.ofPattern(dateformat));}Configuration Hot Update
After changing configurations in Nacos, microservices can apply the changes without restarting, i.e., configuration hot updating.
-
Method 1: add
@RefreshScopeannotation -
Method 2
Use
@ConfigurationPropertiesinstead of@Valueannotations.- In the user-service, add a class to read the
pattern.dateformatproperty:
package cn.itcast.user.config;import lombok.Data;import org.springframework.boot.context.properties.ConfigurationProperties;import org.springframework.stereotype.Component;@Component@Data@ConfigurationProperties(prefix = "pattern")public class PatternProperties {private String dateformat;}- In
UserController, use this class instead of @Value:
@Autowiredprivate PatternProperties patternProperties;@GetMapping("now")public String now(){return LocalDateTime.now().format(DateTimeFormatter.ofPattern(patternProperties.getDateformat()));} - In the user-service, add a class to read the
Configuration Sharing
In fact, when the microservice starts, it will read multiple configuration files from Nacos, for example:
[spring.application.name]-[spring.profiles.active].yaml, e.g., userservice-dev.yaml[spring.application.name].yaml, e.g., userservice.yaml
And [spring.application.name].yaml does not include an environment, so it can be shared across environments.
Configuration sharing priority:
When the same property appears in both Nacos and the service’s local configuration, the priority differs:
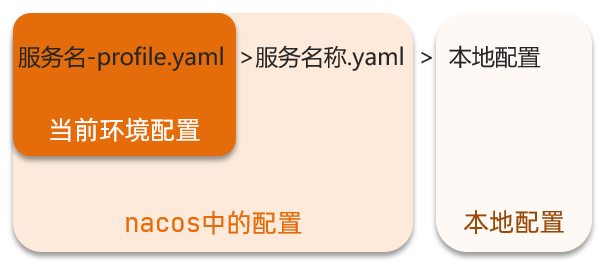
Nacos Clusters
Proxy multiple Nacos servers via Nginx
Configure cluster.conf in Nacos’s conf, adding Nacos cluster addresses.
Feign Remote Calls
Code for initiating remote calls with RestTemplate has the following problems:
- Poor readability and inconsistent programming experience
- Complex URLs make maintenance difficult
Feign is a declarative HTTP client whose purpose is to help us elegantly implement HTTP requests, solving the above issues.
Feign Replaces RestTemplate
-
Import dependencies
<dependency><groupId>org.springframework.cloud</groupId><artifactId>spring-cloud-starter-openfeign</artifactId></dependency> -
Add annotation
Add
@EnableFeignClientsin the startup class -
Create Feign client
In the service, create an interface:
@FeignClient("userservice")public interface UserClient {@GetMapping("/user/{id}")User findById(@PathVariable("id") Long id);}This client is mainly based on Spring MVC annotations to declare remote call details, such as:
- Service name: userservice
- HTTP method: GET
- Path: /user/{id}
- Parameter: Long id
- Return type: User
In this way, Feign can help us send HTTP requests without manually using RestTemplate.
-
Usage
In the service class, call the method:
@Autowiredprivate UserClient userClient;public Order queryOrderById(Long orderId) {// 1. Query the orderOrder order = orderMapper.findById(orderId);// 2. Remote query UserUser user = userClient.findById(order.getUserId());// 3. Put into orderorder.setUser(user);// 4. Returnreturn order;}
Custom Configuration
Feign supports a lot of custom configurations, as shown in the table below:
| Type | Purpose | Description |
|---|---|---|
| feign.Logger.Level | Change log level | Four levels: NONE, BASIC, HEADERS, FULL |
| feign.codec.Decoder | Response parser | Parses the result of HTTP remote calls, e.g., parsing JSON strings into Java objects |
| feign.codec.Encoder | Request parameter encoding | Encodes request parameters for transmission via HTTP |
| feign.Contract | Supported annotation formats | Defaults to SpringMVC annotations |
| feign.Retryer | Failure retry mechanism | Retry logic for failed requests; by default there is none, though Ribbon may retry |
Generally, the defaults are sufficient; if you want to customize, simply create your own @Bean to override the default beans.
Customization via configuration
Modifying Feign’s log level via configuration can target a single service:
feign: client: config: userservice: # configuration for a specific microservice loggerLevel: FULL # log levelYou can also apply it to all services:
feign: client: config: default: # default is global; if you specify a service name, it's for a single microservice loggerLevel: FULL # log levelAnd the log levels are four:
- NONE: Do not log any information; this is the default.
- BASIC: Log only the request method, URL, and the response status code and execution time
- HEADERS: In addition to BASIC, also log request and response headers
- FULL: Log all details of requests and responses, including headers, body, and metadata.
Code-based approach
You can also modify the log level via Java code by declaring a class and then returning a Logger.Level object:
public class DefaultFeignConfiguration { @Bean public Logger.Level feignLogLevel(){ return Logger.Level.BASIC; // log level is BASIC }}If you want global effect, apply it by using the startup class annotation:
@EnableFeignClients(defaultConfiguration = DefaultFeignConfiguration .class)If you want it to be local to a specific Feign client, apply:
@FeignClient(value = "userservice", configuration = DefaultFeignConfiguration .class)Feign Usage Optimization
Feign’s underlying HTTP requests rely on other frameworks. Their underlying client implementations include:
- URLConnection: default implementation, does not support connection pooling
- Apache HttpClient: supports connection pooling
- OKHttp: supports connection pooling
Thus, the main way to improve Feign performance is to use a connection pool instead of the default URLConnection.
Here we demonstrate using Apache HttpClient.
- Import dependencies
In the order-service pom, include Apache HttpClient dependency:
<!--httpClient dependency --><dependency> <groupId>io.github.openfeign</groupId> <artifactId>feign-httpclient</artifactId></dependency>- Configure the connection pool
In the order-service application.yml, add configuration:
feign: client: config: default: # global default loggerLevel: BASIC # log level; BASIC is the basic request/response info httpclient: enabled: true # enable Feign's support for HttpClient max-connections: 200 # maximum connections max-connections-per-route: 50 # maximum connections per routeIn short, Feign optimization:
- Prefer BASIC log level when possible
- Use HttpClient or OKHttp instead of URLConnection
- Include feign-httpClient dependency
- Enable HttpClient in the configuration and set pool parameters
Best Practice
The Feign client and the service provider’s controller code are very similar. Here is a method to reduce repetitive coding:
Inheritance approach
Shared code can be reused via inheritance:
- Define an API interface, declare methods using Spring MVC annotations.
- Have the Feign client and the Controller both implement this interface
Advantages:
- Simple
- Enables code sharing
Disadvantages:
- Tight coupling between the provider and consumer
- Annotations in the parameter list are not inherited, so the Controller must re-declare methods, parameter lists, and annotations
Extraction approach
Extract Feign’s Client into a separate module, and place related POJOs and default Feign configurations into this module for all consumers to use.
For example, extract UserClient, User, and Feign’s default configuration into a feign-api package; all microservices can reference this dependency package and use it directly.
Best practices for extraction-based implementation
-
Extract
Create a module, feign-api
Add OpenFeign dependency
Copy methods from the service
-
Use feign-api in order-service
Add dependency:
<dependency><groupId>cn.itcast.demo</groupId><artifactId>feign-api</artifactId><version>1.0</version></dependency> -
Package scanning considerations
-
Option 1:
Specify the packages Feign should scan:
@EnableFeignClients(basePackages = "cn.itcast.feign.clients") -
Option 2:
Specify the Client interfaces to load:
@EnableFeignClients(clients = {UserClient.class})
-
Gateway Service Gateway
Spring Cloud Gateway is a brand-new project within Spring Cloud. It is developed based on Spring 5.0, Spring Boot 2.0, and Project Reactor and other reactive programming and event-driven technologies. It aims to provide a simple and effective unified API routing management approach for microservice architectures.
Why a Gateway is Needed
The Gateway is the gatekeeper of our services, the single entry point for all microservices.
Core capabilities of the gateway:
- Access control: The gateway, as the entry to microservices, should verify whether the user has permission to request; if not, intercept.
- Routing and load balancing: All requests must pass through the gateway, but the gateway does not process business logic. It forwards requests to a microservice based on certain rules; when there are multiple target services, load balancing is required.
- Rate limiting: When request traffic is high, the gateway releases requests at a rate that downstream microservices can handle, preventing service pressure.
In SpringCloud, there are two gateway implementations:
- gateway
- zuul
Zuul is servlet-based (blocking). SpringCloudGateway is built on WebFlux provided by Spring 5, a reactive programming implementation with better performance.
Quick Start
-
Create a SpringBoot project gateway and include gateway dependencies
<!--网关--><dependency><groupId>org.springframework.cloud</groupId><artifactId>spring-cloud-starter-gateway</artifactId></dependency><!--nacos服务发现依赖--><dependency><groupId>com.alibaba.cloud</groupId><artifactId>spring-cloud-starter-alibaba-nacos-discovery</artifactId></dependency> -
Write the startup class
@SpringBootApplicationpublic class GatewayApplication {public static void main(String[] args) {SpringApplication.run(GatewayApplication.class, args);}} -
Write basic configuration and routing rules
Routing configuration includes:
- Route id: the unique identifier of the route
- Route target (uri): the route’s target address; http represents a fixed address, lb represents load balancing by service name
- Route predicates: the rules to determine routing
- Route filters: process requests or responses
server:port: 10010 # gateway portspring:application:name: gateway # service namecloud:nacos:server-addr: localhost:8848 # nacos addressgateway:routes: # gateway route configuration- id: user-service # route id, unique# uri: <http://127.0.0.1:8081> # route target address; http is fixeduri: lb://userservice # route target address; lb indicates load balancing, followed by service namepredicates: # route predicates, i.e., conditions that determine routing- Path=/user/** # path-based matching; matches any path that starts with /user/ -
Start the gateway service for testing
Restart the gateway; visiting http://localhost:10010/user/1 matches the /user/** rule and the request is forwarded to uri: http://userservice/user/1, yielding the result:
Predicate Factory
What we write in the configuration as assertion rules are strings; these strings are read and processed by Predicate Factory to become route decision conditions.
For example, Path=/user/** matches by path, and this rule is handled by the class org.springframework.cloud.gateway.handler.predicate.PathRoutePredicateFactory. There are a dozen or so such assertion factories in SpringCloudGateway:
| Name | Description | Example |
|---|---|---|
| After | Request after a certain time | - After=2037-01-20T17:42:47.789-07:00[America/Denver] |
| Before | Request before a certain time | - Before=2031-04-13T15:14:47.433+08:00[Asia/Shanghai] |
| Between | Request between two times | - Between=2037-01-20T17:42:47.789-07:00[America/Denver], 2037-01-21T17:42:47.789-07:00[America/Denver] |
| Cookie | Request must contain certain cookies | - Cookie=chocolate, ch.p |
| Header | Request must contain certain headers | - Header=X-Request-Id, \d+ |
| Host | Request must be for a particular host (domain) | - Host=.somehost.org,.anotherhost.org |
| Method | Request method must be a specific one | - Method=GET,POST |
| Path | Request path must match specified rules | - Path=/red/{segment},/blue/** |
| Query | Request parameters must include specified parameters | - Query=name, Jack or - Query=name |
| RemoteAddr | Requester’s IP must fall within a specified range | - RemoteAddr=192.168.1.1/24 |
| Weight | Weight handling |
Filter Factory
GatewayFilter is a filter provided by the gateway that can process incoming requests and responses from microservices
- Process requests or responses for routes, such as adding headers
- Filters defined under a route only apply to the current route’s requests
Types of Route Filters
Spring provides 31 different route filter factories. For example:
| Name | Description |
|---|---|
| AddRequestHeader | Add a request header to the current request |
| RemoveRequestHeader | Remove a header from the request |
| AddResponseHeader | Add a response header to the response |
| RemoveResponseHeader | Remove a response header from the response |
| RequestRateLimiter | Rate limit requests |
Request Header Filter
Here we use AddRequestHeader as an example.
Requirement: Add a request header Truth=dreaife is freaking awesome! to all requests entering userservice.
Just modify gateway service’s application.yml and add a routing filter:
spring: cloud: gateway: routes: - id: user-service uri: lb://userservice predicates: - Path=/user/** filters: # filters - AddRequestHeader=Truth, dreaife is freaking awesome! # add headerThe current filter is defined under the userservice route, so it only affects requests to userservice.
Default Filters
If you want the filter to apply to all routes, you can place the filter factory under default. The format is:
spring: cloud: gateway: routes: - id: user-service uri: lb://userservice predicates: - Path=/user/** default-filters: # default filters - AddRequestHeader=Truth, dreaife is freaking awesome!Global Filters
Global Filter Purpose
Global filters also process all requests entering the gateway and responses from microservices, similar to GatewayFilter. The difference is that GatewayFilter is defined via configuration with fixed logic, while GlobalFilter’s logic must be implemented in code.
Global filters are defined by implementing the GlobalFilter interface.
public interface GlobalFilter { /** * Process the current request; if necessary, pass the request to the next filter * * @param exchange the request context, where you can access Request, Response, etc. * @param chain used to delegate the request to the next filter * @return {@code Mono<Void>} indicates the end of this filter’s processing */ Mono<Void> filter(ServerWebExchange exchange, GatewayFilterChain chain);}In the filter, you can implement custom logic to achieve the following:
- Login status check
- Permission validation
- Request rate limiting, etc.
Custom Global Filter
Example: Define a global filter that intercepts requests and checks whether the request parameters satisfy:
- The parameter authorization exists
- The authorization parameter value is admin
If both are satisfied, let the request pass; otherwise block it
package cn.itcast.gateway.filters;
import org.springframework.cloud.gateway.filter.GatewayFilterChain;import org.springframework.cloud.gateway.filter.GlobalFilter;import org.springframework.core.annotation.Order;import org.springframework.http.HttpStatus;import org.springframework.stereotype.Component;import org.springframework.web.server.ServerWebExchange;import reactor.core.publisher.Mono;
@Order(-1)@Componentpublic class AuthorizeFilter implements GlobalFilter { @Override public Mono<Void> filter(ServerWebExchange exchange, GatewayFilterChain chain) { // 1. Get request parameters MultiValueMap<String, String> params = exchange.getRequest().getQueryParams(); // 2. Get authorization parameter String auth = params.getFirst("authorization"); // 3. Validate if ("admin".equals(auth)) { // Let through return chain.filter(exchange); } // 4. Block // 4.1. Deny access, set status code exchange.getResponse().setStatusCode(HttpStatus.FORBIDDEN); // 4.2. End handling return exchange.getResponse().setComplete(); }}Filter Execution Order
Requests entering the gateway encounter three kinds of filters: the current route’s filters, DefaultFilter, and GlobalFilter.
After the route is determined, the route’s filters, DefaultFilter, and GlobalFilter are merged into a filter chain (collection) and executed in order.
What determines the order?
- Each filter must specify an int order value; the smaller the value, the higher the priority, and the earlier it executes.
- GlobalFilter order is specified by implementing the Ordered interface or by adding the @Order annotation.
- The order of route filters and defaultFilter is determined by Spring; by default, it increments from 1 in the declaration order.
- When filter orders are equal, the execution order is defaultFilter > route filters > GlobalFilter.
Cross-Origin (CORS) Issues
Cross-origin means different domains; examples include:
- Different domains: http://www.taobao.com/ vs http://www.taobao.org/ vs http://www.jd.com/ vs http://miaosha.jd.com/
- Same domain, different ports: localhost<8080> vs localhost<8081>
Cross-origin issues occur when the browser blocks cross-origin AJAX requests initiated by the client.
Solution: CORS
In the gateway service’s application.yml, add the following configuration:
spring: cloud: gateway: globalcors: # Global cross-origin handling add-to-simple-url-handler-mapping: true # Solve options requests being blocked corsConfigurations: '[/**]': allowedOrigins: # Which websites are allowed to make cross-origin requests - "<http://localhost:8090>" allowedMethods: # Allowed cross-origin AJAX request methods - "GET" - "POST" - "DELETE" - "PUT" - "OPTIONS" allowedHeaders: "*" # Headers that are allowed in requests allowCredentials: true # Whether to allow credentials (cookies) maxAge: 360000 # This cross-origin check's validity periodIf this article helped you, please share it with others!
Some information may be outdated