


初识elasticsearch
了解ES
elasticsearch的作用
elasticsearch是一款非常强大的开源搜索引擎,具备非常多强大功能,可以帮助我们从海量数据中快速找到需要的内容
例如:
- 在GitHub搜索代码
- 在电商网站搜索商品
- 在百度搜索答案
- 在打车软件搜索附近的车
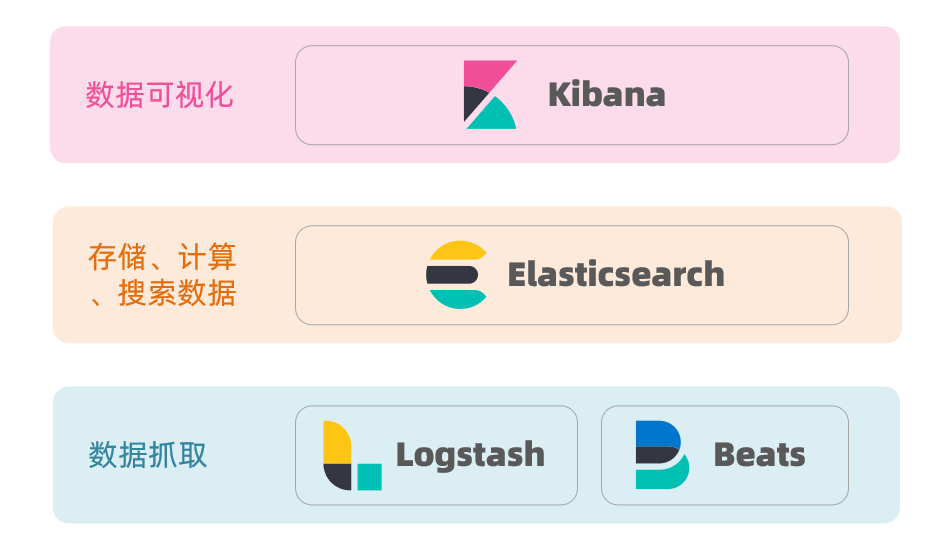
ELK技术栈
elasticsearch结合kibana、Logstash、Beats,也就是elastic stack(ELK)。被广泛应用在日志数据分析、实时监控等领域
而elasticsearch是elastic stack的核心,负责存储、搜索、分析数据。
elasticsearch和lucene
elasticsearch底层是基于lucene来实现的。
Lucene是一个Java语言的搜索引擎类库,是Apache公司的顶级项目,由DougCutting于1999年研发。
elasticsearch的发展历史:
- 2004年Shay Banon基于Lucene开发了Compass
- 2010年Shay Banon 重写了Compass,取名为Elasticsearch。
什么是elasticsearch?
- 一个开源的分布式搜索引擎,可以用来实现搜索、日志统计、分析、系统监控等功能
什么是elastic stack(ELK)?
- 是以elasticsearch为核心的技术栈,包括beats、Logstash、kibana、elasticsearch
什么是Lucene?
- 是Apache的开源搜索引擎类库,提供了搜索引擎的核心API
倒排索引
倒排索引的概念是基于MySQL这样的正向索引而言的。
正向索引
如给表中的id创建索引,如果是根据id查询,那么直接走索引,查询速度非常快。
但如果是基于title做模糊查询,只能是逐行扫描数据,流程如下:
- 用户搜索数据,条件是title符合`“%手机%”
- 逐行获取数据,比如id为1的数据
- 判断数据中的title是否符合用户搜索条件
- 如果符合则放入结果集,不符合则丢弃。回到步骤1
逐行扫描,也就是全表扫描,随着数据量增加,其查询效率也会越来越低。当数据量达到数百万时,就是一场灾难。
倒排索引
倒排索引中有两个非常重要的概念:
- 文档(
Document):用来搜索的数据,其中的每一条数据就是一个文档。例如一个网页、一个商品信息 - 词条(
Term):对文档数据或用户搜索数据,利用某种算法分词,得到的具备含义的词语就是词条
创建倒排索引是对正向索引的一种特殊处理,流程如下:
- 将每一个文档的数据利用算法分词,得到一个个词条
- 创建表,每行数据包括词条、词条所在文档id、位置等信息
- 因为词条唯一性,可以给词条创建索引,例如hash表结构索引
倒排索引的搜索流程如下(以搜索”小米手机”为例):
1)用户输入条件"小米手机"进行搜索。
2)对用户输入内容分词,得到词条:小米、手机。
3)拿着词条在倒排索引中查找,可以得到包含词条的文档id:1、2、3。
4)拿着文档id到正向索引中查找具体文档。
虽然要先查询倒排索引,再查询倒排索引,但是无论是词条、还是文档id都建立了索引,查询速度非常快!无需全表扫描。
正向和倒排
那么为什么一个叫做正向索引,一个叫做倒排索引呢?
- 正向索引是最传统的,根据id索引的方式。但根据词条查询时,必须先逐条获取每个文档,然后判断文档中是否包含所需要的词条,是根据文档找词条的过程。
- 而倒排索引则相反,是先找到用户要搜索的词条,根据词条得到保护词条的文档的id,然后根据id获取文档。是根据词条找文档的过程。
正向索引:
- 优点:
- 可以给多个字段创建索引
- 根据索引字段搜索、排序速度非常快
- 缺点:
- 根据非索引字段,或者索引字段中的部分词条查找时,只能全表扫描。
倒排索引:
- 优点:
- 根据词条搜索、模糊搜索时,速度非常快
- 缺点:
- 只能给词条创建索引,而不是字段
- 无法根据字段做排序
es的一些概念
elasticsearch中有很多独有的概念,与mysql中略有差别,但也有相似之处。
文档和字段
elasticsearch是面向**文档(Document)**存储的,可以是数据库中的一条商品数据,一个订单信息。文档数据会被序列化为json格式后存储在elasticsearch中:
而Json文档中往往包含很多的字段(Field),类似于数据库中的列。
索引和映射
索引(Index),就是相同类型的文档的集合。
例如:
- 所有用户文档,就可以组织在一起,称为用户的索引;
- 所有商品的文档,可以组织在一起,称为商品的索引;
- 所有订单的文档,可以组织在一起,称为订单的索引;
因此,我们可以把索引当做是数据库中的表。
数据库的表会有约束信息,用来定义表的结构、字段的名称、类型等信息。因此,索引库中就有映射(mapping),是索引中文档的字段约束信息,类似表的结构约束。
mysql与elasticsearch
我们统一的把mysql与elasticsearch的概念做一下对比:
| MySQL | Elasticsearch | 说明 |
|---|---|---|
| Table | Index | 索引(index),就是文档的集合,类似数据库的表(table) |
| Row | Document | 文档(Document),就是一条条的数据,类似数据库中的行(Row),文档都是JSON格式 |
| Column | Field | 字段(Field),就是JSON文档中的字段,类似数据库中的列(Column) |
| Schema | Mapping | Mapping(映射)是索引中文档的约束,例如字段类型约束。类似数据库的表结构(Schema) |
| SQL | DSL | DSL是elasticsearch提供的JSON风格的请求语句,用来操作elasticsearch,实现CRUD |
两者各自有自己的擅长支出:
- Mysql:擅长事务类型操作,可以确保数据的安全和一致性
- Elasticsearch:擅长海量数据的搜索、分析、计算
在企业中,往往是两者结合使用:
- 对安全性要求较高的写操作,使用mysql实现
- 对查询性能要求较高的搜索需求,使用elasticsearch实现
- 两者再基于某种方式,实现数据的同步,保证一致性
安装
安装es、kibana
docker run -d \\ --name es \\ -e "ES_JAVA_OPTS=-Xms512m -Xmx512m" \\ -e "discovery.type=single-node" \\ -v es-data:/usr/share/elasticsearch/data \\ -v es-plugins:/usr/share/elasticsearch/plugins \\ --privileged \\ --network es-net \\ -p 9200:9200 \\ -p 9300:9300 \\elasticsearch:8.8.1
# 端口打不开记得把ssl认证跟密码认证关掉xpack.security.enabled: falsexpack.security.http.ssl: enabled: false keystore.path: certs/http.p12
docker run -d \\--name kibana \\-e ELASTICSEARCH_HOSTS=http://es:9200 \\--network=es-net \\-p 5601:5601 \\kibana:8.8.1安装IK分词器
docker exec -it es bash
./bin/elasticsearch-plugin install <https://github.com/medcl/elasticsearch-analysis-ik/releases/download/v8.8.1/elasticsearch-analysis-ik-8.8.1.zip>
exit#重启容器docker restart elasticsearchIKAnalyzer.cfg.xml配置文件内容添加:
<?xml version="1.0" encoding="UTF-8"?><!DOCTYPE properties SYSTEM "<http://java.sun.com/dtd/properties.dtd>"><properties> <comment>IK Analyzer 扩展配置</comment> <!--用户可以在这里配置自己的扩展字典 *** 添加扩展词典--> <entry key="ext_dict">ext.dic</entry> <!--用户可以在这里配置自己的扩展停止词字典 *** 添加停用词词典--> <entry key="ext_stopwords">stopword.dic</entry></properties>在对应文件中修改后重启即可。
分词器的作用是什么?
- 创建倒排索引时对文档分词
- 用户搜索时,对输入的内容分词
IK分词器有几种模式?
- ik_smart:智能切分,粗粒度
- ik_max_word:最细切分,细粒度
IK分词器如何拓展词条?如何停用词条?
- 利用config目录的IkAnalyzer.cfg.xml文件添加拓展词典和停用词典
- 在词典中添加拓展词条或者停用词条
索引库操作
索引库就类似数据库表,mapping映射就类似表的结构。
我们要向es中存储数据,必须先创建“库”和“表”。
mapping映射属性
mapping是对索引库中文档的约束,常见的mapping属性包括:
- type:字段数据类型,常见的简单类型有:
- 字符串:text(可分词的文本)、keyword(精确值,例如:品牌、国家、ip地址)
- 数值:long、integer、short、byte、double、float、
- 布尔:boolean
- 日期:date
- 对象:object
- index:是否创建索引,默认为true
- analyzer:使用哪种分词器
- properties:该字段的子字段
索引库的CRUD
索引库操作有哪些?
- 创建索引库:PUT /索引库名
- 查询索引库:GET /索引库名
- 删除索引库:DELETE /索引库名
- 添加字段:PUT /索引库名/_mapping
创建索引库和映射
基本语法:
- 请求方式:PUT
- 请求路径:/索引库名,可以自定义
- 请求参数:mapping映射
格式:
PUT /索引库名称{ "mappings": { "properties": { "字段名":{ "type": "text", "analyzer": "ik_smart" }, "字段名2":{ "type": "keyword", "index": "false" }, "字段名3":{ "properties": { "子字段": { "type": "keyword" } } }, // ...略 } }}查询索引库
基本语法:
- 请求方式:GET
- 请求路径:/索引库名
- 请求参数:无
格式:
GET /索引库名修改索引库
倒排索引结构虽然不复杂,但是一旦数据结构改变(比如改变了分词器),就需要重新创建倒排索引,这简直是灾难。因此索引库一旦创建,无法修改mapping。
虽然无法修改mapping中已有的字段,但是却允许添加新的字段到mapping中,因为不会对倒排索引产生影响。
语法说明:
PUT /索引库名/_mapping{ "properties": { "新字段名":{ "type": "integer" } }}删除索引库
语法:
- 请求方式:DELETE
- 请求路径:/索引库名
- 请求参数:无
格式:
DELETE /索引库名文档操作
文档操作有哪些?
- 创建文档:POST /{索引库名}/_doc/文档id { json文档 }
- 查询文档:GET /{索引库名}/_doc/文档id
- 删除文档:DELETE /{索引库名}/_doc/文档id
- 修改文档:
- 全量修改:PUT /{索引库名}/_doc/文档id { json文档 }
- 增量修改:POST /{索引库名}/_update/文档id { “doc”: {字段}}
新建文档
语法:
POST /索引库名/_doc/文档id{ "字段1": "值1", "字段2": "值2", "字段3": { "子属性1": "值3", "子属性2": "值4" }, // ...}查询文档
根据rest风格,新增是post,查询应该是get,不过查询一般都需要条件,这里我们把文档id带上。
语法:
GET /{索引库名称}/_doc/{id}删除文档
删除使用DELETE请求,同样,需要根据id进行删除:
语法:
DELETE /{索引库名}/_doc/id值修改文档
修改有两种方式:
- 全量修改:直接覆盖原来的文档
- 增量修改:修改文档中的部分字段
全量修改
全量修改是覆盖原来的文档,其本质是:
- 根据指定的id删除文档
- 新增一个相同id的文档
注意:如果根据id删除时,id不存在,第二步的新增也会执行,也就从修改变成了新增操作了。
语法:
PUT /{索引库名}/_doc/文档id{ "字段1": "值1", "字段2": "值2", // ... 略}增量修改
增量修改是只修改指定id匹配的文档中的部分字段。
语法:
POST /{索引库名}/_update/文档id{ "doc": { "字段名": "新的值", }}RestAPI
ES官方提供了各种不同语言的客户端,用来操作ES。这些客户端的本质就是组装DSL语句,通过http请求发送给ES。
其中的Java Rest Client又包括两种:
- Java Low Level Rest Client
- Java High Level Rest Client
索引库操作的基本步骤:
- 初始化RestHighLevelClient
- 创建XxxIndexRequest。XXX是Create、Get、Delete
- 准备DSL( Create时需要,其它是无参)
- 发送请求。调用RestHighLevelClient#indices().xxx()方法,xxx是create、exists、delete
初始化RestClient
在elasticsearch提供的API中,与elasticsearch一切交互都封装在一个名为RestHighLevelClient的类中,必须先完成这个对象的初始化,建立与elasticsearch的连接。
分为三步:
- 引入es的RestHighLevelClient依赖:
<dependency> <groupId>org.elasticsearch.client</groupId> <artifactId>elasticsearch-rest-high-level-client</artifactId></dependency>- 因为SpringBoot默认的ES版本是7.6.2,所以我们需要覆盖默认的ES版本:
<properties> <java.version>1.8</java.version> <elasticsearch.version>7.12.1</elasticsearch.version></properties>- 初始化RestHighLevelClient:
初始化的代码如下:
RestHighLevelClient client = new RestHighLevelClient(RestClient.builder( HttpHost.create("<http://127.0.0.1:9200>")));创建索引库
代码分为三步:
- 创建Request对象。因为是创建索引库的操作,因此Request是CreateIndexRequest。
- 添加请求参数,其实就是DSL的JSON参数部分。因为json字符串很长,这里是定义了静态字符串常量MAPPING_TEMPLATE,让代码看起来更加优雅。
- 发送请求,client.indices()方法的返回值是IndicesClient类型,封装了所有与索引库操作有关的方法。
在constants包下,创建一个类,定义mapping映射的JSON字符串常量。
在测试类中,编写单元测试,实现创建索引:
@Testvoid createHotelIndex() throws IOException { // 1.创建Request对象 CreateIndexRequest request = new CreateIndexRequest("hotel"); // 2.准备请求的参数:DSL语句 request.source(MAPPING_TEMPLATE, XContentType.JSON); // 3.发送请求 client.indices().create(request, RequestOptions.DEFAULT);}删除索引库
删除索引库的DSL语句非常简单:
DELETE /hotel与创建索引库相比:
- 请求方式从PUT变为DELTE
- 请求路径不变
- 无请求参数
所以代码的差异,注意体现在Request对象上。依然是三步走:
- 创建Request对象。这次是DeleteIndexRequest对象
- 准备参数。这里是无参
- 发送请求。改用delete方法
在hotel-demo中的HotelIndexTest测试类中,编写单元测试,实现删除索引:
@Testvoid testDeleteHotelIndex() throws IOException { // 1.创建Request对象 DeleteIndexRequest request = new DeleteIndexRequest("hotel"); // 2.发送请求 client.indices().delete(request, RequestOptions.DEFAULT);}判断索引库是否存在
判断索引库是否存在,本质就是查询,对应的DSL是:
GET /hotel因此与删除的Java代码流程是类似的。依然是三步走:
- 1)创建Request对象。这次是GetIndexRequest对象
- 2)准备参数。这里是无参
- 3)发送请求。改用exists方法
@Testvoid testExistsHotelIndex() throws IOException { // 1.创建Request对象 GetIndexRequest request = new GetIndexRequest("hotel"); // 2.发送请求 boolean exists = client.indices().exists(request, RequestOptions.DEFAULT); // 3.输出 System.err.println(exists ? "索引库已经存在!" : "索引库不存在!");}RestClient操作文档
JavaRestClient操作elasticsearch的流程基本类似。核心是client.indices()方法来获取索引库的操作对象。
文档操作的基本步骤:
- 初始化RestHighLevelClient
- 创建XxxRequest。XXX是Index、Get、Update、Delete、Bulk
- 准备参数(Index、Update、Bulk时需要)
- 发送请求。调用RestHighLevelClient#.xxx()方法,xxx是index、get、update、delete、bulk
- 解析结果(Get时需要)
新增文档
我们要将数据库的酒店数据查询出来,写入elasticsearch中。
定义一个新的类型,与索引库结构吻合:
package cn.itcast.hotel.pojo;
import lombok.Data;import lombok.NoArgsConstructor;
@Data@NoArgsConstructorpublic class HotelDoc { private Long id; private String name; private String address; private Integer price; private Integer score; private String brand; private String city; private String starName; private String business; private String location; private String pic;
public HotelDoc(Hotel hotel) { this.id = hotel.getId(); this.name = hotel.getName(); this.address = hotel.getAddress(); this.price = hotel.getPrice(); this.score = hotel.getScore(); this.brand = hotel.getBrand(); this.city = hotel.getCity(); this.starName = hotel.getStarName(); this.business = hotel.getBusiness(); this.location = hotel.getLatitude() + ", " + hotel.getLongitude(); this.pic = hotel.getPic(); }}新增文档的DSL语句如下:
POST /{索引库名}/_doc/1{ "name": "Jack", "age": 21}与创建索引库类似,同样是三步走:
- 创建Request对象
- 准备请求参数,也就是DSL中的JSON文档
- 发送请求
变化的地方在于,这里直接使用client.xxx()的API,不再需要client.indices()了。
编写单元测试:
@Testvoid testAddDocument() throws IOException { // 1.根据id查询酒店数据 Hotel hotel = hotelService.getById(61083L); // 2.转换为文档类型 HotelDoc hotelDoc = new HotelDoc(hotel); // 3.将HotelDoc转json String json = JSON.toJSONString(hotelDoc);
// 1.准备Request对象 IndexRequest request = new IndexRequest("hotel").id(hotelDoc.getId().toString()); // 2.准备Json文档 request.source(json, XContentType.JSON); // 3.发送请求 client.index(request, RequestOptions.DEFAULT);}查询文档
查询的DSL语句如下:
GET /hotel/_doc/{id}非常简单,因此代码大概分两步:
- 准备Request对象
- 发送请求
不过查询的目的是得到结果,解析为HotelDoc,因此难点是结果的解析。
结果是一个JSON,其中文档放在一个_source属性中,因此解析就是拿到_source,反序列化为Java对象即可。
与之前类似,也是三步走:
- 准备Request对象。这次是查询,所以是GetRequest
- 发送请求,得到结果。因为是查询,这里调用client.get()方法
- 解析结果,就是对JSON做反序列化
编写单元测试:
@Testvoid testGetDocumentById() throws IOException { // 1.准备Request GetRequest request = new GetRequest("hotel", "61082"); // 2.发送请求,得到响应 GetResponse response = client.get(request, RequestOptions.DEFAULT); // 3.解析响应结果 String json = response.getSourceAsString();
HotelDoc hotelDoc = JSON.parseObject(json, HotelDoc.class); System.out.println(hotelDoc);}删除文档
删除的DSL为是这样的:
DELETE /hotel/_doc/{id}与查询相比,仅仅是请求方式从DELETE变成GET,可以想象Java代码应该依然是三步走:
- 准备Request对象,因为是删除,这次是DeleteRequest对象。要指定索引库名和id
- 准备参数,无参
- 发送请求。因为是删除,所以是client.delete()方法
编写单元测试:
@Testvoid testDeleteDocument() throws IOException { // 1.准备Request DeleteRequest request = new DeleteRequest("hotel", "61083"); // 2.发送请求 client.delete(request, RequestOptions.DEFAULT);}修改文档
修改我们讲过两种方式:
- 全量修改:本质是先根据id删除,再新增
- 增量修改:修改文档中的指定字段值
在RestClient的API中,全量修改与新增的API完全一致,判断依据是ID:
- 如果新增时,ID已经存在,则修改
- 如果新增时,ID不存在,则新增
这里不再赘述,我们主要关注增量修改。
- 准备Request对象。这次是修改,所以是UpdateRequest
- 准备参数。也就是JSON文档,里面包含要修改的字段
- 更新文档。这里调用client.update()方法
编写单元测试:
@Testvoid testUpdateDocument() throws IOException { // 1.准备Request UpdateRequest request = new UpdateRequest("hotel", "61083"); // 2.准备请求参数 request.doc( "price", "952", "starName", "四钻" ); // 3.发送请求 client.update(request, RequestOptions.DEFAULT);}批量导入文档
案例需求:利用BulkRequest批量将数据库数据导入到索引库中。
步骤如下:
- 利用mybatis-plus查询酒店数据
- 将查询到的酒店数据(Hotel)转换为文档类型数据(HotelDoc)
- 利用JavaRestClient中的BulkRequest批处理,实现批量新增文档
批量处理BulkRequest,其本质就是将多个普通的CRUD请求组合在一起发送。其中提供了一个add方法,用来添加其他请求:
可以看到,能添加的请求包括:
- IndexRequest,也就是新增
- UpdateRequest,也就是修改
- DeleteRequest,也就是删除
编写单元测试:
@Testvoid testBulkRequest() throws IOException { // 批量查询酒店数据 List<Hotel> hotels = hotelService.list();
// 1.创建Request BulkRequest request = new BulkRequest(); // 2.准备参数,添加多个新增的Request for (Hotel hotel : hotels) { // 2.1.转换为文档类型HotelDoc HotelDoc hotelDoc = new HotelDoc(hotel); // 2.2.创建新增文档的Request对象 request.add(new IndexRequest("hotel") .id(hotelDoc.getId().toString()) .source(JSON.toJSONString(hotelDoc), XContentType.JSON)); } // 3.发送请求 client.bulk(request, RequestOptions.DEFAULT);}DSL查询文档
elasticsearch的查询依然是基于JSON风格的DSL来实现的。
DSL查询分类
Elasticsearch提供了基于JSON的DSL(Domain Specific Language)来定义查询。常见的查询类型包括:
- 查询所有:查询出所有数据,一般测试用。例如:match_all
- 全文检索(full text)查询:利用分词器对用户输入内容分词,然后去倒排索引库中匹配。例如:
- match_query
- multi_match_query
- 精确查询:根据精确词条值查找数据,一般是查找keyword、数值、日期、boolean等类型字段。例如:
- ids
- range
- term
- 地理(geo)查询:根据经纬度查询。例如:
- geo_distance
- geo_bounding_box
- 复合(compound)查询:复合查询可以将上述各种查询条件组合起来,合并查询条件。例如:
- bool
- function_score
查询的语法基本一致:
GET /indexName/_search{ "query": { "查询类型": { "查询条件": "条件值" } }}全文检索查询
全文检索查询的基本流程如下:
- 对用户搜索的内容做分词,得到词条
- 根据词条去倒排索引库中匹配,得到文档id
- 根据文档id找到文档,返回给用户
比较常用的场景包括:
- 商城的输入框搜索
- 百度输入框搜索
常见的全文检索查询包括:
- match查询:单字段查询
GET /indexName/_search{ "query": { "match": { "FIELD": "TEXT" } }}- multi_match查询:多字段查询,任意一个字段符合条件就算符合查询条件;参与查询字段越多,查询性能越差
GET /indexName/_search{ "query": { "multi_match": { "query": "TEXT", "fields": ["FIELD1", " FIELD12"] } }}精准查询
精确查询一般是查找keyword、数值、日期、boolean等类型字段。所以不会对搜索条件分词。常见的有:
-
term:根据词条精确值查询,一般搜索keyword类型、数值类型、布尔类型、日期类型字段
因为精确查询的字段搜是不分词的字段,因此查询的条件也必须是不分词的词条。查询时,用户输入的内容跟自动值完全匹配时才认为符合条件。如果用户输入的内容过多,反而搜索不到数据。
// term查询GET /indexName/_search{"query": {"term": {"FIELD": {"value": "VALUE"}}}} -
range:根据值的范围查询,可以是数值、日期的范围
范围查询,一般应用在对数值类型做范围过滤的时候。比如做价格范围过滤。
// range查询GET /indexName/_search{"query": {"range": {"FIELD": {"gte": 10, // 这里的gte代表大于等于,gt则代表大于"lte": 20 // lte代表小于等于,lt则代表小于}}}}
地理坐标查询
所谓的地理坐标查询,其实就是根据经纬度查询
常见的使用场景包括:
-
携程:搜索我附近的酒店
-
滴滴:搜索我附近的出租车
-
微信:搜索我附近的人
-
矩形范围查询
矩形范围查询,也就是geo_bounding_box查询,查询坐标落在某个矩形范围的所有文档
查询时,需要指定矩形的左上、右下两个点的坐标,然后画出一个矩形,落在该矩形内的都是符合条件的点。
// geo_bounding_box查询GET /indexName/_search{"query": {"geo_bounding_box": {"FIELD": {"top_left": { // 左上点"lat": 31.1,"lon": 121.5},"bottom_right": { // 右下点"lat": 30.9,"lon": 121.7}}}}} -
附近查询
附近查询,也叫做距离查询(geo_distance):查询到指定中心点小于某个距离值的所有文档。
换句话来说,在地图上找一个点作为圆心,以指定距离为半径,画一个圆,落在圆内的坐标都算符合条件
// geo_distance 查询GET /indexName/_search{"query": {"geo_distance": {"distance": "15km", // 半径"FIELD": "31.21,121.5" // 圆心}}}
复合查询
复合(compound)查询:复合查询可以将其它简单查询组合起来,实现更复杂的搜索逻辑。常见的有两种:
- fuction score:算分函数查询,可以控制文档相关性算分,控制文档排名
- bool query:布尔查询,利用逻辑关系组合多个其它的查询,实现复杂搜索
相关性算分
当我们利用match查询时,文档结果会根据与搜索词条的关联度打分(_score),返回结果时按照分值降序排列。
在elasticsearch中,早期使用的打分算法是TF-IDF算法,公式如下
在后来的5.1版本升级中,elasticsearch将算法改进为BM25算法,公式如下
TF-IDF算法有一各缺陷,就是词条频率越高,文档得分也会越高,单个词条对文档影响较大。而BM25则会让单个词条的算分有一个上限,曲线更加平滑
算分函数查询
根据相关度打分是比较合理的需求,但合理的不一定是产品经理需要的。
以百度为例,你搜索的结果中,并不是相关度越高排名越靠前,而是谁掏的钱多排名就越靠前
要想认为控制相关性算分,就需要利用elasticsearch中的function score 查询了
function score 查询中包含四部分内容:
- 原始查询条件:query部分,基于这个条件搜索文档,并且基于BM25算法给文档打分,原始算分(query score)
- 过滤条件:filter部分,符合该条件的文档才会重新算分
- 算分函数:符合filter条件的文档要根据这个函数做运算,得到的函数算分(function score),有四种函数
- weight:函数结果是常量
- field_value_factor:以文档中的某个字段值作为函数结果
- random_score:以随机数作为函数结果
- script_score:自定义算分函数算法
- 运算模式:boost_mode,算分函数的结果、原始查询的相关性算分,两者之间的运算方式,包括:
- multiply:相乘
- replace:用function score替换query score
- 其它,例如:sum、avg、max、min
function score的运行流程如下:
- 根据原始条件查询搜索文档,并且计算相关性算分,称为原始算分(query score)
- 根据过滤条件,过滤文档
- 符合过滤条件的文档,基于算分函数运算,得到函数算分(function score)
- 将原始算分(query score)和函数算分(function score)基于运算模式做运算,得到最终结果,作为相关性算分。
GET /hotel/_search{ "query": { "function_score": { "query": { .... }, // 原始查询,可以是任意条件 "functions": [ // 算分函数 { "filter": { // 满足的条件,品牌必须是如家 "term": { "brand": "如家" } }, "weight": 2 // 算分权重为2 } ], "boost_mode": "sum" // 加权模式,求和 } }}function score query定义的三要素是什么?
- 过滤条件:哪些文档要加分
- 算分函数:如何计算function score
- 加权方式:function score 与 query score如何运算
布尔查询
布尔查询是一个或多个查询子句的组合,每一个子句就是一个子查询。子查询的组合方式有:
- must:必须匹配每个子查询,类似“与”
- should:选择性匹配子查询,类似“或”
- must_not:必须不匹配,不参与算分,类似“非”
- filter:必须匹配,不参与算分
需要注意的是,搜索时,参与打分的字段越多,查询的性能也越差。因此这种多条件查询时,建议这样做:
- 搜索框的关键字搜索,是全文检索查询,使用must查询,参与算分
- 其它过滤条件,采用filter查询。不参与算分
GET /hotel/_search{ "query": { "bool": { "must": [ {"term": {"city": "上海" }} ], "should": [ {"term": {"brand": "皇冠假日" }}, {"term": {"brand": "华美达" }} ], "must_not": [ { "range": { "price": { "lte": 500 } }} ], "filter": [ { "range": {"score": { "gte": 45 } }} ] } }}搜索结果处理
搜索的结果可以按照用户指定的方式去处理或展示。
排序
elasticsearch默认是根据相关度算分(_score)来排序,但是也支持自定义方式对搜索结果排序。可以排序字段类型有:keyword类型、数值类型、地理坐标类型、日期类型等。
-
普通字段排序
keyword、数值、日期类型排序的语法基本一致。
GET /indexName/_search{"query": {"match_all": {}},"sort": [{"FIELD": "desc" // 排序字段、排序方式ASC、DESC}]}排序条件是一个数组,也就是可以写多个排序条件。按照声明的顺序,当第一个条件相等时,再按照第二个条件排序,以此类推
-
理坐标排序
地理坐标排序略有不同。
GET /indexName/_search{"query": {"match_all": {}},"sort": [{"_geo_distance" : {"FIELD" : "纬度,经度", // 文档中geo_point类型的字段名、目标坐标点"order" : "asc", // 排序方式"unit" : "km" // 排序的距离单位}}]}这个查询的含义是:
- 指定一个坐标,作为目标点
- 计算每一个文档中,指定字段(必须是geo_point类型)的坐标 到目标点的距离是多少
- 根据距离排序
分页
elasticsearch 默认情况下只返回top10的数据。而如果要查询更多数据就需要修改分页参数了。elasticsearch中通过修改from、size参数来控制要返回的分页结果:
- from:从第几个文档开始
- size:总共查询几个文档
类似于mysql中的limit ?, ?
分页的基本语法如下:
GET /hotel/_search{ "query": { "match_all": {} }, "from": 0, // 分页开始的位置,默认为0 "size": 10, // 期望获取的文档总数 "sort": [ {"price": "asc"} ]}当查询分页深度较大时,汇总数据过多,对内存和CPU会产生非常大的压力,因此elasticsearch会禁止from+ size 超过10000的请求。
针对深度分页,ES提供了两种解决方案
- search after:分页时需要排序,原理是从上一次的排序值开始,查询下一页数据。官方推荐使用的方式。
- scroll:原理将排序后的文档id形成快照,保存在内存。官方已经不推荐使用。
分页查询的常见实现方案以及优缺点:
from + size:- 优点:支持随机翻页
- 缺点:深度分页问题,默认查询上限(from + size)是10000
- 场景:百度、京东、谷歌、淘宝这样的随机翻页搜索
after search:- 优点:没有查询上限(单次查询的size不超过10000)
- 缺点:只能向后逐页查询,不支持随机翻页
- 场景:没有随机翻页需求的搜索,例如手机向下滚动翻页
scroll:- 优点:没有查询上限(单次查询的size不超过10000)
- 缺点:会有额外内存消耗,并且搜索结果是非实时的
- 场景:海量数据的获取和迁移。从ES7.1开始不推荐,建议用 after search方案。
高亮
我们在百度,京东搜索时,关键字会变成红色,比较醒目,这叫高亮显示:
高亮显示的实现分为两步:
- 给文档中的所有关键字都添加一个标签,例如
<em>标签 - 页面给
<em>标签编写CSS样式
高亮的语法:
GET /hotel/_search{ "query": { "match": { "FIELD": "TEXT" // 查询条件,高亮一定要使用全文检索查询 } }, "highlight": { "fields": { // 指定要高亮的字段 "FIELD": { "pre_tags": "<em>", // 用来标记高亮字段的前置标签 "post_tags": "</em>" // 用来标记高亮字段的后置标签 } } }}注意:
- 高亮是对关键字高亮,因此搜索条件必须带有关键字,而不能是范围这样的查询。
- 默认情况下,高亮的字段,必须与搜索指定的字段一致,否则无法高亮
- 如果要对非搜索字段高亮,则需要添加一个属性:
required_field_match=false
RestClient查询文档
文档的查询同样适用之前学习的 RestHighLevelClient对象,基本步骤包括:
- 准备Request对象
- 准备请求参数
- 发起请求
- 解析响应
快速入门
@Testvoid testMatchAll() throws IOException { // 1.准备Request SearchRequest request = new SearchRequest("hotel"); // 2.准备DSL request.source() .query(QueryBuilders.matchAllQuery()); // 3.发送请求 SearchResponse response = client.search(request, RequestOptions.DEFAULT);
// 4.解析响应 handleResponse(response);}
private void handleResponse(SearchResponse response) { // 4.解析响应 SearchHits searchHits = response.getHits(); // 4.1.获取总条数 long total = searchHits.getTotalHits().value; System.out.println("共搜索到" + total + "条数据"); // 4.2.文档数组 SearchHit[] hits = searchHits.getHits(); // 4.3.遍历 for (SearchHit hit : hits) { // 获取文档source String json = hit.getSourceAsString(); // 反序列化 HotelDoc hotelDoc = JSON.parseObject(json, HotelDoc.class); System.out.println("hotelDoc = " + hotelDoc); }}- 第一步,创建
SearchRequest对象,指定索引库名 - 第二步,利用
request.source()构建DSL,DSL中可以包含查询、分页、排序、高亮等query():代表查询条件,利用QueryBuilders.matchAllQuery()构建一个match_all查询的DSL,QueryBuilders中包含match、term、function_score、bool等各种查询
- 第三步,利用client.search()发送请求,得到响应
elasticsearch返回的结果是一个JSON字符串,结构包含:
hits:命中的结果total:总条数,其中的value是具体的总条数值max_score:所有结果中得分最高的文档的相关性算分hits:搜索结果的文档数组,其中的每个文档都是一个json对象_source:文档中的原始数据,也是json对象
因此,我们解析响应结果,就是逐层解析JSON字符串,流程如下:
SearchHits:通过response.getHits()获取,就是JSON中的最外层的hits,代表命中的结果SearchHits#getTotalHits().value:获取总条数信息SearchHits#getHits():获取SearchHit数组,也就是文档数组SearchHit#getSourceAsString():获取文档结果中的_source,也就是原始的json文档数据
match查询
全文检索的match和multi_match查询与match_all的API基本一致。差别是查询条件,也就是query的部分。
因此,Java代码上的差异主要是request.source().query()中的参数了。同样是利用QueryBuilders提供的方法
@Testvoid testMatch() throws IOException { // 1.准备Request SearchRequest request = new SearchRequest("hotel"); // 2.准备DSL request.source() .query(QueryBuilders.matchQuery("all", "如家")); // 3.发送请求 SearchResponse response = client.search(request, RequestOptions.DEFAULT); // 4.解析响应 handleResponse(response);
}精确查询
精确查询主要是两者:
- term:词条精确匹配
- range:范围查询
与之前的查询相比,差异同样在查询条件,其它都一样。
//词条查询QueryBuilders.termQuery("city","杭州");
//范围查询QueryBuilders.rangeQuery("price").gte(100).lte(150);布尔查询
布尔查询是用must、must_not、filter等方式组合其它查询
可以看到,API与其它查询的差别同样是在查询条件的构建,QueryBuilders,结果解析等其他代码完全不变。
@Testvoid testBool() throws IOException { // 1.准备Request SearchRequest request = new SearchRequest("hotel"); // 2.准备DSL // 2.1.准备BooleanQuery BoolQueryBuilder boolQuery = QueryBuilders.boolQuery(); // 2.2.添加term boolQuery.must(QueryBuilders.termQuery("city", "杭州")); // 2.3.添加range boolQuery.filter(QueryBuilders.rangeQuery("price").lte(250));
request.source().query(boolQuery); // 3.发送请求 SearchResponse response = client.search(request, RequestOptions.DEFAULT); // 4.解析响应 handleResponse(response);}排序、分页
搜索结果的排序和分页是与query同级的参数,因此同样是使用request.source()来设置。
@Testvoid testPageAndSort() throws IOException { // 页码,每页大小 int page = 1, size = 5;
// 1.准备Request SearchRequest request = new SearchRequest("hotel"); // 2.准备DSL // 2.1.query request.source().query(QueryBuilders.matchAllQuery()); // 2.2.排序 sort request.source().sort("price", SortOrder.ASC); // 2.3.分页 from、size request.source().from((page - 1) * size).size(5); // 3.发送请求 SearchResponse response = client.search(request, RequestOptions.DEFAULT); // 4.解析响应 handleResponse(response);
}高亮
高亮的代码与之前代码差异较大,有两点:
- 查询的DSL:其中除了查询条件,还需要添加高亮条件,同样是与query同级。
- 结果解析:结果除了要解析_source文档数据,还要解析高亮结果
- 第一步:从结果中获取source。hit.getSourceAsString(),这部分是非高亮结果,json字符串。还需要反序列为HotelDoc对象
- 第二步:获取高亮结果。hit.getHighlightFields(),返回值是一个Map,key是高亮字段名称,值是HighlightField对象,代表高亮值
- 第三步:从map中根据高亮字段名称,获取高亮字段值对象HighlightField
- 第四步:从HighlightField中获取Fragments,并且转为字符串。这部分就是真正的高亮字符串了
- 第五步:用高亮的结果替换HotelDoc中的非高亮结果
@Testvoid testHighlight() throws IOException { // 1.准备Request SearchRequest request = new SearchRequest("hotel"); // 2.准备DSL // 2.1.query request.source().query(QueryBuilders.matchQuery("all", "如家")); // 2.2.高亮 request.source().highlighter(new HighlightBuilder().field("name").requireFieldMatch(false)); // 3.发送请求 SearchResponse response = client.search(request, RequestOptions.DEFAULT); // 4.解析响应 handleResponse(response);}
private void handleResponse(SearchResponse response) { // 4.解析响应 SearchHits searchHits = response.getHits(); // 4.1.获取总条数 long total = searchHits.getTotalHits().value; System.out.println("共搜索到" + total + "条数据"); // 4.2.文档数组 SearchHit[] hits = searchHits.getHits(); // 4.3.遍历 for (SearchHit hit : hits) { // 获取文档source String json = hit.getSourceAsString(); // 反序列化 HotelDoc hotelDoc = JSON.parseObject(json, HotelDoc.class); // 获取高亮结果 Map<String, HighlightField> highlightFields = hit.getHighlightFields(); if (!CollectionUtils.isEmpty(highlightFields)) { // 根据字段名获取高亮结果 HighlightField highlightField = highlightFields.get("name"); if (highlightField != null) { // 获取高亮值 String name = highlightField.getFragments()[0].string(); // 覆盖非高亮结果 hotelDoc.setName(name); } } System.out.println("hotelDoc = " + hotelDoc); }}黑马旅游案例
下面,我们通过黑马旅游的案例来实战演练下之前学习的知识。
我们实现四部分功能:
- 酒店搜索和分页
- 酒店结果过滤
- 我周边的酒店
- 酒店竞价排名
酒店搜索和分页
案例需求:实现黑马旅游的酒店搜索功能,完成关键字搜索和分页
定义实体类
实体类有两个,一个是前端的请求参数实体,一个是服务端应该返回的响应结果实体。
// 请求package cn.itcast.hotel.pojo;import lombok.Data;
@Datapublic class RequestParams { private String key; private Integer page; private Integer size; private String sortBy;}
// 返回import lombok.Data;import java.util.List;
@Datapublic class PageResult { private Long total; private List<HotelDoc> hotels;
public PageResult() { }
public PageResult(Long total, List<HotelDoc> hotels) { this.total = total; this.hotels = hotels; }}定义controller
定义一个HotelController,声明查询接口,满足下列要求:
- 请求方式:Post
- 请求路径:/hotel/list
- 请求参数:对象,类型为RequestParam
- 返回值:PageResult,包含两个属性
Long total:总条数List<HotelDoc> hotels:酒店数据
@RestController@RequestMapping("/hotel")public class HotelController {
@Autowired private IHotelService hotelService; // 搜索酒店数据 @PostMapping("/list") public PageResult search(@RequestBody RequestParams params){ return hotelService.search(params); }}实现搜索业务
我们在controller调用了IHotelService,并没有实现该方法,因此下面我们就在IHotelService中定义方法,并且去实现业务逻辑。
实现搜索业务,肯定离不开RestHighLevelClient,我们需要把它注册到Spring中作为一个Bean。在cn.itcast.hotel中的HotelDemoApplication中声明这个Bean:
@Beanpublic RestHighLevelClient client(){ return new RestHighLevelClient(RestClient.builder( HttpHost.create("<http://127.0.0.1:9200>") ));}
// Service@Overridepublic PageResult search(RequestParams params) { try { // 1.准备Request SearchRequest request = new SearchRequest("hotel"); // 2.准备DSL // 2.1.query String key = params.getKey(); if (key == null || "".equals(key)) { boolQuery.must(QueryBuilders.matchAllQuery()); } else { boolQuery.must(QueryBuilders.matchQuery("all", key)); }
// 2.2.分页 int page = params.getPage(); int size = params.getSize(); request.source().from((page - 1) * size).size(size);
// 3.发送请求 SearchResponse response = client.search(request, RequestOptions.DEFAULT); // 4.解析响应 return handleResponse(response); } catch (IOException e) { throw new RuntimeException(e); }}
// 结果解析private PageResult handleResponse(SearchResponse response) { // 4.解析响应 SearchHits searchHits = response.getHits(); // 4.1.获取总条数 long total = searchHits.getTotalHits().value; // 4.2.文档数组 SearchHit[] hits = searchHits.getHits(); // 4.3.遍历 List<HotelDoc> hotels = new ArrayList<>(); for (SearchHit hit : hits) { // 获取文档source String json = hit.getSourceAsString(); // 反序列化 HotelDoc hotelDoc = JSON.parseObject(json, HotelDoc.class); // 放入集合 hotels.add(hotelDoc); } // 4.4.封装返回 return new PageResult(total, hotels);}酒店结果过滤
需求:添加品牌、城市、星级、价格等过滤功能
在HotelService的search方法中,只有一个地方需要修改:requet.source().query( … )其中的查询条件。
在之前的业务中,只有match查询,根据关键字搜索,现在要添加条件过滤,包括:
- 品牌过滤:是keyword类型,用term查询
- 星级过滤:是keyword类型,用term查询
- 价格过滤:是数值类型,用range查询
- 城市过滤:是keyword类型,用term查询
多个查询条件组合,肯定是boolean查询来组合:
- 关键字搜索放到must中,参与算分
- 其它过滤条件放到filter中,不参与算分
private void buildBasicQuery(RequestParams params, SearchRequest request) { // 1.构建BooleanQuery BoolQueryBuilder boolQuery = QueryBuilders.boolQuery(); // 2.关键字搜索 String key = params.getKey(); if (key == null || "".equals(key)) { boolQuery.must(QueryBuilders.matchAllQuery()); } else { boolQuery.must(QueryBuilders.matchQuery("all", key)); } // 3.城市条件 if (params.getCity() != null && !params.getCity().equals("")) { boolQuery.filter(QueryBuilders.termQuery("city", params.getCity())); } // 4.品牌条件 if (params.getBrand() != null && !params.getBrand().equals("")) { boolQuery.filter(QueryBuilders.termQuery("brand", params.getBrand())); } // 5.星级条件 if (params.getStarName() != null && !params.getStarName().equals("")) { boolQuery.filter(QueryBuilders.termQuery("starName", params.getStarName())); } // 6.价格 if (params.getMinPrice() != null && params.getMaxPrice() != null) { boolQuery.filter(QueryBuilders .rangeQuery("price") .gte(params.getMinPrice()) .lte(params.getMaxPrice()) ); } // 7.放入source request.source().query(boolQuery);}我周边的酒店
基于location坐标,按照距离对周围酒店排序。实现思路如下:
- 修改RequestParams参数,接收location字段
- 修改search方法业务逻辑,如果location有值,添加根据geo_distance排序的功能
GET /indexName/_search{ "query": { "match_all": {} }, "sort": [ { "price": "asc" }, { "_geo_distance" : { "FIELD" : "纬度,经度", "order" : "asc", "unit" : "km" } } ]}在search方法中,添加一个排序功能:
// 2.3.排序String location = params.getLocation();if (location != null && !location.equals("")) { request.source().sort(SortBuilders .geoDistanceSort("location", new GeoPoint(location)) .order(SortOrder.ASC) .unit(DistanceUnit.KILOMETERS) );}酒店竞价排名
需求:让指定的酒店在搜索结果中排名置顶,页面会给指定的酒店添加广告标记。
function_score查询可以影响算分,算分高了,自然排名也就高了。而function_score包含3个要素:
- 过滤条件:哪些文档要加分
- 算分函数:如何计算function score
- 加权方式:function score 与 query score如何运算
这里的需求是:让指定酒店排名靠前。因此我们需要给这些酒店添加一个标记,这样在过滤条件中就可以根据这个标记来判断,是否要提高算分。
我们可以将之前写的boolean查询作为原始查询条件放到query中,接下来就是添加过滤条件、算分函数、加权模式了。
// 2.算分控制FunctionScoreQueryBuilder functionScoreQuery = QueryBuilders.functionScoreQuery( // 原始查询,相关性算分的查询 boolQuery, // function score的数组 new FunctionScoreQueryBuilder.FilterFunctionBuilder[]{ // 其中的一个function score 元素 new FunctionScoreQueryBuilder.FilterFunctionBuilder( // 过滤条件 QueryBuilders.termQuery("isAD", true), // 算分函数 ScoreFunctionBuilders.weightFactorFunction(10) ) });request.source().query(functionScoreQuery);数据聚合
- 聚合(aggregations)可以让我们极其方便的实现对数据的统计、分析、运算。例如:
- 什么品牌的手机最受欢迎?
- 这些手机的平均价格、最高价格、最低价格?
- 这些手机每月的销售情况如何?
实现这些统计功能的比数据库的sql要方便的多,而且查询速度非常快,可以实现近实时搜索效果。
聚合的种类
聚合常见的有三类:
- **桶(Bucket)**聚合:用来对文档做分组
- TermAggregation:按照文档字段值分组,例如按照品牌值分组、按照国家分组
- Date Histogram:按照日期阶梯分组,例如一周为一组,或者一月为一组
- **度量(Metric)**聚合:用以计算一些值,比如:最大值、最小值、平均值等
- Avg:求平均值
- Max:求最大值
- Min:求最小值
- Stats:同时求max、min、avg、sum等
- **管道(pipeline)**聚合:其它聚合的结果为基础做聚合
**注意:**参加聚合的字段必须是keyword、日期、数值、布尔类型
DSL实现聚合
现在,我们要统计所有数据中的酒店品牌有几种,其实就是按照品牌对数据分组。此时可以根据酒店品牌的名称做聚合,也就是Bucket聚合。
Bucket聚合语法
语法如下:
GET /hotel/_search{ "size": 0, // 设置size为0,结果中不包含文档,只包含聚合结果 "aggs": { // 定义聚合 "brandAgg": { //给聚合起个名字 "terms": { // 聚合的类型,按照品牌值聚合,所以选择term "field": "brand", // 参与聚合的字段 "size": 20 // 希望获取的聚合结果数量 } } }}聚合结果排序
默认情况下,Bucket聚合会统计Bucket内的文档数量,记为_count,并且按照_count降序排序。
我们可以指定order属性,自定义聚合的排序方式:
GET /hotel/_search{ "size": 0, "aggs": { "brandAgg": { "terms": { "field": "brand", "order": { "_count": "asc" // 按照_count升序排列 }, "size": 20 } } }}限定聚合范围
默认情况下,Bucket聚合是对索引库的所有文档做聚合,但真实场景下,用户会输入搜索条件,因此聚合必须是对搜索结果聚合。那么聚合必须添加限定条件。
我们可以限定要聚合的文档范围,只要添加query条件即可:
GET /hotel/_search{ "query": { "range": { "price": { "lte": 200 // 只对200元以下的文档聚合 } } }, "size": 0, "aggs": { "brandAgg": { "terms": { "field": "brand", "size": 20 } } }}Metric聚合语法
现在我们需要对桶内的酒店做运算,获取每个品牌的用户评分的min、max、avg等值。
这就要用到Metric聚合了,例如stat聚合:就可以获取min、max、avg等结果。
语法如下:
GET /hotel/_search{ "size": 0, "aggs": { "brandAgg": { "terms": { "field": "brand", "size": 20 }, "aggs": { // 是brands聚合的子聚合,也就是分组后对每组分别计算 "score_stats": { // 聚合名称 "stats": { // 聚合类型,这里stats可以计算min、max、avg等 "field": "score" // 聚合字段,这里是score } } } } }}这次的score_stats聚合是在brandAgg的聚合内部嵌套的子聚合。因为我们需要在每个桶分别计算。
aggs代表聚合,与query同级,此时query的作用是?
- 限定聚合的的文档范围
聚合必须的三要素:
- 聚合名称
- 聚合类型
- 聚合字段
聚合可配置属性有:
- size:指定聚合结果数量
- order:指定聚合结果排序方式
- field:指定聚合字段
RestAPI实现聚合
聚合条件与query条件同级别,因此需要使用request.source()来指定聚合条件。
使用聚合功能,利用Bucket聚合,对搜索结果中的文档基于品牌分组、基于城市分组,就能得知包含哪些品牌、哪些城市了。
因为是对搜索结果聚合,因此聚合是限定范围的聚合,也就是说聚合的限定条件跟搜索文档的条件一致。
@Overridepublic Map<String, List<String>> filters(RequestParams params) { try { // 1.准备Request SearchRequest request = new SearchRequest("hotel"); // 2.准备DSL // 2.1.query buildBasicQuery(params, request); // 2.2.设置size request.source().size(0); // 2.3.聚合 buildAggregation(request); // 3.发出请求 SearchResponse response = client.search(request, RequestOptions.DEFAULT); // 4.解析结果 Map<String, List<String>> result = new HashMap<>(); Aggregations aggregations = response.getAggregations(); // 4.1.根据品牌名称,获取品牌结果 List<String> brandList = getAggByName(aggregations, "brandAgg"); result.put("品牌", brandList); // 4.2.根据品牌名称,获取品牌结果 List<String> cityList = getAggByName(aggregations, "cityAgg"); result.put("城市", cityList); // 4.3.根据品牌名称,获取品牌结果 List<String> starList = getAggByName(aggregations, "starAgg"); result.put("星级", starList);
return result; } catch (IOException e) { throw new RuntimeException(e); }}
private void buildAggregation(SearchRequest request) { request.source().aggregation(AggregationBuilders .terms("brandAgg") .field("brand") .size(100) ); request.source().aggregation(AggregationBuilders .terms("cityAgg") .field("city") .size(100) ); request.source().aggregation(AggregationBuilders .terms("starAgg") .field("starName") .size(100) );}
private List<String> getAggByName(Aggregations aggregations, String aggName) { // 4.1.根据聚合名称获取聚合结果 Terms brandTerms = aggregations.get(aggName); // 4.2.获取buckets List<? extends Terms.Bucket> buckets = brandTerms.getBuckets(); // 4.3.遍历 List<String> brandList = new ArrayList<>(); for (Terms.Bucket bucket : buckets) { // 4.4.获取key String key = bucket.getKeyAsString(); brandList.add(key); } return brandList;}自动补全
当用户在搜索框输入字符时,我们应该提示出与该字符有关的搜索项,这种根据用户输入的字母,提示完整词条的功能,就是自动补全了。
拼音分词器
要实现根据字母做补全,就必须对文档按照拼音分词。在GitHub上恰好有elasticsearch的拼音分词插件
与安装IK分词器步骤相同
docker exec -it es bash
./bin/elasticsearch-plugin install <https://github.com/medcl/elasticsearch-analysis-pinyin/releases/download/v7.12.1/elasticsearch-analysis-pinyin-7.12.1.zip>
exit#重启容器docker restart elasticsearch自定义分词器
默认的拼音分词器会将每个汉字单独分为拼音,而我们希望的是每个词条形成一组拼音,需要对拼音分词器做个性化定制,形成自定义分词器。
elasticsearch中分词器(analyzer)的组成包含三部分:
- character filters:在tokenizer之前对文本进行处理。例如删除字符、替换字符
- tokenizer:将文本按照一定的规则切割成词条(term)。例如keyword,就是不分词;还有ik_smart
- tokenizer filter:将tokenizer输出的词条做进一步处理。例如大小写转换、同义词处理、拼音处理等
文档分词时会依次由这三部分来处理文档:
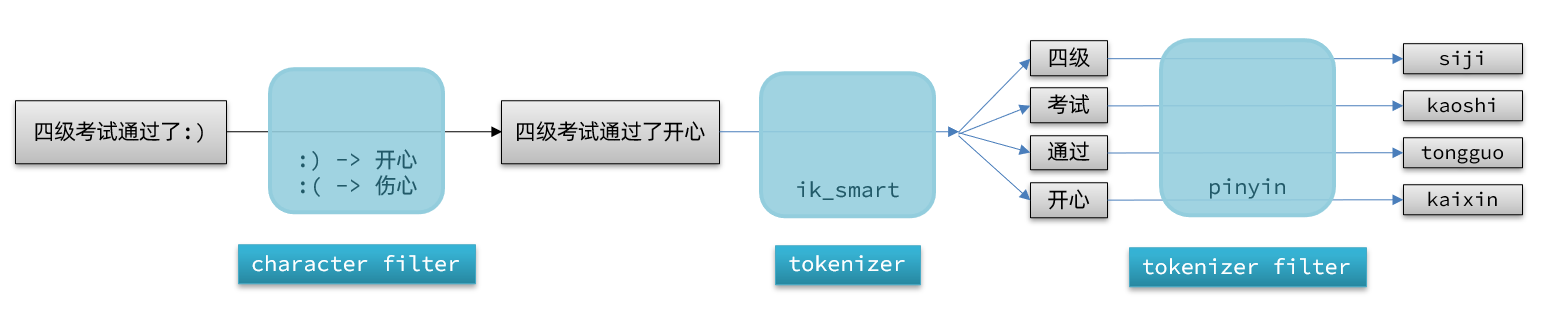
PUT /test{ "settings": { "analysis": { "analyzer": { // 自定义分词器 "my_analyzer": { // 分词器名称 "tokenizer": "ik_max_word", "filter": "py" } }, "filter": { // 自定义tokenizer filter "py": { // 过滤器名称 "type": "pinyin", // 过滤器类型,这里是pinyin "keep_full_pinyin": false, "keep_joined_full_pinyin": true, "keep_original": true, "limit_first_letter_length": 16, "remove_duplicated_term": true, "none_chinese_pinyin_tokenize": false } } } }, "mappings": { "properties": { "name": { "type": "text", "analyzer": "my_analyzer", "search_analyzer": "ik_smart" } } }}自动补全查询
elasticsearch提供了Completion Suggester查询来实现自动补全功能。这个查询会匹配以用户输入内容开头的词条并返回。为了提高补全查询的效率,对于文档中字段的类型有一些约束:
- 参与补全查询的字段必须是completion类型。
- 字段的内容一般是用来补全的多个词条形成的数组。
实现自动补全:
@Overridepublic List<String> getSuggestions(String prefix) { try { // 1.准备Request SearchRequest request = new SearchRequest("hotel"); // 2.准备DSL request.source().suggest(new SuggestBuilder().addSuggestion( "suggestions", SuggestBuilders.completionSuggestion("suggestion") .prefix(prefix) .skipDuplicates(true) .size(10) )); // 3.发起请求 SearchResponse response = client.search(request, RequestOptions.DEFAULT); // 4.解析结果 Suggest suggest = response.getSuggest(); // 4.1.根据补全查询名称,获取补全结果 CompletionSuggestion suggestions = suggest.getSuggestion("suggestions"); // 4.2.获取options List<CompletionSuggestion.Entry.Option> options = suggestions.getOptions(); // 4.3.遍历 List<String> list = new ArrayList<>(options.size()); for (CompletionSuggestion.Entry.Option option : options) { String text = option.getText().toString(); list.add(text); } return list; } catch (IOException e) { throw new RuntimeException(e); }}数据同步
elasticsearch中的酒店数据来自于mysql数据库,因此mysql数据发生改变时,elasticsearch也必须跟着改变,这个就是elasticsearch与mysql之间的数据同步。
常见的数据同步方案有三种:
- 同步调用
- hotel-demo对外提供接口,用来修改elasticsearch中的数据
- 酒店管理服务在完成数据库操作后,直接调用hotel-demo提供的接口
- 异步通知
- hotel-admin对mysql数据库数据完成增、删、改后,发送MQ消息
- hotel-demo监听MQ,接收到消息后完成elasticsearch数据修改
- 监听binlog
- 给mysql开启binlog功能
- mysql完成增、删、改操作都会记录在binlog中
- hotel-demo基于canal监听binlog变化,实时更新elasticsearch中的内容
方式一:同步调用
- 优点:实现简单,粗暴
- 缺点:业务耦合度高
方式二:异步通知
- 优点:低耦合,实现难度一般
- 缺点:依赖mq的可靠性
方式三:监听binlog
- 优点:完全解除服务间耦合
- 缺点:开启binlog增加数据库负担、实现复杂度高
实现数据同步
利用课前资料提供的hotel-admin项目作为酒店管理的微服务。当酒店数据发生增、删、改时,要求对elasticsearch中数据也要完成相同操作。
- 启动并测试酒店数据的CRUD
- 声明exchange、queue、RoutingKey
- 在hotel-admin中的增、删、改业务中完成消息发送
- 在hotel-demo中完成消息监听,并更新elasticsearch中数据
- 启动并测试数据同步功能
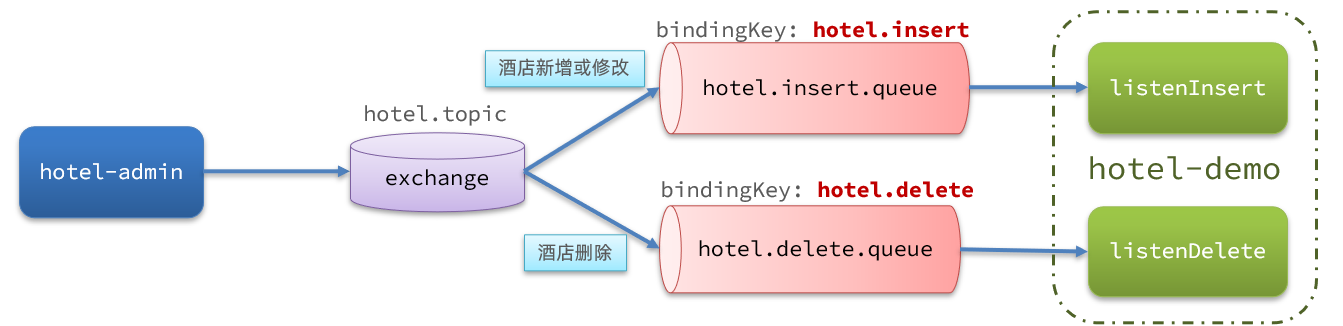
声明交换机、队列
MQ结构如图:
引入依赖
<!--amqp--><dependency> <groupId>org.springframework.boot</groupId> <artifactId>spring-boot-starter-amqp</artifactId></dependency>定义配置类,进行声明
import cn.itcast.hotel.constants.MqConstants;import org.springframework.amqp.core.Binding;import org.springframework.amqp.core.BindingBuilder;import org.springframework.amqp.core.Queue;import org.springframework.amqp.core.TopicExchange;import org.springframework.context.annotation.Bean;import org.springframework.context.annotation.Configuration;
@Configurationpublic class MqConfig { @Bean public TopicExchange topicExchange(){ return new TopicExchange(MqConstants.HOTEL_EXCHANGE, true, false); }
@Bean public Queue insertQueue(){ return new Queue(MqConstants.HOTEL_INSERT_QUEUE, true); }
@Bean public Queue deleteQueue(){ return new Queue(MqConstants.HOTEL_DELETE_QUEUE, true); }
@Bean public Binding insertQueueBinding(){ return BindingBuilder.bind(insertQueue()).to(topicExchange()).with(MqConstants.HOTEL_INSERT_KEY); }
@Bean public Binding deleteQueueBinding(){ return BindingBuilder.bind(deleteQueue()).to(topicExchange()).with(MqConstants.HOTEL_DELETE_KEY); }}在hotel-admin中的增、删、改业务中分别发送MQ消息:
发送MQ信息
@PostMappingpublic void saveHotel(@RequestBody Hotel hotel){ hotelService.save(hotel);
rabbitTemplate.convertAndSend(MqConstants.HOTEL_EXCHANGE,HOTEL_INSERT_KEY,hotel.getId());}
@PutMapping()public void updateById(@RequestBody Hotel hotel){ if (hotel.getId() == null) { throw new InvalidParameterException("id不能为空"); } hotelService.updateById(hotel);
rabbitTemplate.convertAndSend(MqConstants.HOTEL_EXCHANGE,HOTEL_INSERT_KEY,hotel.getId());}
@DeleteMapping("/{id}")public void deleteById(@PathVariable("id") Long id) { hotelService.removeById(id);
rabbitTemplate.convertAndSend(MqConstants.HOTEL_EXCHANGE,MqConstants.HOTEL_DELETE_KEY, id);}接收MQ信息
编写监听器
在hotel-demo中的cn.itcast.hotel.mq包新增一个类:
@Componentpublic class HotelListener {
@Autowired private IHotelService hotelService;
/** * 监听酒店新增或修改的业务 * @param id 酒店id */ @RabbitListener(queues = MqConstants.HOTEL_INSERT_QUEUE) public void listenHotelInsertOrUpdate(Long id){ hotelService.insertById(id); }
/** * 监听酒店删除的业务 * @param id 酒店id */ @RabbitListener(queues = MqConstants.HOTEL_DELETE_QUEUE) public void listenHotelDelete(Long id){ hotelService.deleteById(id); }}实现业务:
@Overridepublic void deleteById(Long id) { try { // 1.准备Request DeleteRequest request = new DeleteRequest("hotel", id.toString()); // 2.发送请求 client.delete(request, RequestOptions.DEFAULT); } catch (IOException e) { throw new RuntimeException(e); }}
@Overridepublic void insertById(Long id) { try { // 0.根据id查询酒店数据 Hotel hotel = getById(id); // 转换为文档类型 HotelDoc hotelDoc = new HotelDoc(hotel);
// 1.准备Request对象 IndexRequest request = new IndexRequest("hotel").id(hotel.getId().toString()); // 2.准备Json文档 request.source(JSON.toJSONString(hotelDoc), XContentType.JSON); // 3.发送请求 client.index(request, RequestOptions.DEFAULT); } catch (IOException e) { throw new RuntimeException(e); }}集群
单机的elasticsearch做数据存储,必然面临两个问题:海量数据存储问题、单点故障问题。
- 海量数据存储问题:将索引库从逻辑上拆分为N个分片(shard),存储到多个节点
- 单点故障问题:将分片数据在不同节点备份(replica )
ES集群相关概念:
-
集群(cluster):一组拥有共同的 cluster name 的 节点。
-
节点(node) :集群中的一个 Elasticearch 实例
-
分片(shard):索引可以被拆分为不同的部分进行存储,称为分片。在集群环境下,一个索引的不同分片可以拆分到不同的节点中
解决问题:数据量太大,单点存储量有限的问题。
-
主分片(Primary shard):相对于副本分片的定义。
-
副本分片(Replica shard)每个主分片可以有一个或者多个副本,数据和主分片一样。
数据备份可以保证高可用,但是每个分片备份一份,所需要的节点数量就会翻一倍,成本太高
为了在高可用和成本间寻求平衡,我们可以这样做:
- 首先对数据分片,存储到不同节点
- 然后对每个分片进行备份,放到对方节点,完成互相备份
这样可以大大减少所需要的服务节点数量
创建es集群
通过docker-compose创建:
version: '2.2'services: es01: image: elasticsearch:7.12.1 container_name: es01 environment: - node.name=es01 - cluster.name=es-docker-cluster - discovery.seed_hosts=es02,es03 - cluster.initial_master_nodes=es01,es02,es03 - "ES_JAVA_OPTS=-Xms512m -Xmx512m" volumes: - data01:/usr/share/elasticsearch/data ports: - 9200:9200 networks: - elastic es02: image: elasticsearch:7.12.1 container_name: es02 environment: - node.name=es02 - cluster.name=es-docker-cluster - discovery.seed_hosts=es01,es03 - cluster.initial_master_nodes=es01,es02,es03 - "ES_JAVA_OPTS=-Xms512m -Xmx512m" volumes: - data02:/usr/share/elasticsearch/data ports: - 9201:9200 networks: - elastic es03: image: elasticsearch:7.12.1 container_name: es03 environment: - node.name=es03 - cluster.name=es-docker-cluster - discovery.seed_hosts=es01,es02 - cluster.initial_master_nodes=es01,es02,es03 - "ES_JAVA_OPTS=-Xms512m -Xmx512m" volumes: - data03:/usr/share/elasticsearch/data networks: - elastic ports: - 9202:9200volumes: data01: driver: local data02: driver: local data03: driver: local
networks: elastic: driver: bridge如果通过wsl来安装导致打不开的话,可以运行以下命令来提高内存(最低需要4g)
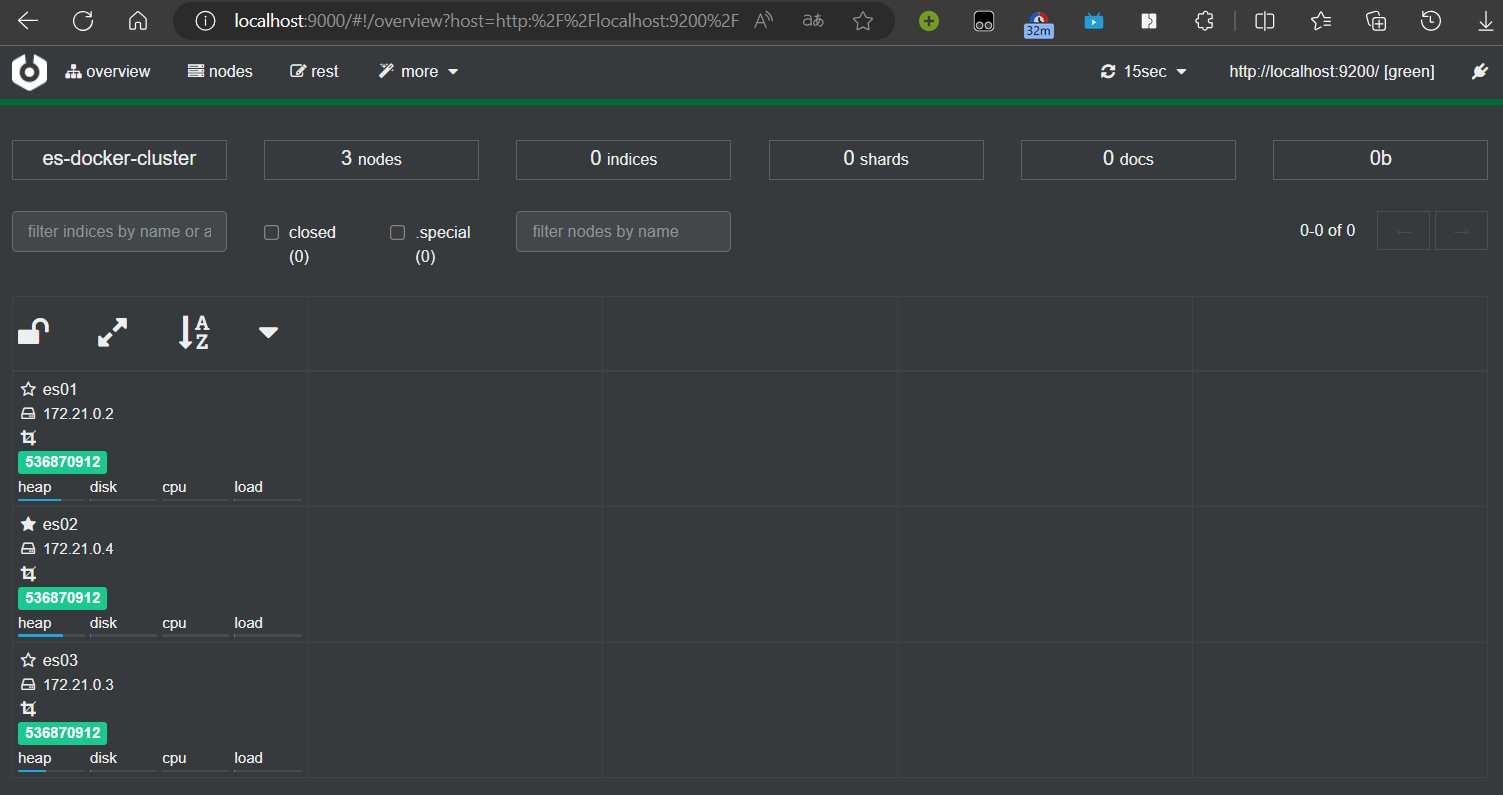
wsl -d docker-desktopecho 262144 >> /proc/sys/vm/max_map_count通过cerebro来监控es集群
集群脑裂问题
集群职责划分
elasticsearch中集群节点有不同的职责划分:
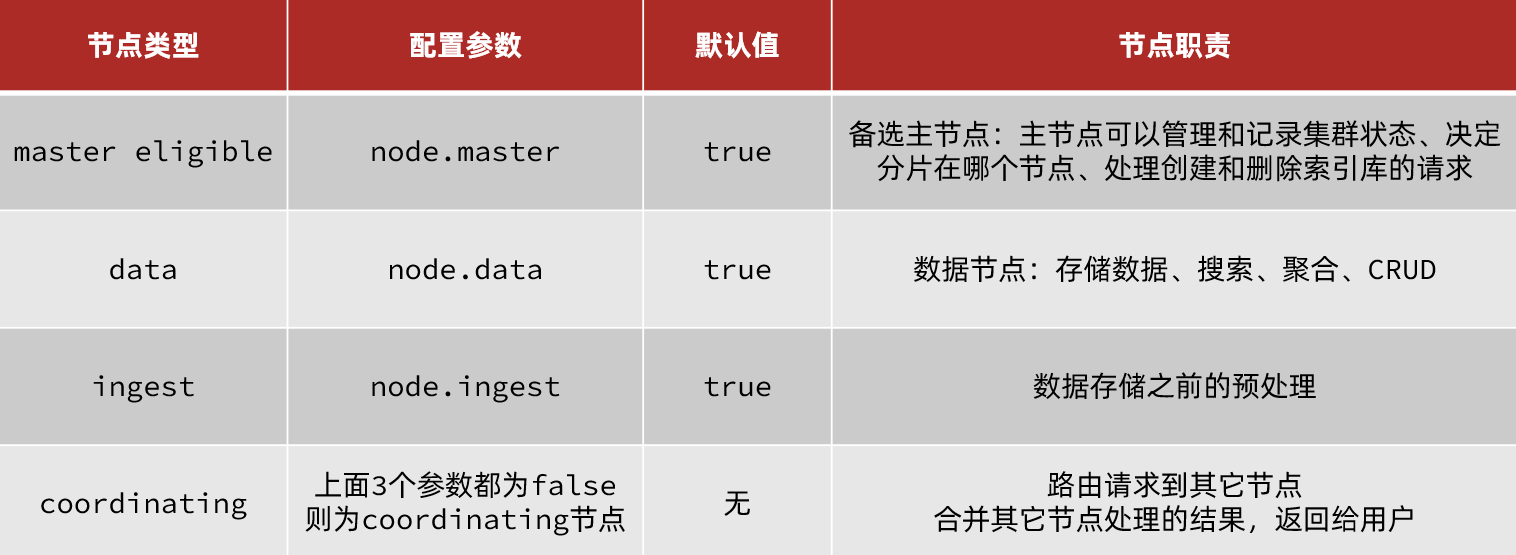
默认情况下,集群中的任何一个节点都同时具备上述四种角色。
但是真实的集群一定要将集群职责分离:
- master节点:对CPU要求高,但是内存要求第
- data节点:对CPU和内存要求都高
- coordinating节点:对网络带宽、CPU要求高
职责分离可以让我们根据不同节点的需求分配不同的硬件去部署。而且避免业务之间的互相干扰。
脑裂问题
脑裂是因为集群中的节点失联导致的。
当网络恢复后,因为集群中有两个master节点,集群状态的不一致,出现脑裂的情况:
解决脑裂的方案是,要求选票超过 ( eligible节点数量 + 1 )/ 2 才能当选为主,因此eligible节点数量最好是奇数。对应配置项是discovery.zen.minimum_master_nodes,在es7.0以后,已经成为默认配置,因此一般不会发生脑裂问题
master eligible节点的作用是什么?
- 参与集群选主
- 主节点可以管理集群状态、管理分片信息、处理创建和删除索引库的请求
data节点的作用是什么?
- 数据的CRUD
coordinator节点的作用是什么?
- 路由请求到其它节点
- 合并查询到的结果,返回给用户
集群分布式存储
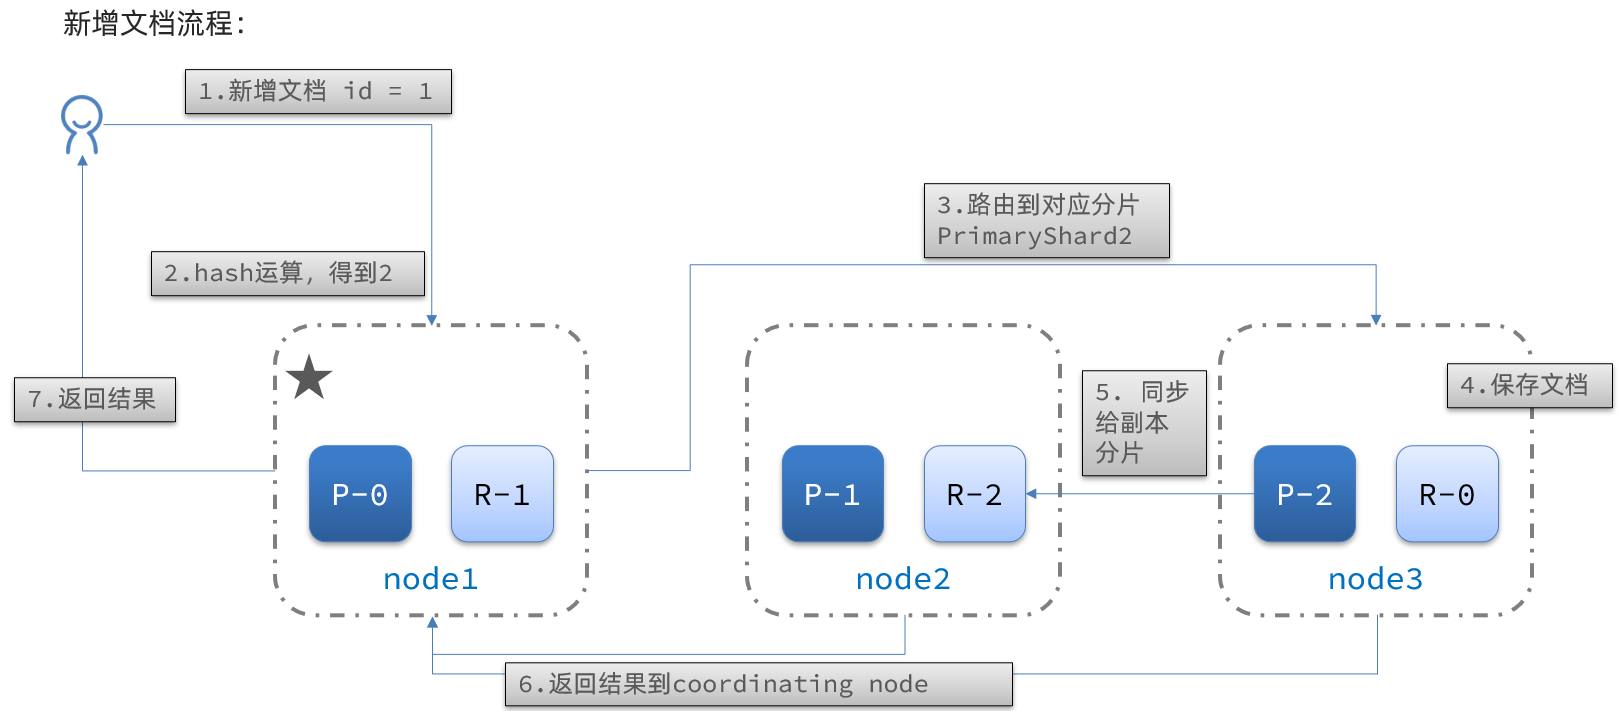
当新增文档时,应该保存到不同分片,保证数据均衡,那么coordinating node如何确定数据该存储到哪个分片呢?
分片存储原理
elasticsearch会通过hash算法来计算文档应该存储到哪个分片:
shard = hash(_routing) % number_of_shards
说明:
- _routing默认是文档的id
- 算法与分片数量有关,因此索引库一旦创建,分片数量不能修改
集群分布式查询
elasticsearch的查询分成两个阶段:
- scatter phase:分散阶段,coordinating node会把请求分发到每一个分片
- gather phase:聚集阶段,coordinating node汇总data node的搜索结果,并处理为最终结果集返回给用户
集群故障转移
集群的master节点会监控集群中的节点状态,如果发现有节点宕机,会立即将宕机节点的分片数据迁移到其它节点,确保数据安全,这个叫做故障转移。
- node1是主节点,其它两个节点是从节点
- node1发生了故障,重新选主,例如选中了node2
- node2检测集群监控状态,发现:shard-1、shard-0没有副本节点
- 将node1上的数据迁移到node2、node3
Getting Started with Elasticsearch
Understanding ES
The role of Elasticsearch
Elasticsearch is a very powerful open-source search engine with many capabilities, which can help us quickly find the content we need from vast amounts of data.
For example:
- Search code on GitHub
- Search products on e-commerce sites
- Search for answers on Baidu
- Search for nearby taxis in ride-hailing apps
ELK Stack
Elasticsearch, together with Kibana, Logstash, and Beats, is the Elastic Stack (ELK). It is widely used in log data analysis, real-time monitoring, and related fields.
And Elasticsearch is the core of the Elastic Stack, responsible for storing, searching, and analyzing data.
Elasticsearch and Lucene
The underlying implementation of Elasticsearch is based on Lucene.
Lucene is a Java-based search engine library, a top-level project of the Apache Software Foundation, developed by Doug Cutting in 1999.
Elasticsearch history:
- In 2004, Shay Banon developed Compass based on Lucene
- In 2010, Shay Banon rewrote Compass and named it Elasticsearch.
What is Elasticsearch?
- An open-source distributed search engine that can be used to implement search, log statistics, analytics, system monitoring, and more
What is the Elastic Stack (ELK)?
- A technology stack centered on Elasticsearch, including Beats, Logstash, Kibana, and Elasticsearch
What is Lucene?
- An Apache open-source search engine library that provides the core APIs for search
Inverted Index
The concept of an inverted index is based on forward indexing, like what is used in MySQL.
Forward Index
If you create an index on the id in a table, queries based on id will go through the index, and the lookup is very fast.
But if you want to perform fuzzy searches on the title, you can only scan row by row, with the following process:
- The user searches data with the condition that the title matches “%phone%”
- Retrieve data row by row, for example data with id = 1
- Check whether the title in the data matches the user’s search condition
- If it matches, add it to the result set; otherwise discard. Go back to step 1
Row-by-row scanning, i.e., full table scan, becomes slower as data volume grows. When data volume reaches millions, it becomes a disaster.
Inverted Index
There are two very important concepts in inverted indexes:
- Document: the data used for searching; each item is a document. For example, a webpage, a product description
- Term: a meaningful word produced by tokenizing the document data or the user search data using some algorithm
Creating an inverted index is a special treatment of forward indexing. The process is:
- Tokenize each document’s data using an algorithm to obtain terms
- Create a table where each row includes a term, the document id where the term resides, position, etc.
- Because terms are unique, you can create an index on terms, such as a hash-table index
The search process for an inverted index (using the query for “Xiaomi phone” as an example):
-
The user enters the query “Xiaomi phone” to search.
-
Tokenize the user input to obtain terms: Xiaomi, phone.
-
Look up the terms in the inverted index to obtain document ids that contain the terms: 1, 2, 3.
-
Use the document ids to look up the actual documents in the forward index.
Although you first query the inverted index, then the forward index, both the terms and the document ids have indexes, so the query is very fast—no full table scans.
Forward vs Inverted
So why is one called forward index and the other inverted index?
-
Forward index is the traditional approach, indexed by id. But when querying by terms, you must first retrieve each document one by one, then check whether the document contains the needed terms. This is a process of finding terms from documents.
-
Inverted index is the opposite: first find the terms the user wants to search for, obtain the document ids containing those terms, then retrieve the documents by id. This is a process of finding documents from terms.
Forward index:
- Advantages:
- You can create indexes on multiple fields
- Search and sort by indexed fields are very fast
- Disadvantages:
- For non-indexed fields, or when querying by a subset of terms in an indexed field, you may need a full table scan
Inverted index:
- Advantages:
- Very fast for term-based and fuzzy searches
- Disadvantages:
- You can only index terms, not fields
- Cannot sort by fields
Some concepts in ES
Elasticsearch has many unique concepts, somewhat different from MySQL, but with similarities.
Documents and Fields
Elasticsearch stores data as documents. A document can be a database row of product data or an order record. Document data is serialized to JSON when stored in Elasticsearch.
JSON documents typically contain many fields, similar to columns in a database.
Index and Mapping
Index is the collection of documents of the same type.
For example:
- All user documents can be organized together as the user index
- All product documents can be organized together as the product index
- All order documents can be organized together as the order index
Therefore, an index can be treated as a table in a database.
A database table has constraints that define its structure, field names, types, and so on. Therefore, the index has mapping, which is the field constraint information for documents in the index, similar to the structure of a table.
MySQL vs Elasticsearch
| MySQL | Elasticsearch | Notes |
|---|---|---|
| Table | Index | An index is a collection of documents, similar to a table in a database |
| Row | Document | A document is a row of data, JSON-formatted |
| Column | Field | A field in a JSON document, similar to a database column |
| Schema | Mapping | Mapping defines field types and constraints, like a table schema |
| SQL | DSL | DSL is Elasticsearch’s JSON-style request language for CRUD |
Both have their strengths:
- MySQL: strong for transactional operations, ensuring data safety and consistency
- Elasticsearch: strong for searching, analyzing, and computing large-scale data
In enterprises, they are often used together:
- Use MySQL for write operations requiring strong safety
- Use Elasticsearch for search needs requiring high query performance
- Then implement data synchronization between the two to ensure consistency
Installation
Install Elasticsearch and Kibana
docker run -d \\ --name es \\ -e "ES_JAVA_OPTS=-Xms512m -Xmx512m" \\ -e "discovery.type=single-node" \\ -v es-data:/usr/share/elasticsearch/data \\ -v es-plugins:/usr/share/elasticsearch/plugins \\ --privileged \\ --network es-net \\ -p 9200:9200 \\ -p 9300:9300 \\elasticsearch:8.8.1
# If ports won't open, remember to disable SSL and password authenticationxpack.security.enabled: falsexpack.security.http.ssl: enabled: false keystore.path: certs/http.p12
docker run -d \\--name kibana \\-e ELASTICSEARCH_HOSTS=http://es:9200 \\--network=es-net \\-p 5601:5601 \\kibana:8.8.1Install IK Analyzer
docker exec -it es bash
./bin/elasticsearch-plugin install <https://github.com/medcl/elasticsearch-analysis-ik/releases/download/v8.8.1/elasticsearch-analysis-ik-8.8.1.zip>
exit#Restart the containerdocker restart elasticsearchIKAnalyzer.cfg.xml configuration content:
<?xml version="1.0" encoding="UTF-8"?><!DOCTYPE properties SYSTEM "<http://java.sun.com/dtd/properties.dtd>"><properties> <comment>IK Analyzer extension configuration</comment> <!-- Users can configure their own extension dictionaries here *** add extension dictionary --> <entry key="ext_dict">ext.dic</entry> <!-- Users can configure their own extension stopword dictionary here *** add stopword dictionary --> <entry key="ext_stopwords">stopword.dic</entry></properties>After editing the corresponding file, restart.
What is the role of the tokenizer?
- Tokenize documents when creating the inverted index
- Tokenize user input when searching
What modes does the IK tokenizer have?
- ik_smart: Smart segmentation, coarse granularity
- ik_max_word: Finest segmentation, fine granularity
How to extend terms for IK tokenizer? How to disable terms?
- Use the IkAnalyzer.cfg.xml file in the config directory to add extension dictionaries and stopword dictionaries
- Add extended terms or stopwords in the dictionaries
Index management
An index is similar to a database table, and mapping is similar to the table structure.
To store data in ES, you must first create an “index” and a “mapping”.
Mapping properties
Mapping constrains the documents in an index. Common mapping properties include:
- type: field data type; common simple types include:
- Strings: text (tokenizable text), keyword (exact values, e.g., brand, country, IP address)
- Numeric: long, integer, short, byte, double, float
- Boolean: boolean
- Date: date
- Object: object
- index: whether to create an index; default true
- analyzer: which analyzer to use
- properties: sub-fields of this field
CRUD for index management
- Create an index: PUT /index_name
- Get an index: GET /index_name
- Delete an index: DELETE /index_name
- Add fields: PUT /index_name/_mapping
Create index and mapping
Basic syntax:
- Method: PUT
- Path: /index_name (customizable)
- Parameters: mapping
Format:
PUT /IndexName{ "mappings": { "properties": { "fieldName": { "type": "text", "analyzer": "ik_smart" }, "fieldName2": { "type": "keyword", "index": "false" }, "fieldName3": { "properties": { "subfield": { "type": "keyword" } } }, // ... omitted } }}Query index
Basic syntax:
- Method: GET
- Path: /IndexName
- Parameters: none
Format:
GET /IndexNameModify index
Although the inverted index structure is not complex, if the data structure changes (for example, changing the tokenizer), you would need to recreate the inverted index. This is why an index’s mapping cannot be modified after creation.
Although you cannot modify existing fields in the mapping, you can add new fields to the mapping without affecting the inverted index.
Syntax:
PUT /IndexName/_mapping{ "properties": { "newFieldName": { "type": "integer" } }}Delete index
Syntax:
- Method: DELETE
- Path: /IndexName
- Parameters: none
Format:
DELETE /IndexNameDocument operations
What document operations exist?
- Create a document: POST /{IndexName}/_doc/{id} { json document }
- Get a document: GET /{IndexName}/_doc/{id}
- Delete a document: DELETE /{IndexName}/_doc/{id}
- Update a document:
- Full update: PUT /{IndexName}/_doc/{id} { json document }
- Partial update: POST /{IndexName}/_update/{id} { “doc”: {field}}
Create a new document
Syntax:
POST /{IndexName}/_doc/{id}{ "field1": "value1", "field2": "value2", "field3": { "subProperty1": "value3", "subProperty2": "value4" }, // ...}Query a document
Following REST conventions, creation uses POST, retrieval uses GET, but queries usually require conditions; here we include the document id.
Syntax:
GET /{IndexName}/_doc/{id}Delete a document
Deletion uses a DELETE request and you delete by id:
Syntax:
DELETE /{IndexName}/_doc/{id}Update a document
There are two ways to update:
- Full update: essentially delete by id, then add
- Partial update: modify specific fields in the document
In the RestClient API, full update and add use the same API; the difference is based on the ID:
- If adding and the ID already exists, it is an update
- If adding and the ID does not exist, it is an addition
We won’t go into detail here; we focus on partial updates.
- Prepare the Request object. This time it’s an UpdateRequest
- Prepare the parameters. The JSON document contains the fields to be updated
- Update the document. Here we call client.update()
Unit test:
@Testvoid testUpdateDocument() throws IOException { // 1. Prepare Request UpdateRequest request = new UpdateRequest("IndexName", "61083"); // 2. Prepare request parameters request.doc( "price", "952", "starName", "四钻" ); // 3. Send the request client.update(request, RequestOptions.DEFAULT);}Bulk import documents
Case: use BulkRequest to bulk import data from the database into the index.
Steps:
- Use MyBatis-Plus to query hotel data
- Convert queried hotels (Hotel) to document type data (HotelDoc)
- Use BulkRequest to batch add documents
Bulk processing with BulkRequest essentially groups multiple CRUD requests and sends them together. It provides an add method to add other requests:
- IndexRequest: insert
- UpdateRequest: update
- DeleteRequest: delete
Unit test:
@Testvoid testBulkRequest() throws IOException { // Bulk query hotel data List<Hotel> hotels = hotelService.list();
// 1. Create Request BulkRequest request = new BulkRequest(); // 2. Prepare parameters; add multiple insert requests for (Hotel hotel : hotels) { // 2.1 Convert to document type HotelDoc HotelDoc hotelDoc = new HotelDoc(hotel); // 2.2 Create a request to add a new document request.add(new IndexRequest("hotel") .id(hotelDoc.getId().toString()) .source(JSON.toJSONString(hotelDoc), XContentType.JSON)); } // 3. Send the request client.bulk(request, RequestOptions.DEFAULT);}DSL Querying documents
Elasticsearch queries are still implemented using a JSON-style DSL.
DSL query categories
Elasticsearch provides a JSON-based DSL (Domain Specific Language) to define queries. Common query types include:
- Match all: query all data; usually used for testing. Example: match_all
- Full-text search: tokenize user input via an analyzer, then match against the inverted index. Examples:
- match_query
- multi_match_query
- Exact queries: search by exact terms for fields like keyword, numeric, date, boolean, etc. Examples:
- ids
- range
- term
- Geo queries: geographic queries. Examples:
- geo_distance
- geo_bounding_box
- Compound queries: combine multiple queries for more complex search logic. Examples:
- bool
- function_score
The query syntax is generally consistent:
GET /indexName/_search{ "query": { "queryType": { "queryField": "value" } }}Full-text search
The basic flow for full-text search is:
- Tokenize the user’s search content into terms
- Use the terms to match in the inverted index and get document ids
- Retrieve documents by id and return them
Common scenarios include:
- E-commerce site search boxes
- Baidu search box
Common full-text search queries include:
- match query: single-field search
GET /indexName/_search{ "query": { "match": { "FIELD": "TEXT" } }}- multi_match query: multi-field search; a match on any field qualifies the query; the more fields involved, the slower the query
GET /indexName/_search{ "query": { "multi_match": { "query": "TEXT", "fields": ["FIELD1", " FIELD12"] } }}Exact queries
Exact queries usually target keyword, numeric, date, boolean type fields, so they are not tokenized. Common examples:
-
term: exact value on a term; used for keyword, numeric, boolean, date fields
Because the field is not tokenized, the query value must also be a non-tokenized term. If the user input does not match exactly, results may not be found.
// term queryGET /indexName/_search{ "query": { "term": { "FIELD": { "value": "VALUE" } } }}- range: range queries for numeric or date types
// range queryGET /indexName/_search{ "query": { "range": { "FIELD": { "gte": 10, // gte means greater than or equal; gt would be greater than "lte": 20 // lte means less than or equal; lt would be less than } } }}Geo queries
Geographic queries are queries based on latitude and longitude.
Common scenarios include:
- Travel sites: search for hotels near me
- Ride-hailing: search for taxis near me
- WeChat: search for nearby people
- Bounding box queries
Bounding box queries select documents whose geo_point fields fall within a rectangle defined by two points (top_left and bottom_right).
// geo_bounding_box queryGET /indexName/_search{ "query": { "geo_bounding_box": { "FIELD": { "top_left": { // top-left point "lat": 31.1, "lon": 121.5 }, "bottom_right": { // bottom-right point "lat": 30.9, "lon": 121.7 } } } }}- Nearby (geo_distance) queries define a center point and a radius; all documents within the distance are returned.
// geo_distance queryGET /indexName/_search{ "query": { "geo_distance": { "distance": "15km", // radius "FIELD": "31.21,121.5" // center } }}Compound queries
Compound queries combine other queries to implement more complex search logic. Two common forms:
- function_score: score-based queries to control relevance
- bool query: boolean combination of other queries
Relevance scoring
When using a match query, documents are scored by their relevance (_score) and results are returned in descending order of score.
Historically, TF-IDF was used, with formulas such as:
TF(term frequency) = (number of occurrences of the term) / (total number of terms in the document)
IDF(inverse document frequency) = Log(total number of documents / number of documents containing the term)
score = sum of TF × IDF
In later versions, BM25 was introduced, with a formula like:
Score(Q,d) = sum over i of log(1 + (N - n + 0.5) / (n + 0.5)) × (f_i / (f_i + k1 × (1 - b + b × dl / avgdl)))
TF-IDF has a drawback: as term frequency increases, the document score increases for a single term. BM25 provides a ceiling and a smoother curve.
Function score queries
Using function_score to influence scoring can be important when the product needs control over relevance, e.g., the Baidu ranking example.
A function_score query contains four parts:
- Original query: the query condition; search and assign the original score (query score) based on BM25
- Filter: documents that meet the filter condition will be re-scored
- Score functions: for documents meeting the filter, apply the function score; four types:
- weight: the function result is a constant
- field_value_factor: use a field’s value as the function result
- random_score: use a random value as the function result
- script_score: a custom scoring function
- Boost mode: how to combine function score with the original query score; options include:
- multiply
- replace
- sum, avg, max, min, etc.
The flow:
- Query documents with the original condition and compute the initial score (query score)
- Filter documents
- For documents that pass the filter, compute the function score
- Combine the query score and function score according to the boost_mode to obtain the final relevance score
GET /hotel/_search{ "query": { "function_score": { "query": { .... }, // original query "functions": [ // scoring functions { "filter": { // condition to match "term": { "brand": "如家" } }, "weight": 2 // scoring weight } ], "boost_mode": "sum" // how to combine } }}What are the three elements defined by a function_score query?
- Filter: which documents should be scored
- Score function: how to calculate the function score
- Boost mode: how to combine function score with the query score
Bool query
Bool query combines one or more sub-queries. Each sub-query is a sub-clause. Sub-clauses can be combined as:
- must: must match each sub-query (AND)
- should: optionally match sub-queries (OR)
- must_not: must not match; does not participate in scoring (NOT)
- filter: must match; does not participate in scoring
Note that the more fields participate in scoring, the worse the query performance. For multi-criteria searches, consider:
- Keyword search in the search box uses a full-text query with must (participates in scoring)
- Other filters use filter (do not participate in scoring)
GET /hotel/_search{ "query": { "bool": { "must": [ {"term": {"city": "上海" }} ], "should": [ {"term": {"brand": "皇冠假日" }}, {"term": {"brand": "华美达" }} ], "must_not": [ { "range": { "price": { "lte": 500 } } } ], "filter": [ { "range": {"score": { "gte": 45 } } } ] } }}Processing search results
Search results can be processed or displayed according to user preferences.
Sorting
By default, Elasticsearch sorts by relevance score (_score), but you can sort in custom ways. Sortable field types include: keyword, numeric, geo_point, date, etc.
-
Plain field sorting
The syntax for sorting by keyword, numeric, and date types is basically the same.
GET /indexName/_search{ "query": { "match_all": {} }, "sort": [ { "FIELD": "desc" // sort field, sort direction ASC or DESC } ]}The sort criteria are an array, so you can specify multiple sort conditions. They are applied in the order declared; if the first condition is equal, then the second, and so on.
-
Geo distance sorting
Geo distance sorting is a bit different.
GET /indexName/_search{ "query": { "match_all": {} }, "sort": [ { "_geo_distance" : { "FIELD" : "latitude, longitude", // geo_point field name, target coordinates "order" : "asc", // sort order "unit" : "km" // distance unit } } ]}This query means:
- Specify a coordinate as the target point
- For every document, compute the distance between the coordinate in the specified field (which must be geo_point) and the target point
- Sort by distance
Pagination
By default, Elasticsearch returns only the top 10 results. To fetch more, adjust from and size:
- from: which document index to start from
- size: how many documents to return
Similar to MySQL’s LIMIT ?, ?
The basic pagination syntax:
GET /hotel/_search{ "query": { "match_all": {} }, "from": 0, // starting offset; default 0 "size": 10, // number of documents to retrieve "sort": [ {"price": "asc"} ]}When deep pagination is used, large result sets can strain memory and CPU, so Elasticsearch forbids from + size exceeding 10000.
For deep pagination, ES offers two approaches:
- search after: requires sorting; starts from the last sort value to fetch the next page. Official recommended approach.
- scroll: creates a snapshot of the sorted results and keeps it in memory. Official guidance is not to use it for new developments.
Common pagination approaches and their pros/cons:
-
from + size:- Pros: supports random page navigation
- Cons: depth pagination limit (from + size) is 10000 by default
- Use case: search pages with random access (Baidu, JD, Google, Taobao)
-
aftersearch:- Pros: no hard limit (per-query size should not exceed 10000)
- Cons: only forward paging; no random access
- Use case: pages that do not require random access
-
scroll:- Pros: no hard limit (per-query size should not exceed 10000)
- Cons: extra memory consumption, and results are not real-time
- Use case: retrieving large datasets, migrations
- Not recommended since ES 7.1; use after search instead.
Highlighting
When we search Baidu or JD, keywords appear highlighted in red; this is highlighting.
Highlighting is implemented in two steps:
- Add tags around all keywords in the document, e.g., tags
- Apply CSS styling to the tags on the page
Highlight syntax:
GET /hotel/_search{ "query": { "match": { "FIELD": "TEXT" // query, highlighting must be used with full-text search } }, "highlight": { "fields": { // specify fields to highlight "FIELD": { "pre_tags": "<em>", // tag before highlighted text "post_tags": "</em>" // tag after highlighted text } } }}Notes:
- Highlighting highlights keywords; the search query must contain keywords, not range queries
- By default, highlighted fields must match the fields specified in the search; otherwise, highlighting will not occur
- To highlight non-search fields, set required_field_match=false
RestClient query documentation
Querying with RestClient follows the same pattern as with RestHighLevelClient. The core is to obtain an index’s operations via the client.indices() object.
Document operations follow these basic steps:
- Initialize RestHighLevelClient
- Create XxxRequest. XXX can be Index, Get, Update, Delete, Bulk
- Prepare parameters (for Index, Update, Bulk)
- Send the request. Call RestHighLevelClient#xxx() where xxx is index, get, update, delete, bulk
- Parse the results (Get requires parsing)
Quick start
@Testvoid testMatchAll() throws IOException { // 1. Prepare Request SearchRequest request = new SearchRequest("hotel"); // 2. Prepare DSL request.source() .query(QueryBuilders.matchAllQuery()); // 3. Send the request SearchResponse response = client.search(request, RequestOptions.DEFAULT);
// 4. Parse the response handleResponse(response);}
private void handleResponse(SearchResponse response) { // 4. Parse the response SearchHits searchHits = response.getHits(); // 4.1. Get total hits long total = searchHits.getTotalHits().value; System.out.println("Total hits: " + total); // 4.2. Documents array SearchHit[] hits = searchHits.getHits(); // 4.3. Iterate for (SearchHit hit : hits) { // Get document source String json = hit.getSourceAsString(); // Deserialize HotelDoc hotelDoc = JSON.parseObject(json, HotelDoc.class); System.out.println("hotelDoc = " + hotelDoc); }}- Step 1: Create a SearchRequest, specifying the index name
- Step 2: Use request.source() to build the DSL, which can include queries, pagination, sorting, highlighting, etc.
- query(): represents the query condition; use QueryBuilders.matchAllQuery() to build a match_all DSL; QueryBuilders includes match, term, function_score, bool, and other queries
- Step 3: Use client.search() to send the request and obtain the response
Elasticsearch returns a JSON string with the following structure:
- hits: the matched results
- total: total number of hits; the value is the actual total
- max_score: the highest relevance score among the results
- hits: array of documents; each document is a JSON object
- _source: the original document data, also a JSON object
Therefore, parsing the response means parsing the JSON string layer by layer:
- SearchHits: obtained via response.getHits(); this is the outermost hits in the JSON, representing matched results
- SearchHits#getTotalHits().value: obtain total count
- SearchHits#getHits(): get the SearchHit array, i.e., the documents array
- SearchHit#getSourceAsString(): obtain the _source from the document result, i.e., the original JSON document
match query
Full-text match and multi_match queries have APIs similar to that of match_all; the difference lies in the query portion.
Therefore, the Java code differences are mainly in the parameters of request.source().query(), still using the methods provided by QueryBuilders
@Testvoid testMatch() throws IOException { // 1. Prepare Request SearchRequest request = new SearchRequest("hotel"); // 2. Prepare DSL request.source() .query(QueryBuilders.matchQuery("all", "如家")); // 3. Send request SearchResponse response = client.search(request, RequestOptions.DEFAULT); // 4. Parse the response handleResponse(response);
}Exact queries
Exact queries are mainly about:
- term: exact match on a term
- range: range query
Compared with other queries, the difference is in the query condition; the rest of the code remains the same.
// term queryQueryBuilders.termQuery("city","杭州");
// range queryQueryBuilders.rangeQuery("price").gte(100).lte(150);Bool queries
Bool queries combine other queries with must, must_not, filter, etc.
You can see that the API differences lie in how the query is constructed via QueryBuilders; the result parsing and other code remain unchanged.
@Testvoid testBool() throws IOException { // 1. Prepare Request SearchRequest request = new SearchRequest("hotel"); // 2. Prepare DSL // 2.1 Prepare BooleanQuery BoolQueryBuilder boolQuery = QueryBuilders.boolQuery(); // 2.2 Add term boolQuery.must(QueryBuilders.termQuery("city", "杭州")); // 2.3 Add range boolQuery.filter(QueryBuilders.rangeQuery("price").lte(250));
request.source().query(boolQuery); // 3. Send request SearchResponse response = client.search(request, RequestOptions.DEFAULT); // 4. Parse the response handleResponse(response);}Sorting, pagination
Sorting and pagination for search results are set at the same level as the query, so you also use request.source() to configure them.
@Testvoid testPageAndSort() throws IOException { // Page number and page size int page = 1, size = 5;
// 1. Prepare Request SearchRequest request = new SearchRequest("hotel"); // 2. Prepare DSL // 2.1 query request.source().query(QueryBuilders.matchAllQuery()); // 2.2 sort request.source().sort("price", SortOrder.ASC); // 2.3 pagination from, size request.source().from((page - 1) * size).size(5); // 3. Send request SearchResponse response = client.search(request, RequestOptions.DEFAULT); // 4. Parse the response handleResponse(response);
}Highlighting
Highlighting code differs from prior code in two ways:
-
The DSL for the query includes highlighting conditions at the same level as the query
-
The results parsing must also parse the highlighted results
-
Step 1: Obtain the source with hit.getSourceAsString(); this is non-highlighted JSON; deserialize to HotelDoc
-
Step 2: Get highlighted results with hit.getHighlightFields(); returns a Map whose key is the highlight field name and value is a HighlightField
-
Step 3: From the map, get the HighlightField by its name
-
Step 4: Get fragments from the HighlightField and convert to strings to obtain the highlighted text
-
Step 5: Replace the non-highlighted text in HotelDoc with the highlighted text
@Testvoid testHighlight() throws IOException { // 1. Prepare Request SearchRequest request = new SearchRequest("hotel"); // 2. Prepare DSL // 2.1 query request.source().query(QueryBuilders.matchQuery("all", "如家")); // 2.2.Highlight request.source().highlighter(new HighlightBuilder().field("name").requireFieldMatch(false)); // 3. Send request SearchResponse response = client.search(request, RequestOptions.DEFAULT); // 4. Parse the response handleResponse(response);}
private void handleResponse(SearchResponse response) { // 4. Parse the response SearchHits searchHits = response.getHits(); // 4.1 Get total long total = searchHits.getTotalHits().value; System.out.println("Total hits: " + total); // 4.2 Documents array SearchHit[] hits = searchHits.getHits(); // 4.3 Iterate for (SearchHit hit : hits) { // Get document source String json = hit.getSourceAsString(); // Deserialize HotelDoc hotelDoc = JSON.parseObject(json, HotelDoc.class); // Get highlighted results Map<String, HighlightField> highlightFields = hit.getHighlightFields(); if (!CollectionUtils.isEmpty(highlightFields)) { // Get highlight result by field name HighlightField highlightField = highlightFields.get("name"); if (highlightField != null) { // Get highlighted value String name = highlightField.getFragments()[0].string(); // Overwrite non-highlighted result hotelDoc.setName(name); } } System.out.println("hotelDoc = " + hotelDoc); }}Heima Travel Case
Next, we will practice the knowledge learned earlier through the Heima Travel case.
We implement four parts:
- Hotel search with pagination
- Hotel result filtering
- Nearby hotels
- Hotel bidding ranking
Hotel search and pagination
Case requirement: implement Heima Travel’s hotel search feature, including keyword search and pagination
Define entity classes
There are two: one for the request parameters from the frontend, and one for the response returned by the service.
// Requestpackage cn.itcast.hotel.pojo;import lombok.Data;
@Datapublic class RequestParams { private String key; private Integer page; private Integer size; private String sortBy;}
// Responseimport lombok.Data;import java.util.List;
@Datapublic class PageResult { private Long total; private List<HotelDoc> hotels;
public PageResult() { }
public PageResult(Long total, List<HotelDoc> hotels) { this.total = total; this.hotels = hotels; }}Define controller
Define a HotelController with a query interface that meets the following requirements:
- Request method: Post
- Path: /hotel/list
- Request parameter: an object of type RequestParams
- Return value: PageResult, containing two fields
Long total: total countList<HotelDoc> hotels: hotel data
@RestController@RequestMapping("/hotel")public class HotelController {
@Autowired private IHotelService hotelService; // Search hotel data @PostMapping("/list") public PageResult search(@RequestBody RequestParams params){ return hotelService.search(params); }}Implement search logic
We rely on RestHighLevelClient, and we need to register it as a Spring bean in the application.
In the HotelDemoApplication under cn.itcast.hotel, declare this bean:
@Beanpublic RestHighLevelClient client(){ return new RestHighLevelClient(RestClient.builder( HttpHost.create("<http://127.0.0.1:9200>") ));}
// Service@Overridepublic PageResult search(RequestParams params) { try { // 1. Prepare Request SearchRequest request = new SearchRequest("hotel"); // 2. Prepare DSL // 2.1 query String key = params.getKey(); if (key == null || "".equals(key)) { boolQuery.must(QueryBuilders.matchAllQuery()); } else { boolQuery.must(QueryBuilders.matchQuery("all", key)); }
// 2.2. Pagination int page = params.getPage(); int size = params.getSize(); request.source().from((page - 1) * size).size(size);
// 3. Send request SearchResponse response = client.search(request, RequestOptions.DEFAULT); // 4. Parse response return handleResponse(response); } catch (IOException e) { throw new RuntimeException(e); }}
// Result parsingprivate PageResult handleResponse(SearchResponse response) { // 4. Parse response SearchHits searchHits = response.getHits(); // 4.1 Get total long total = searchHits.getTotalHits().value; // 4.2 Documents array SearchHit[] hits = searchHits.getHits(); // 4.3 Iterate List<HotelDoc> hotels = new ArrayList<>(); for (SearchHit hit : hits) { // Get document source String json = hit.getSourceAsString(); // Deserialize HotelDoc hotelDoc = JSON.parseObject(json, HotelDoc.class); // Add to collection hotels.add(hotelDoc); } // 4.4 Wrap and return return new PageResult(total, hotels);}Hotel results filtering
Requirement: add filters for brand, city, star, price
In the HotelService’s search method, there is only one place to modify: the query condition inside request.source().query(…). Previously it was a match query by keywords; now we need to add filter conditions, including:
- Brand filter: keyword type, using term
- Star filter: keyword type, using term
- Price filter: numeric type, using range
- City filter: keyword type, using term
Multiple conditions should be combined with a boolean query:
- The keyword search goes into must to participate in scoring
- Other filters go into filter to not participate in scoring
private void buildBasicQuery(RequestParams params, SearchRequest request) { // 1. Build BooleanQuery BoolQueryBuilder boolQuery = QueryBuilders.boolQuery(); // 2. Keyword search String key = params.getKey(); if (key == null || "".equals(key)) { boolQuery.must(QueryBuilders.matchAllQuery()); } else { boolQuery.must(QueryBuilders.matchQuery("all", key)); } // 3. City condition if (params.getCity() != null && !params.getCity().equals("")) { boolQuery.filter(QueryBuilders.termQuery("city", params.getCity())); } // 4. Brand condition if (params.getBrand() != null && !params.getBrand().equals("")) { boolQuery.filter(QueryBuilders.termQuery("brand", params.getBrand())); } // 5. Star condition if (params.getStarName() != null && !params.getStarName().equals("")) { boolQuery.filter(QueryBuilders.termQuery("starName", params.getStarName())); } // 6. Price if (params.getMinPrice() != null && params.getMaxPrice() != null) { boolQuery.filter(QueryBuilders .rangeQuery("price") .gte(params.getMinPrice()) .lte(params.getMaxPrice()) ); } // 7. Put into source request.source().query(boolQuery);}My Nearby Hotels
Sort nearby hotels by distance based on location coordinates. The approach:
- Extend RequestParams to accept a location field
- In the search method, if location has a value, add geo_distance sorting
GET /indexName/_search{ "query": { "match_all": {} }, "sort": [ { "price": "asc" }, { "_geo_distance" : { "FIELD" : "latitude, longitude", "order" : "asc", "unit" : "km" } } ]}In the search method, add sorting:
// 2.3. SortingString location = params.getLocation();if (location != null && !location.equals("")) { request.source().sort(SortBuilders .geoDistanceSort("location", new GeoPoint(location)) .order(SortOrder.ASC) .unit(DistanceUnit.KILOMETERS) );}Hotel bidding ranking
Requirement: Let a specified hotel rank at the top of the results, with an advertising tag.
Function_score queries can influence scoring; a higher score leads to higher ranking. A function_score query has three parts:
- Filter conditions: which docs get scored
- Scoring function: how to compute the function score
- Weighting mode: how function score and query score are combined
Here the need is to rank a specified hotel higher, so we add a tag to these hotels and use that in a filter to boost scoring.
We can place the previously written boolean query as the original query condition in the query, then add filter, scoring function, and boost mode:
// 2. Scoring controlFunctionScoreQueryBuilder functionScoreQuery = QueryBuilders.functionScoreQuery( // Original query, the relevance-scoring query boolQuery, // Array of function_score elements new FunctionScoreQueryBuilder.FilterFunctionBuilder[]{ // One function_score element new FunctionScoreQueryBuilder.FilterFunctionBuilder( // Filter condition QueryBuilders.termQuery("isAD", true), // Scoring function ScoreFunctionBuilders.weightFactorFunction(10) ) });request.source().query(functionScoreQuery);Data Aggregation
- Aggregations make it very convenient to perform statistics, analysis, and computations on data. For example:
- Which brand of phones is the most popular?
- What are the average, maximum, and minimum prices of these phones?
- How are these phones selling each month?
These aggregations are much easier and faster than SQL, and can achieve near real-time search results.
Types of aggregations
There are three common kinds of aggregations:
- Bucket aggregations: group documents
- TermAggregation: group by field values, e.g., by brand or by country
- Date Histogram: group by date intervals, e.g., weekly or monthly
- Metric aggregations: compute values like max, min, average
- Avg: average
- Max: maximum
- Min: minimum
- Stats: compute max, min, avg, sum, etc.
- Pipeline aggregations: base aggregations on the results of other aggregations
Note: The fields participating in aggregations must be keyword, date, numeric, or boolean types.
Implementing aggregations with DSL
Now we want to count how many hotel brands exist in all data, i.e., group by brand name. This means performing a Bucket aggregation on the hotel brand name.
Bucket aggregation syntax
GET /hotel/_search{ "size": 0, // set size to 0 to exclude documents; only return aggregations "aggs": { // define aggregations "brandAgg": { // give the aggregation a name "terms": { // aggregation type: group by brand value "field": "brand", // field participating in aggregation "size": 20 // number of aggregation results } } }}Sorting aggregation results
By default, a Bucket aggregation counts documents in each bucket as _count and sorts by _count in descending order. We can specify the order to customize sorting:
GET /hotel/_search{ "size": 0, "aggs": { "brandAgg": { "terms": { "field": "brand", "order": { "_count": "asc" // sort by _count in ascending order }, "size": 20 } } }}Limiting the aggregation scope
By default, Bucket aggregations run over all documents in the index, but in real scenarios users provide search criteria, so aggregations should be limited to the search results.
You can restrict the documents to be aggregated by adding a query condition:
GET /hotel/_search{ "query": { "range": { "price": { "lte": 200 // aggregate only documents with price <= 200 } } }, "size": 0, "aggs": { "brandAgg": { "terms": { "field": "brand", "size": 20 } } }}Metric aggregation syntax
Now we want to perform calculations within each bucket, such as the min, max, and average user scores per brand.
This uses Metric aggregations, e.g., stats, to obtain min, max, avg, etc.
GET /hotel/_search{ "size": 0, "aggs": { "brandAgg": { "terms": { "field": "brand", "size": 20 }, "aggs": { // a sub-aggregation for each brand "score_stats": { // aggregation name "stats": { // type of aggregation to compute "field": "score" // aggregation field } } } } }}Here, the score_stats aggregation is nested inside the brandAgg aggregation, since we want to compute it for each bucket.
Aggregations are defined at the same level as the query; the query’s role is to:
- Limit the documents that participate in the aggregation
Three essential elements of an aggregation:
- Aggregation name
- Aggregation type
- Aggregation field
Configurable properties include:
- size: specify the number of aggregation results
- order: specify the order of the aggregation results
- field: specify the aggregation field
RestAPI implementation of aggregations
Aggregation conditions are at the same level as the query, so you specify them via request.source().
Using aggregations, bucket aggregations group documents in the search results by brand or by city, so you can know which brands and which cities exist.
Because the aggregation is performed on search results, it is a scoped aggregation; its scope matches the search document criteria.
@Overridepublic Map<String, List<String>> filters(RequestParams params) { try { // 1. Prepare Request SearchRequest request = new SearchRequest("hotel"); // 2. Prepare DSL // 2.1. query buildBasicQuery(params, request); // 2.2. set size request.source().size(0); // 2.3. aggregation buildAggregation(request); // 3. Send request SearchResponse response = client.search(request, RequestOptions.DEFAULT); // 4. Parse results Map<String, List<String>> result = new HashMap<>(); Aggregations aggregations = response.getAggregations(); // 4.1. Get brand results List<String> brandList = getAggByName(aggregations, "brandAgg"); result.put("Brand", brandList); // 4.2. Get city results List<String> cityList = getAggByName(aggregations, "cityAgg"); result.put("City", cityList); // 4.3. Get star results List<String> starList = getAggByName(aggregations, "starAgg"); result.put("Star", starList);
return result; } catch (IOException e) { throw new RuntimeException(e); }}
private void buildAggregation(SearchRequest request) { request.source().aggregation(AggregationBuilders .terms("brandAgg") .field("brand") .size(100) ); request.source().aggregation(AggregationBuilders .terms("cityAgg") .field("city") .size(100) ); request.source().aggregation(AggregationBuilders .terms("starAgg") .field("starName") .size(100) );}
private List<String> getAggByName(Aggregations aggregations, String aggName) { // 4.1 Get the aggregation by name Terms brandTerms = aggregations.get(aggName); // 4.2 Get buckets List<? extends Terms.Bucket> buckets = brandTerms.getBuckets(); // 4.3 Iterate List<String> brandList = new ArrayList<>(); for (Terms.Bucket bucket : buckets) { // 4.4 Get key String key = bucket.getKeyAsString(); brandList.add(key); } return brandList;}Auto-completion
When users type characters in the search box, we should suggest items related to the input; this is auto-complete, which suggests complete terms from partial input.
Pinyin-based tokenizer
To implement prefix-based completion, documents must be tokenized using Pinyin. There is a Elasticsearch pinyin tokenizer plugin on GitHub.
docker exec -it es bash
./bin/elasticsearch-plugin install <https://github.com/medcl/elasticsearch-analysis-pinyin/releases/download/v7.12.1/elasticsearch-analysis-pinyin-7.12.1.zip>
exit#Restart the containerdocker restart elasticsearchCustom analyzers
The default pinyin analyzer tokenizes each Chinese character individually; we want a set of pinyin terms to form a group of terms, so we need to customize the pinyin tokenizer to create a custom analyzer.
An analyzer in Elasticsearch consists of three parts:
- character filters: preprocess text before tokenization (e.g., removing or replacing characters)
- tokenizer: splits text into terms. Examples: keyword (no tokenization) and ik_smart
- tokenizer filters: further process tokens, such as case conversion, synonyms, or pinyin processing
Tokenization proceeds through these three components for documents:
PUT /test{ "settings": { "analysis": { "analyzer": { // Custom analyzer "my_analyzer": { // Analyzer name "tokenizer": "ik_max_word", "filter": "py" } }, "filter": { // Custom tokenizer filter "py": { // Filter name "type": "pinyin", // Filter type "keep_full_pinyin": false, "keep_joined_full_pinyin": true, "keep_original": true, "limit_first_letter_length": 16, "remove_duplicated_term": true, "none_chinese_pinyin_tokenize": false } } } }, "mappings": { "properties": { "name": { "type": "text", "analyzer": "my_analyzer", "search_analyzer": "ik_smart" } } }}Auto-complete query
Elasticsearch provides the Completion Suggester to implement auto-completion. This query matches terms that start with the user input and returns them. To improve efficiency, there are constraints on the field types used for completion:
- The field participating in completion queries must be of type completion.
- The content is typically an array of terms used for completion.
Implementation of auto-completion:
@Overridepublic List<String> getSuggestions(String prefix) { try { // 1. Prepare Request SearchRequest request = new SearchRequest("hotel"); // 2. Prepare DSL request.source().suggest(new SuggestBuilder().addSuggestion( "suggestions", SuggestBuilders.completionSuggestion("suggestion") .prefix(prefix) .skipDuplicates(true) .size(10) )); // 3. Send request SearchResponse response = client.search(request, RequestOptions.DEFAULT); // 4. Parse results Suggest suggest = response.getSuggest(); // 4.1 Get suggestions by name CompletionSuggestion suggestions = suggest.getSuggestion("suggestions"); // 4.2 Get options List<CompletionSuggestion.Entry.Option> options = suggestions.getOptions(); // 4.3 Iterate List<String> list = new ArrayList<>(options.size()); for (CompletionSuggestion.Entry.Option option : options) { String text = option.getText().toString(); list.add(text); } return list; } catch (IOException e) { throw new RuntimeException(e); }}Data synchronization
Elasticsearch hotel data comes from a MySQL database, so when MySQL data changes, Elasticsearch must be updated as well. This is the data synchronization between Elasticsearch and MySQL.
There are three common approaches:
- Synchronous invocation
- hotel-demo exposes an API to modify Elasticsearch data
- The hotel management service calls the hotel-demo API after performing DB operations
- Asynchronous notification
- The hotel-admin service emits MQ messages after MySQL insert/update/delete
- The hotel-demo listens for MQ messages and updates Elasticsearch accordingly
- Binlog listening
- Enable MySQL binlog
- All insert, update, delete operations are logged in binlog
- hotel-demo listens to binlog changes via Canal and updates Elasticsearch in real time
Approach 1: Synchronous invocation
- Pros: simple, crude
- Cons: tight coupling between services
Approach 2: Asynchronous notification
- Pros: low coupling, moderate implementation difficulty
- Cons: depends on MQ reliability
Approach 3: Binlog listening
- Pros: completely decouples services
- Cons: enabling binlog adds DB overhead; implementation is complex
Implementing data synchronization
Use the pre-course material’s hotel-admin project as the hotel management service. When hotel data is added, deleted, or updated, Elasticsearch data should be updated accordingly.
- Start and test hotel data CRUD
- Declare exchanges, queues, RoutingKeys
- In hotel-admin’s add/delete/update operations, publish messages
- In hotel-demo, implement message listening and update Elasticsearch data
- Start and test data synchronization
Declare exchanges and queues
MQ structure as follows:
Add dependencies
<!--amqp--><dependency> <groupId>org.springframework.boot</groupId> <artifactId>spring-boot-starter-amqp</artifactId></dependency>Define configuration class to declare the beans
import cn.itcast.hotel.constants.MqConstants;import org.springframework.amqp.core.Binding;import org.springframework.amqp.core.BindingBuilder;import org.springframework.amqp.core.Queue;import org.springframework.amqp.core.TopicExchange;import org.springframework.context.annotation.Bean;import org.springframework.context.annotation.Configuration;
@Configurationpublic class MqConfig { @Bean public TopicExchange topicExchange(){ return new TopicExchange(MqConstants.HOTEL_EXCHANGE, true, false); }
@Bean public Queue insertQueue(){ return new Queue(MqConstants.HOTEL_INSERT_QUEUE, true); }
@Bean public Queue deleteQueue(){ return new Queue(MqConstants.HOTEL_DELETE_QUEUE, true); }
@Bean public Binding insertQueueBinding(){ return BindingBuilder.bind(insertQueue()).to(topicExchange()).with(MqConstants.HOTEL_INSERT_KEY); }
@Bean public Binding deleteQueueBinding(){ return BindingBuilder.bind(deleteQueue()).to(topicExchange()).with(MqConstants.HOTEL_DELETE_KEY); }}In the add, delete, and update operations in hotel-admin, MQ messages are sent respectively:
Sending MQ messages
@PostMappingpublic void saveHotel(@RequestBody Hotel hotel){ hotelService.save(hotel);
rabbitTemplate.convertAndSend(MqConstants.HOTEL_EXCHANGE,HOTEL_INSERT_KEY,hotel.getId());}
@PutMapping()public void updateById(@RequestBody Hotel hotel){ if (hotel.getId() == null) { throw new InvalidParameterException("id不能为空"); } hotelService.updateById(hotel);
rabbitTemplate.convertAndSend(MqConstants.HOTEL_EXCHANGE,HOTEL_INSERT_KEY,hotel.getId());}
@DeleteMapping("/{id}")public void deleteById(@PathVariable("id") Long id) { hotelService.removeById(id);
rabbitTemplate.convertAndSend(MqConstants.HOTEL_EXCHANGE,MqConstants.HOTEL_DELETE_KEY, id);}Receiving MQ messages
Create a listener
In hotel-demo under the cn.itcast.hotel.mq package, add a class:
@Componentpublic class HotelListener {
@Autowired private IHotelService hotelService;
/** * Listen for hotel add or update operations * @param id hotel id */ @RabbitListener(queues = MqConstants.HOTEL_INSERT_QUEUE) public void listenHotelInsertOrUpdate(Long id){ hotelService.insertById(id); }
/** * Listen for hotel deletion * @param id hotel id */ @RabbitListener(queues = MqConstants.HOTEL_DELETE_QUEUE) public void listenHotelDelete(Long id){ hotelService.deleteById(id); }}Implementing the business logic:
@Overridepublic void deleteById(Long id) { try { // 1. Prepare Request DeleteRequest request = new DeleteRequest("hotel", id.toString()); // 2. Send request client.delete(request, RequestOptions.DEFAULT); } catch (IOException e) { throw new RuntimeException(e); }}
@Overridepublic void insertById(Long id) { try { // 0. Query hotel data by id Hotel hotel = getById(id); // Convert to document type HotelDoc hotelDoc = new HotelDoc(hotel);
// 1. Prepare Request object IndexRequest request = new IndexRequest("hotel").id(hotel.getId().toString()); // 2. Prepare JSON document request.source(JSON.toJSONString(hotelDoc), XContentType.JSON); // 3. Send request client.index(request, RequestOptions.DEFAULT); } catch (IOException e) { throw new RuntimeException(e); }}Clusters
Running Elasticsearch on a single machine inevitably faces two issues: handling massive data and single point of failure.
- Mass data storage: shard the index into several pieces and store across multiple nodes
- Single point of failure: back up shards on different nodes (replicas)
ES cluster concepts:
-
Cluster: A set of nodes that share the same cluster name
-
Node: A single Elasticsearch instance in the cluster
-
Shard: An index can be partitioned into parts; in a cluster, different shards can reside on different nodes
-
Primary shard: as defined relative to replica shards
-
Replica shard: Each primary shard can have one or more replicas; data and primary shards are replicated
Data backups provide high availability but the more replicas you have, the more nodes you need, which increases cost
To balance availability and cost, you can:
- Shard data to different nodes
- Then back up each shard on the other nodes, achieving mutual backup
This can significantly reduce the number of service nodes required
Creating an ES cluster
Using docker-compose:
version: '2.2'services: es01: image: elasticsearch:7.12.1 container_name: es01 environment: - node.name=es01 - cluster.name=es-docker-cluster - discovery.seed_hosts=es02,es03 - cluster.initial_master_nodes=es01,es02,es03 - "ES_JAVA_OPTS=-Xms512m -Xmx512m" volumes: - data01:/usr/share/elasticsearch/data ports: - 9200:9200 networks: - elastic es02: image: elasticsearch:7.12.1 container_name: es02 environment: - node.name=es02 - cluster.name=es-docker-cluster - discovery.seed_hosts=es01,es03 - cluster.initial_master_nodes=es01,es02,es03 - "ES_JAVA_OPTS=-Xms512m -Xmx512m" volumes: - data02:/usr/share/elasticsearch/data ports: - 9201:9200 networks: - elastic es03: image: elasticsearch:7.12.1 container_name: es03 environment: - node.name=es03 - cluster.name=es-docker-cluster - discovery.seed_hosts=es01,es02 - cluster.initial_master_nodes=es01,es02,es03 - "ES_JAVA_OPTS=-Xms512m -Xmx512m" volumes: - data03:/usr/share/elasticsearch/data networks: - elastic ports: - 9202:9200volumes: data01: driver: local data02: driver: local data03: driver: local
networks: elastic: driver: bridgeIf running on WSL makes it difficult to start, increase memory with:
wsl -d docker-desktopecho 262144 >> /proc/sys/vm/max_map_countMonitor the ES cluster with Cerebro
Cluster split-brain
Cluster role separation
In Elasticsearch, cluster nodes have different roles:
By default, any node in the cluster can assume all four roles.
In real deployments, roles should be separated:
- Master node: high CPU requirements, memory needs as well
- Data node: high CPU and memory requirements
- Coordinating node: high network bandwidth and CPU requirements
Role separation allows you to allocate different hardware to different nodes and avoid cross-service interference.
Split-brain
Split-brain occurs when nodes in the cluster lose contact.
When the network recovers, if there are two masters, the cluster state may diverge, causing split-brain:
The solution is to require consensus votes greater than (eligible nodes + 1) / 2 to elect a master; hence an odd number of eligible nodes is preferable. The configuration is discovery.zen.minimum_master_nodes. After ES 7.0, this is usually on by default, so split-brain is rarely an issue.
What is the role of master-eligible nodes?
- Participate in master election
- Master nodes manage the cluster state, shard information, and requests to create/delete indices
What is the role of data nodes?
- CRUD operations on data
What is the role of coordinating nodes?
- Route requests to other nodes
- Merge results from different nodes and return to the user
Cluster distributed storage
When adding a new document, it should be stored on different shards to balance data. How does the coordinating node decide which shard to store data on?
Sharding principle
Elasticsearch uses a hash function to determine which shard a document should be stored on:
shard = hash(_routing) % number_of_shards
Notes:
- _routing defaults to the document id
- The algorithm depends on the number of shards; once an index is created, the shard count cannot be changed
Cluster distributed querying
Elasticsearch queries operate in two phases:
- scatter phase: the coordinating node distributes the request to each shard
- gather phase: the coordinating node collects results from data nodes and returns the final results to the user
Cluster failover
The cluster’s master node monitors node status. If a node fails, the master will immediately relocate the failed node’s shards to other nodes to ensure data safety; this is failover.
- node1 is the master, the other two nodes are replicas
- node1 fails; a new master is elected, for example node2
- node2 detects the cluster state and finds shards-1 and -0 have no replica nodes
- migrate data from node1 to node2 and node3
Elasticsearch入門
ESの理解
Elasticsearchの役割
Elasticsearchは非常に強力なオープンソースの検索エンジンで、非常に多くの強力な機能を備えています。膨大なデータの中から必要な内容を迅速に見つけるのに役立ちます。
例えば:
- GitHubでコードを検索する
- 電子商取引サイトで商品を検索する
- 百度で回答を検索する
- 配車アプリで近くの車を検索する
ELK技術スタック
ElasticsearchはKibana、Logstash、Beatsと組み合わせて、すなわちElastic Stack(ELK)となります。ログデータ分析、リアルタイム監視などの分野で広く活用されています。
一方、ElasticsearchはElastic Stackの中核を担い、データの保存、検索、分析を担当します。
ElasticsearchとLucene
Elasticsearchの基盤はLuceneをベースに実装されています。
Luceneは、Java言語の検索エンジンライブラリで、Apacheのトッププロジェクトであり、Doug Cuttingによって1999年に開発されました。
Elasticsearchの歴史:
- 2004年、Shay BanonがLuceneを基にCompassを開発
- 2010年、Shay BanonがCompassを再設計し、Elasticsearchと命名
Elasticsearchとは?
- オープンソースの分散型検索エンジンで、検索、ログ統計、分析、システム監視などの機能を実現できる
Elastic Stack(ELK)とは?
- Elasticsearchを核とする技術スタックで、Beats、Logstash、Kibana、Elasticsearchを含む
Luceneとは?
- Apacheのオープンソース検索エンジンライブラリで、検索エンジンの核心APIを提供
倒排索引
倒排索引の概念はMySQLのような正順インデックスを基準にしたものです。
正順インデックス
テーブルのidにインデックスを作成した場合、idで検索すると直接インデックスを使用し、検索速度は非常に速い。
ただし、titleを基にしたあいまさ検索(模糊検索)を行うと、全行を走査する必要があり、手順は以下のとおり:
- ユーザーがtitleで検索条件を入力
- 1行ずつデータを取得、例えばidが1のデータ
- データのtitleがユーザーの検索条件に符合するかを判定
- 符合すれば結果セットに追加、そうでなければ破棄。ステップ1へ戻る
逐行スキャン、すなわち全表走査は、データ量が増えるにつれて検索効率が低下します。データ量が数百万件になると大惨事になります。
倒排索引
倒排索引には2つの非常に重要な概念があります:
- ドキュメント(
Document):検索に使われるデータ。各データが1つのドキュメント、例:1つのウェブページ、1つの商品情報 - 用語(
Term):ドキュメントデータまたはユーザー検索データを、あるアルゴリズムで分詞して得られる、有意味な語句
倒排索引の作成は正順インデックスの特別な処理で、流れは次のとおりです:
- 各ドキュメントのデータをアルゴリズムで分詞し、1つずつの語を得る
- テーブルを作成し、各行に語と語が含まれるドキュメントID、位置情報などを含める
- 語の一意性があるため、語に対してインデックスを作成できる、例えばハッシュ表構造のインデックス
倒排索引の検索フローは以下のとおり(「小米手机」を検索する場合):
1)ユーザーが条件"小米手机"を入力して検索。
2)ユーザー入力を分词し、語条を得る:小米、手机。
3)語条を倒排索引で検索すると、語条を含むドキュメントIDを得られる:1、2、3。
4)ドキュメントIDを元に正順索引で具体的な文書を検索。
語条も文書IDもインデックスを持つため、検索速度は非常に速い。全表走査は不要。
正向と倒排
なぜ「正向索引」と「倒排索引」と呼ぶのか?
- 正向索引は最も伝統的で、IDに基づく検索です。しかし語条で検索する場合、各ドキュメントを1件ずつ取得してから、文書中に必要な語条が含まれているかを判断します。これは「文書から語条を探す過程」です。
- 倒排索引は逆で、最初にユーザーが検索したい語条を見つけ、語条から該当する文書のIDを取得し、IDから文書を取得します。これは「語条から文書を探す過程」です。
正向索引:
- 利点:
- 複数のフィールドにインデックスを作成可能
- インデックス化したフィールドの検索・ソートが非常に速い
- 欠点:
- 非インデックスフィールド、またはインデックスフィールドの一部語句で検索する場合は全表走査になる
倒排索引:
- 利点:
- 語条での検索・あいまい検索が非常に速い
- 欠点:
- 語条に対してのみインデックスを作成可能で、フィールドには作成できない
- フィールドでのソートはできない
esのいくつかの概念
ElasticsearchにはMySQLとは異なる独自の概念が多く、若干の違いがある一方、似ている点もあります。
ドキュメントとフィールド
Elasticsearchは**ドキュメント(Document)**を対象として保存します。データベースの1つの商品データ、1つの注文情報などになり得ます。ドキュメントデータはJSON形式へシリアライズされ、Elasticsearchに保存されます。
JSONドキュメントには多くの場合、**フィールド(Field)**が含まれており、データベースの列に似ています。
インデックスとマッピング
**インデックス(Index)**とは、同じタイプのドキュメントの集合です。
例えば:
- すべてのユーザードキュメントをまとめて、ユーザーインデックスと呼ぶ
- すべての商品ドキュメントをまとめて、商品インデックスと呼ぶ
- すべての注文ドキュメントをまとめて、注文インデックスと呼ぶ
したがって、インデックスはデータベースのテーブルに相当します。
データベースのテーブルには制約情報があり、表構造、フィールド名、型などを定義します。したがって、インデックスライブラリには**マッピング(mapping)**があり、インデックス内ドキュメントのフィールド制約情報で、テーブルの構造制約に相当します。
MySQLとElasticsearch
以下に、MySQLとElasticsearchの概念を対比します。
| MySQL | Elasticsearch | 説明 |
|---|---|---|
| Table | Index | インデックス(index)は、ドキュメントの集合で、データベースのテーブル(table)に相当します |
| Row | Document | ドキュメント(Document)は、1つ1つのデータで、データベースの行(Row)に相当します。ドキュメントはJSON形式です |
| Column | Field | フィールド(Field)は、JSONドキュメントのフィールドで、データベースの列(Column)に相当します |
| Schema | Mapping | Mapping(マッピング)は、インデックス内ドキュメントの制約。フィールド型の制約など。データベースのスキーマ(Schema)に相当します |
| SQL | DSL | DSLはElasticsearchが提供するJSON風のリクエスト文で、Elasticsearchを操作してCRUDを実現します |
両者にはそれぞれ得意な分野があります:
- MySQL:トランザクション処理に長けており、データの安全性と整合性を確保
- Elasticsearch:大量データの検索・分析・計算に長ける
企業では、往々にして両者を組み合わせて使用します:
- セキュリティ要件の高い書き込み操作にはMySQLを使用
- クエリ性能が高い検索にはElasticsearchを使用
- 両者を何らかの方法でデータ同期し、一貫性を保証
インストール
ElasticsearchとKibanaのインストール
docker run -d \\ --name es \\ -e "ES_JAVA_OPTS=-Xms512m -Xmx512m" \\ -e "discovery.type=single-node" \\ -v es-data:/usr/share/elasticsearch/data \\ -v es-plugins:/usr/share/elasticsearch/plugins \\ --privileged \\ --network es-net \\ -p 9200:9200 \\ -p 9300:9300 \\elasticsearch:8.8.1
# 端口が開かない場合はssl認証とパスワード認証をオフにするxpack.security.enabled: falsexpack.security.http.ssl: enabled: false keystore.path: certs/http.p12
docker run -d \\--name kibana \\-e ELASTICSEARCH_HOSTS=http://es:9200 \\--network=es-net \\-p 5601:5601 \\kibana:8.8.1IK分詞器のインストール
docker exec -it es bash
./bin/elasticsearch-plugin install <https://github.com/medcl/elasticsearch-analysis-ik/releases/download/v8.8.1/elasticsearch-analysis-ik-8.8.1.zip>
exit# コンテナ再起動docker restart elasticsearchIKAnalyzer.cfg.xmlの設定内容を追加:
<?xml version="1.0" encoding="UTF-8"?><!DOCTYPE properties SYSTEM "<http://java.sun.com/dtd/properties.dtd>"><properties> <comment>IK Analyzer 拡張設定</comment> <!--ユーザーはここに独自の拡張辞典を配置可能、*** 拡張辞書を追加***--> <entry key="ext_dict">ext.dic</entry> <!--ユーザーはここに独自の拡張ストップワード辞書を配置可能、*** 停用語辞典を追加***--> <entry key="ext_stopwords">stopword.dic</entry></properties>対応ファイルを編集後、再起動してください。
分詞器の役割は?
- 倒排索引作成時の文章分詞
- ユーザー検索時の入力内容の分詞
IK分詞器にはいくつのモードがある?
- ik_smart:スマート分割、粗粒度
- ik_max_word:最細分割、細粒度
IK分詞器は語条をどう拡張する?語条をどう停止させる?
- configディレクトリのIkAnalyzer.cfg.xmlファイルに拡張語辞典と停止語辞典を追加
- 辞典に拡張語条または停止語条を追加
索引庫の操作
索引庫はデータベースのテーブルに相当し、mappingはテーブルの構造のようなものです。
ESにデータを保存するには、まず「データベース」と「テーブル」を作成する必要があります。
mapping映射属性
mappingはインデックス内のドキュメントの制約で、一般的なmapping属性には以下が含まれます:
- type:フィールドデータタイプ。代表的な基本型は:
- 字符串:text(分词可能なテキスト)、keyword(厳密値、例:ブランド、国、IPアドレス)
- 数値:long、integer、short、byte、double、float
- 布尔:boolean
- 日付:date
- オブジェクト:object
- index:インデックスを作成するかどうか。デフォルトはtrue
- analyzer:どの分詞器を使用するか
- properties:このフィールドのサブフィールド
索引庫のCRUD
索引庫操作には以下があります:
- 索引庫を作成:PUT /索引庫名
- 索引庫を検索:GET /索引庫名
- 索引庫を削除:DELETE /索引庫名
- フィールドを追加:PUT /索引庫名/_mapping
索引庫と映射の作成
基本構文:
- リクエスト方式:PUT
- リクエストパス:/索引庫名(自由に決めても良い)
- リクエストパラメータ:mapping映射
形式:
PUT /索引库名称{ "mappings": { "properties": { "字段名":{ "type": "text", "analyzer": "ik_smart" }, "字段名2":{ "type": "keyword", "index": "false" }, "字段名3":{ "properties": { "子字段": { "type": "keyword" } } }, // ... 略 } }}索引庫の検索
基本構文:
- リクエスト方式:GET
- パス:/索引库名
- パラメータ:なし
形式:
GET /索引库名索引庫の修改
倒排索引の構造は複雑ではありませんが、データ構造が変更された場合(例えば分詞器を変更した場合)は、倒排索引を再作成する必要があり、これは災難です。したがって、索引庫は作成後はmappingを変更できません。
既存のmappingのフィールドを変更することはできませんが、新しいフィールドをmappingに追加することは可能です。なぜなら倒排索引には影響を与えないからです。
文法説明:
PUT /索引庫名/_mapping{ "properties": { "新字段名":{ "type": "integer" } }}索引庫の削除
文法:
- リクエスト方式:DELETE
- パス:/索引库名
- パラメータ:なし
形式:
DELETE /索引库名ドキュメント操作
ドキュメント操作には以下があります:
- ドキュメントを作成:POST /{索引库名}/_doc/文書id { json文書 }
- ドキュメントを検索:GET /{索引库名}/_doc/文档id
- ドキュメントを削除:DELETE /{索引库名}/_doc/文档id
- ドキュメントを変更:
- 全量修改:PUT /{索引库名}/_doc/文档id { json文档 }
- 増分修改:POST /{索引库名}/_update/文档id { “doc”: {字段}}
新規文档
文法:
POST /索引库名/_doc/文档id{ "字段1": "値1", "字段2": "値2", "字段3": { "子属性1": "値3", "子属性2": "値4" }, // ...}文書の検索
RESTスタイルに基づくと、新規はPOST、検索はGETですが、検索には通常条件が必要なため、ここでは文書IDを含めます。
文法:
GET /{索引库名称}/_doc/{id}文書の削除
削除はDELETEリクエストを使用します。同様にIDで削除します:
文法:
DELETE /{索引库名}/_doc/id値文書の変更
変更には2つの方法があります:
- 全量修改:元の文書を上書き
- 増分修改:文書の一部フィールドを変更
全量修改
全量修改は元の文書を上書きするもので、本質は:
- 指定のIDで文書を削除
- 同じIDの新しい文書を追加
注意:IDで削除時にIDが存在しない場合、2番目の追加も実行され、変更から追加へと変わります。
文法:
PUT /{索引庫名}/_doc/文档id{ "字段1": "値1", "字段2": "値2", // ... 略}増量修改
増分修改は、指定IDに一致する文書の一部のフィールドだけを変更します。
文法:
POST /{索引庫名}/_update/文档id{ "doc": { "字段名": "新的值", }}RestAPI
Elasticsearch公式には、さまざまな言語のクライアントが提供されており、これらのクライアントは本質的にDSL文を組み立て、HTTPリクエストでESへ送信します。
JavaのRest Clientには2種類があります:
- Java Low Level Rest Client
- Java High Level Rest Client
索引庫操作の基本的な手順:
- RestHighLevelClientを初期化する
- XxxIndexRequestを作成。XxxはCreate、Get、Delete
- DSLを準備する(Create時のみ必要、他はパラメータなし)
- リクエストを送信する。RestHighLevelClient#indices().xxx()メソッドを呼び出す。xxxはcreate、exists、delete
RestClientの初期化
elasticsearchのAPIには、Elasticsearchとすべてのやり取りをRestHighLevelClientというクラスに封装しており、まずこのオブジェクトの初期化を完了して、Elasticsearchへの接続を作成する必要があります。
3つのステップに分かれます:
- ESのRestHighLevelClient依存関係を追加:
<dependency> <groupId>org.elasticsearch.client</groupId> <artifactId>elasticsearch-rest-high-level-client</artifactId></dependency>- SpringBootのデフォルトESバージョンは7.6.2なので、デフォルトのESバージョンを上書きします:
<properties> <java.version>1.8</java.version> <elasticsearch.version>7.12.1</elasticsearch.version></properties>- RestHighLevelClientを初期化します:
以下のコードで初期化します:
RestHighLevelClient client = new RestHighLevelClient(RestClient.builder( HttpHost.create("<http://127.0.0.1:9200>")));索引庫の作成
コードは3ステップに分かれます:
- Requestオブジェクトを作成。作成するのはIndexの作成なのでCreateIndexRequest
- リクエストパラメータを追加。実際にはDSLのJSONパラメータ部分。JSON文字列が長いため、静的文字列定数MAPPING_TEMPLATEを定義してコードをきれいにします
- リクエストを送信。client.indices()の戻り値はIndicesClientタイプで、インデックス操作に関連するすべてのメソッドを包含
constantsパッケージの中に、mapping映射のJSON文字列定数を定義するクラスを作成します。
テストクラスで、インデックスの作成を実装するユニットテストを作成します:
@Testvoid createHotelIndex() throws IOException { // 1.作成Requestオブジェクト CreateIndexRequest request = new CreateIndexRequest("hotel"); // 2.リクエストパラメータ:DSL文 request.source(MAPPING_TEMPLATE, XContentType.JSON); // 3.リクエストを送信 client.indices().create(request, RequestOptions.DEFAULT);}索引库の削除
索引庫のDSLは非常にシンプルです:
DELETE /hotel作成と比較して:
- リクエスト方式がPUTからDELETEへ変更
- パスは同じ
- パラメータはなし
従ってコードの差異はRequestオブジェクトに現れます。3ステップを踏みます:
- Requestオブジェクトを作成。今回はDeleteIndexRequest
- パラメータ準備。パラメータなし
- リクエストを送信。deleteメソッドを使用
hotel-demoのHotelIndexTestで、削除のユニットテストを作成します:
@Testvoid testDeleteHotelIndex() throws IOException { // 1.作成Requestオブジェクト DeleteIndexRequest request = new DeleteIndexRequest("hotel"); // 2.リクエスト送信 client.indices().delete(request, RequestOptions.DEFAULT);}索引库の存在確認
索引庫が存在するかどうかを判断するのは、検索と同様の流れです。対応するDSLは:
GET /hotelしたがって、削除と同様のJavaコードの流れになります。三段階:
- 1)Requestオブジェクトを作成。今回はGetIndexRequest
- 2)パラメータ準備。無参
- 3)送信。existsメソッドを使用
@Testvoid testExistsHotelIndex() throws IOException { // 1.作成Requestオブジェクト GetIndexRequest request = new GetIndexRequest("hotel"); // 2.リクエスト送信 boolean exists = client.indices().exists(request, RequestOptions.DEFAULT); // 3.出力 System.err.println(exists ? "索引庫は既に存在します!" : "索引庫は存在しません!");}RestClient操作文書
JavaRestClientを用いたElasticsearch操作の流れは基本的に同じです。コアはclient.indices()メソッドを用いて索引庫の操作オブジェクトを取得することです。
文書操作の基本ステップ:
- RestHighLevelClientを初期化
- XxxRequestを作成。XXXはIndex、Get、Update、Delete、Bulk
- パラメータを準備(Index、Update、Bulk時には必要)
- リクエストを送信。RestHighLevelClient#.xxx()メソッドを呼び出す。xxxはindex、get、update、delete、bulk
- 結果を解析(Getの場合)
新規文書
データベースのホテルデータを検索し、Elasticsearchに書き込みます。
対応する型を定義します(インデックス構造に合わせる):
package cn.itcast.hotel.pojo;
import lombok.Data;import lombok.NoArgsConstructor;
@Data@NoArgsConstructorpublic class HotelDoc { private Long id; private String name; private String address; private Integer price; private Integer score; private String brand; private String city; private String starName; private String business; private String location; private String pic;
public HotelDoc(Hotel hotel) { this.id = hotel.getId(); this.name = hotel.getName(); this.address = hotel.getAddress(); this.price = hotel.getPrice(); this.score = hotel.getScore(); this.brand = hotel.getBrand(); this.city = hotel.getCity(); this.starName = hotel.getStarName(); this.business = hotel.getBusiness(); this.location = hotel.getLatitude() + ", " + hotel.getLongitude(); this.pic = hotel.getPic(); }}新規文書のDSLは以下のとおり:
POST /{索引库名}/_doc/1{ "name": "Jack", "age": 21}索引庫作成と同様、3ステップです:
- Requestオブジェクト作成
- DSLとしてJSON文書を用意
- 送信
ここで変更点は、client.indices()ではなく、直接client.xxx APIを使用する点です。
ユニットテストの例:
@Testvoid testAddDocument() throws IOException { // 1.ホテルデータをIDから取得 Hotel hotel = hotelService.getById(61183L); // 2.ドキュメント型へ変換 HotelDoc hotelDoc = new HotelDoc(hotel); // 3.HotelDocをJSONへ変換 String json = JSON.toJSONString(hotelDoc);
// 1. Requestオブジェクトを準備 IndexRequest request = new IndexRequest("hotel").id(hotelDoc.getId().toString()); // 2. JSONドキュメントを準備 request.source(json, XContentType.JSON); // 3. 送信 client.index(request, RequestOptions.DEFAULT);}文書の検索
検索のDSLは以下のとおり:
GET /hotel/_doc/{id}非常にシンプルで、コードはおおむね2つのステップです:
- Requestオブジェクトを準備
- 送信
ただし検索の目的は結果を得て、HotelDocとして解析することです。そのため結果はJSONの_source属性として格納されているため、_sourceを取得してJavaオブジェクトへ逆シリアライズします。
結果は以下の3ステップ:
- Requestオブジェクトを用意(今回はGetRequest)
- 送信して結果を取得(client.get()を呼び出し)
- 結果を解析(JSONをデシリアライズ)
ユニットテスト:
@Testvoid testGetDocumentById() throws IOException { // 1.リクエスト準備 GetRequest request = new GetRequest("hotel", "61082"); // 2.リクエスト送信、応答を取得 GetResponse response = client.get(request, RequestOptions.DEFAULT); // 3.応答結果を解析 String json = response.getSourceAsString();
HotelDoc hotelDoc = JSON.parseObject(json, HotelDoc.class); System.out.println(hotelDoc);}文書の削除
削除のDSLは以下のとおり:
DELETE /hotel/_doc/{id}検索と比べ、リクエスト方式がDELETEになるだけです。Javaコードも3ステップです:
- Requestオブジェクトを準備。今回はDeleteRequest。インデックス名とIDを指定
- パラメータなし
- 送信。削除なのでclient.delete()を使用
ユニットテスト:
@Testvoid testDeleteDocument() throws IOException { // 1.リクエスト準備 DeleteRequest request = new DeleteRequest("hotel", "61083"); // 2.リクエスト送信 client.delete(request, RequestOptions.DEFAULT);}文書の修改
変更には2つの方法があります:
- 全量修改:まずIDで削除し、次に同じIDで追加
- 増分修改:文書内の特定フィールドを変更
RestClientのAPIでは、全量修改と追加のAPIはIDを基準にしており、次の条件で判定されます:
- 追加時にIDがすでに存在すれば変更
- 追加時にIDが存在しなければ追加
ここでは増分修改に焦点を当てます。
- Requestオブジェクト準備。今回はUpdateRequest
- パラメータ準備。更新したいJSON文書を含む
- 文書を更新。ここでclient.update()を呼び出す
ユニットテスト:
@Testvoid testUpdateDocument() throws IOException { // 1.リクエスト準備 UpdateRequest request = new UpdateRequest("hotel", "61083"); // 2.パラメータ準備 request.doc( "price", "952", "starName", "四つ星" ); // 3.送信 client.update(request, RequestOptions.DEFAULT);}バッチ導入文書
ケース要件:BulkRequestを利用してデータベースデータを一括して索引庫へ導入。
手順は以下のとおり:
- mybatis-plusでホテルデータを照会
- 照会したホテルデータ(Hotel)を、文書タイプデータ(HotelDoc)へ変換
- JavaRestClientのBulkRequestを用いて一括追加文書を実現
BulkRequestの本質は、複数のCRUDリクエストを一括して送信することです。addメソッドが提供されており、他のリクエストを追加できます:
- IndexRequest:新規追加
- UpdateRequest:更新
- DeleteRequest:削除
ユニットテスト:
@Testvoid testBulkRequest() throws IOException { // 一括でホテルデータを照会 List<Hotel> hotels = hotelService.list();
// 1. Requestを作成 BulkRequest request = new BulkRequest(); // 2. パラメータ準備。複数の新規追加リクエストを追加 for (Hotel hotel : hotels) { // 2.1. HotelDocへ変換 HotelDoc hotelDoc = new HotelDoc(hotel); // 2.2. 新規追加のRequestを作成 request.add(new IndexRequest("hotel") .id(hotelDoc.getId().toString()) .source(JSON.toJSONString(hotelDoc), XContentType.JSON)); } // 3. 送信 client.bulk(request, RequestOptions.DEFAULT);}DSLによる文書検索
Elasticsearchの検索は引き続きJSON風のDSLを用いて実現します。
DSL検索の分類
ElasticsearchはJSONベースのDSL(Domain Specific Language)を提供して、検索を定義します。代表的な検索タイプは以下のとおり:
- 全件検索:すべてのデータを検索、一般的なテストとして。例:match_all
- 全文検索(full text):入力を分詞して、倒排索引と照合。例:
- match_query
- multi_match_query
- 精密検索:特定の語条の値でデータを検索。通常はkeyword、数値、日付、booleanなどのフィールドに対して:
- ids
- range
- term
- 地理(geo)検索:緯度経度で検索。例:
- geo_distance
- geo_bounding_box
- 複合(compound)検索:上記の複数条件を組み合わせて、複雑な検索を実現
- bool
- function_score
検索の基本的な文法はほぼ同じです:
GET /indexName/_search{ "query": { "検索タイプ": { "検索条件": "条件値" } }}全文検索クエリ
全文検索クエリの基本的な流れは以下のとおりです:
- ユーザーが検索する内容を分詞して、語条を得る
- 語条を倒排索引でマッチさせ、文書IDを得る
- 文書IDから文書を検索してユーザーに返す
よく使われる状況は次のとおり:
- ECサイトの検索ボックス
- 百度の検索ボックス
よくある全文検索クエリには次のものがあります:
- matchクエリ:単一フィールドの検索
GET /indexName/_search{ "query": { "match": { "FIELD": "TEXT" } }}- multi_matchクエリ:複数フィールドの検索。一方のフィールドでも条件を満たせば検索条件を満たしたとみなす;検索対象フィールドが多いほど検索性能が低下
GET /indexName/_search{ "query": { "multi_match": { "query": "TEXT", "fields": ["FIELD1", " FIELD12"] } }}精密検索
精密検索は通常、keyword、数値、日付、booleanなどのフィールドを対象とするため、検索条件は分词されません。よくあるもの:
-
term:語条の厳密値で検索。通常はkeywordタイプ、数値タイプ、布尔型、日付型のフィールドを検索
分词されていないフィールドを検索するため、入力する条件も非分詞語条である必要があります。ユーザー入力が完全一致する場合のみ、条件に合致すると見なされます。もし入力が多すぎると、データを見つけることができなくなる場合があります。
// termクエリGET /indexName/_search{ "query": { "term": { "FIELD": { "value": "VALUE" } } }}- range:値の範囲で検索。数値や日付の範囲を対象
// rangeクエリGET /indexName/_search{ "query": { "range": { "FIELD": { "gte": 10, // ここでgteは「以上」、gtは「より大きい」 "lte": 20 // lteは「以下」、ltは「未満」 } } }}地理坐標検索
地理座標検索は、要するに経緯度に基づく検索です。
よくあるケース:
- 携程:周辺のホテルを検索
- 滴滴:周辺のタクシーを検索
- 微信:周辺の人を検索
- 矩形範囲検索
矩形範囲検索、すなわちgeo_bounding_box検索、特定の矩形範囲内のすべての文書を検索します。
検索時には矩形の左上、右下の2点の座標を指定し、矩形を描画します。その矩形内に落ちる座標が条件を満たします。
// geo_bounding_boxクエリGET /indexName/_search{ "query": { "geo_bounding_box": { "FIELD": { "top_left": { // 左上点 "lat": 31.1, "lon": 121.5 }, "bottom_right": { // 右下点 "lat": 30.9, "lon": 121.7 } } } }}-
周辺検索
周辺検索、別名距離検索(geo_distance):中心点から指定距離以下の全文書を検索。
すなわち、地図上の点を円心とし、半径を距離として円を描き、円内の座標をすべて条件として扱います。
// geo_distance クエリGET /indexName/_search{ "query": { "geo_distance": { "distance": "15km", // 半径 "FIELD": "31.21,121.5" // 円心 } }}複合検索
複合検索(compound)は、他のシンプルな検索を組み合わせ、より複雑な検索ロジックを実現します。一般的には2つの形:
- fuction_score:スコア算出関数検索で、文書の関連性スコアを制御し、文書の順位を操作
- boolクエリ:ブール条件で複数の他の検索を組み合わせ、複雑な検索を実現
関連性スコア
matchクエリを使うと、文書結果は検索語条との関連度(_score)に基づいてスコアリングされ、結果はスコアの降順で返されます。
早期のTF-IDFアルゴリズムを使っていたElasticsearchは、5.1でBM25アルゴリズムへ置換されました。
BM25の式は以下のとおりです:
Score(Q,d) = ∑_{i=1}^n log(1 + (N-n+0.5)/(n+0.5)) * f_i / (f_i + k_1*(1-b+b*(dl/avgdl)))TF-IDFには欠点があり、語条の頻度が高いと文書のスコアが高くなりすぎる点がありました。BM25は単一語条のスコアに上限を設け、曲線をより滑らかにします。
算分関数クエリ
関連性に基づくスコアリングは合理的な要件ですが、必ずしも製品マネージャーの要件に適うとは限りません。
百度の例では、結果の関連性が高いほど上位になるとは限らず、誰が金を多く払うかで順位が決まる場合もあります。
関連性算出をコントロールするには、Elasticsearchのfunction_scoreクエリを使います。
function_scoreクエリは4つの要素を含みます:
- 原始クエリ(query):この条件で文書を検索し、BM25に基づく原始スコア(query score)を得る
- フィルタ条件(filter):この条件を満たす文書だけが再スコアリング対象になる
- 算分関数(functions):filter条件を満たす文書に対してこの関数で演算し、得られる関数算分(function score)を得る。4種類の関数
- weight:定数としての関数結果
- field_value_factor:文書中の特定フィールド値を関数結果として使用
- random_score:乱数を関数結果として使用
- script_score:独自算分関数アルゴリズム
- 運算モード(boost_mode):function_scoreの結果と原始クエリの関連性スコアの演算方式を決定
function_scoreの実行フローは次のとおりです:
- 原始条件で文書を検索し、関連性算分(query score)を計算
- filter条件で文書をフィルタ
- filter条件を満たす文書を、算分関数で演算し、関数算分を得る
- 原始算分と関数算分を、boost_modeに基づいて演算し、最終結果として関連性算分を得る
GET /hotel/_search{ "query": { "function_score": { "query": { .... }, // 原始検索、任意の条件 "functions": [ // 算分関数 { "filter": { // 満たす条件、ブランドが如家 "term": { "brand": "如家" } }, "weight": 2 // 算分のウェイトを2に設定 } ], "boost_mode": "sum" // 加重モード、合計 } }}function_scoreクエリの3要素は?
- フィルター条件:どの文書を加点するか
- 算分関数:function_scoreの計算方法
- 加重方式:function_scoreとquery scoreの演算方法
ブールクエリ
ブールクエリは、1つ以上のサブクエリを組み合わせたものです。サブクエリの組み合わせ方には:
- must:各サブクエリを必ずマッチさせる(AND)
- should:サブクエリの任意一致(OR的な要素)
- must_not:必ず一致しない(スコアには関与しない)
- filter:必ず一致(スコアには関与しない)
検索時、スコアリングに参与するフィールドが多いほど性能が低下する可能性があるため、次のように分けて使うと良いです:
- 検索ボックスのキーワード検索は全文検索クエリを使い、mustで算分に参加させる
- その他のフィルタ条件はfilterで使用。算分には参加させない
GET /hotel/_search{ "query": { "bool": { "must": [ {"term": {"city": "上海" }} ], "should": [ {"term": {"brand": "皇冠假日" }}, {"term": {"brand": "华美达" }} ], "must_not": [ { "range": { "price": { "lte": 500 } } } ], "filter": [ { "range": {"score": { "gte": 45 } } } ] } }}検索結果の処理
検索結果は、ユーザーが指定した方法で処理または表示できます。
ソート
Elasticsearchはデフォルトで関連性スコア(_score)でソートしますが、検索結果のソートをカスタムすることもできます。ソート可能なフィールドタイプには、keyword、数値、地理座標、日付などがあります。
-
通常のフィールドのソート
keyword、数値、日付タイプのソートの文法はほぼ同じ。
GET /indexName/_search{ "query": { "match_all": {} }, "sort": [ { "FIELD": "desc" // ソート対象フィールド、ASCまたはDESC } ]}-
緯度経度ソート
地理座標ソートは少し異なります。
GET /indexName/_search{ "query": { "match_all": {} }, "sort": [ { "_geo_distance" : { "FIELD" : "latitude, longitude", // ドキュメントのgeo_point型フィールド名とターゲット座標 "order" : "asc", // ソート順 "unit" : "km" // ソートの距離単位 } } ]}このクエリの意味は:
- 座標を指定し、それをターゲット点として使用する
- 各文書中の指定フィールド(geo_point型である必要あり)の座標とターゲット点との距離を計算
- 距離に基づいてソート
ページネーション
Elasticsearchはデフォルトでトップ10のみ返します。より多くのデータを取得するには、fromとsizeパラメータを使ってページネーションを制御します。
- from:何番目の文書から開始するか
- size:取得する文書数の総数
Mysqlのlimit ?, ? に相当します。
基本的なページネーションの形式:
GET /hotel/_search{ "query": { "match_all": {} }, "from": 0, // ページ開始位置、デフォルトは0 "size": 10, // 取得したい文書の総数 "sort": [ {"price": "asc"} ]}深いページネーションはメモリとCPUに大きな負荷を与えるため、from + size の組み合わせは10000を超えないよう Elasticsearchが制限します。
深いページネーションへの対応として、ESはいくつかの解決策を提供します。
- search_after:ソートが必要な場合に、前回のソート値から次のページを取得する方法。公式推奨。
- scroll:ソートした文書IDのスナップショットをメモリに保存する方式。公式は推奨していません。
depth pagination の実装案と長所・短所:
from + size:- 長所:ランダムアクセスが可能
- 短所:深いページネーションの上限が10000
- 想定シナリオ:百度、京東、Google、淘宝などのランダムページネーション検索
after(search_after):- 長所:上限なし(単一のクエリのsizeが10000を超えなければOK)
- 短所:後ろへのみ逐次ページネーション、ランダムページは不可
- 想定シナリオ:ランダムページネーションを必要としない検索
scroll:- 長所:上限なし
- 短所:追加のメモリ消費、検索結果はリアルタイムではない
- 想定シナリオ:大量データの取得・移行。ES7.1以降は推奨されず、after searchの方を推奨
ハイライト
百度や京東の検索では、キーワードが赤カラーで強調表示されます。これがハイライト表示です。
ハイライトの実装は2段階:
- ドキュメント中のすべてのキーワードにタグを追加(例:
<em>タグ) - ページで
<em>タグのCSSを作成
ハイライトの構文:
GET /hotel/_search{ "query": { "match": { "FIELD": "TEXT" // クエリ条件。ハイライトは全文検索が必須 } }, "highlight": { "fields": { // ハイライト対象フィールドを指定 "FIELD": { "pre_tags": "<em>", // ハイライト前置タグ "post_tags": "</em>" // ハイライト後置タグ } } }}注意事項:
- ハイライトはキーワードに対して行われるため、検索条件は必ずキーワードを含む全文検索である必要があります。範囲条件などの検索ではハイライトは生成されません。
- デフォルトでは、ハイライト対象フィールドは検索で指定したフィールドと同一である必要があります。そうでない場合はハイライトされません
- 検索対象外のフィールドをハイライトしたい場合は、属性を追加する必要があります:
required_field_match=false
RestClientによる文書検索
RestHighLevelClientオブジェクトを使う前提の検索は、RestClientでも基本的には同様です。核心はclient.indices()メソッドを使用して索引操作オブジェクトを取得する点です。
文書検索の基本手順:
- RestHighLevelClientを初期化
- XxxRequestを作成。XXXはIndex、Get、Update、Delete、Bulk
- パラメータを準備(Index、Update、Bulk時には必要)
- リクエストを送信。client.xxx()を呼び出す
- 結果を解析
新規文書の追加
ホテルデータをElasticsearchに追加します。
インデックス設計と構造に合わせて新しいタイプを定義します:
package cn.itcast.hotel.pojo;
import lombok.Data;import lombok.NoArgsConstructor;
@Data@NoArgsConstructorpublic class HotelDoc { private Long id; private String name; private String address; private Integer price; private Integer score; private String brand; private String city; private String starName; private String business; private String location; private String pic;
public HotelDoc(Hotel hotel) { this.id = hotel.getId(); this.name = hotel.getName(); this.address = hotel.getAddress(); this.price = hotel.getPrice(); this.score = hotel.getScore(); this.brand = hotel.getBrand(); this.city = hotel.getCity(); this.starName = hotel.getStarName(); this.business = hotel.getBusiness(); this.location = hotel.getLatitude() + ", " + hotel.getLongitude(); this.pic = hotel.getPic(); }}新規文書のDSL:
POST /{索引庫名}/_doc/1{ "name": "Jack", "age": 21}索引庫作成と同様、3ステップです:
- Requestオブジェクトを作成
- JSON文書を準備
- 送信
コード内のAPIは、client.indices()の代わりに直接client.xxx()を使用します。
ユニットテスト:
@Testvoid testAddDocument() throws IOException { // 1. IDでホテルデータを検索 Hotel hotel = hotelService.getById(61083L); // 2. HotelDocへ変換 HotelDoc hotelDoc = new HotelDoc(hotel); // 3. HotelDocをJSONへ変換 String json = JSON.toJSONString(hotelDoc);
// 1. Requestオブジェクトを準備 IndexRequest request = new IndexRequest("hotel").id(hotelDoc.getId().toString()); // 2. JSON文書を準備 request.source(json, XContentType.JSON); // 3. 送信 client.index(request, RequestOptions.DEFAULT);}文書の検索
検索のDSLは以下のとおり:
GET /hotel/_doc/{id}非常にシンプルなため、コードは概ね2ステップです:
- Requestオブジェクト作成
- 送信
ただし検索の目的は結果を得て、それをHotelDocへデシリアライズすることです。そのため、結果は_sourceとして格納されているので、それを取得してJavaオブジェクトへデシリアライズします。
- Requestオブジェクトを作成。今回はGetRequest
- 送信して結果を取得。GetResponseを使用
- 結果を解析。JSONをデシリアライズ
ユニットテスト:
@Testvoid testGetDocumentById() throws IOException { // 1.リクエスト作成 GetRequest request = new GetRequest("hotel", "61082"); // 2.リクエストを送信して応答を取得 GetResponse response = client.get(request, RequestOptions.DEFAULT); // 3.応答結果を解析 String json = response.getSourceAsString();
HotelDoc hotelDoc = JSON.parseObject(json, HotelDoc.class); System.out.println(hotelDoc);}文書の削除
削除のDSLは次のとおり:
DELETE /hotel/_doc/{id}検索と比べ、リクエスト方式がGETへ変更されるだけです。Javaコードは3ステップ:
- Requestオブジェクトを準備。今回はDeleteRequest
- パラメータなし
- 送信。削除なのでclient.delete()を使用
ユニットテスト:
@Testvoid testDeleteDocument() throws IOException { // 1.リクエスト準備 DeleteRequest request = new DeleteRequest("hotel", "61083"); // 2.リクエスト送信 client.delete(request, RequestOptions.DEFAULT);}文書の変更
変更には2つの方法があります:
- 全量修改:まずIDで削除、次に同じIDで追加
- 増分修改:文書の特定フィールドを変更
RestClientのAPIでは、全量修改と追加のAPIはIDで判定します:
- 追加時にIDが既に存在すれば変更
- 追加時にIDが存在しなければ追加
ここでは増分修改にフォーカスします。
- Requestオブジェクト準備。今回はUpdateRequest
- パラメータ準備。変更するフィールドを含むJSON文書
- 文書を更新。ここではclient.update()を呼び出します
ユニットテスト:
@Testvoid testUpdateDocument() throws IOException { // 1.リクエスト準備 UpdateRequest request = new UpdateRequest("hotel", "61083"); // 2.リクエストパラメータ request.doc( "price", "952", "starName", "四つ星" ); // 3.送信 client.update(request, RequestOptions.DEFAULT);}バッチ導入文書
ケース:BulkRequestを用いてデータベースデータを一括して索引庫へ導入。
手順:
- MyBatis-Plusでホテルデータを検索
- 検索されたホテルデータ(Hotel)を、文書型データ(HotelDoc)へ変換
- BulkRequestを用いて一括追加文書を実現
BulkRequestは複数のCRUDリクエストをまとめて送信します。addメソッドで他のリクエストを追加可能です:
追加可能なリクエストには以下があります:
- IndexRequest(新規追加)
- UpdateRequest(更新)
- DeleteRequest(削除)
ユニットテスト:
@Testvoid testBulkRequest() throws IOException { // 一括でホテルデータを取得 List<Hotel> hotels = hotelService.list();
// 1. Requestを作成 BulkRequest request = new BulkRequest(); // 2. パラメータを準備、複数の新規追加Requestを追加 for (Hotel hotel : hotels) { // 2.1. HotelDocへ変換 HotelDoc hotelDoc = new HotelDoc(hotel); // 2.2. 新規追加のRequestを作成 request.add(new IndexRequest("hotel") .id(hotelDoc.getId().toString()) .source(JSON.toJSONString(hotelDoc), XContentType.JSON)); } // 3. 送信 client.bulk(request, RequestOptions.DEFAULT);}DSL検索
Elasticsearchの検索は、JSONスタイルのDSLに基づいて実装されます。
DSL検索の分類
ElasticsearchはJSONベースのDSLを提供し、定義された検索として以下が一般的です:
- 全件検索:すべてのデータを検索。例:match_all
- 全文検索(full text):分詞器を用いて入力を分詞し、倒排索引と一致
- match_query
- multi_match_query
- 正確検索:語条の厳密値で検索。通常はkeyword、数値、日付、booleanなど
- ids
- range
- term
- 地理(geo)検索:経緯度ベース
- geo_distance
- geo_bounding_box
- 複合(compound)検索:他の検索条件を組み合わせる
- bool
- function_score
検索の文法はほぼ共通です:
GET /indexName/_search{ "query": { "検索タイプ": { "検索条件": "条件値" } }}全文検索クエリ
全文検索クエリの基本的な流れ:
- ユーザーの検索内容を分詞して語条を得る
- 語条を倒排索引で検索して文書IDを得る
- 文書IDから文書を検索して返す
代表的なシーン:
- ショッピングサイトの検索ボックス
- 百度の検索ボックス
よく使われる全文検索クエリ:
- matchクエリ:単一フィールドの検索
GET /indexName/_search{ "query": { "match": { "FIELD": "TEXT" } }}- multi_matchクエリ:複数フィールドの検索。条件を満たすフィールドが多いほど性能が低下
GET /indexName/_search{ "query": { "multi_match": { "query": "TEXT", "fields": ["FIELD1", " FIELD12"] } }}正確検索
正確検索は、主に次の2つです:
-
term:語条の厳密値で検索。通常はkeyword、数値、boolean、日付のフィールドを検索
なぜなら、正確検索対象のフィールドは分詞されていないため、検索条件も非分詞の語条である必要があります。ユーザーが入力した内容が完全一致する場合にのみ、条件に合致するとみなされます。もし入力が多すぎると、データを見つけられなくなることがあります。
// termクエリGET /indexName/_search{ "query": { "term": { "FIELD": { "value": "VALUE" } } }}- range:値の範囲で検索。数値・日付の範囲
// rangeクエリGET /indexName/_search{ "query": { "range": { "FIELD": { "gte": 10, // 大なり以上 "lte": 20 // 小なり以下 } } }}地理座標検索
地理座標検索は、経緯度に基づく検索です。
よくあるシナリオ:
- 携程:周辺のホテルを検索
- 滴滴:周辺のタクシーを検索
- WeChat:周辺の人を検索
- 矩形範囲検索
矩形範囲検索、すなわちgeo_bounding_boxクエリは、座標が矩形範囲内に落ちる全ての文書を検索します。
検索時には矩形の左上と右下の2点の座標を指定し、矩形を作成します。その矩形内の座標が条件を満たします。
// geo_bounding_boxクエリGET /indexName/_search{ "query": { "geo_bounding_box": { "FIELD": { "top_left": { // 左上点 "lat": 31.1, "lon": 121.5 }, "bottom_right": { // 右下点 "lat": 30.9, "lon": 121.7 } } } }}-
近隣検索
近隣検索、別名距離検索(geo_distance):中心点から指定距離以下の文書を検索。
言い換えれば、地図上の点を円心として、指定距離を半径とする円を描き、その円内の座標を条件とします。
// geo_distance クエリGET /indexName/_search{ "query": { "geo_distance": { "distance": "15km", // 半径 "FIELD": "31.21,121.5" // 円心 } }}複合クエリ
複合(compound)クエリは、他の複数のクエリを組み合わせて、より複雑な検索ロジックを実現します。一般的には2種類:
- fuction score:スコア算出関数クエリ。文書の関連性を制御して、順位を調整
- boolクエリ:論理演算によって複数のクエリを組み合わせ、複雑な検索を実現
関連性スコア
matchクエリを使用すると、ドキュメントの結果は検索語条との関連度に基づいてスコア付けされ、結果はスコアの降順で返されます。
BM25以前のTF-IDFアルゴリズムは、語条頻度が高いほど文書のスコアが高くなる欠点がありました。BM25は単一語条のスコアに上限を設け、曲線を滑らかにします。
スコア関数クエリ
関連度スコアを制御するにはfunction_scoreクエリを使います。
function_scoreクエリには4つの要素があります:
- 原始クエリ(query):この条件で文書を検索し、BM25アルゴリズムに基づく原始スコア(query score)を得る
- フィルタ条件(filter):この条件を満たす文書のみ再スコアリング対象になる
- 算分関数(functions):条件を満たす文書に対してこの関数で演算して得られる関数算分(function score)がある。4つの関数
- weight:関数結果は定数
- field_value_factor:文書中の特定フィールド値を関数結果として使用
- random_score:乱数を関数結果として使用
- script_score:カスタム算分関数
- 運算モード(boost_mode):function_scoreの結果と原始クエリの関連性算分をどう組み合わせるか
function_scoreの実行フローは以下のとおりです:
- 原始条件で文書を検索し、関連性算分(query score)を計算
- filter条件で文書をフィルタ
- filter条件を満たす文書は、算分関数で演算して関数算分を得る
- 原始算分(query score)と関数算分を、運用モードに基づいて演算して最終結果の関連性算分を得る
GET /hotel/_search{ "query": { "function_score": { "query": { .... }, // 原始クエリ、任意の条件 "functions": [ // 算分関数 { "filter": { // 条件を満たす、ブランドが如家である "term": { "brand": "如家" } }, "weight": 2 // 算分のウェイト } ], "boost_mode": "sum" // 加重モード、加算 } }}function_scoreクエリの3要素は?
- フィルター条件:どの文書に点数を与えるか
- 算分関数:function_scoreの計算方法
- 加重方式:function_scoreとquery scoreの演算方法
ブールクエリ
ブールクエリは、1つ以上のサブクエリの組み合わせで、各サブクエリは「サブクエリ」です。サブクエリの組み合わせ方法には:
- must:各サブクエリを必ずマッチさせる、つまり「AND」
- should:サブクエリの任意一致、つまり「OR」
- must_not:必ずマッチしない、スコアには参加しない、つまり「NOT」
- filter:必ずマッチ、スコアには参加しない
検索時、スコアリングに参加するフィールドが多いほど、検索の性能は低下します。したがって、次のように多条件検索を行うのが望ましいです。
- 検索ボックスのキーワード検索は全文検索クエリを使用し、mustで算分に参加させる
- その他のフィルタ条件はfilterで使用。算分には参加させない
GET /hotel/_search{ "query": { "bool": { "must": [ {"term": {"city": "上海" }} ], "should": [ {"term": {"brand": "皇冠假日" }}, {"term": {"brand": "华美达" }} ], "must_not": [ { "range": { "price": { "lte": 500 } } } ], "filter": [ { "range": {"score": { "gte": 45 } } } ] } }}検索結果の処理
検索結果は、ユーザーが指定した方式で処理・表示できます。
並べ替え
デフォルトでは、Elasticsearchは関連性スコアに基づいて並べ替えしますが、検索結果の並べ替えをカスタムすることも可能です。検索結果の並べ替え。ソート可能なフィールドタイプには、keywordタイプ、数値、地理座標、日付などがあります。
-
普通のフィールドのソート
keyword、数値、日付タイプのソートの文法はほぼ同じ。
GET /indexName/_search{ "query": { "match_all": {} }, "sort": [ { "FIELD": "desc" // ソートフィールド、ソート方法はASCまたはDESC } ]}-
緯度経度ソート
地理座標ソートは少し違います。
GET /indexName/_search{ "query": { "match_all": {} }, "sort": [ { "_geo_distance" : { "FIELD" : "緯度, 経度", // ドキュメント中のgeo_point型フィールド名、ターゲット座標 "order" : "asc", // ソート順 "unit" : "km" // 距離の単位 } } ]}この検索の意味は:
- 座標を指定して、ターゲット点として使う
- ドキュメント中の指定フィールド(geo_point型である必要あり)の座標とターゲット点の距離を算出
- 距離に基づいてソート
ページネーション
Elasticsearchはデフォルトでトップ10のみ返します。より多くのデータを取得するには、fromとsizeで分页を制御します。
from:開始位置
size:取得するドキュメント数
Mysqlのlimit ?, ?に相当
基本的なページネーションの形式:
GET /hotel/_search{ "query": { "match_all": {} }, "from": 0, // ページの開始位置、デフォルトは0 "size": 10, // 取得したいドキュメント数 "sort": [ {"price": "asc"} ]}深いページネーションは、メモリとCPUに大きな負荷を与えるため、from+sizeの組み合わせでのリクエストを10000を超えないように制限します。
深いページネーションへの対応として、ESは以下の2つの解決策を提供します。
- search after:ソートが必要な場合、前回のソート値から次ページを取得する。公式推奨
- scroll:ソート済みの文書IDをスナップショットとしてメモリに保持する。公式は推奨せず
ページネーションの実装方法と長所・短所:
from + size:- 長所:ランダムページネーション対応
- 短所:深いページネーションの上限は10000
- シナリオ:百度、京東、Google、淘宝のようなランダムページネーション検索
after(search_after):- 長所:クエリごとにサイズが10000を超えない限り、制限なし
- 短所:後ろへのみページ進行、ランダムページは不可
- シナリオ:ランダムページネーションの必要がない検索
scroll:- 長所:上限なし
- 短所:追加のメモリ消費、検索結果はリアルタイムではない
- シナリオ:大量データの取得・移行。ES7.1以降は推奨されず、after searchを使用する推奨
ハイライト
百度、京東の検索では、キーワードが赤色で表示されます。これがハイライト表示です。
ハイライトの実装は2段階:
- ドキュメント中のすべてのキーワードにタグを追加する(例:
<em>タグ) - ページ上で
<em>タグのCSSを作成する
ハイライトの構文:
GET /hotel/_search{ "query": { "match": { "FIELD": "TEXT" // クエリ条件、ハイライトは必ず全文検索を使う } }, "highlight": { "fields": { // ハイライトするフィールドを指定 "FIELD": { "pre_tags": "<em>", // ハイライト前置タグ "post_tags": "</em>" // ハイライト後置タグ } } }}注意事項:
- ハイライトはキーワードに対して行われるため、検索条件は必ずキーワードを含む必要があります。範囲条件のような検索ではハイライトは表示されません
- デフォルトでは、ハイライト対象フィールドは検索で指定されたフィールドと一致している必要があります。そうでない場合、ハイライトされません
- 検索対象外のフィールドをハイライトする場合は、属性を追加する必要があります:
required_field_match=false
RestClientによる文書検索
RestHighLevelClientと同様の流れでElasticsearchを操作します。核心はclient.indices()メソッドで索引操作オブジェクトを取得します。
文書検索の基本ステップ:
- RestHighLevelClientを初期化
- XxxRequestを作成。XXXはIndex、Get、Update、Delete、Bulk
- パラメータを準備(Index、Update、Bulk時)
- リクエストを送信。client.xxx()を呼び出す
- 結果を解析
迅速な入門
@Testvoid testMatchAll() throws IOException { // 1.リクエストを準備 SearchRequest request = new SearchRequest("hotel"); // 2.DSLを準備 request.source() .query(QueryBuilders.matchAllQuery()); // 3.リクエストを送信 SearchResponse response = client.search(request, RequestOptions.DEFAULT);
// 4.応答を解析 handleResponse(response);}
private void handleResponse(SearchResponse response) { // 4.応答を解析 SearchHits searchHits = response.getHits(); // 4.1.総件数を取得 long total = searchHits.getTotalHits().value; System.out.println("共検索到 " + total + " 件のデータ"); // 4.2. ドキュメント配列 SearchHit[] hits = searchHits.getHits(); // 4.3. ループ for (SearchHit hit : hits) { // ドキュメントのsourceを取得 String json = hit.getSourceAsString(); // 逆シリアライズ HotelDoc hotelDoc = JSON.parseObject(json, HotelDoc.class); System.out.println("hotelDoc = " + hotelDoc); }}- 第1歩:
SearchRequestオブジェクトを作成し、インデックス名を指定 - 第2歩:
request.source()を用いてDSLを構築。DSLには検索、ページネーション、ソート、ハイライトなどが含まれるquery():検索条件。本質的にはQueryBuilders.matchAllQuery()等を使って、検索条件を構築
- 第3歩:
client.search()でリクエストを送信して、レスポンスを取得
Elasticsearchの返却結果はJSON文字列で、以下の構造を含みます:
hits:ヒットした結果total:総ヒット数。valueが具体的な総数max_score:すべての結果の中で最も高い関連度スコアhits:検索結果の文書配列。それぞれがJSONオブジェクト_source:ドキュメントの元データ、JSONオブジェクト
したがって、応答を解析するには、JSON文字列を階層的に解析します。
SearchHits:response.getHits()で取得。JSONの最外層のhitsSearchHits#getTotalHits().value:総件数を取得SearchHits#getHits():SearchHitの配列を取得。文書配列SearchHit#getSourceAsString():ドキュメントの_sourceを取得。元のJSONデータ
matchクエリ
全文検索のmatchとmulti_matchクエリは、match_allのAPIと基本的には同じです。差異は、クエリの条件部分です。
従って、Javaコードでの差異は、request.source().query()内のパラメータになります。以下は同様にQueryBuildersを使用します。
@Testvoid testMatch() throws IOException { // 1.リクエスト準備 SearchRequest request = new SearchRequest("hotel"); // 2.DSL準備 request.source() .query(QueryBuilders.matchQuery("all", "如家")); // 3.リクエスト送信 SearchResponse response = client.search(request, RequestOptions.DEFAULT); // 4.応答を解析 handleResponse(response);}正確検索
正確検索は主に次の2つです:
- term:語条の正確なマッチ
- range:範囲検索
他のクエリとの違いは、検索条件が分詞されない点です。
//語条検索QueryBuilders.termQuery("city","杭州");
//範囲検索QueryBuilders.rangeQuery("price").gte(100).lte(150);ブールクエリ
ブールクエリは、must、must_not、filter等を用いて他のクエリを組み合わせます。
APIは他のクエリと同様に、条件の構築部分だけが異なります。
@Testvoid testBool() throws IOException { // 1.リクエスト準備 SearchRequest request = new SearchRequest("hotel"); // 2.DSL準備 // 2.1 Booleanクエリの準備 BoolQueryBuilder boolQuery = QueryBuilders.boolQuery(); // 2.2 termの追加 boolQuery.must(QueryBuilders.termQuery("city", "杭州")); // 2.3 rangeの追加 boolQuery.filter(QueryBuilders.rangeQuery("price").lte(250));
request.source().query(boolQuery); // 3.リクエスト送信 SearchResponse response = client.search(request, RequestOptions.DEFAULT); // 4.応答を解析 handleResponse(response);}ソート、ページネーション
検索結果のソートとページネーションは、クエリと同階層のパラメータとして設定します。
@Testvoid testPageAndSort() throws IOException { // ページ数・1ページあたりのサイズ int page = 1, size = 5;
// 1.リクエスト準備 SearchRequest request = new SearchRequest("hotel"); // 2.DSL準備 // 2.1 query request.source().query(QueryBuilders.matchAllQuery()); // 2.2 sort request.source().sort("price", SortOrder.ASC); // 2.3 from, sizeでページネーション request.source().from((page - 1) * size).size(5); // 3.リクエスト送信 SearchResponse response = client.search(request, RequestOptions.DEFAULT); // 4.応答を解析 handleResponse(response);}ハイライト
ハイライトのコードは前者のコードと大きく異なる点が2つあります:
- DSLの構造:クエリ条件に加えて、ハイライト条件を追加する必要がある
- 結果の解析:
_sourceドキュメントデータだけでなく、ハイライト結果の解析が必要
以下はハイライトの例と、その取得処理の要点です。
@Testvoid testHighlight() throws IOException { // 1.準備Request SearchRequest request = new SearchRequest("hotel"); // 2.DSL準備 // 2.1.クエリ request.source().query(QueryBuilders.matchQuery("all", "如家")); // 2.2.ハイライト request.source().highlighter(new HighlightBuilder().field("name").requireFieldMatch(false)); // 3.送信 SearchResponse response = client.search(request, RequestOptions.DEFAULT); // 4.解析 handleResponse(response);}
private void handleResponse(SearchResponse response) { // 4.解析結果 SearchHits searchHits = response.getHits(); long total = searchHits.getTotalHits().value; System.out.println("共検索到" + total + "条数据"); SearchHit[] hits = searchHits.getHits(); for (SearchHit hit : hits) { // sourceを取得 String json = hit.getSourceAsString(); HotelDoc hotelDoc = JSON.parseObject(json, HotelDoc.class); // ハイライト結果を取得 Map<String, HighlightField> highlightFields = hit.getHighlightFields(); if (!CollectionUtils.isEmpty(highlightFields)) { HighlightField highlightField = highlightFields.get("name"); if (highlightField != null) { String name = highlightField.getFragments()[0].string(); hotelDoc.setName(name); } } System.out.println("hotelDoc = " + hotelDoc); }}ブラックホース旅行ケース
以下では、ブラックホース旅行のケースを用いて、これまで学んだ知識を実戦的に練習します。
実現する4つの機能:
- ホテル検索とページネーション
- ホテル結果のフィルタリング
- 周辺のホテル検索
- ホテルの入札ランキング
ホテル検索とページネーション
ケース要件:ブラックホース旅行のホテル検索機能を実装。キーワード検索とページネーションを実現。
エンティティの定義
エンティティは2つ。フロントエンドのリクエストパラメータ用エンティティと、サービスが返却するレスポンス結果エンティティ。
// リクエストpackage cn.itcast.hotel.pojo;import lombok.Data;
@Datapublic class RequestParams { private String key; private Integer page; private Integer size; private String sortBy;}
// レスポンスimport lombok.Data;import java.util.List;
@Datapublic class PageResult { private Long total; private List<HotelDoc> hotels;
public PageResult() { }
public PageResult(Long total, List<HotelDoc> hotels) { this.total = total; this.hotels = hotels; }}コントローラの定義
HotelControllerを定義し、検索APIを宣言します。要件は以下のとおり:
- リクエスト方式:Post
- リクエストパス:/hotel/list
- リクエストパラメータ:RequestParams型のオブジェクト
- 戻り値:PageResult。2つのプロパティを含む
Long total:総件数List<HotelDoc> hotels:ホテルデータ
@RestController@RequestMapping("/hotel")public class HotelController {
@Autowired private IHotelService hotelService; // ホテルデータを検索 @PostMapping("/list") public PageResult search(@RequestBody RequestParams params){ return hotelService.search(params); }}検索業務の実装
コントローラでIHotelServiceを呼び出していますが、まだ実装されていません。したがって、IHotelServiceにメソッドを定義し、ビジネスロジックを実装します。
検索業務の実装にはRestHighLevelClientの登録が不可欠です。SpringにBeanとして登録します。cn.itcast.hotel内のHotelDemoApplicationに以下のBeanを宣言します:
@Beanpublic RestHighLevelClient client(){ return new RestHighLevelClient(RestClient.builder( HttpHost.create("<http://127.0.0.1:9200>") ));}
// Service@Overridepublic PageResult search(RequestParams params) { try { // 1.リクエスト準備 SearchRequest request = new SearchRequest("hotel"); // 2.DSL準備 // 2.1.クエリ String key = params.getKey(); if (key == null || "".equals(key)) { boolQuery.must(QueryBuilders.matchAllQuery()); } else { boolQuery.must(QueryBuilders.matchQuery("all", key)); }
// 2.2.ページネーション int page = params.getPage(); int size = params.getSize(); request.source().from((page - 1) * size).size(size);
// 3.リクエストを送信 SearchResponse response = client.search(request, RequestOptions.DEFAULT); // 4.応答を解析 return handleResponse(response); } catch (IOException e) { throw new RuntimeException(e); }}
// 結果の解析private PageResult handleResponse(SearchResponse response) { // 4.応答を解析 SearchHits searchHits = response.getHits(); // 4.1.総件数 long total = searchHits.getTotalHits().value; // 4.2.文書配列 SearchHit[] hits = searchHits.getHits(); // 4.3.ループ List<HotelDoc> hotels = new ArrayList<>(); for (SearchHit hit : hits) { // ドキュメントsourceを取得 String json = hit.getSourceAsString(); // 逆シリアライズ HotelDoc hotelDoc = JSON.parseObject(json, HotelDoc.class); // コレクションに追加 hotels.add(hotelDoc); } // 4.4.返却を包む return new PageResult(total, hotels);}ホテル結果のフィルタリング
要件:ブランド、都市、星級、価格などのフィルタを追加します。
HotelServiceのsearchメソッドには1箇所のみ変更が必要です:requet.source().query(...)の中の検索条件。
以前のビジネスでは、match検索のみで、キーワード検索を実施していました。今は次の条件を追加します。
- ブランドフィルタ:keyword型、termクエリを使用
- 星級フィルタ:keyword型、termクエリを使用
- 価格フィルタ:数値型、rangeクエリを使用
- 都市フィルタ:keyword型、termクエリを使用
複数の検索条件を組み合わせるには、必ずboolクエリで組み合わせます:
- キーワード検索をmustに入れて算分に参加させる
- その他のフィルタをfilterに入れて算分には参加させない
private void buildBasicQuery(RequestParams params, SearchRequest request) { // 1. BooleanQueryを構築 BoolQueryBuilder boolQuery = QueryBuilders.boolQuery(); // 2. キーワード検索 String key = params.getKey(); if (key == null || "".equals(key)) { boolQuery.must(QueryBuilders.matchAllQuery()); } else { boolQuery.must(QueryBuilders.matchQuery("all", key)); } // 3. 都市条件 if (params.getCity() != null && !params.getCity().equals("")) { boolQuery.filter(QueryBuilders.termQuery("city", params.getCity())); } // 4. ブランド条件 if (params.getBrand() != null && !params.getBrand().equals("")) { boolQuery.filter(QueryBuilders.termQuery("brand", params.getBrand())); } // 5. 星級条件 if (params.getStarName() != null && !params.getStarName().equals("")) { boolQuery.filter(QueryBuilders.termQuery("starName", params.getStarName())); } // 6. 価格 if (params.getMinPrice() != null && params.getMaxPrice() != null) { boolQuery.filter(QueryBuilders .rangeQuery("price") .gte(params.getMinPrice()) .lte(params.getMaxPrice()) ); } // 7. 反映 into source request.source().query(boolQuery);}我周边のホテル
location座標を用いて、周辺のホテルを距離順に並べます。実装の方針は以下のとおり:
- RequestParamsのパラメータをlocationフィールドを受け取るようにする
- searchメソッドのビジネスロジックを修正。locationが値を持つ場合、geo_distanceソートを追加する
GET /indexName/_search{ "query": { "match_all": {} }, "sort": [ { "price": "asc" }, { "_geo_distance" : { "FIELD" : "緯度,经度", // ドキュメントのgeo_point型フィールド名とターゲット座標 "order" : "asc", "unit" : "km" } } ]}searchメソッドにソート機能を追加します:
// 2.3.ソートString location = params.getLocation();if (location != null && !location.equals("")) { request.source().sort(SortBuilders .geoDistanceSort("location", new GeoPoint(location)) .order(SortOrder.ASC) .unit(DistanceUnit.KILOMETERS) );}ホテルの広告順位付け
要件:特定のホテルを検索結果で上位に表示し、広告マークを付与します。
function_scoreクエリはスコア算出に影響を与え、スコアが高いほど上位に表示されます。function_scoreには3つの要素があります:
- 过滤条件:どの文書にスコアを付与するか
- 算分関数:function scoreをどう計算するか
- 加重モード:function scoreとquery scoreの演算方式
このケースでは、指定したホテルを上位に表示したいので、これらのホテルに対して「広告」マークを追加することで、フィルタ条件としてそのホテルを特定し、算分関数でスコアを高めるべくします。
以前に書いたブールクエリを「原始クエリ」として使用し、以下のように「フィルタ条件」「算分関数」「加重モード」を追加します。
// 2.算分コントロールFunctionScoreQueryBuilder functionScoreQuery = QueryBuilders.functionScoreQuery( // 原始クエリ、関連性算分の検索 boolQuery, // function scoreの配列 new FunctionScoreQueryBuilder.FilterFunctionBuilder[]{ // 1つのfunction score要素 new FunctionScoreQueryBuilder.FilterFunctionBuilder( // フィルタ条件 QueryBuilders.termQuery("isAD", true), // 算分関数 ScoreFunctionBuilders.weightFactorFunction(10) ) });request.source().query(functionScoreQuery);データ聚合
- 聚合(aggregations) はデータの集計・分析・計算を非常に簡単に実現できます。
- 例えば、どのブランドのスマートフォンが最も人気があるか、これらのスマホの平均価格・最高価格・最低価格、それぞれの月別の販売状況など
これらの集計機能は、SQLよりもはるかに容易で、ほぼリアルタイムの検索効果を実現できます。
聚合の種類
聚合には大きく3つのタイプがあります:
- Bucket(桶)聚合:文書をグループ化します
- TermAggregation:フィールド値ごとにグルーピング。ブランドごと、国ごとなど
- Date Histogram:日付で階段状にグルーピング。例:1週間ごと、1か月ごと
- Metric(度量)聚合:最大値、最小値、平均値などを計算
- Avg:平均値
- Max:最大値
- Min:最小値
- Stats:最大・最小・平均・合計などを同時計算
- Pipeline(パイプライン)聚合:他の聚合結果を基に新たな聚合を行う
注意:聚合に参加するフィールドは、keyword、日付、数値、布尔型である必要があります
DSLでの聚合実装
今データ全体のホテルブランドがいくついくつあるかを統計する場合、ブランドでデータをグルーピングするBucket聚合を使います。
Bucket聚合の文法
GET /hotel/_search{ "size": 0, // sizeを0に設定、結果にはドキュメントを含めず、聚合結果のみを返す "aggs": { // 聚合を定義 "brandAgg": { // 聚合名を付ける "terms": { // 聚合タイプ:ブランド値でグルーピング "field": "brand", // 集約対象フィールド "size": 20 // 取得する聚合結果数 } } }}聚合結果のソート
デフォルトでは、Bucket聚合はBucket内のドキュメント数を_countとして集計し、降順にソートします。
order 属性を指定して聚合のソート方式をカスタマイズできます:
GET /hotel/_search{ "size": 0, "aggs": { "brandAgg": { "terms": { "field": "brand", "order": { "_count": "asc" // _countで昇順に並べ替え }, "size": 20 } } }}聚合範囲の限定
デフォルトでは Bucket聚合はインデックスの全文書を対象にしますが、現実的にはユーザーが検索条件を入力するため、聚合は検索結果に対して行う必要があります。したがって、聚合には限定条件を追加します。
文書範囲を限定するには、クエリ条件を追加するだけです:
GET /hotel/_search{ "query": { "range": { "price": { "lte": 200 // 200元以下の文書のみを聚合 } } }, "size": 0, "aggs": { "brandAgg": { "terms": { "field": "brand", "size": 20 } } }}Metric聚合の文法
桶内のホテルを集計します。各ブランドごとのユーザー評価のmin、max、avgなどを算出します。
これにはMetric聚合を使います。たとえばstat聚合なら、min、max、avgなどを取得できます。
文法:
GET /hotel/_search{ "size": 0, "aggs": { "brandAgg": { "terms": { "field": "brand", "size": 20 }, "aggs": { // ブランド別のサブ聚合 "score_stats": { // 聚合名 "stats": { // 聚合タイプ。ここではmin、max、avg、sumなどを計算 "field": "score" // 聚合フィールド。ここはscore } } } } }}このscore_stats聚合は、brandAggの各桶ごとに計算を行うサブ聚合です。
aggsは聚合で、queryと同列です。現在のqueryの役割は?
- 聚合の対象文書を限定する
聚合に必要な3要素:
- 聚合名
- 聚合タイプ
- 聚合字段
聚合の設定可能属性:
- size:聚合結果の数を指定
- order:聚合結果のソート順を指定
- field:聚合対象フィールド
RestAPIでの聚合実装
聚合条件はクエリ条件と同格で、聚合条件を指定するにはrequest.source()を使用します。
聚合機能を使い、Bucket聚合を用いて検索結果の文書をブランド別、都市別にグルーピングすることで、含まれるブランドや都市を知ることができます。
聚合は検索結果に対して限定条件を設ける聚合なので、検索文書条件と一致します。
@Overridepublic Map<String, List<String>> filters(RequestParams params) { try { // 1.リクエスト準備 SearchRequest request = new SearchRequest("hotel"); // 2.DSL準備 // 2.1.クエリ buildBasicQuery(params, request); // 2.2. sizeの設定 request.source().size(0); // 2.3.聚合設定 buildAggregation(request); // 3.リクエスト送信 SearchResponse response = client.search(request, RequestOptions.DEFAULT); // 4.結果の解析 Map<String, List<String>> result = new HashMap<>(); Aggregations aggregations = response.getAggregations(); // 4.1.ブランド名に基づく聚合結果を取得 List<String> brandList = getAggByName(aggregations, "brandAgg"); result.put("ブランド", brandList); // 4.2.都市名に基づく聚合結果を取得 List<String> cityList = getAggByName(aggregations, "cityAgg"); result.put("都市", cityList); // 4.3.星級に基づく聚合結果を取得 List<String> starList = getAggByName(aggregations, "starAgg"); result.put("星級", starList);
return result; } catch (IOException e) { throw new RuntimeException(e); }}
private void buildAggregation(SearchRequest request) { request.source().aggregation(AggregationBuilders .terms("brandAgg") .field("brand") .size(100) ); request.source().aggregation(AggregationBuilders .terms("cityAgg") .field("city") .size(100) ); request.source().aggregation(AggregationBuilders .terms("starAgg") .field("starName") .size(100) );}
private List<String> getAggByName(Aggregations aggregations, String aggName) { // 4.1.聚合名で聚合結果を取得 Terms brandTerms = aggregations.get(aggName); // 4.2. bucketを取得 List<? extends Terms.Bucket> buckets = brandTerms.getBuckets(); // 4.3.遍歴 List<String> brandList = new ArrayList<>(); for (Terms.Bucket bucket : buckets) { // 4.4. keyを取得 String key = bucket.getKeyAsString(); brandList.add(key); } return brandList;}自動補完
検索ボックスに文字を入力すると、それに関連する検索項目を提案します。これは、入力文字に基づいて完全な語句を補完する機能です。
ピンイン分詞器
文字列で補完するには、文書をピンイン分詞で処理する必要があります。GitHubにはelasticsearchのピンイン分詞プラグインがあります。
IK分詞器のインストールと同様です。
docker exec -it es bash
./bin/elasticsearch-plugin install <https://github.com/medcl/elasticsearch-analysis-pinyin/releases/download/v7.12.1/elasticsearch-analysis-pinyin-7.12.1.zip>
exit# コンテナを再起動docker restart elasticsearch自作分詞器
デフォルトのピンイン分詞器は漢字を1文字ずつ分割しますが、語条を一組のピンインとして形成したい場合は、ピンイン分詞器をカスタマイズして自作分詞器を作る必要があります。
Elasticsearchの分詞器(analyzer)は3つの要素から構成されます:
- character filters:トークン化前にテキストを処理(文字の削除・置換など)
- tokenizer:テキストを一定のルールで語条(token)に分割。例:keywordは分割なし、ik_max_wordやik_smartなど
- tokenizer filter:tokenizerの出力をさらに処理(大文字小文字変換、同義語、ピンイン処理など)
文書の分詞はこの3つの要素で順次処理されます:
PUT /test{ "settings": { "analysis": { "analyzer": { // 自作分詞器 "my_analyzer": { // 分詞器名 "tokenizer": "ik_max_word", "filter": "py" } }, "filter": { // 自作tokenizer filter "py": { // フィルター名 "type": "pinyin", // フィルタータイプ "keep_full_pinyin": false, "keep_joined_full_pinyin": true, "keep_original": true, "limit_first_letter_length": 16, "remove_duplicated_term": true, "none_chinese_pinyin_tokenize": false } } } }, "mappings": { "properties": { "name": { "type": "text", "analyzer": "my_analyzer", "search_analyzer": "ik_smart" } } }}自動補全クエリ
ElasticsearchはCompletion Suggesterを用いて自動補完機能を実現します。このクエリは、ユーザーの入力で始まる語条をマッチさせて返します。高速化のため、文書中のフィールドにはいくつかの制約があります:
- 自動補完クエリに参加するフィールドはcompletionタイプである必要があります
- フィールドの内容は、補完の語条として形成された配列であることが多い
補完を実現:
@Overridepublic List<String> getSuggestions(String prefix) { try { // 1.準備Request SearchRequest request = new SearchRequest("hotel"); // 2.準備DSL request.source().suggest(new SuggestBuilder().addSuggestion( "suggestions", SuggestBuilders.completionSuggestion("suggestion") .prefix(prefix) .skipDuplicates(true) .size(10) )); // 3.送信 SearchResponse response = client.search(request, RequestOptions.DEFAULT); // 4.解析 Suggest suggest = response.getSuggest(); // 4.1.補完クエリの結果を取得 CompletionSuggestion suggestions = suggest.getSuggestion("suggestions"); // 4.2. optionsを取得 List<CompletionSuggestion.Entry.Option> options = suggestions.getOptions(); // 4.3.走査 List<String> list = new ArrayList<>(options.size()); for (CompletionSuggestion.Entry.Option option : options) { String text = option.getText().toString(); list.add(text); } return list; } catch (IOException e) { throw new RuntimeException(e); }}データ同期
Elasticsearch内のホテルデータはMySQLデータベースから取得します。したがって、MySQLデータが変更されると、Elasticsearchのデータも同様に更新する必要があります。これが、ElasticsearchとMySQL間のデータ同期です。
一般的なデータ同期の3つの方法:
- 同期呼び出し
- hotel-demoが外部APIを提供しており、Elasticsearchデータを変更する
- ホテル管理サービスがデータベース操作を完了した後、hotel-demoが提供するAPIを直接呼び出す
- 非同期通知
- hotel-adminがMySQLデータの增・删・改を完了した後、MQメッセージを送る
- hotel-demoがMQを監視し、メッセージを受信したらElasticsearchのデータを更新
- Binlogの監視
- MySQLでBinlogを有効化
- MySQLの增・删・改の操作は全てBinlogに記録
- hotel-demoがCanalを用いてBinlogの変化をリアルタイムで監視し、Elasticsearchの内容を更新
方式1:同期呼び出し
- 長所:実装が簡単、素早い
- 短所:業務結合度が高い
方式2:非同期通知
- 長所:結合度が低く、実装難易度は中程度
- 短所:MQの信頼性に依存
方式3:Binlog監視
- 長所:サービス間の結合を完全に解放
- 短所:Binlogを有効化するとデータベースに負荷が増え、実装が高度
データ同期の実現
事前資料のhotel-adminプロジェクトをホテル管理のマイクロサービスとして使用します。ホテルデータが増、削除、変更されるたび、Elasticsearchのデータも同様に更新します。
- ホテルデータのCRUDを起動してテスト
- Exchange、Queue、RoutingKeyを宣言
- hotel-adminの増・削除・変更業務でMQメッセージを送信
- hotel-demoでメッセージを受信し、Elasticsearchのデータを更新
- 動作を起動してデータ同期機能をテスト
交換機、キューの宣言
MQ構成は以下の図のとおり:
依存関係の追加
<!--amqp--><dependency> <groupId>org.springframework.boot</groupId> <artifactId>spring-boot-starter-amqp</artifactId></dependency>設定クラスを定義して宣言します:
import cn.itcast.hotel.constants.MqConstants;import org.springframework.amqp.core.Binding;import org.springframework.amqp.core.BindingBuilder;import org.springframework.amqp.core.Queue;import org.springframework.amqp.core.TopicExchange;import org.springframework.context.annotation.Bean;import org.springframework.context.annotation.Configuration;
@Configurationpublic class MqConfig { @Bean public TopicExchange topicExchange(){ return new TopicExchange(MqConstants.HOTEL_EXCHANGE, true, false); }
@Bean public Queue insertQueue(){ return new Queue(MqConstants.HOTEL_INSERT_QUEUE, true); }
@Bean public Queue deleteQueue(){ return new Queue(MqConstants.HOTEL_DELETE_QUEUE, true); }
@Bean public Binding insertQueueBinding(){ return BindingBuilder.bind(insertQueue()).to(topicExchange()).with(MqConstants.HOTEL_INSERT_KEY); }
@Bean public Binding deleteQueueBinding(){ return BindingBuilder.bind(deleteQueue()).to(topicExchange()).with(MqConstants.HOTEL_DELETE_KEY); }}hotel-adminの増・削・変更ビジネスで、それぞれMQメッセージを送信します。
MQ情報の送信
@PostMappingpublic void saveHotel(@RequestBody Hotel hotel){ hotelService.save(hotel);
rabbitTemplate.convertAndSend(MqConstants.HOTEL_EXCHANGE,HOTEL_INSERT_KEY,hotel.getId());}
@PutMapping()public void updateById(@RequestBody Hotel hotel){ if (hotel.getId() == null) { throw new InvalidParameterException("id不能为空"); } hotelService.updateById(hotel);
rabbitTemplate.convertAndSend(MqConstants.HOTEL_EXCHANGE,HOTEL_INSERT_KEY,hotel.getId());}
@DeleteMapping("/{id}")public void deleteById(@PathVariable("id") Long id) { hotelService.removeById(id);
rabbitTemplate.convertAndSend(MqConstants.HOTEL_EXCHANGE,MqConstants.HOTEL_DELETE_KEY, id);}MQ情報の受信
リスナーを実装します
hotel-demoのcn.itcast.hotel.mqパッケージに新しいクラスを追加します:
@Componentpublic class HotelListener {
@Autowired private IHotelService hotelService;
/** * ホテルの新規追加または更新をリッスン * @param id ホテルID */ @RabbitListener(queues = MqConstants.HOTEL_INSERT_QUEUE) public void listenHotelInsertOrUpdate(Long id){ hotelService.insertById(id); }
/** * ホテルの削除をリッスン * @param id ホテルID */ @RabbitListener(queues = MqConstants.HOTEL_DELETE_QUEUE) public void listenHotelDelete(Long id){ hotelService.deleteById(id); }}実装:
@Overridepublic void deleteById(Long id) { try { // 1.リクエスト準備 DeleteRequest request = new DeleteRequest("hotel", id.toString()); // 2.送信 client.delete(request, RequestOptions.DEFAULT); } catch (IOException e) { throw new RuntimeException(e); }}
@Overridepublic void insertById(Long id) { try { // 0. idからホテルを取得 Hotel hotel = getById(id); // ドキュメント型へ変換 HotelDoc hotelDoc = new HotelDoc(hotel);
// 1.リクエストオブジェクトの準備 IndexRequest request = new IndexRequest("hotel").id(hotel.getId().toString()); // 2.JSON文書を準備 request.source(JSON.toJSONString(hotelDoc), XContentType.JSON); // 3.送信 client.index(request, RequestOptions.DEFAULT); } catch (IOException e) { throw new RuntimeException(e); }}クラスター
単一ノードのElasticsearchは、データ量の増大と単一障害点の問題を引き起こします。
- 大量データの保存:インデックスをシャード(shard)に分割して複数ノードへ格納
- 単一障害点の解消:シャードを複製(replica)で別ノードへバックアップ
ESクラスター関連の概念:
- クラスター(cluster):共通のクラスター名を持つノードの集合
- ノード(node):クラスターの1つのElasticsearchインスタンス
- シャード(shard):インデックスを複数の部分に分割したもの。クラスター内では、異なるノードにシャードを格納できる
- 主シャード(Primary shard):副本シャード(Replica shard)に対する定義
- 副本シャード(Replica shard) 各主シャードには1つ以上の副本が存在する。データは主シャードと同じ
データのバックアップは高可用性を確保しますが、各シャードのバックアップが必要となるため、ノード数が膨らみコストが高くなります。
高可用性とコストのバランスを取るためには、以下のようにします:
- まずデータをシャードで分割し、異なるノードに格納
- 各シャードのバックアップを他のノードへ配置し、相互バックアップを完了
これにより、必要なサービスノード数を大幅に削減できます。
ESクラスターの作成
docker-composeを用いて作成します:
version: '2.2'services: es01: image: elasticsearch:7.12.1 container_name: es01 environment: - node.name=es01 - cluster.name=es-docker-cluster - discovery.seed_hosts=es02,es03 - cluster.initial_master_nodes=es01,es02,es03 - "ES_JAVA_OPTS=-Xms512m -Xmx512m" volumes: - data01:/usr/share/elasticsearch/data ports: - 9200:9200 networks: - elastic es02: image: elasticsearch:7.12.1 container_name: es02 environment: - node.name=es02 - cluster.name=es-docker-cluster - discovery.seed_hosts=es01,es03 - cluster.initial_master_nodes=es01,es02,es03 - "ES_JAVA_OPTS=-Xms512m -Xmx512m" volumes: - data02:/usr/share/elasticsearch/data ports: - 9201:9200 networks: - elastic es03: image: elasticsearch:7.12.1 container_name: es03 environment: - node.name=es03 - cluster.name=es-docker-cluster - discovery.seed_hosts=es01,es02 - cluster.initial_master_nodes=es01,es02,es03 - "ES_JAVA_OPTS=-Xms512m -Xmx512m" volumes: - data03:/usr/share/elasticsearch/data networks: - elastic ports: - 9202:9200volumes: data01: driver: local data02: driver: local data03: driver: local
networks: elastic: driver: bridgeWSLでのメモリ不足対策として:
wsl -d docker-desktopecho 262144 >> /proc/sys/vm/max_map_countCerebroでESクラスターを監視します。
クラスターのブレーク問題
クラスターの責務分担
クラスター内のノードには役割分担があります:
デフォルトでは、クラスター内の任意のノードがこれら4つの役割を同時に持つことができます。
ただし、実際のクラスターでは、責務を分離するのが望ましいです。
- マスター・ノード:CPU負荷が高いものの、メモリ要件は低い(説明が抜けていますが、実運用ではデザインが異なります)
- データ・ノード:CPUとメモリ双方の要件が高い
- コーディネーティング・ノード:ネットワーク帯域、CPUが要求される
責務を分離することで、異なるノードの要件に合わせて適切なハードウェアを割り当て、他の業務への影響を避けることができます。
ブレーク(脑裂)問題
脑裂は、クラスターのノードが連絡不能となって発生します。
ネットワークが回復すると、クラスターには2つのマスターノードが存在する可能性があり、クラスター状態が不一致となって脑裂が生じます。
脑裂の解決策はスコア票(投票)を過半数以上にすることです(eligibleノードの数 + 1)/ 2 を超える必要があります。したがって、eligibleノード数は奇数であることが望ましいです。設定項目はdiscovery.zen.minimum_master_nodesです。7.0以降はデフォルト設定となっており、通常は脑裂は発生しません。
master eligibleノードの役割は?
- クラスターの選出に参加
- マスターはクラスターの状態、シャード情報、インデックスの作成・削除などの管理を行う
dataノードの役割は?
- データのCRUD
coordinatorノードの役割は?
- 他ノードへリクエストをルーティング
- 他ノードから集約した結果を統合してユーザーへ返す
クラスターの分散ストレージ
新規文書を追加する際、異なるシャードに保存してデータを均等化します。では、coordinating nodeはどうやってどのシャードへデータを格納するかを決定するのでしょうか?
シャード格納の原理
Elasticsearchはハッシュアルゴリズムで、文書がどのシャードに格納されるべきかを決定します:
shard = hash(_routing) % number_of_shards補足:
- _routingはデフォルトで文書のID
- アルゴリズムとシャード数に依存するため、インデックスを作成した後はシャード数を変更できません
クラスターの分布型検索
Elasticsearchの検索は2段階で行われます:
- scatter phase(分散段階):coordinating nodeがリクエストを各シャードへ分散
- gather phase(収集段階):coordinating nodeがデータノードの検索結果を統合し、最終的な結果セットを返す
クラスターのフェイルオーバー
クラスターのマスターは、ノードの状態を監視します。ノードがダウンした場合、ダウンしたノードのシャードデータを他のノードへ移動してデータを保護します。これをフェイルオーバーと呼びます。
- node1がマスター、他はセカンダリノード
- node1が故障した場合、別のノードを新しいマスターとして選出
- node2がクラスター監視状態を検知し、shard-1、shard-0に副本ノードがないことを確認
- node1上のデータをnode2、node3へ移行
このように、可用性を保つためには、適切にノードを配置し、データを分散させて冗長性を確保します。
部分信息可能已经过时