


1.实验目的
- 了解对称加密、非对称加密体制概念
- 了解散列函数、数字签名和数字证书的概念和理论
- 掌握基于
Openssl的对称加密、密钥对的创建和应用 - 掌握基于
Openssl数字签名和数字证书的创建和应用
2.实验环境
- 硬件要求:阿里云云主机ECS 一台。
- 软件要求:Linux/ Windows 操作系统
3.实验内容
OpenSSL是一个开放源代码的软件库包,应用程序可以使用这个包来进行安全通信,避免窃听,同时确认另一端连接者的身份。这个包广泛被应用在互联网的网页服务器上。
参考资料:
https://gitee.com/mirrors/openssl?utm_source=alading&utm_campaign=repo#download
https://www.jianshu.com/p/fb2ae3dc7986
https://www.yisu.com/zixun/21796.html
3.1对称加密
安装Openssl,并准备任意内容的文本文档lx.txt,利用对称加密算法对lx.txt进行加密和解密操作。
要求:要有过程描述文字,解释当前操作以及参数含义,并提供相应操作截图
3.2 散列函数
计算lx.txt的MD5和SHA256散列值
3.3 非对称加密
创建2048位的公钥密码体制RSA密钥对。利用创建的公钥加密lx.txt,私钥进行解密操作
3.4 数字签名
对文件lx.txt进行数字签名并鉴别
3.5 证书
使用openssl创建自签名证书
4.实验结果与分析
4.1 对称加密
- 安装
Openssl
yum info openssl //检查openssl版本yum update openssl //更新openssl- 使用加密算法进行加密解密
- 创建lx.txt文件

- 加密
openssl enc -e -des -in lx.txt -out lx1.txt
加密成功
- 解密
openssl enc -d -des -in lx1.txt -out lx1.txt
解密成功
4.2 散列函数
计算lx.txt的MD5和SHA256散列值
- 计算MD5
openssl md5 -out lx.txt.md5 lx.txtcat lx.txt.md5
- 计算SHA256散列值
openssl sha256 -out lx.txt.sha lx.txtcat lx.txt.sha
4.3 非对称加密
创建2048位的公钥密码体制RSA密钥对。利用创建的公钥加密lx.txt,私钥进行解密操作
OpenSSL> genrsa -out RsaPrivateKey.pem 2048OpenSSL> rsa -in RsaPrivateKey.pem -pubout -out RsaPublicKey.pemOpenSSL> rsautl -in plain.txt -out enc.txt -inkey RSAPublicKey.pem -pubin -encryptOpenSSL> rsautl -in enc.txt -out replain.txt -inkey RSAPrivateKey.pem -decrypt
密匙创建完成

生成公匙
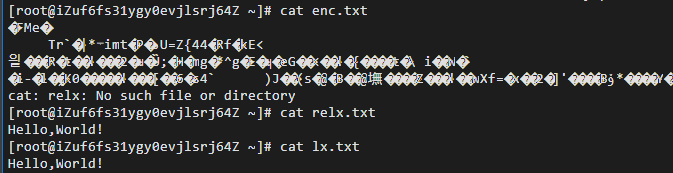
加密于解密后文件
4.4 数字签名
对文件lx.txt进行数字签名并鉴别
sha1 -out digest.txt lx.txtrsautl -sign -inkey RsaPrivateKey.pem -in digest.txt -out signT.binrsautl -verify -inkey RsaPublicKey.pem -pubin -keyform PEM -in signT.bin
4.5 证书
使用openssl创建自签名证书
genrsa -des3 -out ca.key 1024rsa -in ca.key -out ca.keyreq -new -x509 -key ca.key -out ca.crt -days 365genrsa -des3 -out server.key 2048req -new -key server.key -out server.csrx509 -req -in server.csr -CA ca.crt -CAkey ca.key -set_serial 01 -out server.crt -days 365
5、实验小结
5.1 问题与解决办法
问题在进行数字签名时,运行sha1 -out digest.txt lx.txt命令错误。解决方法该问题是因为将sha1指令打为shal导致错误,输入sha1 -out digest.txt lx.txt后正确。
5.2 心得体会
- 本次实验报告熟系了应用OpenSSL实现对于文件的加密以及创建自签证书,实现对课上知识的印证。通过这次实验,我掌握了OpenSSL使用的具体流程,了解了常用Linux配置软件的基本用法,提高了自身编程能力。
- 通过这些常用的Linux命令操作,对OpenSSL的配置与使用,让我印证了上课所学的知识。
1. Experiment Objectives
- Understand the concepts of symmetric and asymmetric encryption systems
- Understand the concepts and theory of hash functions, digital signatures, and digital certificates
- Master symmetric encryption, key-pair creation, and application based on
Openssl - Master the creation and application of digital signatures and digital certificates based on
Openssl
2. Experimental Environment
- Hardware requirements: One Alibaba Cloud ECS instance.
- Software requirements: Linux or Windows operating system
3. Experiment Content
OpenSSL is an open-source software library that applications can use to perform secure communications, prevent eavesdropping, and verify the identity of the other connected party. This package is widely used on Internet web servers.
References:
https://gitee.com/mirrors/openssl?utm_source=alading&utm_campaign=repo#download
https://www.jianshu.com/p/fb2ae3dc7986
https://www.yisu.com/zixun/21796.html
3.1 Symmetric Encryption
Install Openssl, and prepare a plaintext document lx.txt with arbitrary content. Use a symmetric encryption algorithm to encrypt and decrypt lx.txt.
Requirements: There should be descriptive process text, explanations of the current operation and parameter meanings, and provide corresponding operation screenshots
3.2 Hash Functions
Compute the MD5 and SHA-256 hash values of lx.txt
3.3 Asymmetric Encryption
Create a 2048-bit RSA key pair (public-key cryptosystem). Use the created public key to encrypt lx.txt, and decrypt with the private key
OpenSSL> genrsa -out RsaPrivateKey.pem 2048OpenSSL> rsa -in RsaPrivateKey.pem -pubout -out RsaPublicKey.pemOpenSSL> rsautl -in plain.txt -out enc.txt -inkey RSAPublicKey.pem -pubin -encryptOpenSSL> rsautl -in enc.txt -out replain.txt -inkey RSAPrivateKey.pem -decryptKey pair generated
Public key generated
Files before and after encryption/decryption
4.4 Digital Signature
Digitally sign lx.txt and verify
sha1 -out digest.txt lx.txtrsautl -sign -inkey RsaPrivateKey.pem -in digest.txt -out signT.binrsautl -verify -inkey RsaPublicKey.pem -pubin -keyform PEM -in signT.bin
4.5 Certificate
Create a self-signed certificate using openssl
genrsa -des3 -out ca.key 1024rsa -in ca.key -out ca.keyreq -new -x509 -key ca.key -out ca.crt -days 365genrsa -des3 -out server.key 2048req -new -key server.key -out server.csrx509 -req -in server.csr -CA ca.crt -CAkey ca.key -set_serial 01 -out server.crt -days 365
5. Experimental Summary
5.1 Issues and Solutions
During the digital signature step, the command sha1 -out digest.txt lx.txt produced an error. The fix was that sha1 had been mistyped as shal; after entering sha1 -out digest.txt lx.txt, it worked.
5.2 Reflections
- This experiment familiarized me with applying OpenSSL to encrypt files and create self-signed certificates, reinforcing the knowledge presented in class. Through this experiment, I have mastered the concrete workflow of using OpenSSL, learned the basic usage of common Linux configuration software, and improved my programming ability.
- Through these common Linux command operations and OpenSSL configuration and usage, I validated the knowledge learned in class.
1. 実験目的
- 対称暗号・非対称暗号体制の概念を理解する
- ハッシュ関数、デジタル署名、およびデジタル証明書の概念と理論を理解する
- OpenSSL に基づく対称暗号、鍵対の作成と適用を習得する
- OpenSSL に基づくデジタル署名およびデジタル証明書の作成と適用を習得する
2. 実験環境
- ハードウェア要件: Alibaba Cloud の ECS を1台。
- ソフトウェア要件: Linux/ Windows オペレーティングシステム
3. 実験内容
OpenSSL はオープンソースのソフトウェアライブラリです。アプリケーションはこのライブラリを使用して安全な通信を行い、盗聴を回避し、相手側の接続者の身元を確認することができます。このライブラリはインターネットのウェブサーバーに広く使用されています。
参考資料:
https://gitee.com/mirrors/openssl?utm_source=alading&utm_campaign=repo#download
https://www.jianshu.com/p/fb2ae3dc7986
https://www.yisu.com/zixun/21796.html
3.1 対称暗号
OpenSSL をインストールし、任意の内容のテキスト文書 lx.txt を準備し、対称暗号アルゴリズムを用いて lx.txt を暗号化および復号する操作を行う。
要件:操作過程を説明する文章を含め、現在の操作およびパラメータの意味を説明し、対応する操作のスクリーンショットを提供すること
3.2 ハッシュ関数
lx.txt の MD5 および SHA256 ハッシュ値を計算する
3.3 非対称暗号
2048ビットの RSA 鍵ペアを作成する。作成した公開鍵を用いて lx.txt を暗号化し、秘密鍵で復号する操作
OpenSSL> genrsa -out RsaPrivateKey.pem 2048OpenSSL> rsa -in RsaPrivateKey.pem -pubout -out RsaPublicKey.pemOpenSSL> rsautl -in plain.txt -out enc.txt -inkey RSAPublicKey.pem -pubin -encryptOpenSSL> rsautl -in enc.txt -out replain.txt -inkey RSAPrivateKey.pem -decrypt
鍵の作成が完了しました
公開鍵を生成
暗号化および復号後のファイル
4.4 デジタル署名
lx.txt にデジタル署名を行い、検証する
sha1 -out digest.txt lx.txtrsautl -sign -inkey RsaPrivateKey.pem -in digest.txt -out signT.binrsautl -verify -inkey RsaPublicKey.pem -pubin -keyform PEM -in signT.bin
4.5 証明書
OpenSSL を使用して自己署名証明書を作成する
genrsa -des3 -out ca.key 1024rsa -in ca.key -out ca.keyreq -new -x509 -key ca.key -out ca.crt -days 365genrsa -des3 -out server.key 2048req -new -key server.key -out server.csrx509 -req -in server.csr -CA ca.crt -CAkey ca.key -set_serial 01 -out server.crt -days 365
5、実験のまとめ
5.1 問題と対策
デジタル署名を行う際、sha1 -out digest.txt lx.txt コマンドの実行でエラーが出ました。原因は sha1 コマンドを shal と誤って入力してしまったためであり、sha1 -out digest.txt lx.txt を入力すると正しく動作しました。
5.2 学びと感想
- 本実験レポートは、OpenSSL を用いてファイルの暗号化および自己署名証明書の作成を実践し、授業で学んだ知識を実証しました。今回の実験を通じて、OpenSSL の具体的な使用手順を身につけ、一般的な Linux 設定ソフトウェアの基本的な使い方を理解し、プログラミング能力を向上させました。
- これらの一般的な Linux コマンド操作を通じて、OpenSSL の設定と使用を実践的に確認でき、授業で学んだ知識を裏付けることができました。
部分信息可能已经过时