


AQS 介绍
AQS 的全称为 AbstractQueuedSynchronizer ,翻译过来的意思就是抽象队列同步器。这个类在 java.util.concurrent.locks 包下面。
AQS 就是一个抽象类,主要用来构建锁和同步器。
public abstract class AbstractQueuedSynchronizer extends AbstractOwnableSynchronizer implements java.io.Serializable {}AQS 为构建锁和同步器提供了一些通用功能的实现,因此,使用 AQS 能简单且高效地构造出应用广泛的大量的同步器,比如我们提到的 ReentrantLock,Semaphore,其他的诸如 ReentrantReadWriteLock,SynchronousQueue等等皆是基于 AQS 的。
AQS 原理
在面试中被问到并发知识的时候,大多都会被问到“请你说一下自己对于 AQS 原理的理解”。下面给大家一个示例供大家参考,面试不是背题,大家一定要加入自己的思想,即使加入不了自己的思想也要保证自己能够通俗的讲出来而不是背出来。
AQS 核心思想
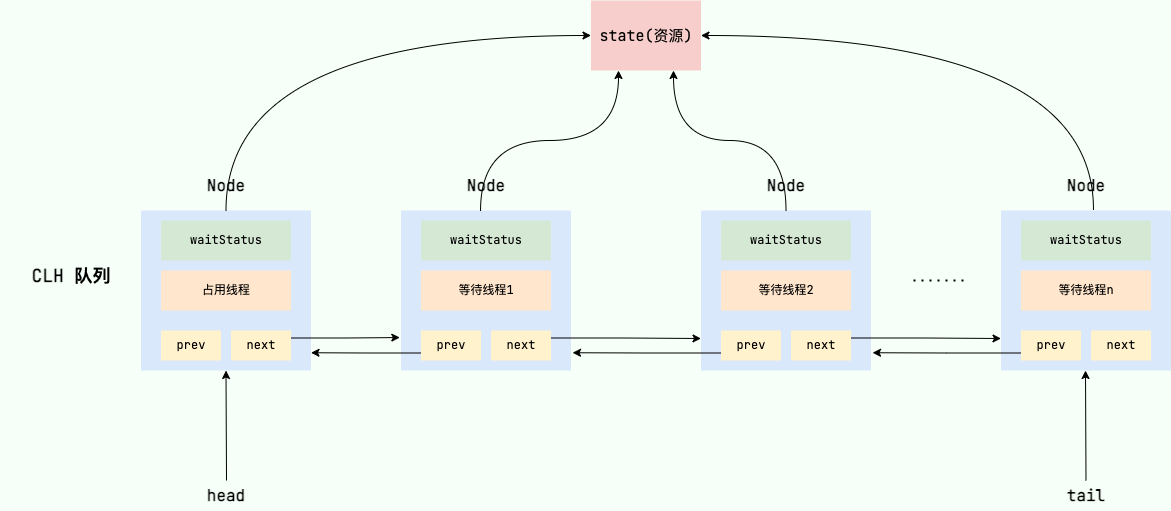
AQS 核心思想是,如果被请求的共享资源空闲,则将当前请求资源的线程设置为有效的工作线程,并且将共享资源设置为锁定状态。如果被请求的共享资源被占用,那么就需要一套线程阻塞等待以及被唤醒时锁分配的机制,这个机制 AQS 是基于 CLH 锁 (Craig, Landin, and Hagersten locks) 实现的。
CLH 锁是对自旋锁的一种改进,是一个虚拟的双向队列(虚拟的双向队列即不存在队列实例,仅存在结点之间的关联关系),暂时获取不到锁的线程将被加入到该队列中。AQS 将每条请求共享资源的线程封装成一个 CLH 队列锁的一个结点(Node)来实现锁的分配。在 CLH 队列锁中,一个节点表示一个线程,它保存着线程的引用(thread)、 当前节点在队列中的状态(waitStatus)、前驱节点(prev)、后继节点(next)。
AQS(AbstractQueuedSynchronizer)的核心原理图:
AQS 使用 int 成员变量 state 表示同步状态,通过内置的 FIFO 线程等待/等待队列 来完成获取资源线程的排队工作。
state 变量由 volatile 修饰,用于展示当前临界资源的获锁情况。
// 共享变量,使用volatile修饰保证线程可见性private volatile int state;另外,状态信息 state 可以通过 protected 类型的getState()、setState()和compareAndSetState() 进行操作。并且,这几个方法都是 final 修饰的,在子类中无法被重写。
//返回同步状态的当前值protected final int getState() { return state;} // 设置同步状态的值protected final void setState(int newState) { state = newState;}//原子地(CAS操作)将同步状态值设置为给定值update如果当前同步状态的值等于expect(期望值)protected final boolean compareAndSetState(int expect, int update) { return unsafe.compareAndSwapInt(this, stateOffset, expect, update);}以可重入的互斥锁 ReentrantLock 为例,它的内部维护了一个 state 变量,用来表示锁的占用状态。state 的初始值为 0,表示锁处于未锁定状态。当线程 A 调用 lock() 方法时,会尝试通过 tryAcquire() 方法独占该锁,并让 state 的值加 1。如果成功了,那么线程 A 就获取到了锁。如果失败了,那么线程 A 就会被加入到一个等待队列(CLH 队列)中,直到其他线程释放该锁。假设线程 A 获取锁成功了,释放锁之前,A 线程自己是可以重复获取此锁的(state 会累加)。这就是可重入性的体现:一个线程可以多次获取同一个锁而不会被阻塞。但是,这也意味着,一个线程必须释放与获取的次数相同的锁,才能让 state 的值回到 0,也就是让锁恢复到未锁定状态。只有这样,其他等待的线程才能有机会获取该锁。
线程 A 尝试获取锁的过程如下图所示:

再以倒计时器 CountDownLatch 以例,任务分为 N 个子线程去执行,state 也初始化为 N(注意 N 要与线程个数一致)。这 N 个子线程开始执行任务,每执行完一个子线程,就调用一次 countDown() 方法。该方法会尝试使用 CAS(Compare and Swap) 操作,让 state 的值减少 1。当所有的子线程都执行完毕后(即 state 的值变为 0),CountDownLatch 会调用 unpark() 方法,唤醒主线程。这时,主线程就可以从 await() 方法(CountDownLatch 中的await() 方法而非 AQS 中的)返回,继续执行后续的操作。
AQS 资源共享方式
AQS 定义两种资源共享方式:Exclusive(独占,只有一个线程能执行,如ReentrantLock)和Share(共享,多个线程可同时执行,如Semaphore/CountDownLatch)。
一般来说,自定义同步器的共享方式要么是独占,要么是共享,他们也只需实现tryAcquire-tryRelease、tryAcquireShared-tryReleaseShared中的一种即可。但 AQS 也支持自定义同步器同时实现独占和共享两种方式,如ReentrantReadWriteLock。
自定义同步器
同步器的设计是基于模板方法模式的,如果需要自定义同步器一般的方式是这样(模板方法模式很经典的一个应用):
- 使用者继承
AbstractQueuedSynchronizer并重写指定的方法。 - 将 AQS 组合在自定义同步组件的实现中,并调用其模板方法,而这些模板方法会调用使用者重写的方法。
这和我们以往通过实现接口的方式有很大区别,这是模板方法模式很经典的一个运用。
AQS 使用了模板方法模式,自定义同步器时需要重写下面几个 AQS 提供的钩子方法:
//独占方式。尝试获取资源,成功则返回true,失败则返回false。protected boolean tryAcquire(int)//独占方式。尝试释放资源,成功则返回true,失败则返回false。protected boolean tryRelease(int)//共享方式。尝试获取资源。负数表示失败;0表示成功,但没有剩余可用资源;正数表示成功,且有剩余资源。protected int tryAcquireShared(int)//共享方式。尝试释放资源,成功则返回true,失败则返回false。protected boolean tryReleaseShared(int)//该线程是否正在独占资源。只有用到condition才需要去实现它。protected boolean isHeldExclusively()什么是钩子方法呢? 钩子方法是一种被声明在抽象类中的方法,一般使用 protected 关键字修饰,它可以是空方法(由子类实现),也可以是默认实现的方法。模板设计模式通过钩子方法控制固定步骤的实现。
除了上面提到的钩子方法之外,AQS 类中的其他方法都是 final ,所以无法被其他类重写。
常见同步工具类
下面介绍几个基于 AQS 的常见同步工具类。
Semaphore(信号量)
介绍
synchronized 和 ReentrantLock 都是一次只允许一个线程访问某个资源,而Semaphore(信号量)可以用来控制同时访问特定资源的线程数量。
Semaphore 的使用简单,我们这里假设有 N(N>5) 个线程来获取 Semaphore 中的共享资源,下面的代码表示同一时刻 N 个线程中只有 5 个线程能获取到共享资源,其他线程都会阻塞,只有获取到共享资源的线程才能执行。等到有线程释放了共享资源,其他阻塞的线程才能获取到。
// 初始共享资源数量final Semaphore semaphore = new Semaphore(5);// 获取1个许可semaphore.acquire();// 释放1个许可semaphore.release();当初始的资源个数为 1 的时候,Semaphore 退化为排他锁。
Semaphore 有两种模式:。
- 公平模式: 调用
acquire()方法的顺序就是获取许可证的顺序,遵循 FIFO; - 非公平模式: 抢占式的。
Semaphore 对应的两个构造方法如下:
public Semaphore(int permits) { sync = new NonfairSync(permits);}
public Semaphore(int permits, boolean fair) { sync = fair ? new FairSync(permits) : new NonfairSync(permits);}这两个构造方法,都必须提供许可的数量,第二个构造方法可以指定是公平模式还是非公平模式,默认非公平模式。
Semaphore 通常用于那些资源有明确访问数量限制的场景比如限流(仅限于单机模式,实际项目中推荐使用 Redis +Lua 来做限流)。
原理
Semaphore 是共享锁的一种实现,它默认构造 AQS 的 state 值为 permits,你可以将 permits 的值理解为许可证的数量,只有拿到许可证的线程才能执行。
以无参 acquire 方法为例,调用semaphore.acquire() ,线程尝试获取许可证,如果 state > 0 的话,则表示可以获取成功,如果 state <= 0 的话,则表示许可证数量不足,获取失败。
如果可以获取成功的话(state > 0 ),会尝试使用 CAS 操作去修改 state 的值 state=state-1。如果获取失败则会创建一个 Node 节点加入等待队列,挂起当前线程。
// 获取1个许可证public void acquire() throws InterruptedException { sync.acquireSharedInterruptibly(1);}
// 获取一个或者多个许可证public void acquire(int permits) throws InterruptedException { if (permits < 0) throw new IllegalArgumentException(); sync.acquireSharedInterruptibly(permits);}acquireSharedInterruptibly方法是 AbstractQueuedSynchronizer 中的默认实现。
// 共享模式下获取许可证,获取成功则返回,失败则加入等待队列,挂起线程public final void acquireSharedInterruptibly(int arg) throws InterruptedException { if (Thread.interrupted()) throw new InterruptedException(); // 尝试获取许可证,arg为获取许可证个数,当获取失败时,则创建一个节点加入等待队列,挂起当前线程。 if (tryAcquireShared(arg) < 0) doAcquireSharedInterruptibly(arg);}这里再以非公平模式(NonfairSync)的为例,看看 tryAcquireShared 方法的实现。
// 共享模式下尝试获取资源(在Semaphore中的资源即许可证):protected int tryAcquireShared(int acquires) { return nonfairTryAcquireShared(acquires);}
// 非公平的共享模式获取许可证final int nonfairTryAcquireShared(int acquires) { for (;;) { // 当前可用许可证数量 int available = getState(); /* * 尝试获取许可证,当前可用许可证数量小于等于0时,返回负值,表示获取失败, * 当前可用许可证大于0时才可能获取成功,CAS失败了会循环重新获取最新的值尝试获取 */ int remaining = available - acquires; if (remaining < 0 || compareAndSetState(available, remaining)) return remaining; }}以无参 release 方法为例,调用semaphore.release(); ,线程尝试释放许可证,并使用 CAS 操作去修改 state 的值 state=state+1。释放许可证成功之后,同时会唤醒等待队列中的一个线程。被唤醒的线程会重新尝试去修改 state 的值 state=state-1 ,如果 state > 0 则获取令牌成功,否则重新进入等待队列,挂起线程。
// 释放一个许可证public void release() { sync.releaseShared(1);}
// 释放一个或者多个许可证public void release(int permits) { if (permits < 0) throw new IllegalArgumentException(); sync.releaseShared(permits);}releaseShared方法是 AbstractQueuedSynchronizer 中的默认实现。
// 释放共享锁// 如果 tryReleaseShared 返回 true,就唤醒等待队列中的一个或多个线程。public final boolean releaseShared(int arg) { //释放共享锁 if (tryReleaseShared(arg)) { //释放当前节点的后置等待节点 doReleaseShared(); return true; } return false;}tryReleaseShared 方法是Semaphore 的内部类 Sync 重写的一个方法, AbstractQueuedSynchronizer中的默认实现仅仅抛出 UnsupportedOperationException 异常。
// 内部类 Sync 中重写的一个方法// 尝试释放资源protected final boolean tryReleaseShared(int releases) { for (;;) { int current = getState(); // 可用许可证+1 int next = current + releases; if (next < current) // overflow throw new Error("Maximum permit count exceeded"); // CAS修改state的值 if (compareAndSetState(current, next)) return true; }}可以看到,上面提到的几个方法底层基本都是通过同步器 sync 实现的。Sync 是 CountDownLatch 的内部类 , 继承了 AbstractQueuedSynchronizer ,重写了其中的某些方法。并且,Sync 对应的还有两个子类 NonfairSync(对应非公平模式) 和 FairSync(对应公平模式)。
private static final class Sync extends AbstractQueuedSynchronizer { // ...}static final class NonfairSync extends Sync { // ...}static final class FairSync extends Sync { // ...}实战
public class SemaphoreExample { // 请求的数量 private static final int threadCount = 550;
public static void main(String[] args) throws InterruptedException { // 创建一个具有固定线程数量的线程池对象(如果这里线程池的线程数量给太少的话你会发现执行的很慢) ExecutorService threadPool = Executors.newFixedThreadPool(300); // 初始许可证数量 final Semaphore semaphore = new Semaphore(20);
for (int i = 0; i < threadCount; i++) { final int threadnum = i; threadPool.execute(() -> {// Lambda 表达式的运用 try { semaphore.acquire();// 获取一个许可,所以可运行线程数量为20/1=20 test(threadnum); semaphore.release();// 释放一个许可 } catch (InterruptedException e) { // TODO Auto-generated catch block e.printStackTrace(); }
}); } threadPool.shutdown(); System.out.println("finish"); }
public static void test(int threadnum) throws InterruptedException { Thread.sleep(1000);// 模拟请求的耗时操作 System.out.println("threadnum:" + threadnum); Thread.sleep(1000);// 模拟请求的耗时操作 }}执行 acquire() 方法阻塞,直到有一个许可证可以获得然后拿走一个许可证;每个 release 方法增加一个许可证,这可能会释放一个阻塞的 acquire() 方法。然而,其实并没有实际的许可证这个对象,Semaphore 只是维持了一个可获得许可证的数量。 Semaphore 经常用于限制获取某种资源的线程数量。
当然一次也可以一次拿取和释放多个许可,不过一般没有必要这样做:
semaphore.acquire(5);// 获取5个许可,所以可运行线程数量为20/5=4test(threadnum);semaphore.release(5);// 释放5个许可除了 acquire() 方法之外,另一个比较常用的与之对应的方法是 tryAcquire() 方法,该方法如果获取不到许可就立即返回 false。
Semaphore 与 CountDownLatch 一样,也是共享锁的一种实现。它默认构造 AQS 的 state 为 permits。当执行任务的线程数量超出 permits,那么多余的线程将会被放入等待队列 Park,并自旋判断 state 是否大于 0。只有当 state 大于 0 的时候,阻塞的线程才能继续执行,此时先前执行任务的线程继续执行 release() 方法,release() 方法使得 state 的变量会加 1,那么自旋的线程便会判断成功。 如此,每次只有最多不超过 permits 数量的线程能自旋成功,便限制了执行任务线程的数量。
CountDownLatch (倒计时器)
介绍
CountDownLatch 允许 count 个线程阻塞在一个地方,直至所有线程的任务都执行完毕。
CountDownLatch 是一次性的,计数器的值只能在构造方法中初始化一次,之后没有任何机制再次对其设置值,当 CountDownLatch 使用完毕后,它不能再次被使用。
原理
CountDownLatch 是共享锁的一种实现,它默认构造 AQS 的 state 值为 count。这个我们通过 CountDownLatch 的构造方法即可看出。
public CountDownLatch(int count) { if (count < 0) throw new IllegalArgumentException("count < 0"); this.sync = new Sync(count);}
private static final class Sync extends AbstractQueuedSynchronizer { Sync(int count) { setState(count); } //...}当线程调用 countDown() 时,其实使用了tryReleaseShared方法以 CAS 的操作来减少 state,直至 state 为 0 。当 state 为 0 时,表示所有的线程都调用了 countDown 方法,那么在 CountDownLatch 上等待的线程就会被唤醒并继续执行。
public void countDown() { // Sync 是 CountDownLatch 的内部类 , 继承了 AbstractQueuedSynchronizer sync.releaseShared(1);}releaseShared方法是 AbstractQueuedSynchronizer 中的默认实现。
// 释放共享锁// 如果 tryReleaseShared 返回 true,就唤醒等待队列中的一个或多个线程。public final boolean releaseShared(int arg) { //释放共享锁 if (tryReleaseShared(arg)) { //释放当前节点的后置等待节点 doReleaseShared(); return true; } return false;}tryReleaseShared 方法是CountDownLatch 的内部类 Sync 重写的一个方法, AbstractQueuedSynchronizer中的默认实现仅仅抛出 UnsupportedOperationException 异常。
// 对 state 进行递减,直到 state 变成 0;// 只有 count 递减到 0 时,countDown 才会返回 trueprotected boolean tryReleaseShared(int releases) { // 自选检查 state 是否为 0 for (;;) { int c = getState(); // 如果 state 已经是 0 了,直接返回 false if (c == 0) return false; // 对 state 进行递减 int nextc = c-1; // CAS 操作更新 state 的值 if (compareAndSetState(c, nextc)) return nextc == 0; }}以无参 await方法为例,当调用 await() 的时候,如果 state 不为 0,那就证明任务还没有执行完毕,await() 就会一直阻塞,也就是说 await() 之后的语句不会被执行(main 线程被加入到等待队列也就是 CLH 队列中了)。然后,CountDownLatch 会自旋 CAS 判断 state == 0,如果 state == 0 的话,就会释放所有等待的线程,await() 方法之后的语句得到执行。
// 等待(也可以叫做加锁)public void await() throws InterruptedException { sync.acquireSharedInterruptibly(1);}// 带有超时时间的等待public boolean await(long timeout, TimeUnit unit) throws InterruptedException { return sync.tryAcquireSharedNanos(1, unit.toNanos(timeout));}acquireSharedInterruptibly方法是 AbstractQueuedSynchronizer 中的默认实现。
// 尝试获取锁,获取成功则返回,失败则加入等待队列,挂起线程public final void acquireSharedInterruptibly(int arg) throws InterruptedException { if (Thread.interrupted()) throw new InterruptedException(); // 尝试获得锁,获取成功则返回 if (tryAcquireShared(arg) < 0) // 获取失败加入等待队列,挂起线程 doAcquireSharedInterruptibly(arg);}tryAcquireShared 方法是CountDownLatch 的内部类 Sync 重写的一个方法,其作用就是判断 state 的值是否为 0,是的话就返回 1,否则返回 -1。
protected int tryAcquireShared(int acquires) { return (getState() == 0) ? 1 : -1;}实战
CountDownLatch 的两种典型用法:
- 某一线程在开始运行前等待 n 个线程执行完毕 : 将
CountDownLatch的计数器初始化为 n (new CountDownLatch(n)),每当一个任务线程执行完毕,就将计数器减 1 (countdownlatch.countDown()),当计数器的值变为 0 时,在CountDownLatch 上 await()的线程就会被唤醒。一个典型应用场景就是启动一个服务时,主线程需要等待多个组件加载完毕,之后再继续执行。 - 实现多个线程开始执行任务的最大并行性:注意是并行性,不是并发,强调的是多个线程在某一时刻同时开始执行。类似于赛跑,将多个线程放到起点,等待发令枪响,然后同时开跑。做法是初始化一个共享的
CountDownLatch对象,将其计数器初始化为 1 (new CountDownLatch(1)),多个线程在开始执行任务前首先coundownlatch.await(),当主线程调用countDown()时,计数器变为 0,多个线程同时被唤醒。
CountDownLatch 代码示例:
public class CountDownLatchExample { // 请求的数量 private static final int THREAD_COUNT = 550;
public static void main(String[] args) throws InterruptedException { // 创建一个具有固定线程数量的线程池对象(如果这里线程池的线程数量给太少的话你会发现执行的很慢) // 只是测试使用,实际场景请手动赋值线程池参数 ExecutorService threadPool = Executors.newFixedThreadPool(300); final CountDownLatch countDownLatch = new CountDownLatch(THREAD_COUNT); for (int i = 0; i < THREAD_COUNT; i++) { final int threadNum = i; threadPool.execute(() -> { try { test(threadNum); } catch (InterruptedException e) { e.printStackTrace(); } finally { // 表示一个请求已经被完成 countDownLatch.countDown(); }
}); } countDownLatch.await(); threadPool.shutdown(); System.out.println("finish"); }
public static void test(int threadnum) throws InterruptedException { Thread.sleep(1000); System.out.println("threadNum:" + threadnum); Thread.sleep(1000); }}上面的代码中,我们定义了请求的数量为 550,当这 550 个请求被处理完成之后,才会执行System.out.println("finish");。
与 CountDownLatch 的第一次交互是主线程等待其他线程。主线程必须在启动其他线程后立即调用 CountDownLatch.await() 方法。这样主线程的操作就会在这个方法上阻塞,直到其他线程完成各自的任务。
其他 N 个线程必须引用闭锁对象,因为他们需要通知 CountDownLatch 对象,他们已经完成了各自的任务。这种通知机制是通过 CountDownLatch.countDown()方法来完成的;每调用一次这个方法,在构造函数中初始化的 count 值就减 1。所以当 N 个线程都调 用了这个方法,count 的值等于 0,然后主线程就能通过 await()方法,恢复执行自己的任务。
再插一嘴:CountDownLatch 的 await() 方法使用不当很容易产生死锁,比如我们上面代码中的 for 循环改为:
for (int i = 0; i < threadCount-1; i++) {.......}这样就导致 count 的值没办法等于 0,然后就会导致一直等待。
CyclicBarrier(循环栅栏)
介绍
CyclicBarrier 和 CountDownLatch 非常类似,它也可以实现线程间的技术等待,但是它的功能比 CountDownLatch 更加复杂和强大。主要应用场景和 CountDownLatch 类似。
CountDownLatch 的实现是基于 AQS 的,而 CycliBarrier 是基于 ReentrantLock(ReentrantLock 也属于 AQS 同步器)和 Condition 的。
CyclicBarrier 的字面意思是可循环使用(Cyclic)的屏障(Barrier)。它要做的事情是:让一组线程到达一个屏障(也可以叫同步点)时被阻塞,直到最后一个线程到达屏障时,屏障才会开门,所有被屏障拦截的线程才会继续干活。
原理
CyclicBarrier 内部通过一个 count 变量作为计数器,count 的初始值为 parties 属性的初始化值,每当一个线程到了栅栏这里了,那么就将计数器减 1。如果 count 值为 0 了,表示这是这一代最后一个线程到达栅栏,就尝试执行我们构造方法中输入的任务。
//每次拦截的线程数private final int parties;//计数器private int count;下面我们结合源码来简单看看。
-
CyclicBarrier默认的构造方法是CyclicBarrier(int parties),其参数表示屏障拦截的线程数量,每个线程调用await()方法告诉CyclicBarrier我已经到达了屏障,然后当前线程被阻塞。public CyclicBarrier(int parties) {this(parties, null);}public CyclicBarrier(int parties, Runnable barrierAction) {if (parties <= 0) throw new IllegalArgumentException();this.parties = parties;this.count = parties;this.barrierCommand = barrierAction;}其中,
parties就代表了有拦截的线程的数量,当拦截的线程数量达到这个值的时候就打开栅栏,让所有线程通过。 -
当调用
CyclicBarrier对象调用await()方法时,实际上调用的是dowait(false, 0L)方法。await()方法就像树立起一个栅栏的行为一样,将线程挡住了,当拦住的线程数量达到parties的值时,栅栏才会打开,线程才得以通过执行。public int await() throws InterruptedException, BrokenBarrierException {try {return dowait(false, 0L);} catch (TimeoutException toe) {throw new Error(toe); // cannot happen}}dowait(false, 0L)方法源码分析如下:// 当线程数量或者请求数量达到 count 时 await 之后的方法才会被执行。上面的示例中 count 的值就为 5。private int count;/*** Main barrier code, covering the various policies.*/private int dowait(boolean timed, long nanos)throws InterruptedException, BrokenBarrierException,TimeoutException {final ReentrantLock lock = this.lock;// 锁住lock.lock();try {final Generation g = generation;if (g.broken)throw new BrokenBarrierException();// 如果线程中断了,抛出异常if (Thread.interrupted()) {breakBarrier();throw new InterruptedException();}// count 减1int index = --count;// 当 count 数量减为 0 之后说明最后一个线程已经到达栅栏了,也就是达到了可以执行await 方法之后的条件if (index == 0) { // trippedboolean ranAction = false;try {final Runnable command = barrierCommand;if (command != null)command.run();ranAction = true;// 将 count 重置为 parties 属性的初始化值// 唤醒之前等待的线程// 下一波执行开始nextGeneration();return 0;} finally {if (!ranAction)breakBarrier();}}// loop until tripped, broken, interrupted, or timed outfor (;;) {try {if (!timed)trip.await();else if (nanos > 0L)nanos = trip.awaitNanos(nanos);} catch (InterruptedException ie) {if (g == generation && ! g.broken) {breakBarrier();throw ie;} else {// We're about to finish waiting even if we had not// been interrupted, so this interrupt is deemed to// "belong" to subsequent execution.Thread.currentThread().interrupt();}}if (g.broken)throw new BrokenBarrierException();if (g != generation)return index;if (timed && nanos <= 0L) {breakBarrier();throw new TimeoutException();}}} finally {lock.unlock();}}
实战
示例 1:
public class CyclicBarrierExample1 { // 请求的数量 private static final int threadCount = 550; // 需要同步的线程数量 private static final CyclicBarrier cyclicBarrier = new CyclicBarrier(5);
public static void main(String[] args) throws InterruptedException { // 创建线程池 ExecutorService threadPool = Executors.newFixedThreadPool(10);
for (int i = 0; i < threadCount; i++) { final int threadNum = i; Thread.sleep(1000); threadPool.execute(() -> { try { test(threadNum); } catch (InterruptedException e) { // TODO Auto-generated catch block e.printStackTrace(); } catch (BrokenBarrierException e) { // TODO Auto-generated catch block e.printStackTrace(); } }); } threadPool.shutdown(); }
public static void test(int threadnum) throws InterruptedException, BrokenBarrierException { System.out.println("threadnum:" + threadnum + "is ready"); try { /**等待60秒,保证子线程完全执行结束*/ cyclicBarrier.await(60, TimeUnit.SECONDS); } catch (Exception e) { System.out.println("-----CyclicBarrierException------"); } System.out.println("threadnum:" + threadnum + "is finish"); }
}运行结果,如下:
threadnum:0is readythreadnum:1is readythreadnum:2is readythreadnum:3is readythreadnum:4is readythreadnum:4is finishthreadnum:0is finishthreadnum:1is finishthreadnum:2is finishthreadnum:3is finishthreadnum:5is readythreadnum:6is readythreadnum:7is readythreadnum:8is readythreadnum:9is readythreadnum:9is finishthreadnum:5is finishthreadnum:8is finishthreadnum:7is finishthreadnum:6is finish......可以看到当线程数量也就是请求数量达到我们定义的 5 个的时候, await() 方法之后的方法才被执行。
另外,CyclicBarrier 还提供一个更高级的构造函数 CyclicBarrier(int parties, Runnable barrierAction),用于在线程到达屏障时,优先执行 barrierAction,方便处理更复杂的业务场景。
示例 2:
public class CyclicBarrierExample2 { // 请求的数量 private static final int threadCount = 550; // 需要同步的线程数量 private static final CyclicBarrier cyclicBarrier = new CyclicBarrier(5, () -> { System.out.println("------当线程数达到之后,优先执行------"); });
public static void main(String[] args) throws InterruptedException { // 创建线程池 ExecutorService threadPool = Executors.newFixedThreadPool(10);
for (int i = 0; i < threadCount; i++) { final int threadNum = i; Thread.sleep(1000); threadPool.execute(() -> { try { test(threadNum); } catch (InterruptedException e) { // TODO Auto-generated catch block e.printStackTrace(); } catch (BrokenBarrierException e) { // TODO Auto-generated catch block e.printStackTrace(); } }); } threadPool.shutdown(); }
public static void test(int threadnum) throws InterruptedException, BrokenBarrierException { System.out.println("threadnum:" + threadnum + "is ready"); cyclicBarrier.await(); System.out.println("threadnum:" + threadnum + "is finish"); }}运行结果,如下:
threadnum:0is readythreadnum:1is readythreadnum:2is readythreadnum:3is readythreadnum:4is ready------当线程数达到之后,优先执行------threadnum:4is finishthreadnum:0is finishthreadnum:2is finishthreadnum:1is finishthreadnum:3is finishthreadnum:5is readythreadnum:6is readythreadnum:7is readythreadnum:8is readythreadnum:9is ready------当线程数达到之后,优先执行------threadnum:9is finishthreadnum:5is finishthreadnum:6is finishthreadnum:8is finishthreadnum:7is finish......AQS Introduction
AQS stands for AbstractQueuedSynchronizer, which translates to Abstract Queued Synchronizer. This class is under the java.util.concurrent.locks package.
AQS is an abstract class mainly used to build locks and synchronizers.
public abstract class AbstractQueuedSynchronizer extends AbstractOwnableSynchronizer implements java.io.Serializable {}AQS provides implementations of some common functionalities for building locks and synchronizers, so using AQS makes it simple and efficient to construct a wide range of widely-used synchronizers, such as the ones we mentioned: ReentrantLock, Semaphore; others like ReentrantReadWriteLock, SynchronousQueue, etc., are all based on AQS.
AQS Principles
In concurrency interviews, people are often asked, “Please explain your understanding of the principles of AQS.” Here’s a reference example. Interviews aren’t about memorization; you should add your own thoughts. Even if you can’t add your own thoughts, you should be able to explain it in a straightforward way rather than reciting.
Core idea of AQS
The core idea of AQS is: if the requested shared resource is free, set the requesting thread as an active worker thread and set the shared resource to a locked state. If the requested shared resource is occupied, a mechanism for blocking/waiting threads and for unlocking and distributing the lock upon wake-up is needed. This mechanism in AQS is based on CLH locks (Craig, Landin, and Hagersten locks).
CLH locks are an improvement over spinlocks, forming a virtual bidirectional queue (a virtual bidirectional queue meaning there is no actual queue instance, only the relationships between nodes). Threads that temporarily cannot acquire the lock are added to this queue. AQS encapsulates each thread requesting the shared resource into a CLH queue lock node (Node) to implement lock distribution. In a CLH queue lock, a node represents a thread, and it stores the thread reference, the node’s state in the queue (waitStatus), the previous node (prev), and the next node (next).
AQS (AbstractQueuedSynchronizer) core diagram:
AQS uses an int state variable to represent the synchronization state, and relies on an internal FIFO thread-waiting/wait queue to handle the queuing of threads trying to acquire the resource.
// Shared variable, use volatile to ensure visibilityprivate volatile int state;Additionally, the state can be accessed via the protected-typed getState(), setState() and compareAndSetState() methods. And these methods are all declared final, so they cannot be overridden in subclasses.
// Return the current value of the synchronization stateprotected final int getState() { return state;} // Set the synchronization state valueprotected final void setState(int newState) { state = newState;}// Atomically (CAS) set the synchronization state to the given valueprotected final boolean compareAndSetState(int expect, int update) { return unsafe.compareAndSwapInt(this, stateOffset, expect, update);}Take the reentrant mutual-exclusion lock ReentrantLock as an example. It maintains an internal state variable to indicate the lock’s occupancy. The initial value of state is 0, meaning the lock is unlocked. When thread A calls lock(), it will try to exclusively acquire the lock via tryAcquire() and increment the value of state by 1. If successful, thread A obtains the lock. If it fails, thread A is added to a waiting queue (the CLH queue) until another thread releases the lock. Suppose thread A acquires the lock; before releasing it, thread A can reacquire the lock (the state will accumulate). This is the manifestation of reentrancy: a thread can acquire the same lock multiple times without being blocked. However, this also means a thread must release the lock the same number of times as it acquired it, so that the value of state returns to 0 and the lock becomes unlocked again. Only in this way can other waiting threads have a chance to acquire the lock.
The process of thread A attempting to acquire the lock is shown in the figure below:
Now, consider the Countdown Timer CountDownLatch as an example. The task is divided into N sub-threads to execute, and the state is initialized to N (note that N should match the number of threads). These N sub-threads begin executing their tasks; after finishing each sub-thread, they call countDown(). This method attempts a CAS operation to decrement the state by 1. When all sub-threads have completed (i.e., state becomes 0), CountDownLatch will call unpark() to wake up the main thread. At this point, the main thread can return from the await() method (the await() in CountDownLatch, not the one in AQS) and continue with subsequent operations.
AQS Shared Resource Modes
AQS defines two resource-sharing modes: Exclusive (exclusive, only one thread can execute, e.g., ReentrantLock) and Shared (shared, multiple threads can execute concurrently, e.g., Semaphore/CountDownLatch).
Generally, a custom synchronizer’s sharing mode is either exclusive or shared, and you only need to implement one of tryAcquire-tryRelease or tryAcquireShared-tryReleaseShared. But AQS also supports a custom synchronizer implementing both exclusive and shared modes, such as in ReentrantReadWriteLock.
Custom synchronizers
The design of a synchronizer is based on the template method pattern. A typical way to customize a synchronizer is as follows (a classic application of the template method pattern):
- The user extends
AbstractQueuedSynchronizerand overrides the specified methods. - The AQS is composed into the custom synchronization component’s implementation, and its template methods are called, which in turn call the methods overridden by the user.
This is a major difference from the traditional approach of implementing interfaces.
AQS uses the template method pattern; when designing a custom synchronizer, you need to override the following AQS-provided hook methods:
// Exclusive mode. Try to acquire the resource; return true if successful, false otherwise.protected boolean tryAcquire(int)// Exclusive mode. Try to release the resource; return true if successful, false otherwise.protected boolean tryRelease(int)// Shared mode. Try to acquire the resource. Negative means failure; 0 means success but no remaining resources; positive means success with remaining resources.protected int tryAcquireShared(int)// Shared mode. Try to release the resource; on success return true, on failure return false.protected boolean tryReleaseShared(int)// Whether this thread holds the lock exclusively. Only needed when you use condition.protected boolean isHeldExclusively()What is a hook method? A hook method is a method declared in an abstract class, usually marked with the protected keyword. It can be a no-op method (implemented by subclasses) or a method with a default implementation. The template method pattern uses hook methods to control the fixed step implementations.
Besides the hook methods mentioned above, the other methods in the AQS class are final, so they cannot be overridden by other classes.
Common Synchronization Utilities
The following introduces several common synchronization utilities based on AQS.
Semaphore (Semaphore)
Introduction
synchronized and ReentrantLock both allow only one thread at a time to access a resource, while Semaphore (the semaphore) can be used to control how many threads can access a particular resource simultaneously.
The usage of Semaphore is straightforward. Suppose there are N (N > 5) threads trying to acquire the shared resource in the Semaphore. The following code indicates that at any moment among N threads, only 5 threads can obtain the shared resource, and the others will block until a thread releases the resource, after which the blocked threads can obtain it.
// Initial number of shared resourcesfinal Semaphore semaphore = new Semaphore(5);// Acquire 1 permitsemaphore.acquire();// Release 1 permitsemaphore.release();When the initial resource count is 1, Semaphore degrades to an exclusive lock.
Semaphore has two modes:
- Fair mode: The order in which
acquire()is called defines the order of acquiring permits, following FIFO; - Unfair mode: Preemptive.
The two constructors for Semaphore are as follows:
public Semaphore(int permits) { sync = new NonfairSync(permits);}
public Semaphore(int permits, boolean fair) { sync = fair ? new FairSync(permits) : new NonfairSync(permits);}Both constructors must specify the number of permits. The second constructor allows you to choose fair or unfair mode, with unfair mode as default.
Semaphore is typically used in scenarios where there is a clear limit on resource access, such as rate limiting (limited to a single machine; for real projects, Redis + Lua is recommended for rate limiting).
Principle
Semaphore is an implementation of a shared lock, and it initializes AQS’s state to permits by default. You can think of permits as the number of licenses; only threads that hold a license can proceed.
Taking the no-argument acquire method as an example, calling semaphore.acquire() makes a thread attempt to obtain a permit. If state > 0, it means it can succeed; if state <= 0, it means there are not enough permits, and acquisition fails.
If acquisition can succeed (state > 0), it will attempt a CAS to modify the state value to state - 1. If acquisition fails, a Node is created and added to the waiting queue, and the current thread is suspended.
// Acquire 1 permitpublic void acquire() throws InterruptedException { sync.acquireSharedInterruptibly(1);}
// Acquire one or more permitspublic void acquire(int permits) throws InterruptedException { if (permits < 0) throw new IllegalArgumentException(); sync.acquireSharedInterruptibly(permits);}acquireSharedInterruptibly is the default implementation in AbstractQueuedSynchronizer.
// Acquire a permit in shared mode; if successful return, otherwise join the waiting queue and suspend the threadpublic final void acquireSharedInterruptibly(int arg) throws InterruptedException { if (Thread.interrupted()) throw new InterruptedException(); // Try to acquire a permit; arg is the number of permits to acquire. If acquisition fails, create a node and join the waiting queue, suspending the current thread. if (tryAcquireShared(arg) < 0) doAcquireSharedInterruptibly(arg);}Taking the nonfair mode (NonfairSync) as an example, here is the implementation of tryAcquireShared:
// In shared mode, attempt to acquire the resource (the resource in Semaphore is the permit):protected int tryAcquireShared(int acquires) { return nonfairTryAcquireShared(acquires);}
// Nonfair shared mode permit acquisitionfinal int nonfairTryAcquireShared(int acquires) { for (;;) { // Current number of available permits int available = getState(); /* * Try to acquire a permit. If the current available permits are less than or equal to 0, return a negative value to indicate failure. * If the current available permits are greater than 0, success may occur; if CAS fails, loop to retry with the latest value. */ int remaining = available - acquires; if (remaining < 0 || compareAndSetState(available, remaining)) return remaining; }}For the no-argument release method, calling semaphore.release(); makes the thread attempt to release a permit and uses CAS to modify the state value to state + 1. After successfully releasing a permit, one thread in the waiting queue is awakened. The awakened thread will again try to modify the state value to state - 1; if state > 0 the token is acquired successfully, otherwise it re-enters the waiting queue and suspends.
// Release 1 permitpublic void release() { sync.releaseShared(1);}
// Release one or more permitspublic void release(int permits) { if (permits < 0) throw new IllegalArgumentException(); sync.releaseShared(permits);}releaseShared is the default implementation in AbstractQueuedSynchronizer.
// Release shared lock// If tryReleaseShared returns true, wake up one or more waiting threads.public final boolean releaseShared(int arg) { // Release the shared lock if (tryReleaseShared(arg)) { // Release the current node's successor waiting node doReleaseShared(); return true; } return false;}tryReleaseShared is a method overridden in Semaphore’s inner Sync class; the default implementation in AbstractQueuedSynchronizer simply throws UnsupportedOperationException.
// Overridden in the inner class Sync of Semaphore// Attempt to release resourcesprotected final boolean tryReleaseShared(int releases) { for (;;) { int current = getState(); // Available permits + 1 int next = current + releases; if (next < current) // overflow throw new Error("Maximum permit count exceeded"); // CAS update of state if (compareAndSetState(current, next)) return true; }}As you can see, the methods mentioned above are largely implemented by the synchronizer sync behind the scenes. Sync is the inner class of CountDownLatch, inheriting from AbstractQueuedSynchronizer, and it overrides some of its methods. There are also two subclasses corresponding to the modes: NonfairSync (for unfair mode) and FairSync (for fair mode).
private static final class Sync extends AbstractQueuedSynchronizer { // ...}static final class NonfairSync extends Sync { // ...}static final class FairSync extends Sync { // ...}Practical Example
public class SemaphoreExample { // Number of requests private static final int threadCount = 550;
public static void main(String[] args) throws InterruptedException { // Create a thread pool with a fixed number of threads (if this is too small, you’ll see it runs slowly) ExecutorService threadPool = Executors.newFixedThreadPool(300); // Initial permits final Semaphore semaphore = new Semaphore(20);
for (int i = 0; i < threadCount; i++) { final int threadnum = i; threadPool.execute(() -> {// Using a lambda expression try { semaphore.acquire();// Acquire a permit, so at most 20 threads can run test(threadnum); semaphore.release();// Release a permit } catch (InterruptedException e) { // TODO Auto-generated catch block e.printStackTrace(); }
}); } threadPool.shutdown(); System.out.println("finish"); }
public static void test(int threadnum) throws InterruptedException { Thread.sleep(1000);// Simulate a time-consuming operation System.out.println("threadnum:" + threadnum); Thread.sleep(1000);// Simulate a time-consuming operation }}Calling acquire() blocks until a permit can be obtained, then grabs one permit; each release increases a permit, which may release a blocked acquire() method. However, there is no actual permit object; Semaphore simply maintains a count of available permits. Semaphores are often used to limit the number of threads that can access a resource.
Of course, you can also acquire and release multiple permits at once, though it’s usually unnecessary:
semaphore.acquire(5);// Acquire 5 permits, so at most 20/5 = 4 threads can runtest(threadnum);semaphore.release(5);// Release 5 permitsBesides the acquire() method, another commonly used counterpart is the tryAcquire() method, which returns false immediately if a permit cannot be obtained.
Semaphore, like CountDownLatch, is also a shared lock implementation. It initializes AQS’s state to permits by default. If the number of threads executing tasks exceeds permits, the extra threads will be parked in a waiting queue (Park) and spin until
statebecomes greater than 0. Only whenstateis greater than 0 can the blocked threads continue; at that moment, the threads that previously performed tasks continue to executerelease(), which incrementsstateby 1, and the spinning threads will detect the success. Thus, at any time, no more thanpermitsthreads can spin successfully, limiting the number of threads executing tasks.
CountDownLatch (Countdown Latch)
Introduction
CountDownLatch allows count threads to block at a location until all threads’ tasks have completed.
CountDownLatch is a one-shot mechanism; the counter value can only be initialized in the constructor, and there is no mechanism to reset it afterwards. Once a CountDownLatch is used up, it cannot be used again.
Principle
CountDownLatch is an implementation of a shared lock; it initializes AQS’s state to count by default. This is evident from the constructor.
public CountDownLatch(int count) { if (count < 0) throw new IllegalArgumentException("count < 0"); this.sync = new Sync(count);}
private static final class Sync extends AbstractQueuedSynchronizer { Sync(int count) { setState(count); } //...}When threads call countDown(), it actually uses tryReleaseShared with CAS to decrement state, until state becomes 0. When state reaches 0, it means all threads have called countDown, and the threads waiting on the CountDownLatch will be awakened and proceed.
public void countDown() { // Sync is an inner class of CountDownLatch, extending AbstractQueuedSynchronizer sync.releaseShared(1);}releaseShared is the default implementation in AbstractQueuedSynchronizer.
// Release shared lock// If tryReleaseShared returns true, wake up one or more waiting threads.public final boolean releaseShared(int arg) { // Release the shared lock if (tryReleaseShared(arg)) { // Release the successor waiting nodes of the current node doReleaseShared(); return true; } return false;}tryReleaseShared is a method overridden in the inner Sync class of CountDownLatch; the default implementation in AbstractQueuedSynchronizer simply throws UnsupportedOperationException.
// Decrement the state; only when state reaches 0 will countDown return trueprotected boolean tryReleaseShared(int releases) { // Optional: check if state is 0 for (;;) { int c = getState(); // If state is already 0, return false if (c == 0) return false; // Decrement state int nextc = c-1; // CAS update of state if (compareAndSetState(c, nextc)) return nextc == 0; }}No-argument await blocks until the state becomes 0. When await() is called and state is not 0, the task is blocked, meaning statements after await() won’t execute (the main thread is added to the CLH queue). CountDownLatch then spin-waits via CAS to observe when state == 0. When it is 0, all waiting threads are released and the code after await() continues to execute.
// Waits (also can be called as locking)public void await() throws InterruptedException { sync.acquireSharedInterruptibly(1);}// Waits with timeoutpublic boolean await(long timeout, TimeUnit unit) throws InterruptedException { return sync.tryAcquireSharedNanos(1, unit.toNanos(timeout));}acquireSharedInterruptibly is the default implementation in AbstractQueuedSynchronizer.
// Try to acquire the lock, on success return, on failure join the waiting queue and suspend the threadpublic final void acquireSharedInterruptibly(int arg) throws InterruptedException { if (Thread.interrupted()) throw new InterruptedException(); // Try to acquire the lock; if acquisition fails, join the waiting queue and suspend the thread if (tryAcquireShared(arg) < 0) // Acquire failed, join the waiting queue and suspend the thread doAcquireSharedInterruptibly(arg);}tryAcquireShared is the method overridden in CountDownLatch’s inner Sync class; its role is to determine whether state is 0 or not—if it is 0, return 1; otherwise return -1.
protected int tryAcquireShared(int acquires) { return (getState() == 0) ? 1 : -1;}Practical Examples
Two typical uses of CountDownLatch:
-
A thread waits for N threads to complete before starting: initialize CountDownLatch with N (
new CountDownLatch(n)); each task thread, upon completion, callscountDown(). When the counter reaches 0, the thread waiting on the CountDownLatch is awakened. A typical use case is waiting for multiple components to load before starting a service. -
Realize maximum parallelism by starting multiple threads at the same time: initialize a shared CountDownLatch with 1 (
new CountDownLatch(1)), have multiple threads wait on it before starting. When the main thread callscountDown(), the count becomes 0 and all threads are awakened to start concurrently.
CountDownLatch code example:
public class CountDownLatchExample { // Number of requests private static final int THREAD_COUNT = 550;
public static void main(String[] args) throws InterruptedException { // Create a thread pool with a fixed number of threads (for testing; adjust in real scenarios) ExecutorService threadPool = Executors.newFixedThreadPool(300); final CountDownLatch countDownLatch = new CountDownLatch(THREAD_COUNT); for (int i = 0; i < THREAD_COUNT; i++) { final int threadNum = i; threadPool.execute(() -> { try { test(threadNum); } catch (InterruptedException e) { e.printStackTrace(); } finally { // Indicates that one request has completed countDownLatch.countDown(); }
}); } countDownLatch.await(); threadPool.shutdown(); System.out.println("finish"); }
public static void test(int threadnum) throws InterruptedException { Thread.sleep(1000); System.out.println("threadNum:" + threadnum); Thread.sleep(1000); }}In the above code, we defined the number of requests as 550. Only after all 550 requests are processed will the line System.out.println("finish"); execute.
The first interaction with CountDownLatch is the main thread waiting for other threads. The main thread must call CountDownLatch.await() immediately after starting the other threads. This blocks the main thread at that method until the other threads finish their tasks.
The other N threads must reference the latch object because they need to notify CountDownLatch that they have completed their tasks. This notification is accomplished via CountDownLatch.countDown(); every call decrements the initial count by 1. When all N threads have called this method, the count reaches 0, and the main thread can resume execution via await().
CyclicBarrier (Cyclic Barrier)
Introduction
CyclicBarrier and CountDownLatch are very similar; they can both realize inter-thread waiting, but CyclicBarrier is more complex and powerful. Its typical usage is similar to CountDownLatch.
CountDownLatch is implemented based on AQS, while CyclicBarrier is based on ReentrantLock (which is also an AQS synchronizer) and Condition.
The literal meaning of CyclicBarrier is a barrier that can be reused (cyclic). It is designed to block a group of threads when they reach the barrier, until the last thread arrives, at which point the barrier opens and the threads that were blocked can continue working.
Principle
Internally, CyclicBarrier uses a count variable as a counter; the initial value of count is the value of the parties parameter. Each time a thread reaches the barrier, the counter is decremented by 1. When the count reaches 0, it indicates that the last thread has arrived at the barrier, and the task provided in the constructor is attempted to be executed.
// Number of threads intercepted each timeprivate final int parties;// Counterprivate int count;Now, let’s briefly look at the source.
- The default constructor of
CyclicBarrierisCyclicBarrier(int parties), whose parameter represents the number of threads to barrier. Each thread callingawait()tells the barrier that it has reached the barrier, and the current thread is blocked.
public CyclicBarrier(int parties) { this(parties, null);}
public CyclicBarrier(int parties, Runnable barrierAction) { if (parties <= 0) throw new IllegalArgumentException(); this.parties = parties; this.count = parties; this.barrierCommand = barrierAction;}Here, parties represents the number of threads to intercept; once the number reaches this value, the barrier opens and all threads pass through.
- When a
CyclicBarrierobject’sawait()method is called, it actually callsdowait(false, 0L). Theawait()method blocks the threads as if a barrier has been erected; when the number of waiting threads reachesparties, the barrier opens and the threads proceed.
public int await() throws InterruptedException, BrokenBarrierException { try { return dowait(false, 0L); } catch (TimeoutException toe) { throw new Error(toe); // cannot happen }}The following is the analysis of dowait(false, 0L):
// When the number of threads reaches count, the await method will proceed. In the example above, count is 5. private int count; /** * Main barrier code, covering the various policies. */ private int dowait(boolean timed, long nanos) throws InterruptedException, BrokenBarrierException, TimeoutException { final ReentrantLock lock = this.lock; // Lock lock.lock(); try { final Generation g = generation;
if (g.broken) throw new BrokenBarrierException();
// If the thread is interrupted, throw exception if (Thread.interrupted()) { breakBarrier(); throw new InterruptedException(); } // Decrement count int index = --count; // If count becomes 0, this is the last thread to reach the barrier if (index == 0) { // tripped boolean ranAction = false; try { final Runnable command = barrierCommand; if (command != null) command.run(); ranAction = true; // Reset count to the initial value of parties // Wake up the previously waiting threads // Start next generation nextGeneration(); return 0; } finally { if (!ranAction) breakBarrier(); } }
// Loop until tripped, broken, interrupted, or timed out for (;;) { try { if (!timed) trip.await(); else if (nanos > 0L) nanos = trip.awaitNanos(nanos); } catch (InterruptedException ie) { if (g == generation && ! g.broken) { breakBarrier(); throw ie; } else { // We're about to finish waiting even if we had not // been interrupted, so this interrupt is deemed to // "belong" to subsequent execution. Thread.currentThread().interrupt(); } }
if (g.broken) throw new BrokenBarrierException();
if (g != generation) return index;
if (timed && nanos <= 0L) { breakBarrier(); throw new TimeoutException(); } } } finally { lock.unlock(); } }Practical Examples
Example 1:
public class CyclicBarrierExample1 { // Number of requests private static final int threadCount = 550; // Number of threads to synchronize private static final CyclicBarrier cyclicBarrier = new CyclicBarrier(5);
public static void main(String[] args) throws InterruptedException { // Create thread pool ExecutorService threadPool = Executors.newFixedThreadPool(10);
for (int i = 0; i < threadCount; i++) { final int threadNum = i; Thread.sleep(1000); threadPool.execute(() -> { try { test(threadNum); } catch (InterruptedException e) { // TODO Auto-generated catch block e.printStackTrace(); } catch (BrokenBarrierException e) { // TODO Auto-generated catch block e.printStackTrace(); } }); } threadPool.shutdown(); }
public static void test(int threadnum) throws InterruptedException, BrokenBarrierException { System.out.println("threadnum:" + threadnum + "is ready"); try { /**Wait for 60 seconds to ensure all sub-threads finish*/ cyclicBarrier.await(60, TimeUnit.SECONDS); } catch (Exception e) { System.out.println("-----CyclicBarrierException------"); } System.out.println("threadnum:" + threadnum + "is finish"); }
}Running result:
threadnum:0is readythreadnum:1is readythreadnum:2is readythreadnum:3is readythreadnum:4is readythreadnum:4is finishthreadnum:0is finishthreadnum:1is finishthreadnum:2is finishthreadnum:3is finishthreadnum:5is readythreadnum:6is readythreadnum:7is readythreadnum:8is readythreadnum:9is readythreadnum:9is finishthreadnum:5is finishthreadnum:8is finishthreadnum:7is finishthreadnum:6is finish......You can see that when the number of threads—i.e., the number of requests—reaches the defined value of 5, the code after await() is executed.
Additionally, CyclicBarrier provides a more advanced constructor CyclicBarrier(int parties, Runnable barrierAction) to run the barrierAction first when threads reach the barrier, which is convenient for handling more complex business scenarios.
Example 2:
public class CyclicBarrierExample2 { // Number of requests private static final int threadCount = 550; // Number of threads to synchronize private static final CyclicBarrier cyclicBarrier = new CyclicBarrier(5, () -> { System.out.println("------When the thread count is reached, this runs first------"); });
public static void main(String[] args) throws InterruptedException { // Create thread pool ExecutorService threadPool = Executors.newFixedThreadPool(10);
for (int i = 0; i < threadCount; i++) { final int threadNum = i; Thread.sleep(1000); threadPool.execute(() -> { try { test(threadNum); } catch (InterruptedException e) { // TODO Auto-generated catch block e.printStackTrace(); } catch (BrokenBarrierException e) { // TODO Auto-generated catch block e.printStackTrace(); } }); } threadPool.shutdown(); }
public static void test(int threadnum) throws InterruptedException, BrokenBarrierException { System.out.println("threadnum:" + threadnum + "is ready"); cyclicBarrier.await(); System.out.println("threadnum:" + threadnum + "is finish"); }}Running result:
threadnum:0is readythreadnum:1is readythreadnum:2is readythreadnum:3is readythreadnum:4is ready------When the thread count is reached, this runs first------threadnum:4is finishthreadnum:0is finishthreadnum:2is finishthreadnum:1is finishthreadnum:3is finishthreadnum:5is readythreadnum:6is readythreadnum:7is readythreadnum:8is readythreadnum:9is ready------When the thread count is reached, this runs first------threadnum:9is finishthreadnum:5is finishthreadnum:6is finishthreadnum:8is finishthreadnum:7is finish......AQS 紹介
AQS の正式名称は AbstractQueuedSynchronizer で、和訳すると「抽象キュー同期化子」です。このクラスは java.util.concurrent.locks パッケージにあります。
AQS は抽象クラスで、主にロックと同期機構を構築するために用いられます。
public abstract class AbstractQueuedSynchronizer extends AbstractOwnableSynchronizer implements java.io.Serializable {}AQS はロックと同期器を構築するための共通機能の実装を提供します。したがって AQS を使用すると、広く使われている多数の同期器を簡潔かつ高効率に構築できます。例えば前述の ReentrantLock、Semaphore の他にも、ReentrantReadWriteLock、SynchronousQueue などはすべて AQS を基盤としています。
AQS 原理
面接で並行知識を問われるとき、多くは「自分の AQS 原理の理解を教えてください」と聞かれます。以下は参考になる例です。面接は暗記ではなく、皆さん自身の考えを加えるべきです。自分の考えを完全に持てなくても、平易に説明できるようにしておくことが大切です。
AQS の核心思想
AQS の核心思想は、要求された共有資源が空いていれば、現在リソースを要求しているスレッドを有効な作業スレッドとして設定し、共有資源をロック状態にすることです。もし要求された共有資源が占有されている場合には、スレッドのブロック待機と、解放時のロック割り当てを行う仕組みが必要になります。この仕組みは AQS が CLH ロック(Craig, Landin, and Hagersten locks)に基づいて実装しています。
CLH ロックはスピンロックの改良版で、仮想の双方向キュー(仮想の双方向キューすなわち実体としてのキューは存在せず、ノード同士の関連だけがある状態)です。現在ロックを取得できないスレッドはこのキューに追加されます。AQS は共有リソースを要求するスレッドを CLH キューのノード(Node)として包み込み、ロックの割り当てを実現します。CLH キューでは、ノードは1つのスレッドを表し、スレッドの参照(thread)、現在のノードのキュー内状態(waitStatus)、前駆ノード(prev)、後継ノード(next)を保持します。
AQS(AbstractQueuedSynchronizer) の核心原理図:
AQS は int 型のメンバ変数 state を使って同期状態を表します。内蔵の FIFO スレッド待機/待機列 によって、資源を取得しようとするスレッドの待機を整えます。
// 共有変数、volatile修飾でスレッド可視性を保証private volatile int state;また、状態情報 state は protected な getState()、setState()、compareAndSetState() で操作できます。なお、これらのメソッドはすべて final なので、サブクラスでオーバーライドすることはできません。
// 現在の同期状態の値を返すprotected final int getState() { return state;} // 同期状態の値を設定するprotected final void setState(int newState) { state = newState;}// 原子的に(CAS操作)同期状態を指定値に更新するprotected final boolean compareAndSetState(int expect, int update) { return unsafe.compareAndSwapInt(this, stateOffset, expect, update);}可用性の高い再入互斥ロック ReentrantLock を例にとると、その内部は state 変数を用いてロックの占有状態を表します。state の初期値は 0 で、ロックが未占有状態を表します。スレッド A が lock() を呼ぶと、tryAcquire() を介してそのロックを独占し、state を 1 つ増やします。成功すればスレッド A はロックを取得します。失敗した場合、スレッド A は待機キュー(CLH キュー)に加わり、他のスレッドがロックを解放するのを待ちます。A がロックを取得できたとき、解放前に A 自身はこのロックを再取得できる(state が累加)ことがあります。これは再入性の表れです。つまり、同じスレッドが同じロックを複数回取得してもブロックされません。しかし、他のスレッドにロックを渡すためには、取得回数と同じ回数の解放が必要で、state が 0 に戻って初めて他の待機スレッドがロックを取得できるようになります。
スレッド A がロックを取得しようとする過程は以下の図のとおりです:
倒计時器 CountDownLatch を例に挙げると、タスクを N 個のサブスレッドに分割して実行し、state も初期値を N にします(N はスレッド数と同じである必要があります)。この N 個のサブスレッドはタスクを実行し終えると、それぞれ countDown() を呼び出します。この方法は CAS(Compare and Swap)操作を用いて state の値を 1 減らします。すべてのサブスレッドが実行を終えると(state が 0 になる)、CountDownLatch は主スレッドを unpark() で起こします。これにより主スレッドは await()(CountDownLatch の await()、AQS のものではない)から戻り、以後の処理を継続できます。
AQS 资源共享方式
AQS はリソース共有モードを 2 つ定義しています:Exclusive(独占、1スレッドのみ実行、例: ReentrantLock)と Share(共有、複数スレッドが同時に実行可能、例: Semaphore / CountDownLatch)。
一般には、カスタム同期器の共有モードは独占か共有のどちらかを実装すれば足り、tryAcquire-tryRelease、tryAcquireShared-tryReleaseShared のいずれかを実装すればよいです。しかし AQS は、独占と共有の両方を同時に実装できるカスタム同期器もサポートしており、例えば ReentrantReadWriteLock があります。
自定义同步器
同期器の設計はテンプレートメソッドパターンに基づきます。カスタム同期器を作成する一般的な方法は以下のとおりです(テンプレートメソッドパターンは古典的な適用例です):
- ユーザーは
AbstractQueuedSynchronizerを継承し、指定したメソッドをオーバーライドします。 - AQS をカスタム同期コンポーネントの実装に組み込み、そのテンプレートメソッドを呼び出します。これらのテンプレ methods は、ユーザーがオーバーライドしたメソッドを呼び出します。
これは、従来のインタフェース実装方式と大きく異なる点で、テンプレートメソッドパターンの古典的な応用例です。
AQS はテンプレートメソッドパターンを使用しています。カスタム同期器を作成する際には、以下の AQS 提供のフックメソッドをオーバーライドする必要があります:
// 独占方式。資源を取得して成功すれば true を返し、失敗すれば false を返す。protected boolean tryAcquire(int)// 独占方式。資源を解放して成功すれば true を返し、失敗すれば false を返す。protected boolean tryRelease(int)// 共有方式。資源を取得する。負数は失敗;0 は成功だが残り資源なし;正数は成功で残り資源あり。protected int tryAcquireShared(int)// 共有方式。資源を解放する。成功すれば true、失敗すれば false。protected boolean tryReleaseShared(int)// このスレッドが独占資源を保持しているか。条件が必要な場合にだけ実装します。protected boolean isHeldExclusively()フックメソッドとは何か? フックメソッドは、抽象クラスに宣言されるメソッドで、通常は protected で修飾されます。空の実装(サブクラスが実装)もしくはデフォルト実装を持つことがあります。テンプレートデザインパターンは、フックメソッドを通じて固定の手順の実装を制御します。
上記のフックメソッド以外、AQS クラスの他のメソッドはすべて final なので、他のクラスで再定義することはできません。
よく使われる同期ツール類
以下に、AQS をベースにした代表的な同期ツールクラスを紹介します。
Semaphore(セマフォ)
概要
synchronized および ReentrantLock は同時に 1 スレッドだけがある資源へアクセスできるようにしますが、Semaphore(セマフォ)は特定の資源へ同時にアクセスできるスレッド数を制御できます。
Semaphore の使い方は簡単です。ここでは N(N > 5)個のスレッドが Semaphore の共有資源を取得するとします。以下のコードは、同時に N 個のスレッドがいてもうち 5 個だけが共有資源を取得でき、それ以外はブロックされ、共有資源を取得したスレッドだけが処理を実行できる、ということを示しています。
// 初期の共有資源の数final Semaphore semaphore = new Semaphore(5);// 1 つの許可を取得semaphore.acquire();// 1 つの許可を解放semaphore.release();初期の資源数が 1 の場合、Semaphore は排他ロックへと退化します。
Semaphore には二つのモードがあります。
- 公平モード:
acquire()を呼ぶ順序が許可の取得順序になり、FIFO に従います; - 非公平モード: 抢占的です。
Semaphore の対応する二つのコンストラクタは以下のとおりです。
public Semaphore(int permits) { sync = new NonfairSync(permits);}
public Semaphore(int permits, boolean fair) { sync = fair ? new FairSync(permits) : new NonfairSync(permits);}これら二つのコンストラクタは、許可の数を必ず指定する必要があります。第二のコンストラクタでは公平モードか非公平モードを指定でき、デフォルトは非公平モードです。
Semaphore は通常、資源のアクセス数が明確に制限されているシーン、例えばレートリミット(単一機器モードに限定。実プロジェクトでは Redis + Lua を使ってレートリミットを行うことを推奨)で使われます。
原理
Semaphore は共有ロックの一種の実装で、AQS の state 値をデフォルトで permits に設定します。permits の値をライセンスの数として理解してください。ライセンスを取得したスレッドのみが実行できます。
例として無引数の acquire メソッドを見てみると、semaphore.acquire() を呼ぶとスレッドは許可を取得しようとします。state > 0 なら取得成功、state <= 0 なら許可数が不足して取得に失敗します。
取得可能である場合(state > 0)、state の値を state = state - 1 に変更するために CAS を試みます。取得に失敗すると待機キューにノードを追加し、現在のスレッドを待機させます。
// 1 つの許可を取得public void acquire() throws InterruptedException { sync.acquireSharedInterruptibly(1);}
// 1 つ以上の許可を取得public void acquire(int permits) throws InterruptedException { if (permits < 0) throw new IllegalArgumentException(); sync.acquireSharedInterruptibly(permits);}acquireSharedInterruptibly メソッドは AbstractQueuedSynchronizer のデフォルト実装です。
// 共有モードで許可を取得。取得成功なら戻り、失敗なら待機キューに追加してスレッドを待機public final void acquireSharedInterruptibly(int arg) throws InterruptedException { if (Thread.interrupted()) throw new InterruptedException(); // 許可を取得。arg は取得する許可数。取得に失敗した場合はノードを作成して待機列へ追加し、現在のスレッドを待機させる。 if (tryAcquireShared(arg) < 0) doAcquireSharedInterruptibly(arg);}ここでは非公平モード(NonfairSync)の tryAcquireShared の実装を例に取ります。
// 共有モードでリソースを取得してみる(Semaphore でいうと許可を取る)protected int tryAcquireShared(int acquires) { return nonfairTryAcquireShared(acquires);}
// 非公平な共有モードで許可を取得final int nonfairTryAcquireShared(int acquires) { for (;;) { // 現在利用可能な許可数 int available = getState(); /* * 許可を取得する試み。現在の利用可能許可数が 0 以下なら負の値を返して取得失敗を示す。 * 利用可能許可数が正のときのみ取得が成功する可能性がある。CAS が失敗した場合は最新値を取得して再試行する */ int remaining = available - acquires; if (remaining < 0 || compareAndSetState(available, remaining)) return remaining; }}無引数の release メソッドを例にすると、semaphore.release() を呼ぶとスレッドは許可を解放し、state を state = state + 1 に更新します。許可を解放すると、待機キュー中の1つのスレッドが起床します。起床したスレッドは再度 state を state - 1 に更新しようとし、state > 0 ならトークンの取得に成功します。そうでなければ再度待機列へ戻ってスレッドを待機させます。
// 1 つの許可を解放public void release() { sync.releaseShared(1);}
// 1 つ以上の許可を解放public void release(int permits) { if (permits < 0) throw new IllegalArgumentException(); sync.releaseShared(permits);}releaseShared メソッドは AbstractQueuedSynchronizer のデフォルト実装です。
// 共有ロックを解放// tryReleaseShared が true を返したら、待機列の1つ以上のスレッドを起こす。public final boolean releaseShared(int arg) { // 共有ロックを解放 if (tryReleaseShared(arg)) { // 現在のノードの後続待機ノードを解放 doReleaseShared(); return true; } return false;}tryReleaseShared メソッドは Semaphore の内部クラス Sync がオーバーライドしたメソッドで、AbstractQueuedSynchronizer のデフォルト実装は単に UnsupportedOperationException をスローします。
// 内部クラス Sync のオーバーライドされたメソッド// リソースを解放するprotected final boolean tryReleaseShared(int releases) { for (;;) { int current = getState(); // 利用可能な許可を +1 int next = current + releases; if (next < current) // オーバーフロー throw new Error("Maximum permit count exceeded"); // state の値を CAS で更新 if (compareAndSetState(current, next)) return true; }}上で述べた複数のメソッドは、基本的に同期機能の実装を sync を通じて行っています。Sync は CountDownLatch の内部クラスであり、AbstractQueuedSynchronizer を継承して、いくつかのメソッドをオーバーライドしています。さらに、Sync には二つのサブクラスがあります。NonfairSync(非公平モード対応)と FairSync(公平モード対応)です。
private static final class Sync extends AbstractQueuedSynchronizer { // ...}static final class NonfairSync extends Sync { // ...}static final class FairSync extends Sync { // ...}実戦
public class SemaphoreExample { // 要求数 private static final int threadCount = 550;
public static void main(String[] args) throws InterruptedException { // 固定スレッド数のスレッドプールを作成(ここでスレッド数を少なくしすぎると遅くなる場合があります) ExecutorService threadPool = Executors.newFixedThreadPool(300); // 初期許可数 final Semaphore semaphore = new Semaphore(20);
for (int i = 0; i < threadCount; i++) { final int threadnum = i; threadPool.execute(() -> {// ラムダ式の利用 try { semaphore.acquire();// 1つの許可を取得。したがって同時実行数は 20 test(threadnum); semaphore.release();// 1つの許可を解放 } catch (InterruptedException e) { // TODO Auto-generated catch block e.printStackTrace(); }
}); } threadPool.shutdown(); System.out.println("finish"); }
public static void test(int threadnum) throws InterruptedException { Thread.sleep(1000);// 模擬リクエストの処理時間 System.out.println("threadnum:" + threadnum); Thread.sleep(1000);// 模擬リクエストの処理時間 }}acquire() はブロックされ、利用可能な許可が現れ次第取得されます。各 release は1つの許可を追加し、ブロックされている acquire() が解放される可能性を作ります。しかし、実際には許可自体のオブジェクトは存在せず、Semaphore は取得可能な許可の数を保持しているだけです。Semaphore は、1つのリソースを取得するスレッド数を制限する場合に頻繁に使われます。
もちろん、一度に複数の許可を同時に取得・解放することも可能ですが、通常は必要ありません。
semaphore.acquire(5);// 5 個の許可を取得、したがって実行可能スレッド数は 20/5=4test(threadnum);semaphore.release(5);// 5 個の許可を解放acquire() メソッド以外にも、もう一つよく使われる対応メソッドは tryAcquire() です。このメソッドは許可を取得できない場合、即座に false を返します。
Semaphore は CountDownLatch と同様、共有ロックの一種の実装です。デフォルトで AQS の
stateがpermitsに設定されています。タスクを実行しているスレッド数がpermitsを超えると、多すぎるスレッドは Park 処理に入り、stateが 0 になるかを自分で待機し続けます。stateが 0 より大きい場合にのみ、ブロックされているスレッドが継続できます。前述のタスクを実行しているスレッドは順次release()を呼び、stateが 1 ずつ増え、待機中のスレッドは再開します。したがって、毎回permits数を超えないスレッドのみが自回的 retry に成功します。これにより、実行するスレッド数を制限します。
CountDownLatch(カウントダウン・ラッチ)
介绍
CountDownLatch は count 個のスレッドをある場所で待機させ、全スレッドのタスクが完了するまで待機します。
CountDownLatch は一度きりのもので、カウンタの値はコンストラクタで初期化された後、再設定する仕組みはありません。使用後は再利用できません。
原理
CountDownLatch は共有ロックの一種で、AQS の state の初期値を count に設定します。次のコードはその振る舞いを示します。
public CountDownLatch(int count) { if (count < 0) throw new IllegalArgumentException("count < 0"); this.sync = new Sync(count);}
private static final class Sync extends AbstractQueuedSynchronizer { Sync(int count) { setState(count); } //...}スレッドが countDown() を呼ぶと、実際には tryReleaseShared を CAS 操作で呼び出して state を減らします。state が 0 になると、すべてのスレッドが countDown を呼んだことになり、CountDownLatch 上で待機しているスレッドが起床して処理を継続します。
public void countDown() { // Sync は CountDownLatch の内部クラス , 继承した AbstractQueuedSynchronizer sync.releaseShared(1);}releaseShared メソッドは AbstractQueuedSynchronizer のデフォルト実装です。
// 共有ロックを解放// tryReleaseShared が true を返したら、待機列の1つ以上のスレッドを起こす。public final boolean releaseShared(int arg) { // 共有ロックを解放 if (tryReleaseShared(arg)) { // 現在のノードの後続待機ノードを解放 doReleaseShared(); return true; } return false;}tryReleaseShared は CountDownLatch の内部クラス Sync がオーバーライドするメソッドで、AbstractQueuedSynchronizer のデフォルト実装は UnsupportedOperationException を投げるだけです。
// state を減らして、state が 0 になるまで実行// count が 0 になると countDown は true を返すprotected boolean tryReleaseShared(int releases) { // state が 0 かどうかを任意にチェック for (;;) { int c = getState(); // state がすでに 0 の場合は false を返す if (c == 0) return false; // state を減らす int nextc = c-1; // CAS 操作で state の値を更新 if (compareAndSetState(c, nextc)) return nextc == 0; }}無引数の await メソッドを例にすると、await() を呼ぶと state が 0 でない場合、タスクはまだ完了していないことを意味し、await() はブロックされ、await() 以降の文は実行されません(main スレッドが CLH キューに待機します)。その後、CountDownLatch は state == 0 になるまで CAS を回し、0 になれば待機中のすべてのスレッドを解放して、await() 以降の文を実行可能にします。
// 待機(ロック付加とも呼ばれます)public void await() throws InterruptedException { sync.acquireSharedInterruptibly(1);}// タイムアウト付きの待機public boolean await(long timeout, TimeUnit unit) throws InterruptedException { return sync.tryAcquireSharedNanos(1, unit.toNanos(timeout));}acquireSharedInterruptibly メソッドは AbstractQueuedSynchronizer のデフォルト実装です。
// ロックを取得しようと試み、成功すれば戻る。失敗なら待機列へ追加、スレッドを停止public final void acquireSharedInterruptibly(int arg) throws InterruptedException { if (Thread.interrupted()) throw new InterruptedException(); // ロックを取得、取得に失敗した場合は待機列へ追加して現在のスレッドを停止 if (tryAcquireShared(arg) < 0) // 待機列へ追加して待機 doAcquireSharedInterruptibly(arg);}tryAcquireShared メソッドは CountDownLatch の内部クラス Sync がオーバーライドするメソッドで、state の値が 0 かどうかを判断します。0 であれば 1 を返し、そうでなければ -1 を返します。
protected int tryAcquireShared(int acquires) { return (getState() == 0) ? 1 : -1;}実戦
CountDownLatch の二つの典型的な使い方:
-
あるスレッドが開始する前に n 個のスレッドの完了を待つ: CountDownLatch のカウンタを n に初期化します(
new CountDownLatch(n))。各タスクスレッドが完了するたびにカウンタを 1 減らします(countDownLatch.countDown())。カウンタの値が 0 になれば、CountDownLatch上で待機しているスレッドが起床して処理を継続します。典型的な用途は、サービスを起動する際に複数のコンポーネントのロード完了を待つケースです。 -
複数のスレッドを同時に開始して最大の並行性を実現する: すなわち、複数のスレッドをスタート地点に配置し、信号発砲後に同時に走らせます。共有の CountDownLatch オブジェクトを用いて、カウンタを 1 に初期化します(
new CountDownLatch(1))。複数のスレッドはタスクを開始する前にまずcountDownLatch.await()を呼び、メインスレッドがcountDown()を呼ぶとカウントが 0 になり、複数のスレッドが同時に起動します。
CountDownLatch のコード例:
public class CountDownLatchExample { // 要求数 private static final int THREAD_COUNT = 550;
public static void main(String[] args) throws InterruptedException { // 固定スレッド数のスレッドプールを用意 // 実際の運用ではスレッドプールの設定を適切に行ってください ExecutorService threadPool = Executors.newFixedThreadPool(300); final CountDownLatch countDownLatch = new CountDownLatch(THREAD_COUNT); for (int i = 0; i < THREAD_COUNT; i++) { final int threadNum = i; threadPool.execute(() -> { try { test(threadNum); } catch (InterruptedException e) { e.printStackTrace(); } finally { // リクエストが完了したことを表す countDownLatch.countDown(); }
}); } countDownLatch.await(); threadPool.shutdown(); System.out.println("finish"); }
public static void test(int threadnum) throws InterruptedException { Thread.sleep(1000); System.out.println("threadNum:" + threadnum); Thread.sleep(1000); }}上記のコードでは、リクエスト数を 550 と定義しています。この 550 件のリクエストが処理完了した後にのみ System.out.println("finish"); が実行されます。
CountDownLatch との初期のやり取りは、メインスレッドが他のスレッドを待機することです。メインスレッドは他のスレッドを起動した後すぐに CountDownLatch.await() を呼ぶべきです。これにより、メインスレッドの処理はこのメソッドでブロックされ、他のスレッドが各自のタスクを完了するまで待機します。
他の N 個のスレッドは、CountDownLatch オブジェクトに通知を送る必要があります。これは CountDownLatch.countDown() によって実現されます。呼び出されるたびに、コンストラクタで初期化されたカウントが 1 減ります。N 個のスレッドがすべてこのメソッドを呼ぶと、カウントは 0 となり、主スレッドは await() を通じて処理を再開できます。
ちなみに、CountDownLatch の await() の使い方を誤るとデッドロックを引き起こす可能性があります。例えば、上のコードの for ループを次のように変更します。
for (int i = 0; i < threadCount-1; i++) {.......}このようにすると、カウントが 0 にならず、永久に待機します。
CyclicBarrier(循環バリア)
介绍
CyclicBarrier は CountDownLatch と非常に似ていますが、スレッド間の待機の仕組みをより柔軟に扱える点で、CountDownLatch よりも複雑かつ強力です。主な適用シーンは CountDownLatch と同様です。
CountDownLatch の実装は AQS に基づく一方、CyclicBarrier は ReentrantLock(ReentrantLock も AQS 同期器に属します)と Condition に基づいています。
CyclicBarrier の直訳は「循環可能な障壁(Barrier)」です。これが行うべきことは、複数のスレッドが障壁に到達する際にブロックし、最後のスレッドが到達したときに障壁を開放して、遮られていたすべてのスレッドが処理を再開することです。
原理
CyclicBarrier 内部では count 変数をカウントとして使用します。count の初期値は parties の初期値です。スレッドが到達するたびにカウントを 1 減らします。count が 0 になると、それはこの世代の最後のスレッドが到達したことを表し、コンストラクタで入力されたタスクを実行し、次の世代を開始します。
//毎回ブロックするスレッド数private final int parties;//カウントprivate int count;以下、ソースコードの解説を簡略に。
-
CyclicBarrier(int parties)のデフォルト構成はCyclicBarrier(int parties)で、パラメータはバリアを遮断するスレッド数を表します。各スレッドはawait()を呼び出して自分がバリアに到達したことを伝え、現在のスレッドはブロックされます。public CyclicBarrier(int parties) {this(parties, null);}public CyclicBarrier(int parties, Runnable barrierAction) {if (parties <= 0) throw new IllegalArgumentException();this.parties = parties;this.count = parties;this.barrierCommand = barrierAction;}ここで、
partiesはブロックするスレッドの数を表します。到達するスレッド数がこの値に達すると、バーが開いて全てのスレッドが通過します。 -
CyclicBarrierオブジェクトがawait()を呼ぶと、実際にはdowait(false, 0L)が呼ばれます。await()はバリアを作動させる行動のように、スレッドをブロックします。到達スレッド数がpartiesの値に達すと、バリアが開きスレッドが通過します。public int await() throws InterruptedException, BrokenBarrierException {try {return dowait(false, 0L);} catch (TimeoutException toe) {throw new Error(toe); // cannot happen}}dowait(false, 0L)のソース解析は以下のとおりです:
// スレッド数または要求数が count に達した場合のみ await 後の処理が実行される。上の例では count は 5。 private int count; /** * Main barrier code, covering the various policies. */ private int dowait(boolean timed, long nanos) throws InterruptedException, BrokenBarrierException, TimeoutException { final ReentrantLock lock = this.lock; // 施錠 lock.lock(); try { final Generation g = generation;
if (g.broken) throw new BrokenBarrierException();
// スレッドが中断されている場合 if (Thread.interrupted()) { breakBarrier(); throw new InterruptedException(); } // count を -1 int index = --count; // index が 0 になれば tripped(通過可能) if (index == 0) { // tripped boolean ranAction = false; try { final Runnable command = barrierCommand; if (command != null) command.run(); ranAction = true; // count を parties の初期値にリセット // 待機していたスレッドを起こす // 次の波を開始 nextGeneration(); return 0; } finally { if (!ranAction) breakBarrier(); } }
// トライする待機ループ for (;;) { try { if (!timed) trip.await(); else if (nanos > 0L) nanos = trip.awaitNanos(nanos); } catch (InterruptedException ie) { if (g == generation && ! g.broken) { breakBarrier(); throw ie; } else { // 待機を終える直前なので、割り込みは // 後続の実行に「属する」とみなす Thread.currentThread().interrupt(); } }
if (g.broken) throw new BrokenBarrierException();
if (g != generation) return index;
if (timed && nanos <= 0L) { breakBarrier(); throw new TimeoutException(); } } } finally { lock.unlock(); } }実戦
例 1:
public class CyclicBarrierExample1 { // 要求数 private static final int threadCount = 550; // 同期するスレッド数 private static final CyclicBarrier cyclicBarrier = new CyclicBarrier(5);
public static void main(String[] args) throws InterruptedException { // スレッドプールの作成 ExecutorService threadPool = Executors.newFixedThreadPool(10);
for (int i = 0; i < threadCount; i++) { final int threadNum = i; Thread.sleep(1000); threadPool.execute(() -> { try { test(threadNum); } catch (InterruptedException e) { // TODO Auto-generated catch block e.printStackTrace(); } catch (BrokenBarrierException e) { // TODO Auto-generated catch block e.printStackTrace(); } }); } threadPool.shutdown(); }
public static void test(int threadnum) throws InterruptedException, BrokenBarrierException { System.out.println("threadnum:" + threadnum + "is ready"); try { /**Wait 60 seconds to ensure all sub-threads finish*/ cyclicBarrier.await(60, TimeUnit.SECONDS); } catch (Exception e) { System.out.println("-----CyclicBarrierException------"); } System.out.println("threadnum:" + threadnum + "is finish"); }
}実行結果は以下のとおり:
threadnum:0is readythreadnum:1is readythreadnum:2is readythreadnum:3is readythreadnum:4is readythreadnum:4is finishthreadnum:0is finishthreadnum:1is finishthreadnum:2is finishthreadnum:3is finishthreadnum:5is readythreadnum:6is readythreadnum:7is readythreadnum:8is readythreadnum:9is readythreadnum:9is finishthreadnum:5is finishthreadnum:8is finishthreadnum:7is finishthreadnum:6is finish......5 が到達した時点で await() 後の処理が実行されるのが分かります。
また、CyclicBarrier にはさらに高度なコンストラクタ CyclicBarrier(int parties, Runnable barrierAction) も用意されています。スレッドが障壁に到達したとき、まず barrierAction を実行してから処理を続行させることができ、より複雑なビジネスシーンに対応します。
例 2:
public class CyclicBarrierExample2 { // 要求数 private static final int threadCount = 550; // 同期するスレッド数 private static final CyclicBarrier cyclicBarrier = new CyclicBarrier(5, () -> { System.out.println("------当线程数达到之后,优先执行------"); });
public static void main(String[] args) throws InterruptedException { // スレッドプールを作成 ExecutorService threadPool = Executors.newFixedThreadPool(10);
for (int i = 0; i < threadCount; i++) { final int threadNum = i; Thread.sleep(1000); threadPool.execute(() -> { try { test(threadNum); } catch (InterruptedException e) { // TODO Auto-generated catch block e.printStackTrace(); } catch (BrokenBarrierException e) { // TODO Auto-generated catch block e.printStackTrace(); } }); } threadPool.shutdown(); }
public static void test(int threadnum) throws InterruptedException, BrokenBarrierException { System.out.println("threadnum:" + threadnum + "is ready"); cyclicBarrier.await(); System.out.println("threadnum:" + threadnum + "is finish"); }}実行結果は以下のとおり:
threadnum:0is readythreadnum:1is readythreadnum:2is readythreadnum:3is readythreadnum:4is ready------当线程数达到之后,优先执行------threadnum:4is finishthreadnum:0is finishthreadnum:2is finishthreadnum:1is finishthreadnum:3is finishthreadnum:5is readythreadnum:6is readythreadnum:7is readythreadnum:8is readythreadnum:9is ready------当线程数达到之后,优先执行------threadnum:9is finishthreadnum:5is finishthreadnum:6is finishthreadnum:8is finishthreadnum:7is finish......部分信息可能已经过时