


Java IO基础知识
IO 流简介
IO 即 Input/Output,输入和输出。数据输入到计算机内存的过程即输入,反之输出到外部存储(比如数据库,文件,远程主机)的过程即输出。数据传输过程类似于水流,因此称为 IO 流。IO 流在 Java 中分为输入流和输出流,而根据数据的处理方式又分为字节流和字符流。
Java IO 流的 40 多个类都是从如下 4 个抽象类基类中派生出来的。
InputStream/Reader: 所有的输入流的基类,前者是字节输入流,后者是字符输入流。OutputStream/Writer: 所有输出流的基类,前者是字节输出流,后者是字符输出流。
字节流
InputStream(字节输入流)
InputStream用于从源头(通常是文件)读取数据(字节信息)到内存中,java.io.InputStream抽象类是所有字节输入流的父类。
InputStream 常用方法:
read():返回输入流中下一个字节的数据。返回的值介于 0 到 255 之间。如果未读取任何字节,则代码返回1,表示文件结束。read(byte b[ ]): 从输入流中读取一些字节存储到数组b中。如果数组b的长度为零,则不读取。如果没有可用字节读取,返回1。如果有可用字节读取,则最多读取的字节数最多等于b.length, 返回读取的字节数。这个方法等价于read(b, 0, b.length)。read(byte b[], int off, int len):在read(byte b[ ])方法的基础上增加了off参数(偏移量)和len参数(要读取的最大字节数)。skip(long n):忽略输入流中的 n 个字节 ,返回实际忽略的字节数。available():返回输入流中可以读取的字节数。close():关闭输入流释放相关的系统资源。
从 Java 9 开始,InputStream 新增加了多个实用的方法:
readAllBytes():读取输入流中的所有字节,返回字节数组。readNBytes(byte[] b, int off, int len):阻塞直到读取len个字节。transferTo(OutputStream out):将所有字节从一个输入流传递到一个输出流。
FileInputStream 是一个比较常用的字节输入流对象,可直接指定文件路径,可以直接读取单字节数据,也可以读取至字节数组中。
FileInputStream 代码示例:
try (InputStream fis = new FileInputStream("input.txt")) { System.out.println("Number of remaining bytes:" + fis.available()); int content; long skip = fis.skip(2); System.out.println("The actual number of bytes skipped:" + skip); System.out.print("The content read from file:"); while ((content = fis.read()) != -1) { System.out.print((char) content); }} catch (IOException e) { e.printStackTrace();}不过,一般我们是不会直接单独使用 FileInputStream ,通常会配合 BufferedInputStream(字节缓冲输入流)来使用。
像下面这段代码在我们的项目中就比较常见,我们通过 readAllBytes() 读取输入流所有字节并将其直接赋值给一个 String 对象。
// 新建一个 BufferedInputStream 对象BufferedInputStream bufferedInputStream = new BufferedInputStream(new FileInputStream("input.txt"));// 读取文件的内容并复制到 String 对象中String result = new String(bufferedInputStream.readAllBytes());System.out.println(result);DataInputStream 用于读取指定类型数据,不能单独使用,必须结合其它流,比如 FileInputStream 。
FileInputStream fileInputStream = new FileInputStream("input.txt");//必须将fileInputStream作为构造参数才能使用DataInputStream dataInputStream = new DataInputStream(fileInputStream);//可以读取任意具体的类型数据dataInputStream.readBoolean();dataInputStream.readInt();dataInputStream.readUTF();ObjectInputStream 用于从输入流中读取 Java 对象(反序列化),ObjectOutputStream 用于将对象写入到输出流(序列化)。
ObjectInputStream input = new ObjectInputStream(new FileInputStream("object.data"));MyClass object = (MyClass) input.readObject();input.close();另外,用于序列化和反序列化的类必须实现 Serializable 接口,对象中如果有属性不想被序列化,使用 transient 修饰。
OutputStream(字节输出流)
OutputStream用于将数据(字节信息)写入到目的地(通常是文件),java.io.OutputStream抽象类是所有字节输出流的父类。
OutputStream 常用方法:
write(int b):将特定字节写入输出流。write(byte b[ ]): 将数组b写入到输出流,等价于write(b, 0, b.length)。write(byte[] b, int off, int len): 在write(byte b[ ])方法的基础上增加了off参数(偏移量)和len参数(要读取的最大字节数)。flush():刷新此输出流并强制写出所有缓冲的输出字节。close():关闭输出流释放相关的系统资源。
FileOutputStream 是最常用的字节输出流对象,可直接指定文件路径,可以直接输出单字节数据,也可以输出指定的字节数组。
FileOutputStream 代码示例:
try (FileOutputStream output = new FileOutputStream("output.txt")) { byte[] array = "Dreaifeyyy".getBytes(); output.write(array);} catch (IOException e) { e.printStackTrace();}类似于 FileInputStream,FileOutputStream 通常也会配合 BufferedOutputStream(字节缓冲输出流)来使用。
FileOutputStream fileOutputStream = new FileOutputStream("output.txt");BufferedOutputStream bos = new BufferedOutputStream(fileOutputStream)DataOutputStream 用于写入指定类型数据,不能单独使用,必须结合其它流,比如 FileOutputStream 。
// 输出流FileOutputStream fileOutputStream = new FileOutputStream("out.txt");DataOutputStream dataOutputStream = new DataOutputStream(fileOutputStream);// 输出任意数据类型dataOutputStream.writeBoolean(true);dataOutputStream.writeByte(1);ObjectInputStream 用于从输入流中读取 Java 对象(ObjectInputStream,反序列化),ObjectOutputStream将对象写入到输出流(ObjectOutputStream,序列化)。
ObjectOutputStream output = new ObjectOutputStream(new FileOutputStream("file.txt")Person person = new Person("dreaife", "eroger");output.writeObject(person);字符流
不管是文件读写还是网络发送接收,信息的最小存储单元都是字节。 那为什么 I/O 流操作要分为字节流操作和字符流操作呢?
个人认为主要有两点原因:
- 字符流是由 Java 虚拟机将字节转换得到的,这个过程还算是比较耗时。
- 如果我们不知道编码类型就很容易出现乱码问题。
乱码问题这个很容易就可以复现,我们只需要将上面提到的 FileInputStream 代码示例中的 input.txt 文件内容改为中文即可,原代码不需要改动就可以明显地看到读取出来的内容已经变成了乱码。
因此,I/O 流就干脆提供了一个直接操作字符的接口,方便我们平时对字符进行流操作。如果音频文件、图片等媒体文件用字节流比较好,如果涉及到字符的话使用字符流比较好。
字符流默认采用的是 Unicode 编码,我们可以通过构造方法自定义编码。
顺便分享一下之前遇到的笔试题:常用字符编码所占字节数?utf8 :英文占 1 字节,中文占 3 字节,unicode:任何字符都占 2 个字节,gbk:英文占 1 字节,中文占 2 字节。
Reader(字符输入流)
Reader用于从源头(通常是文件)读取数据(字符信息)到内存中,java.io.Reader抽象类是所有字符输入流的父类。
Reader 用于读取文本, InputStream 用于读取原始字节。
Reader 常用方法:
read(): 从输入流读取一个字符。read(char[] cbuf): 从输入流中读取一些字符,并将它们存储到字符数组cbuf中,等价于read(cbuf, 0, cbuf.length)。read(char[] cbuf, int off, int len):在read(char[] cbuf)方法的基础上增加了off参数(偏移量)和len参数(要读取的最大字符数)。skip(long n):忽略输入流中的 n 个字符 ,返回实际忽略的字符数。close(): 关闭输入流并释放相关的系统资源。
InputStreamReader 是字节流转换为字符流的桥梁,其子类 FileReader 是基于该基础上的封装,可以直接操作字符文件。
// 字节流转换为字符流的桥梁public class InputStreamReader extends Reader {}// 用于读取字符文件public class FileReader extends InputStreamReader {}FileReader 代码示例:
try (FileReader fileReader = new FileReader("input.txt");) { int content; long skip = fileReader.skip(3); System.out.println("The actual number of bytes skipped:" + skip); System.out.print("The content read from file:"); while ((content = fileReader.read()) != -1) { System.out.print((char) content); }} catch (IOException e) { e.printStackTrace();}Writer(字符输出流)
Writer用于将数据(字符信息)写入到目的地(通常是文件),java.io.Writer抽象类是所有字符输出流的父类。
Writer 常用方法:
write(int c): 写入单个字符。write(char[] cbuf):写入字符数组cbuf,等价于write(cbuf, 0, cbuf.length)。write(char[] cbuf, int off, int len):在write(char[] cbuf)方法的基础上增加了off参数(偏移量)和len参数(要读取的最大字符数)。write(String str):写入字符串,等价于write(str, 0, str.length())。write(String str, int off, int len):在write(String str)方法的基础上增加了off参数(偏移量)和len参数(要读取的最大字符数)。append(CharSequence csq):将指定的字符序列附加到指定的Writer对象并返回该Writer对象。append(char c):将指定的字符附加到指定的Writer对象并返回该Writer对象。flush():刷新此输出流并强制写出所有缓冲的输出字符。close():关闭输出流释放相关的系统资源。
OutputStreamWriter 是字符流转换为字节流的桥梁,其子类 FileWriter 是基于该基础上的封装,可以直接将字符写入到文件。
// 字符流转换为字节流的桥梁public class OutputStreamWriter extends Writer {}// 用于写入字符到文件public class FileWriter extends OutputStreamWriter {}FileWriter 代码示例:
try (Writer output = new FileWriter("output.txt")) { output.write("你好,我是dreaife");} catch (IOException e) { e.printStackTrace();}字节缓冲流
IO 操作是很消耗性能的,缓冲流将数据加载至缓冲区,一次性读取/写入多个字节,从而避免频繁的 IO 操作,提高流的传输效率。
字节缓冲流这里采用了装饰器模式来增强 InputStream 和OutputStream子类对象的功能。
举个例子,我们可以通过 BufferedInputStream(字节缓冲输入流)来增强 FileInputStream 的功能。
// 新建一个 BufferedInputStream 对象BufferedInputStream bufferedInputStream = new BufferedInputStream(new FileInputStream("input.txt"));字节流和字节缓冲流的性能差别主要体现在我们使用两者的时候都是调用 write(int b) 和 read() 这两个一次只读取一个字节的方法的时候。由于字节缓冲流内部有缓冲区(字节数组),因此,字节缓冲流会先将读取到的字节存放在缓存区,大幅减少 IO 次数,提高读取效率。
我使用 write(int b) 和 read() 方法,分别通过字节流和字节缓冲流复制一个 524.9 mb 的 PDF 文件耗时对比如下:
使用缓冲流复制PDF文件总耗时:15428 毫秒使用普通字节流复制PDF文件总耗时:2555062 毫秒两者耗时差别非常大,缓冲流耗费的时间是字节流的 1/165。
测试代码如下:
@Testvoid copy_pdf_to_another_pdf_buffer_stream() { // 记录开始时间 long start = System.currentTimeMillis(); try (BufferedInputStream bis = new BufferedInputStream(new FileInputStream("深入理解计算机操作系统.pdf")); BufferedOutputStream bos = new BufferedOutputStream(new FileOutputStream("深入理解计算机操作系统-副本.pdf"))) { int content; while ((content = bis.read()) != -1) { bos.write(content); } } catch (IOException e) { e.printStackTrace(); } // 记录结束时间 long end = System.currentTimeMillis(); System.out.println("使用缓冲流复制PDF文件总耗时:" + (end - start) + " 毫秒");}
@Testvoid copy_pdf_to_another_pdf_stream() { // 记录开始时间 long start = System.currentTimeMillis(); try (FileInputStream fis = new FileInputStream("深入理解计算机操作系统.pdf"); FileOutputStream fos = new FileOutputStream("深入理解计算机操作系统-副本.pdf")) { int content; while ((content = fis.read()) != -1) { fos.write(content); } } catch (IOException e) { e.printStackTrace(); } // 记录结束时间 long end = System.currentTimeMillis(); System.out.println("使用普通流复制PDF文件总耗时:" + (end - start) + " 毫秒");}如果是调用 read(byte b[]) 和 write(byte b[], int off, int len) 这两个写入一个字节数组的方法的话,只要字节数组的大小合适,两者的性能差距其实不大,基本可以忽略。
这次我们使用 read(byte b[]) 和 write(byte b[], int off, int len) 方法,分别通过字节流和字节缓冲流复制一个 524.9 mb 的 PDF 文件耗时对比如下:
使用缓冲流复制PDF文件总耗时:695 毫秒使用普通字节流复制PDF文件总耗时:989 毫秒两者耗时差别不是很大,缓冲流的性能要略微好一点点。
测试代码如下:
@Testvoid copy_pdf_to_another_pdf_with_byte_array_buffer_stream() { // 记录开始时间 long start = System.currentTimeMillis(); try (BufferedInputStream bis = new BufferedInputStream(new FileInputStream("深入理解计算机操作系统.pdf")); BufferedOutputStream bos = new BufferedOutputStream(new FileOutputStream("深入理解计算机操作系统-副本.pdf"))) { int len; byte[] bytes = new byte[4 * 1024]; while ((len = bis.read(bytes)) != -1) { bos.write(bytes, 0, len); } } catch (IOException e) { e.printStackTrace(); } // 记录结束时间 long end = System.currentTimeMillis(); System.out.println("使用缓冲流复制PDF文件总耗时:" + (end - start) + " 毫秒");}
@Testvoid copy_pdf_to_another_pdf_with_byte_array_stream() { // 记录开始时间 long start = System.currentTimeMillis(); try (FileInputStream fis = new FileInputStream("深入理解计算机操作系统.pdf"); FileOutputStream fos = new FileOutputStream("深入理解计算机操作系统-副本.pdf")) { int len; byte[] bytes = new byte[4 * 1024]; while ((len = fis.read(bytes)) != -1) { fos.write(bytes, 0, len); } } catch (IOException e) { e.printStackTrace(); } // 记录结束时间 long end = System.currentTimeMillis(); System.out.println("使用普通流复制PDF文件总耗时:" + (end - start) + " 毫秒");}BufferedInputStream(字节缓冲输入流)
BufferedInputStream 从源头(通常是文件)读取数据(字节信息)到内存的过程中不会一个字节一个字节的读取,而是会先将读取到的字节存放在缓存区,并从内部缓冲区中单独读取字节。这样大幅减少了 IO 次数,提高了读取效率。
BufferedInputStream 内部维护了一个缓冲区,这个缓冲区实际就是一个字节数组,通过阅读 BufferedInputStream 源码即可得到这个结论。
publicclass BufferedInputStream extends FilterInputStream { // 内部缓冲区数组 protected volatile byte buf[]; // 缓冲区的默认大小 private static int DEFAULT_BUFFER_SIZE = 8192; // 使用默认的缓冲区大小 public BufferedInputStream(InputStream in) { this(in, DEFAULT_BUFFER_SIZE); } // 自定义缓冲区大小 public BufferedInputStream(InputStream in, int size) { super(in); if (size <= 0) { throw new IllegalArgumentException("Buffer size <= 0"); } buf = new byte[size]; }}缓冲区的大小默认为 8192 字节,当然了,你也可以通过 BufferedInputStream(InputStream in, int size) 这个构造方法来指定缓冲区的大小。
BufferedOutputStream(字节缓冲输出流)
BufferedOutputStream 将数据(字节信息)写入到目的地(通常是文件)的过程中不会一个字节一个字节的写入,而是会先将要写入的字节存放在缓存区,并从内部缓冲区中单独写入字节。这样大幅减少了 IO 次数,提高了读取效率
try (BufferedOutputStream bos = new BufferedOutputStream(new FileOutputStream("output.txt"))) { byte[] array = "dreaifeICU".getBytes(); bos.write(array);} catch (IOException e) { e.printStackTrace();}类似于 BufferedInputStream ,BufferedOutputStream 内部也维护了一个缓冲区,并且,这个缓存区的大小也是 8192 字节。
字符缓冲流
BufferedReader (字符缓冲输入流)和 BufferedWriter(字符缓冲输出流)类似于 BufferedInputStream(字节缓冲输入流)和BufferedOutputStream(字节缓冲输入流),内部都维护了一个字节数组作为缓冲区。不过,前者主要是用来操作字符信息。
打印流
下面这段代码大家经常使用吧?
System.out.print("Hello!");System.out.println("Hello!");System.out 实际是用于获取一个 PrintStream 对象,print方法实际调用的是 PrintStream 对象的 write 方法。
PrintStream 属于字节打印流,与之对应的是 PrintWriter (字符打印流)。PrintStream 是 OutputStream 的子类,PrintWriter 是 Writer 的子类。
public class PrintStream extends FilterOutputStream implements Appendable, Closeable {}public class PrintWriter extends Writer {}随机访问流
这里要介绍的随机访问流指的是支持随意跳转到文件的任意位置进行读写的 RandomAccessFile 。
RandomAccessFile 的构造方法如下,我们可以指定 mode(读写模式)。
// openAndDelete 参数默认为 false 表示打开文件并且这个文件不会被删除public RandomAccessFile(File file, String mode) throws FileNotFoundException { this(file, mode, false);}// 私有方法private RandomAccessFile(File file, String mode, boolean openAndDelete) throws FileNotFoundException{ // 省略大部分代码}读写模式主要有下面四种:
r: 只读模式。rw: 读写模式rws: 相对于rw,rws同步更新对“文件的内容”或“元数据”的修改到外部存储设备。rwd: 相对于rw,rwd同步更新对“文件的内容”的修改到外部存储设备。
文件内容指的是文件中实际保存的数据,元数据则是用来描述文件属性比如文件的大小信息、创建和修改时间。
RandomAccessFile 中有一个文件指针用来表示下一个将要被写入或者读取的字节所处的位置。我们可以通过 RandomAccessFile 的 seek(long pos) 方法来设置文件指针的偏移量(距文件开头 pos 个字节处)。如果想要获取文件指针当前的位置的话,可以使用 getFilePointer() 方法。
RandomAccessFile 代码示例:
RandomAccessFile randomAccessFile = new RandomAccessFile(new File("input.txt"), "rw");System.out.println("读取之前的偏移量:" + randomAccessFile.getFilePointer() + ",当前读取到的字符" + (char) randomAccessFile.read() + ",读取之后的偏移量:" + randomAccessFile.getFilePointer());// 指针当前偏移量为 6randomAccessFile.seek(6);System.out.println("读取之前的偏移量:" + randomAccessFile.getFilePointer() + ",当前读取到的字符" + (char) randomAccessFile.read() + ",读取之后的偏移量:" + randomAccessFile.getFilePointer());// 从偏移量 7 的位置开始往后写入字节数据randomAccessFile.write(new byte[]{'H', 'I', 'J', 'K'});// 指针当前偏移量为 0,回到起始位置randomAccessFile.seek(0);System.out.println("读取之前的偏移量:" + randomAccessFile.getFilePointer() + ",当前读取到的字符" + (char) randomAccessFile.read() + ",读取之后的偏移量:" + randomAccessFile.getFilePointer());RandomAccessFile 的 write 方法在写入对象的时候如果对应的位置已经有数据的话,会将其覆盖掉。
RandomAccessFile randomAccessFile = new RandomAccessFile(new File("input.txt"), "rw");randomAccessFile.write(new byte[]{'H', 'I', 'J', 'K'});假设运行上面这段程序之前 input.txt 文件内容变为 ABCD ,运行之后则变为 HIJK 。
RandomAccessFile 比较常见的一个应用就是实现大文件的 断点续传 。何谓断点续传?简单来说就是上传文件中途暂停或失败(比如遇到网络问题)之后,不需要重新上传,只需要上传那些未成功上传的文件分片即可。分片(先将文件切分成多个文件分片)上传是断点续传的基础。
RandomAccessFile 的实现依赖于 FileDescriptor (文件描述符) 和 FileChannel (内存映射文件)。
Java IO设计模式
装饰器模式
装饰器(Decorator)模式 可以在不改变原有对象的情况下拓展其功能。
装饰器模式通过组合替代继承来扩展原始类的功能,在一些继承关系比较复杂的场景(IO 这一场景各种类的继承关系就比较复杂)更加实用。
对于字节流来说, FilterInputStream (对应输入流)和FilterOutputStream(对应输出流)是装饰器模式的核心,分别用于增强 InputStream 和OutputStream子类对象的功能。
我们常见的BufferedInputStream(字节缓冲输入流)、DataInputStream 等等都是FilterInputStream 的子类,BufferedOutputStream(字节缓冲输出流)、DataOutputStream等等都是FilterOutputStream的子类。
举个例子,我们可以通过 BufferedInputStream(字节缓冲输入流)来增强 FileInputStream 的功能。
BufferedInputStream 构造函数如下:
public BufferedInputStream(InputStream in) { this(in, DEFAULT_BUFFER_SIZE);}
public BufferedInputStream(InputStream in, int size) { super(in); if (size <= 0) { throw new IllegalArgumentException("Buffer size <= 0"); } buf = new byte[size];}可以看出,BufferedInputStream 的构造函数其中的一个参数就是 InputStream 。
BufferedInputStream 代码示例:
try (BufferedInputStream bis = new BufferedInputStream(new FileInputStream("input.txt"))) { int content; long skip = bis.skip(2); while ((content = bis.read()) != -1) { System.out.print((char) content); }} catch (IOException e) { e.printStackTrace();}这个时候,你可以会想了:为啥我们直接不弄一个**BufferedFileInputStream****(字符缓冲文件输入流)呢?**
BufferedFileInputStream bfis = new BufferedFileInputStream("input.txt");如果 InputStream的子类比较少的话,这样做是没问题的。不过, InputStream的子类实在太多,继承关系也太复杂了。如果我们为每一个子类都定制一个对应的缓冲输入流,那岂不是太麻烦了。
如果你对 IO 流比较熟悉的话,你会发现ZipInputStream 和ZipOutputStream 还可以分别增强 BufferedInputStream 和 BufferedOutputStream 的能力。
BufferedInputStream bis = new BufferedInputStream(new FileInputStream(fileName));ZipInputStream zis = new ZipInputStream(bis);
BufferedOutputStream bos = new BufferedOutputStream(new FileOutputStream(fileName));ZipOutputStream zipOut = new ZipOutputStream(bos);ZipInputStream 和ZipOutputStream 分别继承自InflaterInputStream 和DeflaterOutputStream。
publicclass InflaterInputStream extends FilterInputStream {}
publicclass DeflaterOutputStream extends FilterOutputStream {}这也是装饰器模式很重要的一个特征,那就是可以对原始类嵌套使用多个装饰器。
为了实现这一效果,装饰器类需要跟原始类继承相同的抽象类或者实现相同的接口。上面介绍到的这些 IO 相关的装饰类和原始类共同的父类是 InputStream 和OutputStream。
对于字符流来说,BufferedReader 可以用来增加 Reader (字符输入流)子类的功能,BufferedWriter 可以用来增加 Writer (字符输出流)子类的功能。
BufferedWriter bw = new BufferedWriter(new OutputStreamWriter(new FileOutputStream(fileName), "UTF-8"));IO 流中的装饰器模式应用的例子实在是太多了,不需要特意记忆,完全没必要哈!搞清了装饰器模式的核心之后,你在使用的时候自然就会知道哪些地方运用到了装饰器模式。
适配器模式
适配器(Adapter Pattern)模式 主要用于接口互不兼容的类的协调工作,你可以将其联想到我们日常经常使用的电源适配器。
适配器模式中存在被适配的对象或者类称为 适配者(Adaptee) ,作用于适配者的对象或者类称为适配器(Adapter) 。适配器分为对象适配器和类适配器。类适配器使用继承关系来实现,对象适配器使用组合关系来实现。
IO 流中的字符流和字节流的接口不同,它们之间可以协调工作就是基于适配器模式来做的,更准确点来说是对象适配器。通过适配器,我们可以将字节流对象适配成一个字符流对象,这样我们可以直接通过字节流对象来读取或者写入字符数据。
InputStreamReader 和 OutputStreamWriter 就是两个适配器(Adapter), 同时,它们两个也是字节流和字符流之间的桥梁。InputStreamReader 使用 StreamDecoder (流解码器)对字节进行解码,实现字节流到字符流的转换, OutputStreamWriter 使用StreamEncoder(流编码器)对字符进行编码,实现字符流到字节流的转换。
InputStream 和 OutputStream 的子类是被适配者, InputStreamReader 和 OutputStreamWriter是适配器。
// InputStreamReader 是适配器,FileInputStream 是被适配的类InputStreamReader isr = new InputStreamReader(new FileInputStream(fileName), "UTF-8");// BufferedReader 增强 InputStreamReader 的功能(装饰器模式)BufferedReader bufferedReader = new BufferedReader(isr);java.io.InputStreamReader 部分源码:
public class InputStreamReader extends Reader { //用于解码的对象 private final StreamDecoder sd; public InputStreamReader(InputStream in) { super(in); try { // 获取 StreamDecoder 对象 sd = StreamDecoder.forInputStreamReader(in, this, (String)null); } catch (UnsupportedEncodingException e) { throw new Error(e); } } // 使用 StreamDecoder 对象做具体的读取工作 public int read() throws IOException { return sd.read(); }}java.io.OutputStreamWriter 部分源码:
public class OutputStreamWriter extends Writer { // 用于编码的对象 private final StreamEncoder se; public OutputStreamWriter(OutputStream out) { super(out); try { // 获取 StreamEncoder 对象 se = StreamEncoder.forOutputStreamWriter(out, this, (String)null); } catch (UnsupportedEncodingException e) { throw new Error(e); } } // 使用 StreamEncoder 对象做具体的写入工作 public void write(int c) throws IOException { se.write(c); }}适配器模式和装饰器模式有什么区别呢?
-
装饰器模式 更侧重于动态地增强原始类的功能,装饰器类需要跟原始类继承相同的抽象类或者实现相同的接口。并且,装饰器模式支持对原始类嵌套使用多个装饰器。
-
适配器模式 更侧重于让接口不兼容而不能交互的类可以一起工作,当我们调用适配器对应的方法时,适配器内部会调用适配者类或者和适配类相关的类的方法,这个过程透明的。就比如说
StreamDecoder(流解码器)和StreamEncoder(流编码器)就是分别基于InputStream和OutputStream来获取FileChannel对象并调用对应的read方法和write方法进行字节数据的读取和写入。StreamDecoder(InputStream in, Object lock, CharsetDecoder dec) {// 省略大部分代码// 根据 InputStream 对象获取 FileChannel 对象ch = getChannel((FileInputStream)in);} -
适配器和适配者两者不需要继承相同的抽象类或者实现相同的接口。
另外,FutureTask 类使用了适配器模式,Executors 的内部类 RunnableAdapter 实现属于适配器,用于将 Runnable 适配成 Callable。
FutureTask参数包含 Runnable 的一个构造方法:
public FutureTask(Runnable runnable, V result) { // 调用 Executors 类的 callable 方法 this.callable = Executors.callable(runnable, result); this.state = NEW;}Executors中对应的方法和适配器:
// 实际调用的是 Executors 的内部类 RunnableAdapter 的构造方法public static <T> Callable<T> callable(Runnable task, T result) { if (task == null) throw new NullPointerException(); return new RunnableAdapter<T>(task, result);}// 适配器static final class RunnableAdapter<T> implements Callable<T> { final Runnable task; final T result; RunnableAdapter(Runnable task, T result) { this.task = task; this.result = result; } public T call() { task.run(); return result; }}工厂模式
工厂模式用于创建对象,NIO 中大量用到了工厂模式,比如 Files 类的 newInputStream 方法用于创建 InputStream 对象(静态工厂)、 Paths 类的 get 方法创建 Path 对象(静态工厂)、ZipFileSystem 类(sun.nio包下的类,属于 java.nio 相关的一些内部实现)的 getPath 的方法创建 Path 对象(简单工厂)。
InputStream is = Files.newInputStream(Paths.get(generatorLogoPath))观察者模式
NIO 中的文件目录监听服务使用到了观察者模式。
NIO 中的文件目录监听服务基于 WatchService 接口和 Watchable 接口。WatchService 属于观察者,Watchable 属于被观察者。
Watchable 接口定义了一个用于将对象注册到 WatchService(监控服务) 并绑定监听事件的方法 register 。
public interface Path extends Comparable<Path>, Iterable<Path>, Watchable{}
public interface Watchable { WatchKey register(WatchService watcher, WatchEvent.Kind<?>[] events, WatchEvent.Modifier... modifiers) throws IOException;}WatchService 用于监听文件目录的变化,同一个 WatchService 对象能够监听多个文件目录。
// 创建 WatchService 对象WatchService watchService = FileSystems.getDefault().newWatchService();
// 初始化一个被监控文件夹的 Path 类:Path path = Paths.get("workingDirectory");// 将这个 path 对象注册到 WatchService(监控服务) 中去WatchKey watchKey = path.register(watchService, StandardWatchEventKinds...);Path 类 register 方法的第二个参数 events (需要监听的事件)为可变长参数,也就是说我们可以同时监听多种事件。
WatchKey register(WatchService watcher, WatchEvent.Kind<?>... events) throws IOException;常用的监听事件有 3 种:
StandardWatchEventKinds.ENTRY_CREATE:文件创建。StandardWatchEventKinds.ENTRY_DELETE: 文件删除。StandardWatchEventKinds.ENTRY_MODIFY: 文件修改。
register 方法返回 WatchKey 对象,通过WatchKey 对象可以获取事件的具体信息比如文件目录下是创建、删除还是修改了文件、创建、删除或者修改的文件的具体名称是什么。
WatchKey key;while ((key = watchService.take()) != null) { for (WatchEvent<?> event : key.pollEvents()) { // 可以调用 WatchEvent 对象的方法做一些事情比如输出事件的具体上下文信息 } key.reset();}WatchService 内部是通过一个 daemon thread(守护线程)采用定期轮询的方式来检测文件的变化,简化后的源码如下所示。
class PollingWatchService extends AbstractWatchService{ // 定义一个 daemon thread(守护线程)轮询检测文件变化 private final ScheduledExecutorService scheduledExecutor;
PollingWatchService() { scheduledExecutor = Executors .newSingleThreadScheduledExecutor(new ThreadFactory() { @Override public Thread newThread(Runnable r) { Thread t = new Thread(r); t.setDaemon(true); return t; }}); }
void enable(Set<? extends WatchEvent.Kind<?>> events, long period) { synchronized (this) { // 更新监听事件 this.events = events;
// 开启定期轮询 Runnable thunk = new Runnable() { public void run() { poll(); }}; this.poller = scheduledExecutor .scheduleAtFixedRate(thunk, period, period, TimeUnit.SECONDS); } }}Java IO模型
I/O
何为 I/O?
I/O(Input/Outpu) 即输入/输出 。
我们先从计算机结构的角度来解读一下 I/O。
根据冯.诺依曼结构,计算机结构分为 5 大部分:运算器、控制器、存储器、输入设备、输出设备。
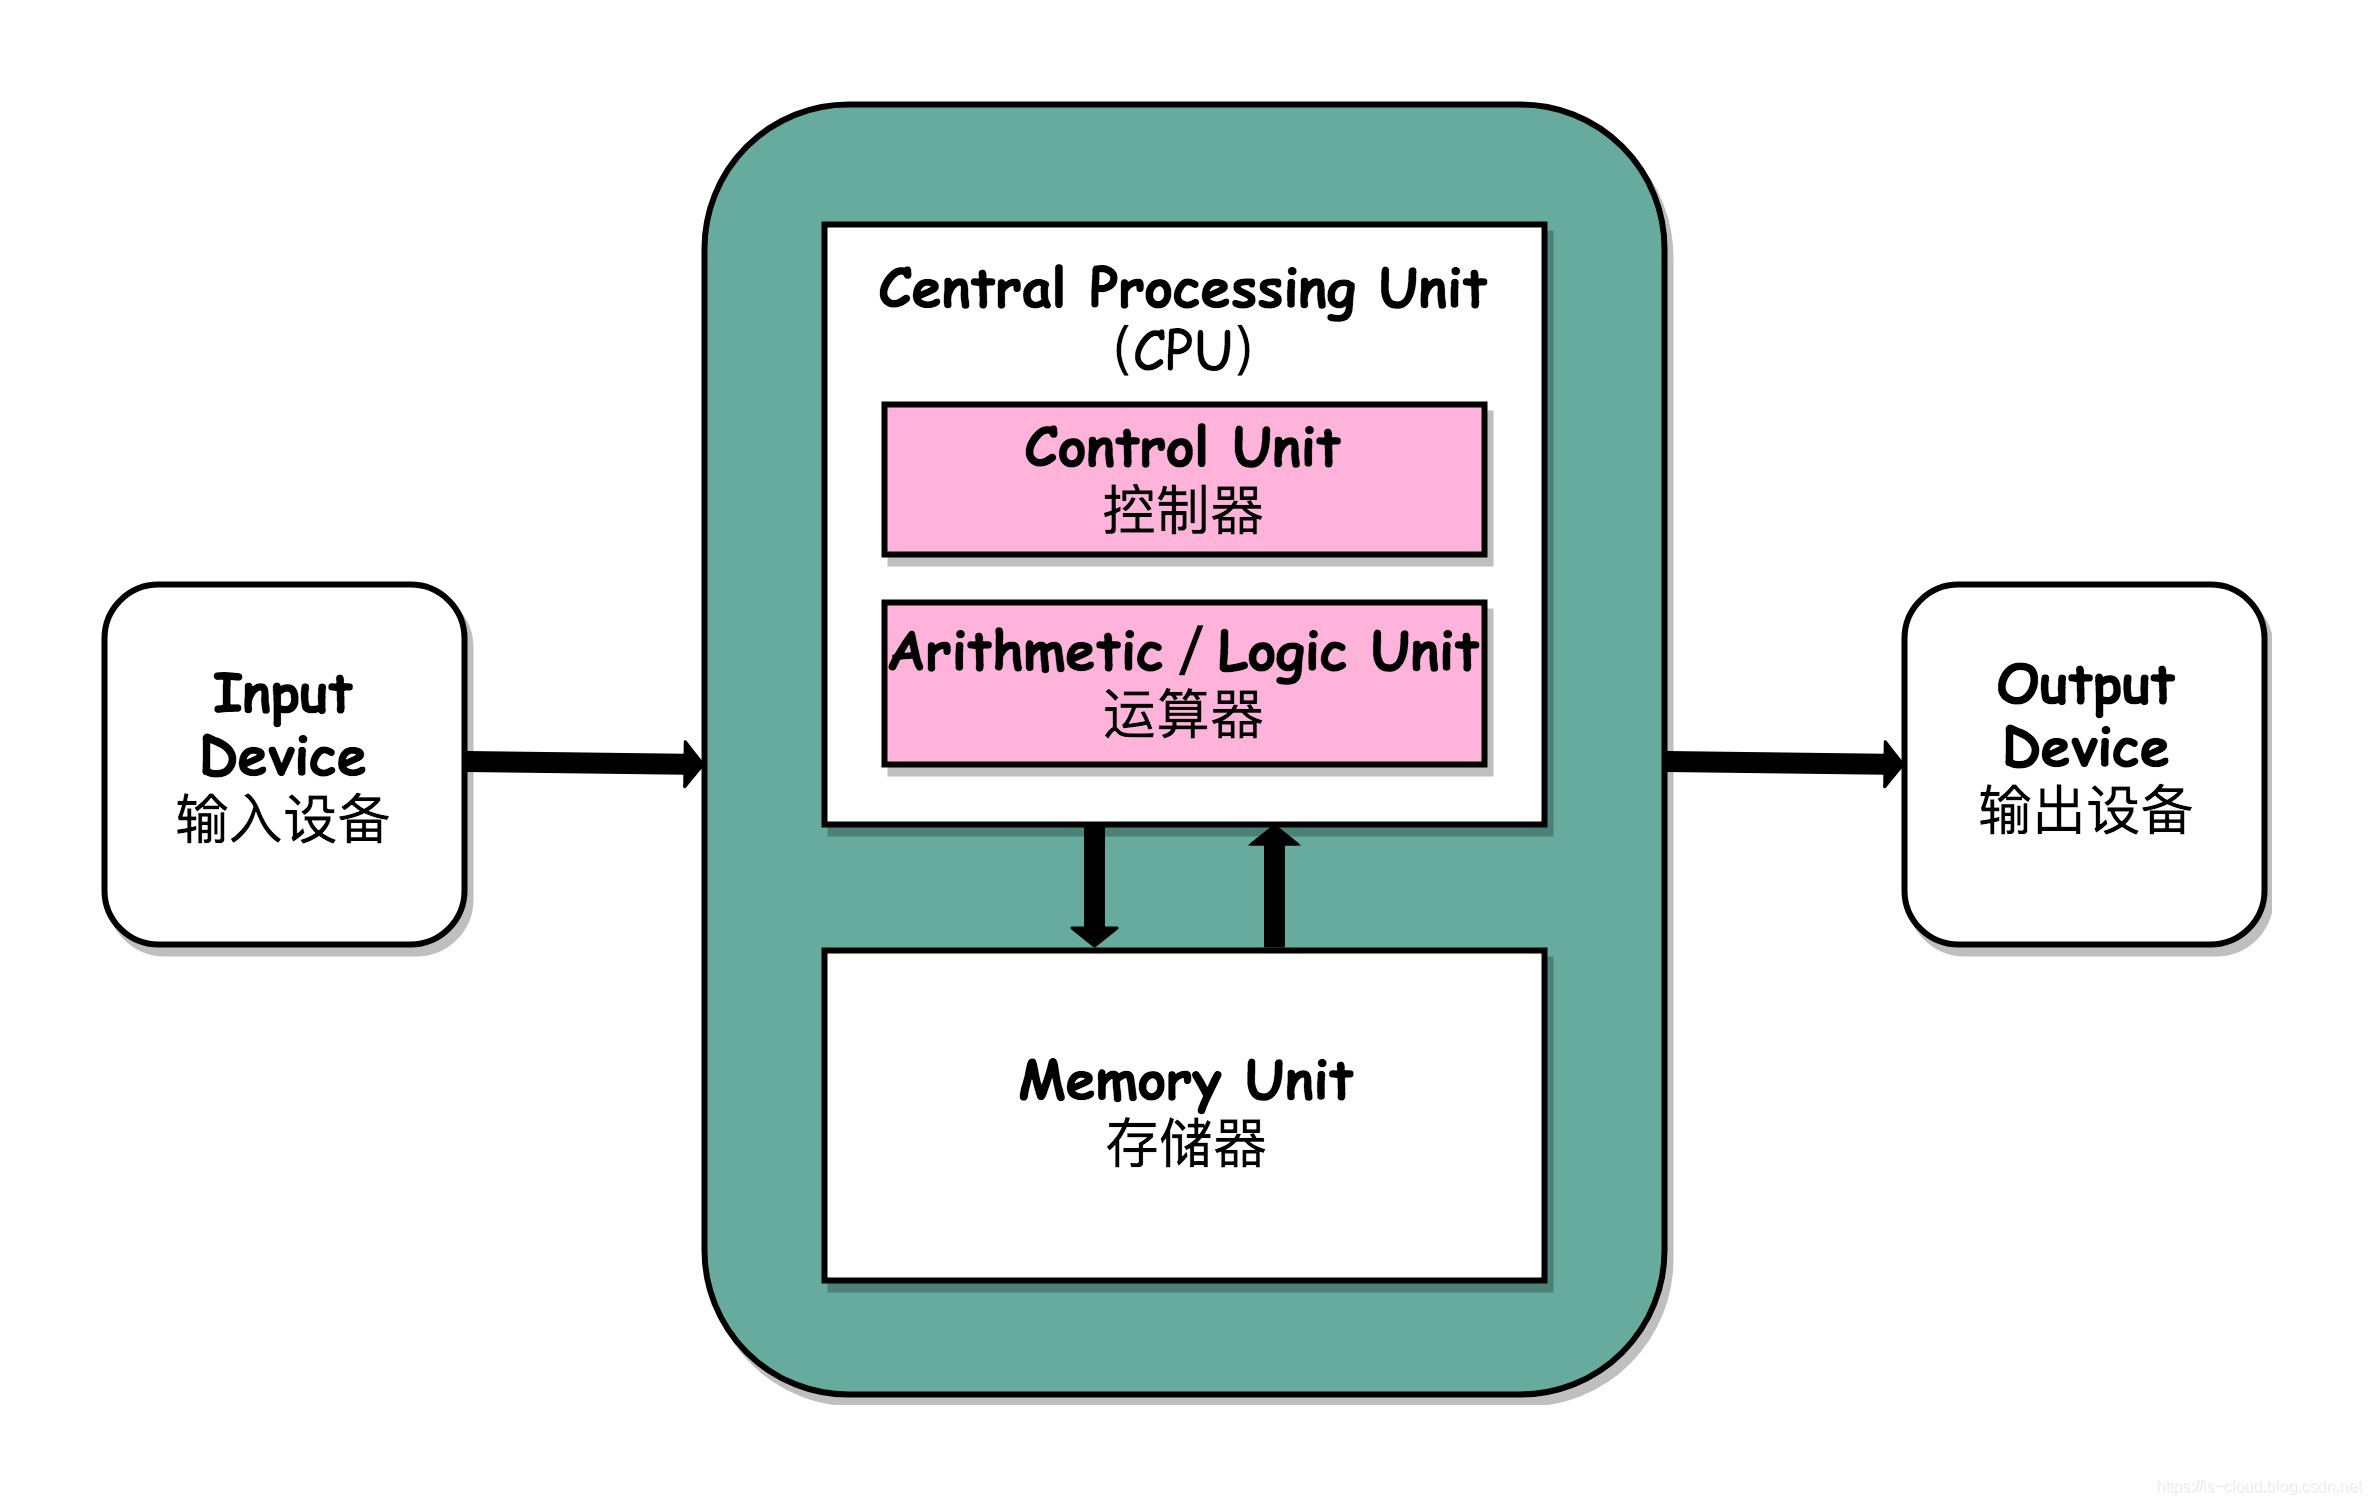
输入设备(比如键盘)和输出设备(比如显示器)都属于外部设备。网卡、硬盘这种既可以属于输入设备,也可以属于输出设备。
输入设备向计算机输入数据,输出设备接收计算机输出的数据。
从计算机结构的视角来看的话, I/O 描述了计算机系统与外部设备之间通信的过程。
我们再先从应用程序的角度来解读一下 I/O。
根据操作系统相关的知识:为了保证操作系统的稳定性和安全性,一个进程的地址空间划分为 用户空间(User space) 和 内核空间(Kernel space ) 。
像我们平常运行的应用程序都是运行在用户空间,只有内核空间才能进行系统态级别的资源有关的操作,比如文件管理、进程通信、内存管理等等。也就是说,我们想要进行 IO 操作,一定是要依赖内核空间的能力。
并且,用户空间的程序不能直接访问内核空间。
当想要执行 IO 操作时,由于没有执行这些操作的权限,只能发起系统调用请求操作系统帮忙完成。
因此,用户进程想要执行 IO 操作的话,必须通过 系统调用 来间接访问内核空间
我们在平常开发过程中接触最多的就是 磁盘 IO(读写文件) 和 网络 IO(网络请求和响应)。
从应用程序的视角来看的话,我们的应用程序对操作系统的内核发起 IO 调用(系统调用),操作系统负责的内核执行具体的 IO 操作。也就是说,我们的应用程序实际上只是发起了 IO 操作的调用而已,具体 IO 的执行是由操作系统的内核来完成的。
当应用程序发起 I/O 调用后,会经历两个步骤:
- 内核等待 I/O 设备准备好数据
- 内核将数据从内核空间拷贝到用户空间。
有哪些常见的 IO 模型?
UNIX 系统下, IO 模型一共有 5 种:同步阻塞 I/O、同步非阻塞 I/O、I/O 多路复用、信号驱动 I/O 和异步 I/O。
这也是我们经常提到的 5 种 IO 模型。
Java 中 3 种常见 IO 模型
BIO (Blocking I/O)
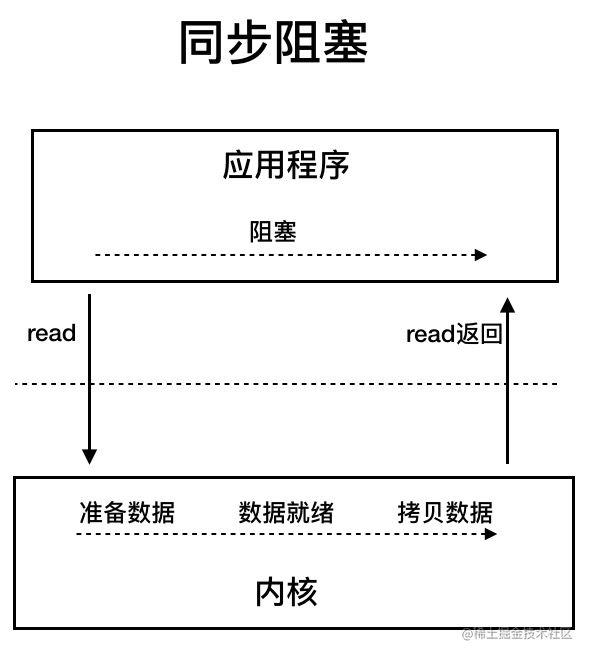
BIO 属于同步阻塞 IO 模型 。
同步阻塞 IO 模型中,应用程序发起 read 调用后,会一直阻塞,直到内核把数据拷贝到用户空间。
在客户端连接数量不高的情况下,是没问题的。但是,当面对十万甚至百万级连接的时候,传统的 BIO 模型是无能为力的。因此,我们需要一种更高效的 I/O 处理模型来应对更高的并发量。
NIO (Non-blocking/New I/O)
Java 中的 NIO 于 Java 1.4 中引入,对应 java.nio 包,提供了 Channel , Selector,Buffer 等抽象。NIO 中的 N 可以理解为 Non-blocking,不单纯是 New。它是支持面向缓冲的,基于通道的 I/O 操作方法。 对于高负载、高并发的(网络)应用,应使用 NIO 。
Java 中的 NIO 可以看作是 I/O 多路复用模型。也有很多人认为,Java 中的 NIO 属于同步非阻塞 IO 模型。
我们先来看看 同步非阻塞 IO 模型。
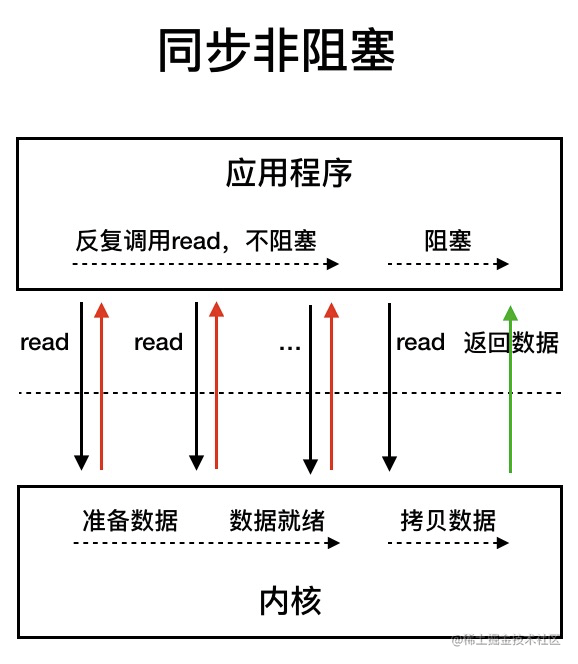
同步非阻塞 IO 模型中,应用程序会一直发起 read 调用,等待数据从内核空间拷贝到用户空间的这段时间里,线程依然是阻塞的,直到在内核把数据拷贝到用户空间。
相比于同步阻塞 IO 模型,同步非阻塞 IO 模型确实有了很大改进。通过轮询操作,避免了一直阻塞。
但是,这种 IO 模型同样存在问题:应用程序不断进行 I/O 系统调用轮询数据是否已经准备好的过程是十分消耗 CPU 资源的。
这个时候,I/O 多路复用模型 就上场了。
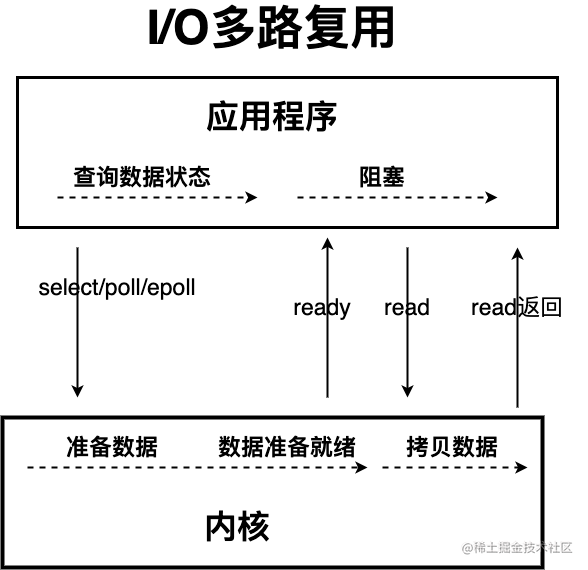
IO 多路复用模型中,线程首先发起 select 调用,询问内核数据是否准备就绪,等内核把数据准备好了,用户线程再发起 read 调用。read 调用的过程(数据从内核空间 -> 用户空间)还是阻塞的。
目前支持 IO 多路复用的系统调用,有 select,epoll 等等。select 系统调用,目前几乎在所有的操作系统上都有支持。
- select 调用:内核提供的系统调用,它支持一次查询多个系统调用的可用状态。几乎所有的操作系统都支持。
- epoll 调用:linux 2.6 内核,属于 select 调用的增强版本,优化了 IO 的执行效率。
IO 多路复用模型,通过减少无效的系统调用,减少了对 CPU 资源的消耗。
Java 中的 NIO ,有一个非常重要的选择器 ( Selector ) 的概念,也可以被称为 多路复用器。通过它,只需要一个线程便可以管理多个客户端连接。当客户端数据到了之后,才会为其服务。

AIO (Asynchronous I/O)
AIO 也就是 NIO 2。Java 7 中引入了 NIO 的改进版 NIO 2,它是异步 IO 模型。
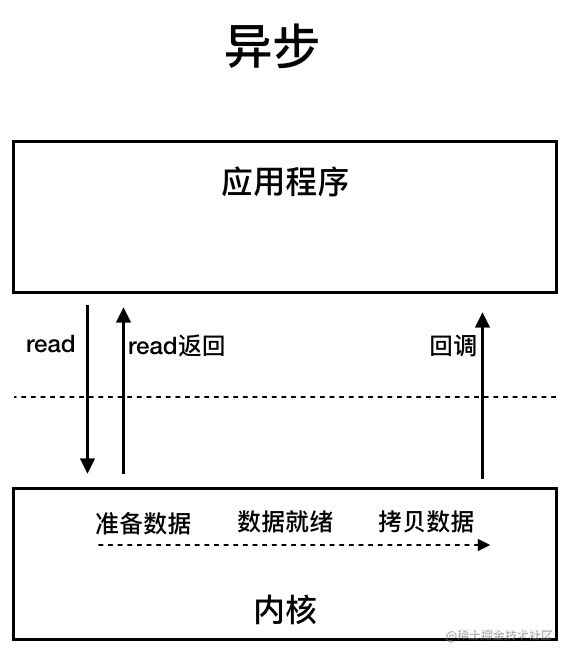
异步 IO 是基于事件和回调机制实现的,也就是应用操作之后会直接返回,不会堵塞在那里,当后台处理完成,操作系统会通知相应的线程进行后续的操作。
目前来说 AIO 的应用还不是很广泛。Netty 之前也尝试使用过 AIO,不过又放弃了。这是因为,Netty 使用了 AIO 之后,在 Linux 系统上的性能并没有多少提升。
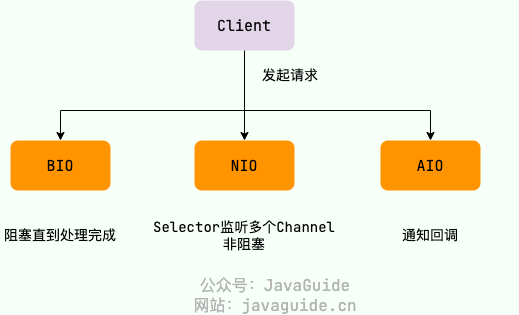
最后,来一张图,简单总结一下 Java 中的 BIO、NIO、AIO。
Java IO Basics
IO Streams Overview
IO stands for Input/Output, input and output. The process of data entering the computer memory is input, while the process of outputting to external storage (such as a database, files, or remote hosts) is output. The data transfer process is like a flow of water, hence called IO streams. In Java, IO streams are divided into input streams and output streams, and based on how data is processed they are divided into byte streams and character streams.
Java IO has more than 40 classes derived from the following four abstract base classes.
InputStream/Reader: The base class for all input streams; the former is a byte input stream, the latter is a character input stream.OutputStream/Writer: The base class for all output streams; the former is a byte output stream, the latter is a character output stream.
Byte Streams
InputStream (Byte Input Stream)
InputStream is used to read data (byte information) from a source (usually a file) into memory. The abstract class java.io.InputStream is the parent class of all byte input streams.
InputStream common methods:
read(): Returns the next byte of data from the input stream. The returned value is between 0 and 255. If no bytes are read, the code returns 1, indicating end of file.read(byte b[ ]): Reads some bytes from the input stream and stores them into the arrayb. If the length ofbis zero, nothing is read. If there are no available bytes to read, returns 1. If there are available bytes to read, the maximum number of bytes read is up tob.length, returning the number of bytes read. This method is equivalent toread(b, 0, b.length).read(byte b[], int off, int len): Adds theoff(offset) andlen(maximum number of bytes to read) parameters on top ofread(byte b[ ]).skip(long n): Skipnbytes in the input stream, returns the actual number of bytes skipped.available(): Returns the number of bytes that can be read from the input stream.close(): Closes the input stream and releases the associated system resources.
From Java 9 onward, InputStream adds several useful methods:
readAllBytes(): Reads all bytes from the input stream and returns a byte array.readNBytes(byte[] b, int off, int len): Blocks untillenbytes are read.transferTo(OutputStream out): Transfers all bytes from an input stream to an output stream.
FileInputStream is a commonly used byte input stream object; you can specify a file path directly, read single bytes, or read into a byte array.
FileInputStream code example:
try (InputStream fis = new FileInputStream("input.txt")) { System.out.println("Number of remaining bytes:" + fis.available()); int content; long skip = fis.skip(2); System.out.println("The actual number of bytes skipped:" + skip); System.out.print("The content read from file:"); while ((content = fis.read()) != -1) { System.out.print((char) content); }} catch (IOException e) { e.printStackTrace();}However, generally we don’t use FileInputStream by itself; we typically use it together with BufferedInputStream (byte buffered input stream).
Like the code below, which is common in our projects, we read all bytes from the input stream with readAllBytes() and assign them directly to a String object.
// 新建一个 BufferedInputStream 对象BufferedInputStream bufferedInputStream = new BufferedInputStream(new FileInputStream("input.txt"));// 读取文件的内容并复制到 String 对象中String result = new String(bufferedInputStream.readAllBytes());System.out.println(result);DataInputStream is used to read data of specified types and cannot be used alone; it must be combined with other streams, such as FileInputStream.
FileInputStream fileInputStream = new FileInputStream("input.txt");//必须将fileInputStream作为构造参数才能使用DataInputStream dataInputStream = new DataInputStream(fileInputStream);//可以读取任意具体的类型数据dataInputStream.readBoolean();dataInputStream.readInt();dataInputStream.readUTF();ObjectInputStream is used to read Java objects from an input stream (deserialization), and ObjectOutputStream is used to write objects to an output stream (serialization).
ObjectInputStream input = new ObjectInputStream(new FileInputStream("object.data"));MyClass object = (MyClass) input.readObject();input.close();Additionally, the classes used for serialization and deserialization must implement the Serializable interface; if there are fields you do not want serialized, mark them as transient.
OutputStream (Byte Output Stream)
OutputStream is used to write data (byte information) to a destination (usually a file). The abstract class java.io.OutputStream is the parent class of all byte output streams.
OutputStream common methods:
write(int b): Write a single byte to the output stream.write(byte b[ ]): Write the arraybto the output stream, equivalent towrite(b, 0, b.length).write(byte[] b, int off, int len): Adds theoffandlenparameters to thewrite(byte b[ ])method.flush(): Flush this output stream and force all buffered output bytes to be written out.close(): Close the output stream and release the associated system resources.
FileOutputStream is the most common byte output stream object; you can specify a file path directly, can write single bytes or a specified byte array.
FileOutputStream code example:
try (FileOutputStream output = new FileOutputStream("output.txt")) { byte[] array = "Dreaife yy".getBytes(); output.write(array);} catch (IOException e) { e.printStackTrace();}Similar to FileInputStream, FileOutputStream is usually used together with BufferedOutputStream (byte buffered output stream).
FileOutputStream fileOutputStream = new FileOutputStream("output.txt");BufferedOutputStream bos = new BufferedOutputStream(fileOutputStream)DataOutputStream is used to write data of specified types; it cannot be used alone and must be combined with other streams, such as FileOutputStream.
// 输出流FileOutputStream fileOutputStream = new FileOutputStream("out.txt");DataOutputStream dataOutputStream = new DataOutputStream(fileOutputStream);// 输出任意数据类型dataOutputStream.writeBoolean(true);dataOutputStream.writeByte(1);ObjectInputStream is used to read Java objects from an input stream (ObjectInputStream, deserialization), and ObjectOutputStream writes objects to an output stream (ObjectOutputStream, serialization).
ObjectOutputStream output = new ObjectOutputStream(new FileOutputStream("file.txt")Person person = new Person("dreaife", "eroger");output.writeObject(person);Character Streams
No matter whether reading/writing files or sending/receiving over the network, the smallest storage unit of information is bytes. Why do IO operations distinguish between byte streams and character streams?
I think there are two main reasons:
- Character streams are produced by the JVM by converting bytes, which can be quite time-consuming.
- If we don’t know the encoding, garbled characters can easily occur.
The garbled text issue is easy to reproduce: simply change the content of the input.txt in the FileInputStream example above to Chinese; the original code does not need to change, but the read content will clearly become garbled.
Therefore, IO streams provide a direct interface to operate on characters, making it convenient to handle character data. For media files like audio or images, byte streams are preferable; for character data, character streams are better.
Character streams default to Unicode encoding; we can customize encoding through constructors.
By the way, a previously encountered interview question: how many bytes do common character encodings use? utf8: English 1 byte, Chinese 3 bytes; unicode: any character 2 bytes; gbk: English 1 byte, Chinese 2 bytes.
Reader (Character Input Stream)
Reader is used to read data (character information) from a source (usually a file) into memory. The abstract class java.io.Reader is the parent class of all character input streams.
Reader is used to read text, while InputStream is used to read raw bytes.
Reader common methods:
read(): Reads a character from the input stream.read(char[] cbuf): Reads some characters from the input stream and stores them into the character arraycbuf, equivalent toread(cbuf, 0, cbuf.length).read(char[] cbuf, int off, int len): Adds theoffandlenparameters on top ofread(char[] cbuf).skip(long n): Skipncharacters in the input stream, returns the actual number of characters skipped.close(): Closes the input stream and releases the associated resources.
InputStreamReader is the bridge from byte streams to character streams; its subclass FileReader is a wrapper based on that, allowing direct operations on character files.
// 字节流转换为字符流的桥梁public class InputStreamReader extends Reader {}// 用于读取字符文件public class FileReader extends InputStreamReader {}FileReader code example:
try (FileReader fileReader = new FileReader("input.txt");) { int content; long skip = fileReader.skip(3); System.out.println("The actual number of bytes skipped:" + skip); System.out.print("The content read from file:"); while ((content = fileReader.read()) != -1) { System.out.print((char) content); }} catch (IOException e) { e.printStackTrace();}Writer (Character Output Stream)
Writer is used to write data (character information) to a destination (usually a file); the abstract class java.io.Writer is the parent class of all character output streams.
Writer common methods:
write(int c): Write a single character.write(char[] cbuf): Write the character arraycbuf, equivalent towrite(cbuf, 0, cbuf.length).write(char[] cbuf, int off, int len): Adds theoffandlenparameters on top ofwrite(char[] cbuf).write(String str): Write a string, equivalent towrite(str, 0, str.length()).write(String str, int off, int len): Adds theoffandlenparameters on top ofwrite(String str).append(CharSequence csq): Append the specified character sequence to thisWriterand return thisWriter.append(char c): Append the specified character to thisWriterand return thisWriter.flush(): Flush this output stream and force any buffered characters to be written out.close(): Close the output stream and release the associated resources.
OutputStreamWriter is the bridge from character streams to byte streams; its subclass FileWriter is a wrapper based on this, which can write characters directly to a file.
// 字符流转换为字节流的桥梁public class OutputStreamWriter extends Writer {}// 用于写入字符到文件public class FileWriter extends OutputStreamWriter {}FileWriter code example:
try (Writer output = new FileWriter("output.txt")) { output.write("你好,我是dreaife");} catch (IOException e) { e.printStackTrace();}Byte Buffered Streams
IO operations are performance-intensive; buffered streams load data into a buffer so that multiple bytes can be read or written at once, avoiding frequent IO operations and improving stream transfer efficiency.
Byte-buffered streams use the decorator pattern to enhance the functionality of InputStream and OutputStream subclasses.
For example, we can enhance FileInputStream with BufferedInputStream (byte buffered input stream).
// 新建一个 BufferedInputStream 对象BufferedInputStream bufferedInputStream = new BufferedInputStream(new FileInputStream("input.txt"));The performance difference between byte streams and buffered byte streams mainly shows when we use the methods write(int b) and read() which read one byte at a time. Since buffered streams have an internal buffer (byte array), the buffered stream stores the read bytes in the buffer first, significantly reducing the number of IO operations and improving read efficiency.
I used the write(int b) and read() methods to copy a 524.9 mb PDF file with byte streams and buffered byte streams, and the timing comparison is as follows:
使用缓冲流复制PDF文件总耗时:15428 毫秒使用普通字节流复制PDF文件总耗时:2555062 毫秒The time difference is very large; buffered streams take about 1/165 of the time of byte streams.
Test code:
@Testvoid copy_pdf_to_another_pdf_buffer_stream() { // 记录开始时间 long start = System.currentTimeMillis(); try (BufferedInputStream bis = new BufferedInputStream(new FileInputStream("深入理解计算机操作系统.pdf")); BufferedOutputStream bos = new BufferedOutputStream(new FileOutputStream("深入理解计算机操作系统-副本.pdf"))) { int content; while ((content = bis.read()) != -1) { bos.write(content); } } catch (IOException e) { e.printStackTrace(); } // 记录结束时间 long end = System.currentTimeMillis(); System.out.println("使用缓冲流复制PDF文件总耗时:" + (end - start) + " 毫秒");}
@Testvoid copy_pdf_to_another_pdf_stream() { // 记录开始时间 long start = System.currentTimeMillis(); try (FileInputStream fis = new FileInputStream("深入理解计算机操作系统.pdf"); FileOutputStream fos = new FileOutputStream("深入理解计算机操作系统-副本.pdf")) { int content; while ((content = fis.read()) != -1) { fos.write(content); } } catch (IOException e) { e.printStackTrace(); } // 记录结束时间 long end = System.currentTimeMillis(); System.out.println("使用普通流复制PDF文件总耗时:" + (end - start) + " 毫秒");}If you call read(byte b[]) and write(byte b[], int off, int len) to write or read a byte array, as long as the byte array size is appropriate, the performance difference is not significant and can be basically ignored.
This time we use the methods read(byte b[]) and write(byte b[], int off, int len) to copy a 524.9 mb PDF file, comparing the times between byte streams and buffered streams:
使用缓冲流复制PDF文件总耗时:695 毫秒使用普通字节流复制PDF文件总耗时:989 毫秒The timing difference is not very large; buffered streams are a little faster.
Test code:
@Testvoid copy_pdf_to_another_pdf_with_byte_array_buffer_stream() { // 记录开始时间 long start = System.currentTimeMillis(); try (BufferedInputStream bis = new BufferedInputStream(new FileInputStream("深入理解计算机操作系统.pdf")); BufferedOutputStream bos = new BufferedOutputStream(new FileOutputStream("深入理解计算机操作系统-副本.pdf"))) { int len; byte[] bytes = new byte[4 * 1024]; while ((len = bis.read(bytes)) != -1) { bos.write(bytes, 0, len); } } catch (IOException e) { e.printStackTrace(); } // 记录结束时间 long end = System.currentTimeMillis(); System.out.println("使用缓冲流复制PDF文件总耗时:" + (end - start) + " 毫秒");}
@Testvoid copy_pdf_to_another_pdf_with_byte_array_stream() { // 记录开始时间 long start = System.currentTimeMillis(); try (FileInputStream fis = new FileInputStream("深入理解计算机操作系统.pdf"); FileOutputStream fos = new FileOutputStream("深入理解计算机操作系统-副本.pdf")) { int len; byte[] bytes = new byte[4 * 1024]; while ((len = fis.read(bytes)) != -1) { fos.write(bytes, 0, len); } } catch (IOException e) { e.printStackTrace(); } // 记录结束时间 long end = System.currentTimeMillis(); System.out.println("使用普通流复制PDF文件总耗时:" + (end - start) + " 毫秒");}BufferedInputStream (Byte Buffered Input Stream)
BufferedInputStream reads data (byte information) from a source (usually a file) into memory without reading byte by byte; it first stores the read bytes into an internal buffer and then reads bytes from that internal buffer. This significantly reduces the number of IO operations and improves read efficiency.
BufferedInputStream maintains an internal buffer; this buffer is effectively a byte array, as seen from its source code.
publicclass BufferedInputStream extends FilterInputStream { // 内部缓冲区数组 protected volatile byte buf[]; // 缓冲区的默认大小 private static int DEFAULT_BUFFER_SIZE = 8192; // 使用默认的缓冲区大小 public BufferedInputStream(InputStream in) { this(in, DEFAULT_BUFFER_SIZE); } // 自定义缓冲区大小 public BufferedInputStream(InputStream in, int size) { super(in); if (size <= 0) { throw new IllegalArgumentException("Buffer size <= 0"); } buf = new byte[size]; }}The default buffer size is 8192 bytes. You can also specify the buffer size through the BufferedInputStream(InputStream in, int size) constructor.
BufferedOutputStream (Byte Buffered Output Stream)
BufferedOutputStream does not write data (byte information) to the destination (usually a file) one byte at a time. Instead, it first stores bytes in an internal buffer and writes from that buffer in batches. This greatly reduces the number of IO operations and improves efficiency.
try (BufferedOutputStream bos = new BufferedOutputStream(new FileOutputStream("output.txt"))) { byte[] array = "dreaifeICU".getBytes(); bos.write(array);} catch (IOException e) { e.printStackTrace();}Similar to BufferedInputStream, BufferedOutputStream also maintains an internal buffer, and the buffer size is also 8192 bytes.
Character Buffered Streams
BufferedReader (Character Buffered Input Stream) and BufferedWriter (Character Buffered Output Stream) are similar to BufferedInputStream (Byte Buffered Input Stream) and BufferedOutputStream (Byte Buffered Output Stream); both maintain an internal buffer. However, the former is mainly used to handle character information.
Print Streams
You probably use this code often, right?
System.out.print("Hello!");System.out.println("Hello!");System.out is actually used to obtain a PrintStream object; the print method actually calls the write method of the PrintStream object.
PrintStream is a byte-based print stream, and its counterpart is PrintWriter (character print stream). PrintStream is a subclass of OutputStream, and PrintWriter is a subclass of Writer.
public class PrintStream extends FilterOutputStream implements Appendable, Closeable {}public class PrintWriter extends Writer {}Random Access Streams
The random access stream we will discuss here refers to RandomAccessFile, which supports jumping to any position in a file for reading and writing.
RandomAccessFile constructors are as follows; you can specify mode (read/write).
// openAndDelete 参数默认为 false 表示打开文件并且这个文件不会被删除public RandomAccessFile(File file, String mode) throws FileNotFoundException { this(file, mode, false);}// 私有方法private RandomAccessFile(File file, String mode, boolean openAndDelete) throws FileNotFoundException{ // 省略大部分代码}There are four main modes:
r: Read-only mode.rw: Read/write moderws: In relation torw, synchronously updates to external storage device for modifications to both the file’s content and metadata.rwd: In relation torw, synchronously updates to external storage device for modifications to the file’s content.
File content refers to the actual data stored in the file; metadata describes attributes such as file size, creation and modification times.
RandomAccessFile has a file pointer that indicates the position of the next byte to be read or written. You can set the file pointer offset with seek(long pos) (pos bytes from the beginning). If you want to get the current position, use getFilePointer().
RandomAccessFile code example:
RandomAccessFile randomAccessFile = new RandomAccessFile(new File("input.txt"), "rw");System.out.println("读取之前的偏移量:" + randomAccessFile.getFilePointer() + ",当前读取到的字符" + (char) randomAccessFile.read() + ",读取之后的偏移量:" + randomAccessFile.getFilePointer());// 指针当前偏移量为 6randomAccessFile.seek(6);System.out.println("读取之前的偏移量:" + randomAccessFile.getFilePointer() + ",当前读取到的字符" + (char) randomAccessFile.read() + ",读取之后的偏移量:" + randomAccessFile.getFilePointer());// 从偏移量 7 的位置开始往后写入字节数据randomAccessFile.write(new byte[]{'H', 'I', 'J', 'K'});// 指针当前偏移量为 0,回到起始位置randomAccessFile.seek(0);System.out.println("读取之前的偏移量:" + randomAccessFile.getFilePointer() + ",当前读取到的字符" + (char) randomAccessFile.read() + ",读取之后的偏移量:" + randomAccessFile.getFilePointer());If the target position already contains data, the write method of RandomAccessFile will overwrite it.
RandomAccessFile randomAccessFile = new RandomAccessFile(new File("input.txt"), "rw");randomAccessFile.write(new byte[]{'H', 'I', 'J', 'K'});Suppose the contents of input.txt are ABCD before running the program above; after running it, the file becomes HIJK.
A common use case of RandomAccessFile is implementing resumable uploads for large files. In short, after an upload is paused or fails (for example, due to network issues), you do not need to re-upload the entire file; you only upload the chunks that were not successfully uploaded. Chunked upload (splitting a file into multiple chunks first) is the foundation of resumable uploads.
RandomAccessFile is implemented based on FileDescriptor (file descriptor) and FileChannel (file channel).
Java IO Design Patterns
Decorator Pattern
The Decorator pattern can extend the functionality of an existing object without modifying the object itself.
The decorator pattern uses composition instead of inheritance to extend the functionality of the original class, and it is particularly useful in scenarios with complex inheritance hierarchies (IO features many inheritance relationships).
For byte streams, FilterInputStream (for input streams) and FilterOutputStream (for output streams) are the core of the decorator pattern, used to enhance the functionality of InputStream and OutputStream subclasses respectively.
Common examples like BufferedInputStream (byte buffered input stream) and DataInputStream etc. are subclasses of FilterInputStream, while BufferedOutputStream (byte buffered output stream) and DataOutputStream etc. are subclasses of FilterOutputStream.
For example, we can enhance FileInputStream with BufferedInputStream (byte buffered input stream).
BufferedInputStream constructor is as follows:
public BufferedInputStream(InputStream in) { this(in, DEFAULT_BUFFER_SIZE);}
public BufferedInputStream(InputStream in, int size) { super(in); if (size <= 0) { throw new IllegalArgumentException("Buffer size <= 0"); } buf = new byte[size];}As you can see, one of the constructor parameters of BufferedInputStream is an InputStream.
BufferedInputStream code example:
try (BufferedInputStream bis = new BufferedInputStream(new FileInputStream("input.txt"))) { int content; long skip = bis.skip(2); while ((content = bis.read()) != -1) { System.out.print((char) content); }} catch (IOException e) { e.printStackTrace();}At this point you may wonder: why not just make a BufferedFileInputStream (character buffered file input stream) directly?
BufferedFileInputStream bfis = new BufferedFileInputStream("input.txt");If there are only a few InputStream subclasses, this would be fine. However, there are many InputStream subclasses, and the inheritance is quite complex. If we tailor a buffered input stream for every subclass, that would be quite a hassle.
If you are familiar with IO streams, you will notice that ZipInputStream and ZipOutputStream can also enhance the capabilities of BufferedInputStream and BufferedOutputStream respectively.
BufferedInputStream bis = new BufferedInputStream(new FileInputStream(fileName));ZipInputStream zis = new ZipInputStream(bis);
BufferedOutputStream bos = new BufferedOutputStream(new FileOutputStream(fileName));ZipOutputStream zipOut = new ZipOutputStream(bos);ZipInputStream and ZipOutputStream extend InflaterInputStream and DeflaterOutputStream, respectively.
publicclass InflaterInputStream extends FilterInputStream {}
publicclass DeflaterOutputStream extends FilterOutputStream {}This is also an important feature of the decorator pattern: you can nest multiple decorators around the original class.
To achieve this, decorator classes need to extend the same abstract class or implement the same interface as the original class. The IO-related decorators mentioned above share the common base classes of InputStream and OutputStream with the original classes.
For character streams, BufferedReader can be used to augment the functionality of Reader (character input streams), and BufferedWriter can augment the functionality of Writer (character output streams).
BufferedWriter bw = new BufferedWriter(new OutputStreamWriter(new FileOutputStream(fileName), "UTF-8"));There are many examples of applying the decorator pattern in IO streams; you don’t need to memorize them all. Once you grasp the decorator pattern’s core, you’ll naturally know where it applies when using IO streams.
Adapter Pattern
The Adapter Pattern is mainly used to coordinate classes with incompatible interfaces; you can think of it as the power adapter we use in daily life.
In the adapter pattern, the object or class being adapted is called the Adaptee, and the object or class that adapts is called the Adapter. Adapters can be class adapters (using inheritance) or object adapters (using composition).
The interfaces of character streams and byte streams in IO are different; adapters allow them to work together, more precisely as object adapters. Through the adapter, we can adapt a byte stream object into a character stream object, so we can directly read or write character data through the byte stream object.
InputStreamReader and OutputStreamWriter are two adapters, and they are also bridges between byte streams and character streams. InputStreamReader uses StreamDecoder (a stream decoder) to decode bytes, implementing conversion from byte streams to character streams, while OutputStreamWriter uses StreamEncoder (a stream encoder) to encode characters, implementing conversion from character streams to byte streams.
InputStream and OutputStream subclasses are the adaptees, while InputStreamReader and OutputStreamWriter are the adapters.
// InputStreamReader 是适配器,FileInputStream 是被适配的类InputStreamReader isr = new InputStreamReader(new FileInputStream(fileName), "UTF-8");// BufferedReader 增强 InputStreamReader 的功能(装饰器模式)BufferedReader bufferedReader = new BufferedReader(isr);java.io.InputStreamReader partial source code:
public class InputStreamReader extends Reader { //用于解码的对象 private final StreamDecoder sd; public InputStreamReader(InputStream in) { super(in); try { // 获取 StreamDecoder 对象 sd = StreamDecoder.forInputStreamReader(in, this, (String)null); } catch (UnsupportedEncodingException e) { throw new Error(e); } } // 使用 StreamDecoder 对象做具体的读取工作 public int read() throws IOException { return sd.read(); }}java.io.OutputStreamWriter partial source code:
public class OutputStreamWriter extends Writer { // 用于编码的对象 private final StreamEncoder se; public OutputStreamWriter(OutputStream out) { super(out); try { // 获取 StreamEncoder 对象 se = StreamEncoder.forOutputStreamWriter(out, this, (String)null); } catch (UnsupportedEncodingException e) { throw new Error(e); } } // 使用 StreamEncoder 对象做具体的写入工作 public void write(int c) throws IOException { se.write(c); }}What is the difference between the Adapter pattern and the Decorator pattern?
- The Decorator pattern focuses more on dynamically enhancing the functionality of the original class; decorator classes must extend the same abstract class or implement the same interface as the original class. It also supports nesting multiple decorators around the original class.
- The Adapter pattern focuses on making otherwise incompatible interfaces work together; when we call the adapter’s corresponding method, the adapter will internally call the adaptee’s method or related classes’ methods, in a transparent way. For example,
StreamDecoder(stream decoder) andStreamEncoder(stream encoder) are based onInputStreamandOutputStreamto obtain aFileChannelobject and call the correspondingreadandwritemethods to read and write byte data.
StreamDecoder(InputStream in, Object lock, CharsetDecoder dec) { // 省略大部分代码 // 根据 InputStream 对象获取 FileChannel 对象 ch = getChannel((FileInputStream)in);}- Adapter and adaptee do not need to share the same abstract class or interface.
Additionally, the FutureTask class uses the Adapter pattern; the internal class RunnableAdapter in Executors is an adapter that adapts a Runnable to a Callable.
FutureTask constructor with a Runnable parameter:
public FutureTask(Runnable runnable, V result) { // 调用 Executors 类的 callable 方法 this.callable = Executors.callable(runnable, result); this.state = NEW;}The corresponding methods and adapters inside Executors:
// 实际调用的是 Executors 的内部类 RunnableAdapter 的构造方法public static <T> Callable<T> callable(Runnable task, T result) { if (task == null) throw new NullPointerException(); return new RunnableAdapter<T>(task, result);}// 适配器static final class RunnableAdapter<T> implements Callable<T> { final Runnable task; final T result; RunnableAdapter(Runnable task, T result) { this.task = task; this.result = result; } public T call() { task.run(); return result; }}Factory Pattern
The factory pattern is used to create objects; in NIO there are many factory patterns, such as the static factory method in Files to create an InputStream object via newInputStream, the Paths class’s get method to create Path objects (static factory), and ZipFileSystem’s getPath method to create Path objects (simple factory) in internal implementations under the sun.nio package related to java.nio.
InputStream is = Files.newInputStream(Paths.get(generatorLogoPath))Observer Pattern
The file directory monitoring service in NIO uses the observer pattern.
The file directory monitoring service in NIO is based on the WatchService interface and the Watchable interface. WatchService is the observer, and Watchable is the observed.
Watchable interface defines a method to register an object with a WatchService (monitoring service) and bind the events to listen for, via register.
public interface Path extends Comparable<Path>, Iterable<Path>, Watchable{}
public interface Watchable { WatchKey register(WatchService watcher, WatchEvent.Kind<?>[] events, WatchEvent.Modifier... modifiers) throws IOException;}WatchService is used to monitor changes to directories, and a single WatchService object can listen to multiple directories.
// 创建 WatchService 对象WatchService watchService = FileSystems.getDefault().newWatchService();
// 初始化一个被监控文件夹的 Path 类:Path path = Paths.get("workingDirectory");// 将这个 path 对象注册到 WatchService(监控服务) 中去WatchKey watchKey = path.register(watchService, StandardWatchEventKinds...);The second parameter of the Path class’s register method, events (events to listen for), is a varargs parameter, meaning we can listen for multiple events at once.
WatchKey register(WatchService watcher, WatchEvent.Kind<?>... events) throws IOException;Common events include three types:
StandardWatchEventKinds.ENTRY_CREATE: File creation.StandardWatchEventKinds.ENTRY_DELETE: File deletion.StandardWatchEventKinds.ENTRY_MODIFY: File modification.
The register method returns a WatchKey object, through which you can obtain specific information about the event, such as whether a file was created, deleted, or modified, and the exact name of the file.
WatchKey key;while ((key = watchService.take()) != null) { for (WatchEvent<?> event : key.pollEvents()) { // 可以调用 WatchEvent 对象的方法做一些事情比如输出事件的具体上下文信息 } key.reset();}The internals of WatchService implement a daemon thread that periodically polls for file changes; a simplified version is shown below.
class PollingWatchService extends AbstractWatchService{ // 定义一个 daemon thread(守护线程)轮询检测文件变化 private final ScheduledExecutorService scheduledExecutor;
PollingWatchService() { scheduledExecutor = Executors .newSingleThreadScheduledExecutor(new ThreadFactory() { @Override public Thread newThread(Runnable r) { Thread t = new Thread(r); t.setDaemon(true); return t; }}); }
void enable(Set<? extends WatchEvent.Kind<?>> events, long period) { synchronized (this) { // 更新监听事件 this.events = events;
// 开启定期轮询 Runnable thunk = new Runnable() { public void run() { poll(); }}; this.poller = scheduledExecutor .scheduleAtFixedRate(thunk, period, period, TimeUnit.SECONDS); } }}Java IO Models
I/O
What is I/O?
I/O (I nput / O utpu t) stands for inputs/outputs.
We’ll first interpret I/O from the perspective of computer architecture.
According to the von Neumann architecture, a computer’s structure is divided into five parts: the Arithmetic Logic Unit, the Control Unit, memory, input devices, and output devices.
[Image: 20240205214505.png]
Input devices (such as a keyboard) and output devices (such as a monitor) are external devices. Network interfaces and hard disks can be both input and output devices.
Input devices input data to the computer, and output devices receive data output by the computer.
From the perspective of computer architecture, I/O describes the communication process between the computer system and external devices.
Now from the perspective of an application:
According to OS knowledge: to ensure the stability and safety of the operating system, a process’s address space is divided into the user space and the kernel space.
Typically, the applications we run operate in user space; only the kernel space can perform system-level resource operations such as file management, inter-process communication, memory management, etc. In other words, to perform IO operations, we must rely on the kernel space.
Also, user-space programs cannot directly access the kernel space.
When you want to perform IO operations, because you don’t have permission to perform those operations directly, you must issue system calls to request the operating system to help.
Therefore, when a user process wants to perform IO operations, it must indirectly access the kernel space through system calls.
In our daily development, the most common IO we deal with are disk IO (reading/writing files) and network IO (network requests and responses).
From the application’s perspective, our application makes IO calls to the kernel of the operating system (system calls); the kernel performs the actual IO operations. In other words, our application merely initiates the IO operation, and the actual IO execution is performed by the OS kernel.
When an application initiates an I/O call, there are two steps:
- The kernel waits for the IO device to be ready with data
- The kernel copies the data from the kernel space to the user space.
What are the common IO models?
In UNIX systems, there are five IO models: synchronous blocking I/O, synchronous non-blocking I/O, I/O multiplexing, signal-driven I/O, and asynchronous I/O.
These are the five IO models we often refer to.
Three Common IO Models in Java
BIO (Blocking I/O)
BIO belongs to the synchronous blocking IO model.
In the synchronous blocking IO model, once the application issues a read call, it will block until the kernel copies the data into the user space.
[Image: 20240205214516.png]
When the number of client connections is not large, this is fine. But when faced with hundreds of thousands or millions of connections, the traditional BIO model falls short. Therefore, we need a more efficient I/O processing model to handle higher concurrency.
NIO (Non-blocking / New I/O)
Java NIO was introduced in Java 1.4 within the java.nio package, providing abstractions such as Channel, Selector, Buffer, and other constructs. The N in NIO can be understood as Non-blocking, not merely New. It is geared toward buffer-oriented, channel-based I/O operations. For high-load, high-concurrency (network) applications, use NIO.
Java’s NIO can be seen as an I/O multiplexing model. Some people also consider Java’s NIO to be a form of synchronous non-blocking IO.
First, look at the synchronous non-blocking IO model.
[Image: 20240205214524.png]
In the synchronous non-blocking IO model, the application continuously issues a read call, and during the time the data is being copied from kernel space to user space, the thread remains blocked until the data is copied to user space.
Compared with the synchronous blocking IO model, the synchronous non-blocking IO model is indeed an improvement. Through polling, it avoids constant blocking.
However, this IO model also has a problem: the application repeatedly makes I/O system calls to poll whether data is ready, which is highly CPU-intensive.
At this point, the IO multiplexing model comes into play.
[Image: 20240205214533.png]
In the IO multiplexing model, a thread first issues a select call to ask the kernel whether data is ready; once the kernel has prepared the data, the user thread issues a read call. The read operation (data from kernel space to user space) is still blocking.
Currently available IO multiplexing system calls include select, epoll, etc. The select call is supported by almost all operating systems. The epoll call is an enhanced version of select in Linux 2.6, optimized for IO execution efficiency.
The IO multiplexing model reduces CPU resource consumption by reducing unnecessary system calls.
In Java, NIO has a very important concept: the Selector, also known as the multiplexer. With it, you can manage multiple client connections with a single thread. When client data arrives, you then service it.
[Image: 20240205214546.png]
AIO (Asynchronous I/O)
AIO is also NIO.2. Introduced in Java 7, it is an improved version of NIO and represents an asynchronous IO model.
Asynchronous IO is implemented based on events and callbacks. After issuing an operation, the application returns immediately, and the operation does not block; when the background processing completes, the OS notifies the corresponding thread to continue.
[Image: 20240205214556.png]
As of now, AIO is not widely used. Netty has experimented with AIO before but abandoned it, because Netty’s performance on Linux did not improve much after adopting AIO.
Finally, a diagram summarizing BIO, NIO, and AIO in Java.
[Image: 20240205214605.png]
Java IO基礎知識
IOストリームの概要
IO はすなわち Input/Output。データがコンピュータのメモリへ入力される過程を入力、逆に外部ストレージへ出力される過程を出力と呼ぶ。データ転送の過程は水の流れに似ているため IO ストリームと呼ばれる。Java の IO ストリームは入力ストリームと出力ストリームに分かれ、データの処理方法に応じてバイトストリームとキャラクタストリームに分かれる。
Java IO ストリームの40以上のクラスは、以下の4つの抽象クラスの基底クラスから派生している。
InputStream/Reader: すべての入力ストリームの基底クラス。前者はバイト入力ストリーム、後者は文字入力ストリーム。OutputStream/Writer: すべての出力ストリームの基底クラス。前者はバイト出力ストリーム、後者は文字出力ストリーム。
バイトストリーム
InputStream(バイト入力ストリーム)
InputStream は源泉(通常はファイル)からデータ(バイト情報)をメモリへ読み込むために用いられ、java.io.InputStream 抽象クラスはすべてのバイト入力ストリームの親クラス。
InputStream 常用メソッド:
read():入力ストリームの次のバイトのデータを返す。返される値は 0 から 255 の範囲。もし読み取れるバイトがない場合、コードは1を返し、ファイル終端を示す。read(byte b[]): 入力ストリームからいくつかのバイトを読み取り、配列bに格納する。配列bの長さがゼロの場合は読み取らない。利用可能なバイトが読み取れない場合は1を返す。読み取れるバイト数は最大でb.length。このメソッドはread(b, 0, b.length)と同等。read(byte b[], int off, int len):read(byte b[])メソッドを基にoff(オフセット)とlen(読み取る最大バイト数)を追加。skip(long n):入力ストリーム内の n バイトをスキップし、実際にスキップしたバイト数を返す。available():入力ストリーム内で読み取れるバイト数を返す。close():入力ストリームを閉じ、関連するシステムリソースを解放。
Java 9 以降、InputStream には新たな実用メソッドが追加された。
readAllBytes():入力ストリームの全バイトを読み取り、バイト配列を返す。readNBytes(byte[] b, int off, int len):ブロックしてlenバイトを読み取る。transferTo(OutputStream out):すべてのバイトを別の出力ストリームへ転送する。
FileInputStream は比較的よく使われるバイト入力ストリームで、ファイルパスを直接指定でき、単一バイトの読み取りも、バイト配列への読み込みも可能。
FileInputStream のコード例:
try (InputStream fis = new FileInputStream("input.txt")) { System.out.println("Number of remaining bytes:" + fis.available()); int content; long skip = fis.skip(2); System.out.println("The actual number of bytes skipped:" + skip); System.out.print("The content read from file:"); while ((content = fis.read()) != -1) { System.out.print((char) content); }} catch (IOException e) { e.printStackTrace();}ただし、一般的には直接 FileInputStream を単体で使うことはなく、通常は BufferedInputStream(バイトバッファ付き入力ストリーム)と組み合わせて使用する。
下記のようなコードは私たちのプロジェクトでよく見られます。readAllBytes() を通じて入力ストリームの全バイトを読み取り、直接 String オブジェクトへ代入する例。
// 新規 BufferedInputStream オブジェクトを作成BufferedInputStream bufferedInputStream = new BufferedInputStream(new FileInputStream("input.txt"));// ファイルの内容を読み取り、String オブジェクトへコピーString result = new String(bufferedInputStream.readAllBytes());System.out.println(result);DataInputStream は指定した型のデータを読み取るために使用され、単独では使用せず、他のストリームと組み合わせて使用する必要がある。
FileInputStream fileInputStream = new FileInputStream("input.txt");// fileInputStream をコンストラクタの引数として渡す必要ありDataInputStream dataInputStream = new DataInputStream(fileInputStream);// さまざまな型のデータを読み取るdataInputStream.readBoolean();dataInputStream.readInt();dataInputStream.readUTF();ObjectInputStream は入力ストリームから Java オブジェクトを読み取るため(デシリアライズ)、ObjectOutputStream はオブジェクトを出力ストリームへ書き込むため(シリアライズ)。
ObjectInputStream input = new ObjectInputStream(new FileInputStream("object.data"));MyClass object = (MyClass) input.readObject();input.close();また、シリアライズ・デシリアライズのクラスは Serializable を実装する必要があり、オブジェクトの属性の中でシリアライズしたくないものには transient を付ける。
OutputStream(バイト出力ストリーム)
OutputStream はデータ(バイト情報)を宛先へ書き込むために用いられ、java.io.OutputStream 抽象クラスはすべてのバイト出力ストリームの基底クラス。
OutputStream 常用メソッド:
write(int b):指定した1バイトを出力ストリームへ書き込む。write(byte[] b[]): 配列bを出力ストリームへ書き込む。write(b, 0, b.length)に相当。write(byte[] b, int off, int len):write(byte b[])を基にoff(オフセット)とlen(読み取る最大バイト数)を追加。flush():この出力ストリームをフラッシュし、バッファリングされたすべてのバイトを書き出す。close():出力ストリームを閉じ、関連するシステムリソースを解放。
FileOutputStream は最もよく使われるバイト出力ストリームで、ファイルパスを直接指定でき、単一バイトの書き込みも、指定したバイト配列の書き込みも可能。
FileOutputStream のコード例:
try (FileOutputStream output = new FileOutputStream("output.txt")) { byte[] array = "Dreaifeyyy".getBytes(); output.write(array);} catch (IOException e) { e.printStackTrace();}FileInputStream と同様、FileOutputStream は通常も BufferedOutputStream(バイトバッファ付き出力ストリーム)と組み合わせて使用する。
FileOutputStream fileOutputStream = new FileOutputStream("output.txt");BufferedOutputStream bos = new BufferedOutputStream(fileOutputStream)DataOutputStream は指定した型のデータを書き込むために用いられ、単独では使用せず、他のストリームと組み合わせて使用する必要がある。
// 出力ストリームFileOutputStream fileOutputStream = new FileOutputStream("out.txt");DataOutputStream dataOutputStream = new DataOutputStream(fileOutputStream);// 任意のデータ型を出力dataOutputStream.writeBoolean(true);dataOutputStream.writeByte(1);ObjectInputStream は入力ストリームから Java オブジェクトを読み取るため(ObjectInputStream、デシリアライズ)、ObjectOutputStream はオブジェクトを出力ストリームへ書き込むため(シリアライズ)。
ObjectOutputStream output = new ObjectOutputStream(new FileOutputStream("file.txt")Person person = new Person("dreaife", "eroger");output.writeObject(person);キャラクタストリーム
ファイルの読み書きやネットワークの送受信を問わず、情報の最小保存単位はバイトです。では、なぜ I/O ストリーム操作はバイトストリームとキャラクタストリームに分けられるのか。
個人的には2つの理由があると考えます:
- キャラクタストリームは Java 仮想マシンがバイトを文字へ変換する過程であり、これには時間がかかることがある。
- エンコーディングの種類がわからないと、文字化けが発生しやすい。
文字化けの問題は容易に再現できます。上記の FileInputStream のコード例の input.txt の内容を中国語に変更するだけで、元のコードを変更せずに読み取られた内容がすでに文字化けしていることが明らかになります。
したがって、I/O ストリームは直接文字を操作するインターフェースを提供するようになりました。音声ファイル、画像などのメディアファイルにはバイトストリームの方が適しており、文字を扱う場合はキャラクタストリームを使用するのが良いです。
キャラクタストリームはデフォルトで Unicode エンコードを採用しており、コンストラクタを通じてエンコードをカスタマイズできます。
ついでに、以前遭遇した筆記試験の問題:一般的な文字エンコードが占めるバイト数は? utf8:英字は 1 バイト、漢字は 3 バイト、Unicode:任意の文字はすべて 2 バイト、gbk:英字は 1 バイト、漢字は 2 バイト。
Reader(キャラクター入力ストリーム)
Reader は源泉(通常はファイル)からデータ(文字情報)をメモリへ読み込むために使用され、java.io.Reader 抽象クラスはすべての文字入力ストリームの親クラス。
Reader はテキストを読み取るために使われ、InputStream は原始バイトを読み取るために使われます。
Reader 常用メソッド:
read():入力ストリームから1文字を読み取る。read(char[] cbuf):入力ストリームからいくつかの文字を読み取り、文字配列cbufに格納する。等価なのはread(cbuf, 0, cbuf.length)。read(char[] cbuf, int off, int len):read(char[] cbuf)を基にoff(オフセット)とlen(読み取る最大文字数)を追加。skip(long n):入力ストリーム内の n 文字をスキップし、実際にスキップした文字数を返す。close():入力ストリームを閉じ、関連するシステムリソースを解放。
InputStreamReader はバイトストリームをキャラクタストリームへ変換する橋渡しで、そのサブクラスの FileReader はこの基盤の上でのファイル操作をカプセル化したもの。
// バイトストリームをキャラクタストリームへ変換する橋渡しpublic class InputStreamReader extends Reader {}// キャラクタファイルを読むためのクラスpublic class FileReader extends InputStreamReader {}FileReader のコード例:
try (FileReader fileReader = new FileReader("input.txt");) { int content; long skip = fileReader.skip(3); System.out.println("The actual number of bytes skipped:" + skip); System.out.print("The content read from file:"); while ((content = fileReader.read()) != -1) { System.out.print((char) content); }} catch (IOException e) { e.printStackTrace();}Writer(キャラクター出力ストリーム)
Writer はデータ(文字情報)を宛先へ書き込むために用いられ、java.io.Writer 抽象クラスはすべてのキャラクター出力ストリームの基底クラス。
Writer 常用メソッド:
write(int c):1文字を書き込む。write(char[] cbuf):文字配列cbufを書き込み、write(cbuf, 0, cbuf.length)に相当。write(char[] cbuf, int off, int len):write(char[] cbuf)を基にoffとlenを追加。write(String str):文字列を書き込み、write(str, 0, str.length())に相当。write(String str, int off, int len):write(String str)を基にoffとlenを追加。append(CharSequence csq):指定の文字列をWriterオブジェクトへ追加し、そのWriterを返す。append(char c):指定の文字を追加し、そのWriterを返す。flush():この出力ストリームをフラッシュし、すべてのバッファ出力文字を書き出す。close():出力ストリームを閉じ、関連するシステムリソースを解放。
OutputStreamWriter はキャラクタストリームをバイトストリームへ変換する橋渡しで、そのサブクラスの FileWriter はこの基盤の上でのファイルへのキャラクタ書き込みを提供する。
// キャラクタストリームをバイトストリームへ変換する橋渡しpublic class OutputStreamWriter extends Writer {}// キャラクタを書き込むためのファイル書き込みpublic class FileWriter extends OutputStreamWriter {}FileWriter のコード例:
try (Writer output = new FileWriter("output.txt")) { output.write("你好,我是dreaife");} catch (IOException e) { e.printStackTrace();}バイトバッファ付きストリーム
IO 操作は非常にコストが高いため、バッファ付きストリームはデータをバッファ領域へロードし、一度に複数バイトを読み書きすることで頻繁な IO 操作を回避し、ストリーム転送の効率を高めます。
バイトバッファ付きストリームはデコレータパターンを用いて、InputStream および OutputStream のサブクラスの機能を強化します。
なお、以下は BufferedInputStream(バイトバッファ付き入力ストリーム)を介して FileInputStream の機能を拡張する例。
// バイトストリームをバッファ付きストリームへ拡張BufferedInputStream bufferedInputStream = new BufferedInputStream(new FileInputStream("input.txt"));バッファのサイズはデフォルトで 8192 バイト。もちろん BufferedInputStream(InputStream in, int size) コンストラクタでバッファサイズを指定可能。
BufferedOutputStream(バイトバッファ付き出力ストリーム)
BufferedOutputStream はデータ(バイト情報)を宛先へ書き込む際、1バイトずつ書き込むのではなく、書き込むバイトをバッファ領域へ格納し、内部のバッファから順次書き出します。これにより IO 回数を大幅に減らし、読み書きの効率を高めます。
try (BufferedOutputStream bos = new BufferedOutputStream(new FileOutputStream("output.txt"))) { byte[] array = "dreaifeICU".getBytes(); bos.write(array);} catch (IOException e) { e.printStackTrace();}BufferedInputStream と同様、内部にもバッファがあり、そのサイズも 8192 バイトです。
キャラクタバッファストリーム
BufferedReader(キャラクターバッファ入力ストリーム)と BufferedWriter(キャラクターバッファ出力ストリーム)は、内部にバイト配列をバッファとして保持しますが、前者は主に文字情報を操作するために用いられます。
プリントストリーム
以下のコードはよく使われますね?
System.out.print("Hello!");System.out.println("Hello!");System.out は PrintStream オブジェクトを取得するためのもので、print メソッドは実際には PrintStream オブジェクトの write メソッドを呼び出します。
PrintStream はバイトプリントストリームに属し、それに対応するのが PrintWriter(キャラクタープリントストリーム)です。PrintStream は OutputStream のサブクラス、PrintWriter は Writer のサブクラス。
public class PrintStream extends FilterOutputStream implements Appendable, Closeable {}public class PrintWriter extends Writer {}ランダムアクセスストリーム
ここで解説するランダムアクセスストリームは、ファイルの任意の位置へ自由にジャンプして読み書きできる RandomAccessFile を指します。
RandomAccessFile のコンストラクタは次のとおりで、モードを指定できます。
// openAndDelete パラメータはデフォルト falseで、ファイルを開くが削除はされないpublic RandomAccessFile(File file, String mode) throws FileNotFoundException { this(file, mode, false);}// プライベートメソッドprivate RandomAccessFile(File file, String mode, boolean openAndDelete) throws FileNotFoundException{ // 省略}読み書きモードは主に次の4種類:
r:読み取り専用モード。rw: 読み書きモードrws:rwを基準として、ファイルの内容またはメタデータの変更を外部ストレージへ同期更新する。rwd:rwを基準として、ファイルの内容の変更を外部ストレージへ同期更新する。
ファイル内容はファイルに実際に保存されているデータを指し、メタデータはファイル属性(例:ファイルのサイズ、作成・変更時間など)を説明する。
RandomAccessFile には次の1つのファイルポインタがあり、次に書き込みまたは読み取りが行われるバイトの位置を表す。seek(long pos) メソッドでファイルポインタのオフセットを設定でき、ファイルの先頭から pos バイトの位置へ移動する。現在のファイルポインタの位置を知りたい場合は getFilePointer() を使う。
RandomAccessFile のコード例:
RandomAccessFile randomAccessFile = new RandomAccessFile(new File("input.txt"), "rw");System.out.println("読み取り前のオフセット:" + randomAccessFile.getFilePointer() + ",現在読み取り済みの文字" + (char) randomAccessFile.read() + ",読み取り後のオフセット:" + randomAccessFile.getFilePointer());// ポインタの現在のオフセットは6randomAccessFile.seek(6);System.out.println("読み取り前のオフセット:" + randomAccessFile.getFilePointer() + ",現在読み取った文字" + (char) randomAccessFile.read() + ",読み取り後のオフセット:" + randomAccessFile.getFilePointer());// オフセット7の位置からバイトデータを書き込むrandomAccessFile.write(new byte[]{'H', 'I', 'J', 'K'});// ポインタは現在0、先頭へ戻るrandomAccessFile.seek(0);System.out.println("読み取り前のオフセット:" + randomAccessFile.getFilePointer() + ",現在読み取った文字" + (char) randomAccessFile.read() + ",読み取り後のオフセット:" + randomAccessFile.getFilePointer());RandomAccessFile の write メソッドは、書き込み位置にすでにデータがある場合、それを上書きします。
RandomAccessFile randomAccessFile = new RandomAccessFile(new File("input.txt"), "rw");randomAccessFile.write(new byte[]{'H', 'I', 'J', 'K'});上記のプログラムを実行する前に input.txt の内容が ABCD だった場合、実行後は HIJK になります。
RandomAccessFile の代表的な用途の1つは、大容量ファイルの断点再開(Continue from where you left off)を実現することです。断点再開とは、ファイルのアップロードが途中で一時停止・失敗した場合でも、未アップロードの部分だけを再開してアップロードすることを指します。断片化してファイルを分割してアップロードすることが断点再開の基盤です。
RandomAccessFile の実装は FileDescriptor(ファイル記述子)と FileChannel(メモリマップドファイル)に依存します。
Java IO設計パターン
デコレーター・パターン
デコレーター(Decorator)パターン は、元のオブジェクトを変更することなく機能を拡張できます。
デコレーターは継承の代わりに組み合わせを使って元のクラスの機能を拡張します。継承関係が複雑な状況(IO のように多様なクラス継承関係がある場合)で特に有用です。
バイトストリームにとって、FilterInputStream(入力ストリームに対応)と FilterOutputStream(出力ストリームに対応)はデコレーターの核となり、それぞれ InputStream と OutputStream のサブクラスの機能を拡張します。
私たちがよく見る BufferedInputStream(バイトバッファ付き入力ストリーム)、DataInputStream などはすべて FilterInputStream のサブクラスであり、BufferedOutputStream(バイトバッファ付き出力ストリーム)、DataOutputStream などは FilterOutputStream のサブクラスです。
例として、BufferedInputStream(バイトバッファ付き入力ストリーム)を介して FileInputStream の機能を拡張することができます。
public BufferedInputStream(InputStream in) { this(in, DEFAULT_BUFFER_SIZE);}
public BufferedInputStream(InputStream in, int size) { super(in); if (size <= 0) { throw new IllegalArgumentException("Buffer size <= 0"); } buf = new byte[size];}このように、BufferedInputStream のコンストラクタの1つの引数は InputStream です。
BufferedInputStream のコード例:
try (BufferedInputStream bis = new BufferedInputStream(new FileInputStream("input.txt"))) { int content; long skip = bis.skip(2); while ((content = bis.read()) != -1) { System.out.print((char) content); }} catch (IOException e) { e.printStackTrace();}この時、私たちは次のことを考えるかもしれません:なぜ直接 BufferedFileInputStream(文字バッファ付きファイル入力ストリーム)を作らないのか?
BufferedFileInputStream bfis = new BufferedFileInputStream("input.txt");InputStream のサブクラスが少なければこのようにしても問題ありません。しかし、InputStream のサブクラスは非常に多く、継承関係も複雑です。各サブクラスに対して対応するバッファ付き入力ストリームを用意するのは煩雑です。
IO ストリームに関するデコレーターの例は非常に多く、必ずしも覚える必要はありません。デコレーターの核を理解していれば、どこでデコレーターが使われているか自然と分かるようになります。
適応パターン
アダプター(Adapter Pattern) は、互換性のないクラス間の協調作業を実現するパターンです。日常生活でよく使われる電源アダプターを思い浮かべてください。
アダプターパターンには、適合される対象(Adaptee)とそれを対象へ適合させる Adapter があります。アダプターはオブジェクトアダプターとクラスアダプターに分かれます。クラスアダプターは継承関係を用い、オブジェクトアダプターは組み合わせ関係を用います。
IO ストリームのキャラクタストリームとバイトストリームのインターフェースは異なるため、互いに協調して動作させることはデコレーターではなくアダプターとして実現されます。より正確には「オブジェクトアダプター」です。アダプターを介して、バイトストリームのオブジェクトをキャラクタストリームのオブジェクトへ適合させることで、バイトストリームのオブジェクトを使って直接文字データを読み書きできます。
InputStreamReader と OutputStreamWriter は2つのアダプター(Adapter)であり、同時に、バイトストリームとキャラクタストリームの間の橋渡しでもあります。InputStreamReader は StreamDecoder(ストリームデコーダ)を使ってバイトをデコードし、バイトストリームからキャラクタストリームへの変換を実現します。 OutputStreamWriter は StreamEncoder(ストリームエンコーダ)を使って文字をエンコードし、キャラクタストリームからバイトストリームへの変換を実現します。
// InputStreamReader はアダプター、FileInputStream は被適合のクラスInputStreamReader isr = new InputStreamReader(new FileInputStream(fileName), "UTF-8");// BufferedReader が InputStreamReader の機能を拡張(デコレーター方式)BufferedReader bufferedReader = new BufferedReader(isr);java.io.InputStreamReader の一部ソースコード:
public class InputStreamReader extends Reader { //デコード用オブジェクト private final StreamDecoder sd; public InputStreamReader(InputStream in) { super(in); try { // StreamDecoder オブジェクトを取得 sd = StreamDecoder.forInputStreamReader(in, this, (String)null); } catch (UnsupportedEncodingException e) { throw new Error(e); } } // StreamDecoder オブジェクトを用いて具体的な読み取りを実装 public int read() throws IOException { return sd.read(); }}java.io.OutputStreamWriter の一部ソースコード:
public class OutputStreamWriter extends Writer { // エンコード用オブジェクト private final StreamEncoder se; public OutputStreamWriter(OutputStream out) { super(out); try { // StreamEncoder オブジェクトを取得 se = StreamEncoder.forOutputStreamWriter(out, this, (String)null); } catch (UnsupportedEncodingException e) { throw new Error(e); } } // 書き込み作業を行うために StreamEncoder オブジェクトを用いる public void write(int c) throws IOException { se.write(c); }}アダプター・パターンとデコレーター・パターンの違いは何ですか?
- デコレーター・パターンは、元のクラスの機能を動的に拡張することに重心を置き、デコレーターは元のクラスと同じ抽象クラスを継承するか同じインターフェースを実装する必要があります。また、デコレーター・パターンは元のクラスに複数のデコレーターをネストして適用することをサポートします。
- アダプター・パターンは、互換性のないインタフェースを持つクラスが一緒に動作できるようにすることを重視します。アダプター内部が適合元のクラスのメソッドを呼び出すことで、呼び出す側には透明です。例えば
StreamDecoder(ストリームデコーダ)とStreamEncoder(ストリームエンコーダ)は、それぞれInputStreamとOutputStreamを基に FileChannel オブジェクトを取得し、対応するread/writeメソッドを呼び出してバイトデータを読み書きします。
// InputStreamReader はアダプター、FileInputStream は適合元のクラスInputStreamReader isr = new InputStreamReader(new FileInputStream(fileName), "UTF-8");// BufferedReader は InputStreamReader の機能を拡張するデコレーターBufferedReader bufferedReader = new BufferedReader(isr);java.io.InputStreamReader の一部ソースコード:
public class InputStreamReader extends Reader { //デコード用のオブジェクト private final StreamDecoder sd; public InputStreamReader(InputStream in) { super(in); try { // StreamDecoder オブジェクトを取得 sd = StreamDecoder.forInputStreamReader(in, this, (String)null); } catch (UnsupportedEncodingException e) { throw new Error(e); } } // デコード用オブジェクトで具体的な読み取りを実行 public int read() throws IOException { return sd.read(); }}java.io.OutputStreamWriter の一部ソースコード:
public class OutputStreamWriter extends Writer { // エンコード用オブジェクト private final StreamEncoder se; public OutputStreamWriter(OutputStream out) { super(out); try { // StreamEncoder オブジェクトを取得 se = StreamEncoder.forOutputStreamWriter(out, this, (String)null); } catch (UnsupportedEncodingException e) { throw new Error(e); } } // 書き込み作業を行う public void write(int c) throws IOException { se.write(c); }}アダプターとデコレーターの違いは何ですか。
- デコレーターは元のクラスの機能を動的に拡張することに重心を置き、デコレーター自身が元クラスと同じ抽象クラスを継承または同じインターフェースを実装します。複数のデコレーターをネスト可能です。
- アダプターは互換性のないインターフェース同士をつなぐことを目的としています。アダプターの内部は適合元のクラスの機能を呼び出しますが、それは呼び出し元には透過的です。
さらに、FutureTask クラスはアダプター・パターンを使用しており、Executors の内部クラス RunnableAdapter の実装はアダプターとして、Runnable を Callable に適合させるために用いられます。
public FutureTask(Runnable runnable, V result) { // Executors クラスの callable メソッドを呼ぶ this.callable = Executors.callable(runnable, result); this.state = NEW;}Executors における対応するメソッドとアダプター:
// 実際には Executors の内部クラス RunnableAdapter のコンストラクタが呼ばれるpublic static <T> Callable<T> callable(Runnable task, T result) { if (task == null) throw new NullPointerException(); return new RunnableAdapter<T>(task, result);}// アダプターstatic final class RunnableAdapter<T> implements Callable<T> { final Runnable task; final T result; RunnableAdapter(Runnable task, T result) { this.task = task; this.result = result; } public T call() { task.run(); return result; }}ファクトリーパターン
ファクトリーパターンはオブジェクトを作成するためのパターンで、NIO においても多く利用されます。例えば、Files クラスの newInputStream メソッドは InputStream オブジェクトを作成します(静的ファクトリ)、Paths クラスの get メソッドは Path オブジェクトを作成します(静的ファクトリ)、ZipFileSystem クラス(sun.nio パッケージのクラス、java.nio 関連の内部実装の1つ) の getPath メソッドは Path オブジェクトを作成します(シンプルファクトリ)。
InputStream is = Files.newInputStream(Paths.get(generatorLogoPath))観察者パターン
NIO のディレクトリ監視サービスは観察者パターンを使用します。
NIO のディレクトリ監視サービスは WatchService インターフェースと Watchable インターフェースに基づきます。WatchService は観察者、Watchable は被観察者です。
Watchable インターフェースは、オブジェクトを WatchService(監視サービス)へ登録し、監視イベントを結び付けるためのメソッド register を定義します。
public interface Path extends Comparable<Path>, Iterable<Path>, Watchable{}
public interface Watchable { WatchKey register(WatchService watcher, WatchEvent.Kind<?>[] events, WatchEvent.Modifier... modifiers) throws IOException;}WatchService はファイルディレクトリの変化を監視するためのサービスです。同じ WatchService オブジェクトで複数のファイルディレクトリを監視できます。
// WatchService オブジェクトを作成WatchService watchService = FileSystems.getDefault().newWatchService();
// 監視対象のディレクトリの Path を初期化Path path = Paths.get("workingDirectory");// この path を WatchService の監視対象として登録WatchKey watchKey = path.register(watchService, StandardWatchEventKinds...);Path クラスの register メソッドの第2引数 events(監視するイベント)は可変長引数であり、複数のイベントを同時に監視可能です。
WatchKey register(WatchService watcher, WatchEvent.Kind<?>... events) throws IOException;よく使われるイベントは3種類:
StandardWatchEventKinds.ENTRY_CREATE:ファイル作成。StandardWatchEventKinds.ENTRY_DELETE:ファイル削除。StandardWatchEventKinds.ENTRY_MODIFY:ファイル変更。
register メソッドは WatchKey を返し、WatchKey を通じてファイルディレクトリ内で作成・削除・変更が行われたか、作成・削除・変更されたファイルの具体的名称が何かといった情報を取得できる。
WatchKey key;while ((key = watchService.take()) != null) { for (WatchEvent<?> event : key.pollEvents()) { // WatchEvent オブジェクトのメソッドを呼んで、イベントの具体的情報を出力するなど } key.reset();}WatchService の内部は、デーモン・スレッドを使い、定期的にポーリングする方式でファイルの変更を検出します。簡略化したソースの例は以下のとおり。
class PollingWatchService extends AbstractWatchService{ // daemon thread を用意してファイルの変更をポーリング private final ScheduledExecutorService scheduledExecutor;
PollingWatchService() { scheduledExecutor = Executors .newSingleThreadScheduledExecutor(new ThreadFactory() { @Override public Thread newThread(Runnable r) { Thread t = new Thread(r); t.setDaemon(true); return t; }}); }
void enable(Set<? extends WatchEvent.Kind<?>> events, long period) { synchronized (this) { // 監視イベントを更新 this.events = events;
// 定期的なポーリングを開始 Runnable thunk = new Runnable() { public void run() { poll(); }}; this.poller = scheduledExecutor .scheduleAtFixedRate(thunk, period, period, TimeUnit.SECONDS); } }}Java IOモデル
I/O
I/O とは?
I/O(Input/Outpu)すなわち「入力/出力」。
私たちはまず、コンピュータ構造の観点から I/O を見てみましょう。
フォン・ノイマン構成に基づくと、コンピュータ構造は5つの部分に分かれます。演算装置、制御装置、記憶装置、入力装置、出力装置。
入力装置(例えばキーボード)と出力装置(例えばディスプレイ)は外部デバイスに属します。ネットワークカードやハードディスクは入力装置にも出力装置にもなることがあります。
入力装置はデータをコンピュータへ入力し、出力装置はコンピュータからのデータを受け取ります。
コンピュータ構造の観点から見ると、I/O はコンピュータシステムと外部デバイス間の通信プロセスを指します。
次に、アプリケーションの観点から I/O を解釈します。
OS の知識に基づくと:OS の安定性と安全性を確保するため、1つのプロセスのアドレス空間は**ユーザ空間(User space)とカーネル空間(Kernel space)**に分割されます。
私たちが日常に使うアプリケーションはユーザ空間で実行され、システム状態レベルのリソース操作はカーネル空間でのみ可能です。つまり、IO 操作を実行するには必ずカーネル空間の能力に依存します。
さらに、ユーザ空間のプログラムは直接カーネル空間へアクセスできません。
IO 操作を実行したいとき、権限の問題があるため、システムコールを発行して OS に手伝ってもらいます。
したがって、ユーザプロセスが IO 操作を実行する場合、システムコールを介して間接的にカーネル空間へアクセスします。
私たちは日常の開発で最も接するのは「ディスク IO(ファイルの読み書き)」と「ネットワーク IO(ネットワークの要求と応答)」です。
アプリケーションの観点から見ると、アプリケーションは OS のカーネルへ IO 呼び出し(システムコール)を発行し、カーネルが具体的な IO 操作を実行します。つまり、アプリケーションは IO 操作の呼び出しを発行するだけで、IO の実行は OS のカーネルが行います。
アプリケーションが IO 呼び出しを発行した後、2つのステップを経ます:
- カーネルが IO デバイスのデータ準備を待つ
- カーネルがデータをカーネル空間からユーザ空間へコピーする。
よくある IO モデルは?
UNIX 系のシステムには I/O モデルが5種類あります:同期ブロッキング I/O、同期ノンブロッキング I/O、I/O 多重路復用、シグナル駆動 I/O、非同期 I/O。
これらは私たちがよく耳にする5つの IO モデルです。
Java における3つの一般的な IO モデル
BIO (Blocking I/O)
BIO は同期ブロッキング IO モデルに属します。
同期ブロッキング IO モデルでは、アプリケーションが read を呼ぶと、データがユーザ空間へコピーされるまで待機します。
クライアント接続数が多くなければ問題ありません。しかし、十万~百万規模の接続を扱う場合、従来の BIO モデルは力不足です。したがって、より高効率な I/O 処理モデルが必要です。
NIO (Non-blocking/New I/O)
Java の NIO は Java 1.4 で導入され、java.nio パッケージに対応し、Channel、Selector、Buffer などの抽象を提供します。NIO は「I/O 多路復用モデル」と捉えることができます。多くの人は Java の NIO を「同期ノンブロッキング IO モデル」と見なすこともあります。
まずは「同期ノンブロッキング IO モデル」を見てみましょう。
(図の説明:同期ノンブロッキング IO モデルでは、アプリケーションは継続的に `read` を呼び出すが、データがカーネル空間からユーザ空間へコピーされる間、スレッドはブロックされる。)同期ノンブロッキング IO モデルでは、スレッドはデータが準備できているかをポーリングします。これには CPU リソースが多く消費されます。
しかし、この時点で IO 多路復用モデルが登場します。
IO 多路復用モデルでは、スレッドは最初に `select` 呼び出しを実行して、データ準備ができているかをカーネルへ問い合わせ、カーネルが準備完了となると、ユーザースレッドは `read` を呼び出します。`read` の過程は相変わらずブロックします。現在、IO 多路復用をサポートするシステムコールには select や epoll などがあります。select はほぼすべての OS でサポートされ、epoll は Linux 2.6 以降のカーネルで、IO の実行効率を向上させる拡張版です。
IO 多路復用モデルは、無効なシステムコールを減らすことで CPU リソースの消費を抑えます。
Java の NIO には「選択子(Selector)」という非常に重要な概念があり、これをマルチプレクサとも呼べます。これを用いれば、1 つのスレッドで複数のクライアント接続を管理できます。クライアントデータが到着したときだけ処理を行います。
AIO (Asynchronous I/O)
AIO とは NIO.2。Java 7 で NIO の改良版として導入された非同期 IO モデルです。
非同期 IO はイベントとコールバック機構に基づいており、アプリケーションの操作を実行した直後に戻り、バックグラウンド処理が完了すると OS が対応するスレッドに後続処理を通知します。
現在のところ AIO の適用はまだ広くありません。Netty も以前は AIO を試みましたが、Linux 系での性能向上があまり見られず、断念しました。
最後に、Java の BIO、NIO、AIO を簡単にまとめた図をどうぞ。
部分信息可能已经过时