


numpy
介绍
NumPy(Numerical Python) 是 Python 语言的一个扩展程序库,支持大量的维度数组与矩阵运算,此外也针对数组运算提供大量的数学函数库。
NumPy 是一个运行速度非常快的数学库,主要用于数组计算,包含:
- 一个强大的N维数组对象 ndarray
- 广播功能函数
- 整合 C/C++/Fortran 代码的工具
- 线性代数、傅里叶变换、随机数生成等功能
应用
NumPy 通常与 SciPy(Scientific Python)和 Matplotlib(绘图库)一起使用
这种组合广泛用于替代 MatLab,是一个强大的科学计算环境,有助于我们通过 Python 学习数据科学或者机器学习。
SciPy 是一个开源的 Python 算法库和数学工具包。
SciPy 包含的模块有最优化、线性代数、积分、插值、特殊函数、快速傅里叶变换、信号处理和图像处理、常微分方程求解和其他科学与工程中常用的计算。
Matplotlib 是 Python 编程语言及其数值数学扩展包 NumPy 的可视化操作界面。
它为利用通用的图形用户界面工具包,如 Tkinter, wxPython, Qt 或 GTK+ 向应用程序嵌入式绘图提供了应用程序接口(API)。
安装
- 安装发行版
- pip安装
pip3 install numpy scipy matplotlib
安装验证
from numpy import *eye(4)Numpy数据
Numpy Ndarray对象
NumPy 最重要的一个特点是其 N 维数组对象 ndarray,它是一系列同类型数据的集合,以 0 下标为开始进行集合中元素的索引。
ndarray 对象是用于存放同类型元素的多维数组。
ndarray 中的每个元素在内存中都有相同存储大小的区域。
ndarray 内部由以下内容组成:
- 一个指向数据(内存或内存映射文件中的一块数据)的指针。
- 数据类型或 dtype,描述在数组中的固定大小值的格子。
- 一个表示数组形状(shape)的元组,表示各维度大小的元组。
- 一个跨度元组(stride),其中的整数指的是为了前进到当前维度下一个元素需要”跨过”的字节数。
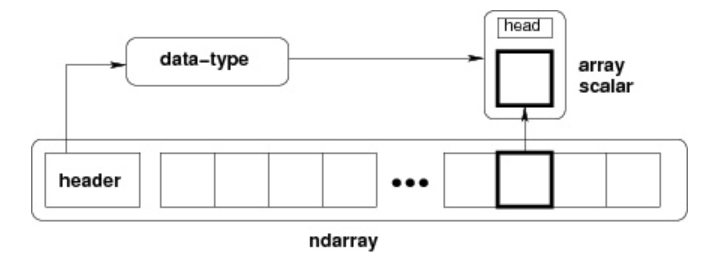
ndarray 对象由计算机内存的连续一维部分组成,并结合索引模式,将每个元素映射到内存块中的一个位置。内存块以行顺序(C样式)或列顺序(FORTRAN或MatLab风格,即前述的F样式)来保存元素。
创建Ndarray
创建一个 ndarray 只需调用 NumPy 的 array 函数即可:
numpy.array(object,dtype = None,copy = True,order = None,subok = False,ndmin = 0)
# object:数组或嵌套的数列# dtype:数组元素的数据类型,可选# copy:对象是否需要复制,可选# order:创建数组的样式,C为行方向,F为列方向,A为任意方向(默认)# subok:默认返回一个与基类类型一致的数组# ndmin:指定生成数组的最小维度实例
import numpy as npa = np.array([1,2,3])print (a)
a = np.array([[1, 2], [3, 4]])print (a)
# 最小维度a = np.array([1, 2, 3, 4, 5], ndmin = 2)print (a)
# dtype 参数a = np.array([1, 2, 3], dtype = complex)print (a)数据类型
numpy 支持的数据类型比 Python 内置的类型要多很多,基本上可以和 C 语言的数据类型对应上,其中部分类型对应为 Python 内置的类型。
bool,int,intc,intp,int8,int16,int32,int64,uint8,uint16,uint32,uint64,float,float16,float32,float64,complex_,complex128,complex64,complex128
数据类型对象(numpy.dtype 类的实例)用来描述与数组对应的内存区域是如何使用,它描述了数据的以下几个方面::
- 数据的类型(整数,浮点数或者 Python 对象)
- 数据的大小(例如, 整数使用多少个字节存储)
- 数据的字节顺序(小端法或大端法)
- 在结构化类型的情况下,字段的名称、每个字段的数据类型和每个字段所取的内存块的部分
- 如果数据类型是子数组,那么它的形状和数据类型是什么。
字节顺序是通过对数据类型预先设定 < 或 > 来决定的。 < 意味着小端法(最小值存储在最小的地址,即低位组放在最前面)。> 意味着大端法(最重要的字节存储在最小的地址,即高位组放在最前面)。
dtype 对象是使用以下语法构造的:
numpy.dtype(object, align, copy)
# object - 要转换为的数据类型对象# align - 如果为 true,填充字段使其类似 C 的结构体。# copy - 复制 dtype 对象 ,如果为 false,则是对内置数据类型对象的引用使用:
import numpy as np# 使用标量类型dt = np.dtype(np.int32)print(dt)
# 首先创建结构化数据类型dt = np.dtype([('age',np.int8)])# 将数据类型应用于 ndarray 对象a = np.array([(10,),(20,),(30,)], dtype = dt)print(a)每个内建类型都有一个唯一定义它的字符代码,如下:
| 字符 | 对应类型 |
|---|---|
| b | 布尔型 |
| i | (有符号) 整型 |
| u | 无符号整型 integer |
| f | 浮点型 |
| c | 复数浮点型 |
| m | timedelta(时间间隔) |
| M | datetime(日期时间) |
| O | (Python) 对象 |
| S, a | (byte-)字符串 |
| U | Unicode |
| V | 原始数据 (void) |
Numpy数组
Numpy数组属性
NumPy 数组的维数称为秩(rank),秩就是轴的数量,即数组的维度,一维数组的秩为 1,二维数组的秩为 2,以此类推。
在 NumPy中,每一个线性的数组称为是一个轴(axis),也就是维度(dimensions)。比如说,二维数组相当于是两个一维数组,其中第一个一维数组中每个元素又是一个一维数组。
所以一维数组就是 NumPy 中的轴(axis),第一个轴相当于是底层数组,第二个轴是底层数组里的数组。而轴的数量——秩,就是数组的维数。
很多时候可以声明 axis。axis=0,表示沿着第 0 轴进行操作,即对每一列进行操作;axis=1,表示沿着第1轴进行操作,即对每一行进行操作。
NumPy 的数组中比较重要 ndarray 对象属性有:
-
ndarray.ndim 秩,即轴的数量或维度的数量
import numpy as npa = np.arange(24)print (a.ndim) # a 现只有一个维度# 现在调整其大小b = a.reshape(2,4,3) # b 现在拥有三个维度print (b.ndim) -
ndarray.shape 数组的维度,对于矩阵,n 行 m 列
ndarray.shape 也可以用于调整数组大小。
NumPy 也提供了 reshape 函数来调整数组大小。
import numpy as npa = np.array([[1,2,3],[4,5,6]])print (a.shape)a.shape = (3,2)print (a)a = np.array([[1,2,3],[4,5,6]])b = a.reshape(3,2)print (b) -
ndarray.size 数组元素的总个数,相当于 .shape 中 n*m 的值
-
ndarray.dtype ndarray 对象的元素类型
-
ndarray.itemsize ndarray 对象中每个元素的大小,以字节为单位
import numpy as np# 数组的 dtype 为 int8(一个字节)x = np.array([1,2,3,4,5], dtype = np.int8)print (x.itemsize)# 数组的 dtype 现在为 float64(八个字节)y = np.array([1,2,3,4,5], dtype = np.float64)print (y.itemsize) -
ndarray.flags ndarray 对象的内存信息
属性 描述 C_CONTIGUOUS (C) 数据是在一个单一的C风格的连续段中 F_CONTIGUOUS (F) 数据是在一个单一的Fortran风格的连续段中 OWNDATA (O) 数组拥有它所使用的内存或从另一个对象中借用它 WRITEABLE (W) 数据区域可以被写入,将该值设置为 False,则数据为只读 ALIGNED (A) 数据和所有元素都适当地对齐到硬件上 UPDATEIFCOPY (U) 这个数组是其它数组的一个副本,当这个数组被释放时,原数组的内容将被更新 import numpy as npx = np.array([1,2,3,4,5])print (x.flags) -
ndarray.real ndarray元素的实部
-
ndarray.imag ndarray 元素的虚部
-
ndarray.data 包含实际数组元素的缓冲区,由于一般通过数组的索引获取元素,所以通常不需要使用这个属性
创建Numpy数组
ndarray 数组除了可以使用底层 ndarray 构造器来创建外,也可以通过以下几种方式来创建。
-
numpy.empty
numpy.empty 方法用来创建一个指定形状(shape)、数据类型(dtype)且未初始化的数组:
numpy.empty(shape, dtype = float, order = 'C')# shape 数组形状# dtype 数据类型,可选# order 有"C"和"F"两个选项,分别代表,行优先和列优先,在计算机内存中的存储元素的顺序。使用:
import numpy as npx = np.empty([3,2], dtype = int)print (x) -
numpy.zeros
创建指定大小的数组,数组元素以 0 来填充:
numpy.zeros(shape, dtype = float, order = 'C')# shape 数组形状# dtype 数据类型,可选# order 'C' 用于 C 的行数组,或者 'F' 用于 FORTRAN 的列数组使用:
import numpy as np# 默认为浮点数x = np.zeros(5)print(x)# 设置类型为整数y = np.zeros((5,), dtype = int)print(y)# 自定义类型z = np.zeros((2,2), dtype = [('x', 'i4'), ('y', 'i4')])print(z) -
numpy.ones
创建指定形状的数组,数组元素以 1 来填充:
numpy.ones(shape, dtype = float, order = 'C')# shape 数组形状# dtype 数据类型,可选# order 'C' 用于 C 的行数组,或者 'F' 用于 FORTRAN 的列数组使用:
import numpy as np# 默认为浮点数x = np.ones(5)print(x)# 自定义类型x = np.ones([2,2], dtype = int)print(x) -
numpy.zeros_like/ones_like
numpy.zeros_like 用于创建一个与给定数组具有相同形状的数组,数组元素以 0 来填充。
numpy.zeros 和 numpy.zeros_like 都是用于创建一个指定形状的数组,其中所有元素都是 0。
它们之间的区别在于:numpy.zeros 可以直接指定要创建的数组的形状,而 numpy.zeros_like 则是创建一个与给定数组具有相同形状的数组。
numpy.zeros_like(a, dtype=None, order='K', subok=True, shape=None)# a 给定要创建相同形状的数组# dtype 创建的数组的数据类型# order 数组在内存中的存储顺序,可选值为 'C'(按行优先)或 'F'(按列优先),默认为 'K'(保留输入数组的存储顺序)# subok 是否允许返回子类,如果为 True,则返回一个子类对象,否则返回一个与 a 数组具有相同数据类型和存储顺序的数组# shape 创建的数组的形状,如果不指定,则默认为 a 数组的形状。使用:
import numpy as np# 创建一个 3x3 的二维数组arr = np.array([[1, 2, 3], [4, 5, 6], [7, 8, 9]])# 创建一个与 arr 形状相同的,所有元素都为 0 的数组zeros_arr = np.zeros_like(arr)print(zeros_arr)
从已有数组创建
-
numpy.asarray
numpy.asarray 类似 numpy.array,但 numpy.asarray 参数只有三个,比 numpy.array 少两个。
numpy.asarray(a, dtype = None, order = None)# 参数说明:# 参数 描述# a 任意形式的输入参数,可以是,列表, 列表的元组, 元组, 元组的元组, 元组的列表,多维数组# dtype 数据类型,可选# order 可选,有"C"和"F"两个选项,分别代表,行优先和列优先,在计算机内存中的存储元素的顺序。# 使用:import numpy as np# 列表x = [1,2,3]a = np.asarray(x)print (a)# 元组x = (1,2,3)a = np.asarray(x)print (a)# 元组列表x = [(1,2,3),(4,5)]a = np.asarray(x)print (a)x = [1,2,3]a = np.asarray(x, dtype = float)print (a) -
numpy.frombuffer
numpy.frombuffer 用于实现动态数组。
numpy.frombuffer 接受 buffer 输入参数,以流的形式读入转化成 ndarray 对象。
注意:buffer 是字符串的时候,Python3 默认 str 是 Unicode 类型,所以要转成 bytestring 在原 str 前加上 b。
numpy.frombuffer(buffer, dtype = float, count = -1, offset = 0)# 参数说明:# 参数 描述# buffer 可以是任意对象,会以流的形式读入。# dtype 返回数组的数据类型,可选# count 读取的数据数量,默认为-1,读取所有数据。# offset 读取的起始位置,默认为0。# 使用:import numpy as nps = b'Hello World'a = np.frombuffer(s, dtype = 'S1')print (a) -
numpy.fromiter
numpy.fromiter 方法从可迭代对象中建立 ndarray 对象,返回一维数组。
numpy.fromiter(iterable, dtype, count=-1)# 参数说明:# iterable 可迭代对象# dtype 返回数组的数据类型# count 读取的数据数量,默认为-1,读取所有数据# 使用:import numpy as np# 使用 range 函数创建列表对象list=range(5)it=iter(list)# 使用迭代器创建 ndarrayx=np.fromiter(it, dtype=float)print(x)
从数值范围创建
-
numpy.arange
numpy 包中的使用 arange 函数创建数值范围并返回 ndarray 对象,函数格式如下:
根据 start 与 stop 指定的范围以及 step 设定的步长,生成一个 ndarray。
numpy.arange(start, stop, step, dtype)# 参数说明:# start 起始值,默认为0# stop 终止值(不包含)# step 步长,默认为1# dtype 返回ndarray的数据类型,如果没有提供,则会使用输入数据的类型。# 使用:import numpy as npx = np.arange(5)print (x)# 设置了 dtypex = np.arange(5, dtype = float)print (x)# 设置了起始值、终止值及步长:x = np.arange(10,20,2)print (x) -
numpy.linspace
numpy.linspace 函数用于创建一个一维数组,数组是一个等差数列构成的,格式如下:
np.linspace(start, stop, num=50, endpoint=True, retstep=False, dtype=None)# 参数说明:# start 序列的起始值# stop 序列的终止值,如果endpoint为true,该值包含于数列中# num 要生成的等步长的样本数量,默认为50# endpoint 该值为 true 时,数列中包含stop值,反之不包含,默认是True。# retstep 如果为 True 时,生成的数组中会显示间距,反之不显示。# dtype ndarray 的数据类型# 使用:import numpy as npa = np.linspace(1,10,10)print(a)a = np.linspace(1,1,10)print(a)a = np.linspace(10, 20, 5, endpoint = False)print(a)a =np.linspace(1,10,10,retstep= True)print(a)b =np.linspace(1,10,10).reshape([10,1])print(b) -
numpy.logspace
numpy.logspace 函数用于创建一个于等比数列。格式如下:
np.logspace(start, stop, num=50, endpoint=True, base=10.0, dtype=None)# 参数说明:# start 序列的起始值为:base ** start# stop 序列的终止值为:base ** stop。如果endpoint为true,该值包含于数列中# num 要生成的等步长的样本数量,默认为50# endpoint 该值为 true 时,数列中包含stop值,反之不包含,默认是True。# base 对数 log 的底数。# dtype ndarray 的数据类型# 使用:import numpy as np# 默认底数是 10a = np.logspace(1.0, 2.0, num = 10)print (a)a = np.logspace(0,9,10,base=2)print (a)
数组的切片和索引
切片和索引
ndarray对象的内容可以通过索引或切片来访问和修改,与 Python 中 list 的切片操作一样。
ndarray 数组可以基于 0 - n 的下标进行索引,切片对象可以通过内置的 slice 函数,并设置 start, stop 及 step 参数进行,从原数组中切割出一个新数组。
冒号 : 的解释:如果只放置一个参数,如 [2],将返回与该索引相对应的单个元素。
如果为 [2:],表示从该索引开始以后的所有项都将被提取。如果使用了两个参数,如 [2:7],那么则提取两个索引(不包括停止索引)之间的项。切片还可以包括省略号 …,来使选择元组的长度与数组的维度相同。 如果在行位置使用省略号,它将返回包含行中元素的 ndarray。
import numpy as np
a = np.arange(10)s = slice(2,7,2) # 从索引 2 开始到索引 7 停止,间隔为2print (a[s])
# 也可以通过冒号分隔切片参数 start:stop:step 来进行切片操作a = np.arange(10)b = a[2:7:2] # 从索引 2 开始到索引 7 停止,间隔为 2print(b)
a = np.arange(10) # [0 1 2 3 4 5 6 7 8 9]b = a[5]print(b)
print(a[2:])
print(a[2:5])
# 多维a = np.array([[1,2,3],[3,4,5],[4,5,6]])print(a)# 从某个索引处开始切割print('从数组索引 a[1:] 处开始切割')print(a[1:])
# 省略号a = np.array([[1,2,3],[3,4,5],[4,5,6]])print (a[...,1]) # 第2列元素print (a[1,...]) # 第2行元素print (a[...,1:]) # 第2列及剩下的所有元素高级索引
NumPy 比一般的 Python 序列提供更多的索引方式。
除了之前看到的用整数和切片的索引外,数组可以由整数数组索引、布尔索引及花式索引。
NumPy 中的高级索引指的是使用整数数组、布尔数组或者其他序列来访问数组的元素。相比于基本索引,高级索引可以访问到数组中的任意元素,并且可以用来对数组进行复杂的操作和修改。
整数数组索引
整数数组索引是指使用一个数组来访问另一个数组的元素。这个数组中的每个元素都是目标数组中某个维度上的索引值。
import numpy as np
# 获取数组中 (0,0),(1,1) 和 (2,0) 位置处的元素x = np.array([[1, 2], [3, 4], [5, 6]])y = x[[0,1,2], [0,1,0]]print (y)
# 获取了 4X3 数组中的四个角的元素。 行索引是 [0,0] 和 [3,3],而列索引是 [0,2] 和 [0,2]x = np.array([[ 0, 1, 2],[ 3, 4, 5],[ 6, 7, 8],[ 9, 10, 11]])print ('我们的数组是:' )print (x)print ('\\n')rows = np.array([[0,0],[3,3]])cols = np.array([[0,2],[0,2]])y = x[rows,cols]print ('这个数组的四个角元素是:')print (y)
# 可以借助切片 : 或 … 与索引数组组合a = np.array([[1,2,3], [4,5,6],[7,8,9]])b = a[1:3, 1:3]c = a[1:3,[1,2]]d = a[...,1:]print(b)print(c)print(d)布尔索引
我们可以通过一个布尔数组来索引目标数组。
布尔索引通过布尔运算(如:比较运算符)来获取符合指定条件的元素的数组。
import numpy as np
x = np.array([[ 0, 1, 2],[ 3, 4, 5],[ 6, 7, 8],[ 9, 10, 11]])print ('我们的数组是:')print (x)print ('\\n')# 现在我们会打印出大于 5 的元素print ('大于 5 的元素是:')print (x[x > 5])
a = np.array([np.nan, 1,2,np.nan,3,4,5])print (a[~np.isnan(a)])
a = np.array([1, 2+6j, 5, 3.5+5j])print (a[np.iscomplex(a)])花式索引
花式索引指的是利用整数数组进行索引。
花式索引根据索引数组的值作为目标数组的某个轴的下标来取值。
对于使用一维整型数组作为索引,如果目标是一维数组,那么索引的结果就是对应位置的元素,如果目标是二维数组,那么就是对应下标的行。
花式索引跟切片不一样,它总是将数据复制到新数组中。
-
一维数组
一维数组只有一个轴 axis = 0,所以一维数组就在 axis = 0 这个轴上取值:
import numpy as npx = np.arange(9,0,-1)print(x)print(x[[0,2]]) -
二维数组
一维数组只有一个轴 axis = 0,所以一维数组就在 axis = 0 这个轴上取值:
import numpy as npx=np.arange(32).reshape((8,4))print(x)# 二维数组读取指定下标对应的行print("-------读取下标对应的行-------")print (x[[4,2,1,7]])px=np.arange(32).reshape((8,4))print (x[[-4,-2,-1,-7]]) -
传入多个索引数组
np.ix_ 函数就是输入两个数组,产生笛卡尔积的映射关系。
import numpy as npx=np.arange(32).reshape((8,4))print (x[np.ix_([1,5,7,2],[0,3,1,2])])
广播 broadcast
广播(Broadcast)是 numpy 对不同形状(shape)的数组进行数值计算的方式, 对数组的算术运算通常在相应的元素上进行。
如果两个数组 a 和 b 形状相同,即满足 a.shape == b.shape,那么 a*b 的结果就是 a 与 b 数组对应位相乘。这要求维数相同,且各维度的长度相同。
当运算中的 2 个数组的形状不同时,numpy 将自动触发广播机制。4x3 的二维数组与长为 3 的一维数组相加,等效于把数组 b 在二维上重复 4 次再运算:
import numpy as np
a = np.array([[ 0, 0, 0], [10,10,10], [20,20,20], [30,30,30]])b = np.array([0,1,2])print(a + b)
bb = np.tile(b, (4, 1)) # 重复 b 的各个维度print(a + bb)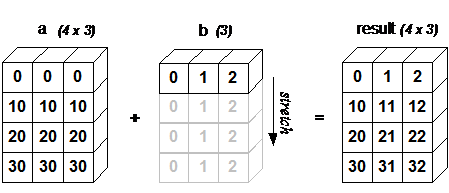
广播的规则:
- 让所有输入数组都向其中形状最长的数组看齐,形状中不足的部分都通过在前面加 1 补齐。
- 输出数组的形状是输入数组形状的各个维度上的最大值。
- 如果输入数组的某个维度和输出数组的对应维度的长度相同或者其长度为 1 时,这个数组能够用来计算,否则出错。
- 当输入数组的某个维度的长度为 1 时,沿着此维度运算时都用此维度上的第一组值。
若条件不满足,抛出 “ValueError: frames are not aligned” 异常。
数组操作
迭代数组
NumPy 迭代器对象 numpy.nditer 提供了一种灵活访问一个或者多个数组元素的方式。
迭代器最基本的任务的可以完成对数组元素的访问。
import numpy as np
a = np.arange(6).reshape(2,3)print ('原始数组是:')print (a,'\\n')print ('迭代输出元素:')for x in np.nditer(a): print (x, end=", " )print ('\\n')
for x in np.nditer(a.T): print (x, end=", " )print ('\\n')
for x in np.nditer(a.T.copy(order='C')): print (x, end=", " )print ('\\n')从上述例子可以看出,a 和 a.T 的遍历顺序是一样的,也就是他们在内存中的存储顺序也是一样的,但是 a.T.copy(order = ‘C’) 的遍历结果是不同的,那是因为它和前两种的存储方式是不一样的。nditer默认是按K顺序,即尽可能接近数组元素在内存中的显示数据。
控制遍历顺序
- for x in np.nditer(a, order=‘F’)
order,即是列序优先; - for x in np.nditer(a.T, order=‘C’)
order,即是行序优先;
import numpy as np
a = np.arange(0,60,5)a = a.reshape(3,4)print ('原始数组是:')print (a)print ('\\n')print ('原始数组的转置是:')b = a.Tprint (b)print ('\\n')print ('以 C 风格顺序排序:')c = b.copy(order='C')print (c)for x in np.nditer(c): print (x, end=", " )print ('\\n')print ('以 F 风格顺序排序:')c = b.copy(order='F')print (c)for x in np.nditer(c): print (x, end=", " )print ('\\n')# 可以通过显式设置,来强制 nditer 对象使用某种顺序:print ('以 C 风格顺序排序:')for x in np.nditer(a, order = 'C'): print (x, end=", " )print ('\\n')print ('以 F 风格顺序排序:')for x in np.nditer(a, order = 'F'): print (x, end=", " )修改数组元素
nditer对象有另一个可选参数op_flags。默认情况下,nditer将视待迭代遍历的数组为只读对象(read-only),为了在遍历数组的同时,实现对数组元素值的修改,必须指定readwrite或者writeonly的模式。
import numpy as np
a = np.arange(0,60,5)a = a.reshape(3,4)print ('原始数组是:')print (a)print ('\\n')for x in np.nditer(a, op_flags=['readwrite']): x[...]=2*xprint ('修改后的数组是:')print (a)使用外部循环
nditer 类的构造器拥有 flags 参数,它可以接受下列值:
| 参数 | 描述 |
|---|---|
| c_index | 可以跟踪 C 顺序的索引 |
| f_index | 可以跟踪 Fortran 顺序的索引 |
| multi_index | 每次迭代可以跟踪一种索引类型 |
| external_loop | 给出的值是具有多个值的一维数组,而不是零维数组 |
import numpy as npa = np.arange(0,60,5)a = a.reshape(3,4)print ('原始数组是:')print (a)print ('\\n')print ('修改后的数组是:')for x in np.nditer(a, flags = ['external_loop'], order = 'F'): print (x, end=", " )广播迭代
如果两个数组是可广播的,nditer组合对象能够同时迭代它们。假设数组a的维度为3X4,数组b的维度为1X4,则使用以下迭代器(数组b被广播到a的大小)。
import numpy as np
a = np.arange(0,60,5)a = a.reshape(3,4)print ('第一个数组为:')print (a)print ('\\n')print ('第二个数组为:')b = np.array([1, 2, 3, 4], dtype = int)print (b)print ('\\n')print ('修改后的数组为:')for x,y in np.nditer([a,b]): print ("%d:%d" % (x,y), end=", " )数组操作
改变数组形状
| 函数 | 描述 | 函数 |
|---|---|---|
| reshape | 不改变数据的条件下修改形状 | numpy.reshape(arr, newshape, order=['C'|'F'|'A'|'k']) |
| flat | 数组元素迭代器 | 数组元素迭代器(for e in a.flat:) |
| flatten | 返回一份数组拷贝,对拷贝所做的修改不会影响原始数组 | ndarray.flatten(order=['C'|'F'|'A'|'k']) |
| ravel | 返回展开数组 | numpy.ravel(a, order=['C'|'F'|'A'|'k']) |
翻转数组
| 函数 | 描述 | 函数 |
|---|---|---|
| transpose | 对换数组的维度 | numpy.transpose(arr, axes) |
| ndarray.T | 和 self.transpose() 相同 | 类似 numpy.transpose |
| rollaxis | 向后滚动指定的轴 | numpy.rollaxis(arr, axis, start) |
| swapaxes | 对换数组的两个轴 | numpy.swapaxes(arr, axis1, axis2) |
修改数组维度
| 函数 | 描述 | 函数 |
|---|---|---|
| broadcast | 产生模仿广播的对象 | 该函数使用两个数组作为输入参数 |
| broadcast_to | 将数组广播到新形状 | numpy.broadcast_to(array, shape, subok) |
| expand_dims | 扩展数组的形状 | numpy.expand_dims(arr, axis) |
| squeeze | 从数组的形状中删除一维条目 | numpy.squeeze(arr, axis) |
连接数组
| 函数 | 描述 | 函数 |
|---|---|---|
| concatenate | 连接沿现有轴的数组序列 | numpy.concatenate((a1, a2, ...), axis) |
| stack | 沿着新的轴加入一系列数组。 | numpy.stack(arrays, axis) |
| hstack | 水平堆叠序列中的数组(列方向) | numpy.hstack(arrays) |
| vstack | 竖直堆叠序列中的数组(行方向) | numpy.vstack(arrays |
分割数组
| 函数 | 描述 | 函数 |
|---|---|---|
| split | 将一个数组分割为多个子数组,左闭右开 | numpy.split(ary, indices_or_sections, axis) |
| hsplit | 将一个数组水平分割为多个子数组(按列) | numpy.hsplit(ary, indices_or_sections) |
| vsplit | 将一个数组垂直分割为多个子数组(按行) | numpy.vsplit(ary, indices_or_sections) |
数组元素的添加与删除
| 函数 | 描述 | 函数 |
|---|---|---|
| resize | 返回指定形状的新数组 | numpy.resize(arr, shape) |
| append | 将值添加到数组末尾 | numpy.append(arr, values, axis=None) |
| insert | 沿指定轴将值插入到指定下标之前 | numpy.insert(arr, obj, values, axis) |
| delete | 删掉某个轴的子数组,并返回删除后的新数组 | Numpy.delete(arr, obj, axis) |
| unique | 查找数组内的唯一元素 | numpy.unique(arr, return_index, return_inverse, return_counts) |
numpy
Introduction
NumPy(Numerical Python) is an extension library for the Python language that supports extensive multi-dimensional array and matrix operations, and also provides a large collection of mathematical functions for array operations.
NumPy is a fast mathematical library, primarily used for array computations, and includes:
- A powerful N-dimensional array object ndarray
- Broadcasting function facilities
- Tools for integrating C/C++/Fortran code
- Functions for linear algebra, Fourier transforms, random number generation, and more
Applications
NumPy is typically used together with SciPy (Scientific Python) and Matplotlib (the plotting library)
This combination is widely used as a replacement for MATLAB and provides a powerful scientific computing environment, helping us learn data science or machine learning through Python.
SciPy is an open-source Python algorithms library and mathematical toolkit.
SciPy includes modules for optimization, linear algebra, integration, interpolation, special functions, fast Fourier transforms, signal processing and image processing, solving ordinary differential equations, and other computations commonly used in science and engineering.
Matplotlib is the visualization interface for Python programming language and its NumPy numerical extension package.
It provides an API for embedding plots into applications using common GUI toolkits such as Tkinter, wxPython, Qt, or GTK+.
Installation
- Install from a distribution package
- Install via pip:
pip3 install numpy scipy matplotlib
Installation verification
from numpy import *eye(4)NumPy Data
NumPy ndarray Object
One of NumPy’s most important features is its N-dimensional array object, ndarray. It is a collection of elements of the same type, indexed from 0.
An ndarray object is a multidimensional array used to store elements of the same type.
Each element in an ndarray occupies a memory region of the same size.
An ndarray internally consists of the following parts:
- A pointer to the data (a block in memory or in a memory-mapped file).
- A data type (
dtype) that describes the fixed-size element slots in the array. - A tuple representing the array shape, i.e., the size of each dimension.
- A stride tuple, whose integers indicate how many bytes to skip to move to the next element along each dimension.
An ndarray consists of a contiguous one-dimensional memory block plus an indexing scheme that maps each element to a position in that block. Elements are stored in row-major order (C-style) or column-major order (FORTRAN/MatLab-style, i.e. F-order).
Create ndarray
To create an ndarray, simply call NumPy’s array function:
numpy.array(object,dtype = None,copy = True,order = None,subok = False,ndmin = 0)
# object:数组或嵌套的数列# dtype:数组元素的数据类型,可选# copy:对象是否需要复制,可选# order:创建数组的样式,C为行方向,F为列方向,A为任意方向(默认)# subok:默认返回一个与基类类型一致的数组# ndmin:指定生成数组的最小维度Example
import numpy as npa = np.array([1,2,3])print (a)
a = np.array([[1, 2], [3, 4]])print (a)
# 最小维度a = np.array([1, 2, 3, 4, 5], ndmin = 2)print (a)
# dtype 参数a = np.array([1, 2, 3], dtype = complex)print (a)Data Types
NumPy supports many more data types than Python built-ins, and most of them correspond to C language data types. Some of them also map to Python built-in types.
bool,int,intc,intp,int8,int16,int32,int64,uint8,uint16,uint32,uint64,float,float16,float32,float64,complex_,complex128,complex64,complex128
A data type object (an instance of numpy.dtype) describes how the memory area corresponding to an array is used. It describes the following aspects of the data:
- The data type (integer, floating point, or Python object)
- The size of the data (for example, how many bytes an integer uses)
- The byte order of the data (little-endian or big-endian)
- For structured types, the field names, each field’s data type, and the portion of memory occupied by each field
- If the data type is a sub-array, its shape and data type
Byte order is determined by prefixing the data type with < or >. < means little-endian (least significant bytes at lower addresses), and > means big-endian (most significant bytes at lower addresses).
A dtype object is constructed using the following syntax:
numpy.dtype(object, align, copy)
# object - 要转换为的数据类型对象# align - 如果为 true,填充字段使其类似 C 的结构体。# copy - 复制 dtype 对象 ,如果为 false,则是对内置数据类型对象的引用Usage:
import numpy as np# 使用标量类型dt = np.dtype(np.int32)print(dt)
# 首先创建结构化数据类型dt = np.dtype([('age',np.int8)])# 将数据类型应用于 ndarray 对象a = np.array([(10,),(20,),(30,)], dtype = dt)print(a)Each built-in type has a unique character code, as shown below:
| Character | Corresponding Type |
|---|---|
| b | Boolean |
| i | (Signed) integer |
| u | Unsigned integer |
| f | Floating-point |
| c | Complex floating-point |
| m | timedelta (time interval) |
| M | datetime (date-time) |
| O | (Python) object |
| S, a | (byte-)string |
| U | Unicode |
| V | Raw data (void) |
NumPy Arrays
NumPy Array Attributes
The number of dimensions in a NumPy array is called its rank, which is the number of axes. A 1D array has rank 1, a 2D array has rank 2, and so on.
In NumPy, each linear array is called an axis, i.e., a dimension. For example, a 2D array can be seen as an array of 1D arrays.
So in NumPy, a one-dimensional direction is an axis. The first axis corresponds to the outer array, and the second axis corresponds to arrays inside it. The number of axes (rank) is the number of dimensions.
In many operations you can specify axis. axis=0 means operating along axis 0 (typically column-wise), while axis=1 means operating along axis 1 (typically row-wise).
Important ndarray attributes in NumPy arrays include:
-
ndarray.ndim Rank, i.e., the number of axes or dimensions
import numpy as npa = np.arange(24)print (a.ndim) # a 现只有一个维度# 现在调整其大小b = a.reshape(2,4,3) # b 现在拥有三个维度print (b.ndim) -
ndarray.shape Array dimensions; for a matrix,
nrows bymcolumnsndarray.shapecan also be used to reshape an array.NumPy also provides the
reshapefunction to resize/reshape arrays.import numpy as npa = np.array([[1,2,3],[4,5,6]])print (a.shape)a.shape = (3,2)print (a)a = np.array([[1,2,3],[4,5,6]])b = a.reshape(3,2)print (b) -
ndarray.size The total number of array elements, equivalent to
n*min.shape(for matrices) -
ndarray.dtype Element type of the
ndarrayobject -
ndarray.itemsize Size of each element in the
ndarray, in bytesimport numpy as np# 数组的 dtype 为 int8(一个字节)x = np.array([1,2,3,4,5], dtype = np.int8)print (x.itemsize)# 数组的 dtype 现在为 float64(八个字节)y = np.array([1,2,3,4,5], dtype = np.float64)print (y.itemsize) -
ndarray.flags Memory information of the
ndarrayobjectProperty Description C_CONTIGUOUS (C) Data is stored in a single C-style contiguous segment F_CONTIGUOUS (F) Data is stored in a single Fortran-style contiguous segment OWNDATA (O) The array owns the memory it uses, or borrows it from another object WRITEABLE (W) The data area is writable; if set to False, the data becomes read-onlyALIGNED (A) The data and all elements are properly aligned for hardware UPDATEIFCOPY (U) This array is a copy of another array; when released, the original array content is updated import numpy as npx = np.array([1,2,3,4,5])print (x.flags) -
ndarray.real Real part of
ndarrayelements -
ndarray.imag Imaginary part of
ndarrayelements -
ndarray.data Buffer containing the actual array elements. Since elements are usually accessed via indexing, this attribute is not often used directly.
Creating NumPy Arrays
Besides using the underlying ndarray constructor, NumPy arrays can also be created in the following ways.
-
numpy.empty
The
numpy.emptymethod creates an uninitialized array with a specified shape and data type:numpy.empty(shape, dtype = float, order = 'C')# shape 数组形状# dtype 数据类型,可选# order 有"C"和"F"两个选项,分别代表,行优先和列优先,在计算机内存中的存储元素的顺序。Usage:
import numpy as npx = np.empty([3,2], dtype = int)print (x) -
numpy.zeros
Create an array of the specified size, filled with
0s:numpy.zeros(shape, dtype = float, order = 'C')# shape 数组形状# dtype 数据类型,可选# order 'C' 用于 C 的行数组,或者 'F' 用于 FORTRAN 的列数组Usage:
import numpy as np# 默认为浮点数x = np.zeros(5)print(x)# 设置类型为整数y = np.zeros((5,), dtype = int)print(y)# 自定义类型z = np.zeros((2,2), dtype = [('x', 'i4'), ('y', 'i4')])print(z) -
numpy.ones
Create an array of the specified shape, filled with
1s:numpy.ones(shape, dtype = float, order = 'C')# shape 数组形状# dtype 数据类型,可选# order 'C' 用于 C 的行数组,或者 'F' 用于 FORTRAN 的列数组Usage:
import numpy as np# 默认为浮点数x = np.ones(5)print(x)# 自定义类型x = np.ones([2,2], dtype = int)print(x) -
numpy.zeros_like/ones_like
numpy.zeros_likecreates an array with the same shape as a given array, filled with0s.Both
numpy.zerosandnumpy.zeros_likeare used to create arrays whose elements are all0.The difference is that
numpy.zerosdirectly specifies the shape to create, whilenumpy.zeros_likecreates an array with the same shape as an existing array.numpy.zeros_like(a, dtype=None, order='K', subok=True, shape=None)# a 给定要创建相同形状的数组# dtype 创建的数组的数据类型# order 数组在内存中的存储顺序,可选值为 'C'(按行优先)或 'F'(按列优先),默认为 'K'(保留输入数组的存储顺序)# subok 是否允许返回子类,如果为 True,则返回一个子类对象,否则返回一个与 a 数组具有相同数据类型和存储顺序的数组# shape 创建的数组的形状,如果不指定,则默认为 a 数组的形状。Usage:
import numpy as np# 创建一个 3x3 的二维数组arr = np.array([[1, 2, 3], [4, 5, 6], [7, 8, 9]])# 创建一个与 arr 形状相同的,所有元素都为 0 的数组zeros_arr = np.zeros_like(arr)print(zeros_arr)
Create from Existing Arrays
-
numpy.asarray
numpy.asarrayis similar tonumpy.array, butnumpy.asarrayonly has three parameters, two fewer thannumpy.array.numpy.asarray(a, dtype = None, order = None)# 参数说明:# 参数 描述# a 任意形式的输入参数,可以是,列表, 列表的元组, 元组, 元组的元组, 元组的列表,多维数组# dtype 数据类型,可选# order 可选,有"C"和"F"两个选项,分别代表,行优先和列优先,在计算机内存中的存储元素的顺序。# 使用:import numpy as np# 列表x = [1,2,3]a = np.asarray(x)print (a)# 元组x = (1,2,3)a = np.asarray(x)print (a)# 元组列表x = [(1,2,3),(4,5)]a = np.asarray(x)print (a)x = [1,2,3]a = np.asarray(x, dtype = float)print (a) -
numpy.frombuffer
numpy.frombufferis used to create arrays from buffer-like objects.numpy.frombufferaccepts a buffer input and reads it as a stream, converting it into anndarrayobject.Note: When the buffer is a string, Python 3 uses Unicode
strby default, so convert it to a bytestring by addingbbefore the original string.numpy.frombuffer(buffer, dtype = float, count = -1, offset = 0)# 参数说明:# 参数 描述# buffer 可以是任意对象,会以流的形式读入。# dtype 返回数组的数据类型,可选# count 读取的数据数量,默认为-1,读取所有数据。# offset 读取的起始位置,默认为0。# 使用:import numpy as nps = b'Hello World'a = np.frombuffer(s, dtype = 'S1')print (a) -
numpy.fromiter
The
numpy.fromitermethod creates anndarrayobject from an iterable and returns a one-dimensional array.numpy.fromiter(iterable, dtype, count=-1)# 参数说明:# iterable 可迭代对象# dtype 返回数组的数据类型# count 读取的数据数量,默认为-1,读取所有数据# 使用:import numpy as np# 使用 range 函数创建列表对象list=range(5)it=iter(list)# 使用迭代器创建 ndarrayx=np.fromiter(it, dtype=float)print(x)
Create from Numeric Ranges
-
numpy.arange
In NumPy, the
arangefunction is used to create a numeric range and return anndarrayobject. The function format is:An
ndarrayis generated according to the range specified bystartandstopand the step size set bystep.numpy.arange(start, stop, step, dtype)# 参数说明:# start 起始值,默认为0# stop 终止值(不包含)# step 步长,默认为1# dtype 返回ndarray的数据类型,如果没有提供,则会使用输入数据的类型。# 使用:import numpy as npx = np.arange(5)print (x)# 设置了 dtypex = np.arange(5, dtype = float)print (x)# 设置了起始值、终止值及步长:x = np.arange(10,20,2)print (x) -
numpy.linspace
The
numpy.linspacefunction is used to create a one-dimensional array made of an arithmetic progression. The format is:np.linspace(start, stop, num=50, endpoint=True, retstep=False, dtype=None)# 参数说明:# start 序列的起始值# stop 序列的终止值,如果endpoint为true,该值包含于数列中# num 要生成的等步长的样本数量,默认为50# endpoint 该值为 true 时,数列中包含stop值,反之不包含,默认是True。# retstep 如果为 True 时,生成的数组中会显示间距,反之不显示。# dtype ndarray 的数据类型# 使用:import numpy as npa = np.linspace(1,10,10)print(a)a = np.linspace(1,1,10)print(a)a = np.linspace(10, 20, 5, endpoint = False)print(a)a =np.linspace(1,10,10,retstep= True)print(a)b =np.linspace(1,10,10).reshape([10,1])print(b) -
numpy.logspace
The
numpy.logspacefunction is used to create a geometric progression. The format is:np.logspace(start, stop, num=50, endpoint=True, base=10.0, dtype=None)# 参数说明:# start 序列的起始值为:base ** start# stop 序列的终止值为:base ** stop。如果endpoint为true,该值包含于数列中# num 要生成的等步长的样本数量,默认为50# endpoint 该值为 true 时,数列中包含stop值,反之不包含,默认是True。# base 对数 log 的底数。# dtype ndarray 的数据类型# 使用:import numpy as np# 默认底数是 10a = np.logspace(1.0, 2.0, num = 10)print (a)a = np.logspace(0,9,10,base=2)print (a)
Array Slicing and Indexing
Slicing and Indexing
The contents of an ndarray can be accessed and modified through indexing or slicing, similar to slicing operations on Python lists.
ndarray arrays can be indexed with positions from 0 to n. Slices can be created with Python’s built-in slice function by setting start, stop, and step, producing a new array from the original one.
Explanation of
:: if only one index is provided, such as[2], it returns the single element at that index. If it is[2:], it means all items after that index are selected. If two parameters are used, such as[2:7], it selects items between the two indices (excluding the stop index).Slices can also include an ellipsis
...to make the selection tuple length match the array dimensions. If the ellipsis is used in the row position, it returns anndarraycontaining the elements in the row.
import numpy as np
a = np.arange(10)s = slice(2,7,2) # 从索引 2 开始到索引 7 停止,间隔为2print (a[s])
# 也可以通过冒号分隔切片参数 start:stop:step 来进行切片操作a = np.arange(10)b = a[2:7:2] # 从索引 2 开始到索引 7 停止,间隔为 2print(b)
a = np.arange(10) # [0 1 2 3 4 5 6 7 8 9]b = a[5]print(b)
print(a[2:])
print(a[2:5])
# 多维a = np.array([[1,2,3],[3,4,5],[4,5,6]])print(a)# 从某个索引处开始切割print('从数组索引 a[1:] 处开始切割')print(a[1:])
# 省略号a = np.array([[1,2,3],[3,4,5],[4,5,6]])print (a[...,1]) # 第2列元素print (a[1,...]) # 第2行元素print (a[...,1:]) # 第2列及剩下的所有元素Advanced Indexing
NumPy provides more indexing methods than ordinary Python sequences.
In addition to integer and slice indexing, arrays can also be indexed with integer arrays, boolean indexing, and fancy indexing.
Advanced indexing in NumPy refers to using integer arrays, boolean arrays, or other sequences to access array elements. Compared with basic indexing, advanced indexing can access arbitrary elements and is useful for more complex operations and modifications.
Integer Array Indexing
Integer array indexing means using one array to access elements in another array. Each element in the indexing array is an index value along some dimension of the target array.
import numpy as np
# 获取数组中 (0,0),(1,1) 和 (2,0) 位置处的元素x = np.array([[1, 2], [3, 4], [5, 6]])y = x[[0,1,2], [0,1,0]]print (y)
# 获取了 4X3 数组中的四个角的元素。 行索引是 [0,0] 和 [3,3],而列索引是 [0,2] 和 [0,2]x = np.array([[ 0, 1, 2],[ 3, 4, 5],[ 6, 7, 8],[ 9, 10, 11]])print ('我们的数组是:' )print (x)print ('\\n')rows = np.array([[0,0],[3,3]])cols = np.array([[0,2],[0,2]])y = x[rows,cols]print ('这个数组的四个角元素是:')print (y)
# 可以借助切片 : 或 … 与索引数组组合a = np.array([[1,2,3], [4,5,6],[7,8,9]])b = a[1:3, 1:3]c = a[1:3,[1,2]]d = a[...,1:]print(b)print(c)print(d)Boolean Indexing
We can index a target array using a boolean array.
Boolean indexing uses boolean operations (such as comparison operators) to obtain an array of elements that satisfy specified conditions.
import numpy as np
x = np.array([[ 0, 1, 2],[ 3, 4, 5],[ 6, 7, 8],[ 9, 10, 11]])print ('我们的数组是:')print (x)print ('\\n')# 现在我们会打印出大于 5 的元素print ('大于 5 的元素是:')print (x[x > 5])
a = np.array([np.nan, 1,2,np.nan,3,4,5])print (a[~np.isnan(a)])
a = np.array([1, 2+6j, 5, 3.5+5j])print (a[np.iscomplex(a)])Fancy Indexing
Fancy indexing refers to indexing with integer arrays.
Fancy indexing retrieves values by using the values in the index array as indices along a target array axis.
When using a one-dimensional integer array as an index: if the target is a 1D array, the result is the elements at those positions; if the target is a 2D array, the result is the rows at those indices.
Unlike slicing, fancy indexing always copies data into a new array.
-
One-dimensional array
A two-dimensional array has two axes, so indexing can retrieve data along the corresponding axes:
import numpy as npx = np.arange(9,0,-1)print(x)print(x[[0,2]]) -
Two-dimensional array
A two-dimensional array has two axes, so indexing can retrieve data along the corresponding axes:
import numpy as npx=np.arange(32).reshape((8,4))print(x)# 二维数组读取指定下标对应的行print("-------读取下标对应的行-------")print (x[[4,2,1,7]])px=np.arange(32).reshape((8,4))print (x[[-4,-2,-1,-7]]) -
Pass in multiple index arrays
The
np.ix_function takes two arrays and produces index arrays representing their Cartesian-product mapping.import numpy as npx=np.arange(32).reshape((8,4))print (x[np.ix_([1,5,7,2],[0,3,1,2])])
Broadcasting
Broadcasting is NumPy’s way of performing numeric computations on arrays of different shapes. Arithmetic operations on arrays are usually performed element-wise.
If two arrays a and b have the same shape, i.e. a.shape == b.shape, then a*b multiplies corresponding elements. This requires the same number of dimensions and the same length in each dimension.
When the shapes of two arrays in an operation are different, NumPy automatically triggers broadcasting. Adding a 4x3 2D array and a length-3 1D array is equivalent to repeating array b four times along a new dimension and then performing the operation:
import numpy as np
a = np.array([[ 0, 0, 0], [10,10,10], [20,20,20], [30,30,30]])b = np.array([0,1,2])print(a + b)
bb = np.tile(b, (4, 1)) # 重复 b 的各个维度print(a + bb)
Broadcasting rules:
- Align all input arrays to the array with the most dimensions; prepend
1s to shapes with fewer dimensions. - The output shape takes the maximum size along each dimension of the input shapes.
- For each dimension, an input array can participate if its length matches the output dimension or its length is
1; otherwise an error occurs. - When an input array has length
1on a dimension, the first value along that dimension is reused during computation.
If the conditions are not satisfied, a ValueError: frames are not aligned exception is raised.
Array Operations
Iterating Arrays
The NumPy iterator object numpy.nditer provides a flexible way to access elements of one or more arrays.
The most basic task of an iterator is to access array elements.
import numpy as np
a = np.arange(6).reshape(2,3)print ('原始数组是:')print (a,'\\n')print ('迭代输出元素:')for x in np.nditer(a): print (x, end=", " )print ('\\n')
for x in np.nditer(a.T): print (x, end=", " )print ('\\n')
for x in np.nditer(a.T.copy(order='C')): print (x, end=", " )print ('\\n')From the example above, we can see that a and a.T are traversed in the same order, which means their storage order in memory is also the same. However, the traversal result of a.T.copy(order = 'C') is different because its storage layout differs from the first two. By default, nditer uses K-order, i.e., an order as close as possible to the array’s actual memory layout.
Control Traversal Order
for x in np.nditer(a, order='F'): Fortran order, i.e., column-major traversal;for x in np.nditer(a.T, order='C'): C order, i.e., row-major traversal;
import numpy as np
a = np.arange(0,60,5)a = a.reshape(3,4)print ('原始数组是:')print (a)print ('\\n')print ('原始数组的转置是:')b = a.Tprint (b)print ('\\n')print ('以 C 风格顺序排序:')c = b.copy(order='C')print (c)for x in np.nditer(c): print (x, end=", " )print ('\\n')print ('以 F 风格顺序排序:')c = b.copy(order='F')print (c)for x in np.nditer(c): print (x, end=", " )print ('\\n')# 可以通过显式设置,来强制 nditer 对象使用某种顺序:print ('以 C 风格顺序排序:')for x in np.nditer(a, order = 'C'): print (x, end=", " )print ('\\n')print ('以 F 风格顺序排序:')for x in np.nditer(a, order = 'F'): print (x, end=", " )``
### 修改数组元素
nditer对象有另一个可选参数op_flags。默认情况下,nditer将视待迭代遍历的数组为只读对象(read-only),为了在遍历数组的同时,实现对数组元素值的修改,必须指定readwrite或者writeonly的模式。
```pythonimport numpy as np
a = np.arange(0,60,5)a = a.reshape(3,4)print ('Original array:')print (a)print ('\\n')for x in np.nditer(a, op_flags=['readwrite']): x[...]=2*xprint ('Modified array:')print (a)使用外部循环
nditer 类的构造器拥有 flags 参数,它可以接受下列值:
| 参数 | 描述 |
|---|---|
| c_index | 可以跟踪 C 顺序的索引 |
| f_index | 可以跟踪 Fortran 顺序的索引 |
| multi_index | 每次迭代可以跟踪一种索引类型 |
| external_loop | 给出的值是具有多个值的一维数组,而不是零维数组 |
import numpy as npa = np.arange(0,60,5)a = a.reshape(3,4)print ('Original array:')print (a)print ('\\n')print ('Modified array:')for x in np.nditer(a, flags = ['external_loop'], order = 'F'): print (x, end=", " )广播迭代
如果两个数组是可广播的,nditer组合对象能够同时迭代它们。假设数组a的维度为3X4,数组b的维度为1X4,则使用以下迭代器(数组b被广播到a的大小)。
import numpy as np
a = np.arange(0,60,5)a = a.reshape(3,4)print ('The first array is:')print (a)print ('\\n')print ('The second array is:')b = np.array([1, 2, 3, 4], dtype = int)print (b)print ('\\n')print ('Modified array is:')for x,y in np.nditer([a,b]): print ("%d:%d" % (x,y), end=", " )数组操作
改变数组形状
| 函数 | 描述 | 函数 |
|---|---|---|
| reshape | 不改变数据的条件下修改形状 | numpy.reshape(arr, newshape, order=['C'|'F'|'A'|'k']) |
| flat | 数组元素迭代器 | 数组元素迭代器(for e in a.flat:) |
| flatten | 返回一份数组拷贝,对拷贝所做的修改不会影响原始数组 | ndarray.flatten(order=['C'|'F'|'A'|'k']) |
| ravel | 返回展开数组 | numpy.ravel(a, order=['C'|'F'|'A'|'k']) |
翻转数组
| 函数 | 描述 | 函数 |
|---|---|---|
| transpose | 对换数组的维度 | numpy.transpose(arr, axes) |
| ndarray.T | 和 self.transpose() 相同 | 类似 numpy.transpose |
| rollaxis | 向后滚动指定的轴 | numpy.rollaxis(arr, axis, start) |
| swapaxes | 对换数组的两个轴 | numpy.swapaxes(arr, axis1, axis2) |
修改数组维度
| 函数 | 描述 | 函数 |
|---|---|---|
| broadcast | 产生模仿广播的对象 | 该函数使用两个数组作为输入参数 |
| broadcast_to | 将数组广播到新形状 | numpy.broadcast_to(array, shape, subok) |
| expand_dims | 扩展数组的形状 | numpy.expand_dims(arr, axis) |
| squeeze | 从数组的形状中删除一维条目 | numpy.squeeze(arr, axis) |
连接数组
| 函数 | 描述 | 函数 |
|---|---|---|
| concatenate | 连接沿现有轴的数组序列 | numpy.concatenate((a1, a2, ...), axis) |
| stack | 沿着新的轴加入一系列数组。 | numpy.stack(arrays, axis) |
| hstack | 水平堆叠序列中的数组(列方向) | numpy.hstack(arrays) |
| vstack | 竖直堆叠序列中的数组(行方向) | numpy.vstack(arrays |
分割数组
| 函数 | 描述 | 函数 |
|---|---|---|
| split | 将一个数组分割为多个子数组,左闭右开 | numpy.split(ary, indices_or_sections, axis) |
| hsplit | 将一个数组水平分割为多个子数组(按列) | numpy.hsplit(ary, indices_or_sections) |
| vsplit | 将一个数组垂直分割为多个子数组(按行) | numpy.vsplit(ary, indices_or_sections) |
数组元素的添加与删除
| 函数 | 描述 | 函数 |
|---|---|---|
| resize | 返回指定形状的新数组 | numpy.resize(arr, shape) |
| append | 将值添加到数组末尾 | numpy.append(arr, values, axis=None) |
| insert | 沿指定轴将值插入到指定下标之前 | numpy.insert(arr, obj, values, axis) |
| delete | 删掉某个轴的子数组,并返回删除后的新数组 | Numpy.delete(arr, obj, axis) |
| unique | 查找数组内的唯一元素 | numpy.unique(arr, return_index, return_inverse, return_counts) |
numpy
はじめに
NumPy(Numerical Python) は Python 言語の拡張ライブラリで、多数の次元配列と行列演算をサポートします。さらに、配列演算のための数学関数ライブラリも多数提供します。
NumPy は非常に高速な数学ライブラリで、主に配列計算に用いられ、以下を含みます:
- 強力なN次元配列オブジェクト ndarray
- ブロードキャスト機能関数
- C/C++/Fortran コードを統合するツール
- 線形代数、フーリエ変換、乱数生成などの機能
アプリケーション
NumPy は通常 SciPy(Scientific Python)と Matplotlib(描画ライブラリ)と一緒に使用されます。
この組み合わせは MatLab の代替として広く用いられる強力な科学計算環境で、Python を通じてデータサイエンスや機械学習を学ぶのに役立ちます。
SciPy はオープンソースの Python アルゴリズムライブラリと数学ツールキットです。
SciPy に含まれるモジュールとして、最適化、線形代数、積分、補間、特殊関数、高速フーリエ変換、信号処理と画像処理、常微分方程式の解法など、科学と工学でよく使われる計算があります。
Matplotlib は Python プログラミング言語と NumPy の数値数学拡張パックの可視化操作インターフェースです。
それは Tkinter、wxPython、Qt、GTK+ などの一般的な GUI ツールキットを用いて、アプリケーションに組み込み型の描画を提供する API を提供します。
インストール
- 配布版のインストール
- pip によるインストール
pip3 install numpy scipy matplotlib
インストールの検証
from numpy import *eye(4)Numpyデータ
Numpy Ndarrayオブジェクト
NumPy の最も重要な特徴の一つは N 次元配列オブジェクト ndarray で、同じ型のデータの集合であり、0 番目のインデックスから要素を参照します。
ndarray オブジェクトは同一型要素を格納する多次元配列です。
ndarray の各要素はメモリ内で同じサイズの領域を占めます。
ndarray は以下の構成要素から成ります:
- データを指すポインタ(メモリまたはメモリマッピングファイル内の一部のデータ)
- データ型(dtype)、配列内の固定サイズ値を表します
- 配列の形状(shape)を表すタプル、各次元の大きさを表します
- ストライド(stride)を表すタプルで、現在の次元の次の要素へ進むために跨ぐバイト数を表します
ndarray オブジェクトはメモリの連続した1次元部分で構成され、インデックスの方法と組み合わせて、各要素をメモリブロックの1つの位置にマッピングします。メモリブロックは行優先(C順)または列優先(Fortran/MatLab 風、F順)で要素を格納します。
Ndarrayの作成
ndarray を作成するには NumPy の array 関数を呼ぶだけです:
numpy.array(object,dtype = None,copy = True,order = None,subok = False,ndmin = 0)
# object:配列またはネストされた数列# dtype:配列要素のデータ型、オプション# copy: オブジェクトをコピーするかどうか、オプション# order: 配列の作成順序、Cは行方向、Fは列方向、Aは任意(デフォルト)# subok: デフォルトで基底クラスと同一の配列を返す# ndmin: 生成される配列の最小次元数例
import numpy as npa = np.array([1,2,3])print (a)
a = np.array([[1, 2], [3, 4]])print (a)
# 最小次元a = np.array([1, 2, 3, 4, 5], ndmin = 2)print (a)
# dtype パラメータa = np.array([1, 2, 3], dtype = complex)print (a)データ型
NumPy がサポートするデータ型は Python の組み込み型よりもはるかに多く、基本的には C 言語のデータ型と対応します。そのうちの一部の型は Python の組み込み型に対応します。
bool,int,intc,intp,int8,int16,int32,int64,uint8,uint16,uint32,uint64,float,float16,float32,float64,complex_,complex128,complex64,complex128
データ型オブジェクト(numpy.dtype クラスのインスタンス)は、配列に対応するメモリ領域がどのように使われるかを説明します。以下の点を説明します:
- データの型(整数、浮動小数点数、あるいは Python オブジェクト)
- データのサイズ(例:整数は何バイトで格納されるか)
- データのバイト順序(リトルエンディアンかビッグエンディアン)
- 構造化型の場合、フィールドの名前、各フィールドのデータ型、各フィールドが占めるメモリブロックの部分
- データ型がサブ配列の場合、その形状とデータ型
バイト順序は、データ型を予め設定する < または > によって決まります。 < はリトルエンディアン(最小値が最小アドレスに格納され、低位のバイトが先頭)を意味します。> はビッグエンディアン(最も重要なバイトが最小アドレスに格納され、最高位のバイトが先頭)を意味します。
dtype オブジェクトは以下の構文で作成します:
numpy.dtype(object, align, copy)
# object - 変換するデータ型オブジェクト# align - true の場合、フィールドを C の構造体風にパディングします。# copy - dtype オブジェクトをコピー。false の場合、組み込みデータ型オブジェクトへの参照になります。使用例:
import numpy as np# スカラー型を使用dt = np.dtype(np.int32)print(dt)
# まず構造化データ型を作成dt = np.dtype([('age',np.int8)])# ndarray にデータ型を適用a = np.array([(10,),(20,),(30,)], dtype = dt)print(a)各組み込み型には、それを一意に定義する文字コードがあり、以下のとおりです:
| 文字 | 対応する型 |
|---|---|
| b | ブール型 |
| i | (符号付き) 整数型 |
| u | 符号なし整数型 |
| f | 浮動小数点型 |
| c | 複素浮動小数点型 |
| m | timedelta(時間間隔) |
| M | datetime(日時) |
| O | (Python) オブジェクト |
| S, a | (バイト列)文字列 |
| U | Unicode |
| V | 生データ(void) |
Numpy配列
Numpy配列の属性
NumPy 配列の次元は「階数(rank)」と呼ばれ、軸の数、すなわち配列の次元を表します。1 次元配列の階数は 1、2 次元は 2、以下同様です。
NumPy では、配列の各軸を axis と呼び、これが次元(dimensions)を構成します。例えば、2 次元配列は 2 つの 1 次元配列から成り、それぞれの 1 次元配列の中にはさらに別の 1 次元配列が含まれます。
したがって、1 次元配列は NumPy の軸(axis)であり、最初の軸は下位の配列、次の軸はその中の配列を表します。軸の数、すなわち「秩」は配列の次元数です。
多くの場合、axis を宣言できます。axis=0 は第 0 軸に沿って操作することを意味し、列ごとに操作します。axis=1 は第 1 軸に沿って操作することを意味し、行ごとに操作します。
NumPy の配列で特に重要な ndarray オブジェクトの属性には次のものがあります:
-
ndarray.ndim 秩、軸の数または次元の数
import numpy as npa = np.arange(24)print (a.ndim) # a は現在1次元です# サイズを変更しますb = a.reshape(2,4,3) # b は3次元になりますprint (b.ndim) -
ndarray.shape 配列の次元、行列の場合は n 行 m 列
ndarray.shape も配列のサイズを調整するのに使用できます。
NumPy も reshape 関数を提供して、配列のサイズを調整します。
import numpy as npa = np.array([[1,2,3],[4,5,6]])print (a.shape)a.shape = (3,2)print (a)a = np.array([[1,2,3],[4,5,6]])b = a.reshape(3,2)print (b) -
ndarray.size 配列要素の総数、すなわち .shape の n*m に相当します
-
ndarray.dtype ndarray オブジェクトの要素型
-
ndarray.itemsize ndarray オブジェクトの各要素の大きさをバイト単位で
import numpy as np# 配列の dtype が int8(1 バイト)x = np.array([1,2,3,4,5], dtype = np.int8)print (x.itemsize)# 配列の dtype が float64(8 バイト)y = np.array([1,2,3,4,5], dtype = np.float64)print (y.itemsize) -
ndarray.flags ndarray オブジェクトのメモリ情報
属性 説明 C_CONTIGUOUS (C) データは単一の C 風の連続領域に格納されます F_CONTIGUOUS (F) データは単一の Fortran 風の連続領域に格納されます OWNDATA (O) 配列は使用するメモリを所有するか、他のオブジェクトから借用します WRITEABLE (W) データ領域は書き込み可能で、False に設定するとデータは読み取り専用 ALIGNED (A) データとすべての要素が適切にハードウェアに整列します UPDATEIFCOPY (U) この配列は他の配列のコピーであり、この配列が解放されると元配列の内容が更新されます import numpy as npx = np.array([1,2,3,4,5])print (x.flags) -
ndarray.real ndarray 要素の実部
-
ndarray.imag ndarray 要素の虚部
-
ndarray.data 実際の配列要素を含むバッファ。通常は配列のインデックスを介して要素を取得するため、この属性を使う機会はほとんどありません
Numpy配列の作成
ndarray 配列は基盤となる ndarray コンストラクタを使って作成するほか、以下の方法でも作成できます。
-
numpy.empty
numpy.empty は、指定した形状(shape)、データ型(dtype)を持ち、未初期化の配列を作成します:
numpy.empty(shape, dtype = float, order = 'C')# shape 配列の形状# dtype データ型、任意# order 'C' または 'F' の2つのオプション、要素をメモリ上に格納する順序を表します使用例:
import numpy as npx = np.empty([3,2], dtype = int)print (x) -
numpy.zeros
指定したサイズの配列を作成し、要素を 0 で埋めます:
numpy.zeros(shape, dtype = float, order = 'C')# shape 配列の形状# dtype データ型、任意# order 'C' は行優先、`'F'` は Fortran の列優先使用例:
import numpy as np# デフォルトは浮動小数点数x = np.zeros(5)print(x)# 整数型を設定y = np.zeros((5,), dtype = int)print(y)# 複数の型を指定z = np.zeros((2,2), dtype = [('x', 'i4'), ('y', 'i4')])print(z) -
numpy.ones
指定した形状の配列を作成し、要素を 1 で埋めます:
numpy.ones(shape, dtype = float, order = 'C')# shape 配列の形状# dtype データ型、任意# order 'C' は行優先、または 'F' は Fortran の列優先使用例:
import numpy as np# デフォルトは浮動小数点数x = np.ones(5)print(x)# 自定义类型x = np.ones([2,2], dtype = int)print(x) -
numpy.zeros_like/ones_like
numpy.zeros_like は、与えられた配列と同じ形状の配列を作成し、要素を 0 で埋めます。
numpy.zeros と numpy.zeros_like は、指定した形状の配列を作成し、全要素を 0 にします。
これらの違いは、numpy.zeros は作成する配列の形状を直接指定できるのに対し、numpy.zeros_like は与えられた配列と同じ形状の配列を作る点です。
numpy.zeros_like(a, dtype=None, order='K', subok=True, shape=None)# a 与えられた同形状の配列# dtype 作成する配列のデータ型# order メモリ上の格納順序、'C'(行優先)または 'F'(列優先)、デフォルトは 'K'(入力配列の格納順序を保持)# subok サブクラスの返却を許可するか、True の場合はサブクラスを返す、そうでなければ a 配列と同じデータ型と格納順序の配列を返します# shape 作成する配列の形状。指定しなければ a 配列と同じ形状になります。使用例:
import numpy as np# 3x3 の2次元配列を作成arr = np.array([[1, 2, 3], [4, 5, 6], [7, 8, 9]])# arr と同じ形状の、全要素が 0 の配列を作成zeros_arr = np.zeros_like(arr)print(zeros_arr)
既存の配列から作成
-
numpy.asarray
numpy.asarray は numpy.array に似ていますが、引数は 3 つだけで、numpy.array より少なくなっています。
numpy.asarray(a, dtype = None, order = None)# パラメータの説明:# a 任意の形式の入力パラメータ。リスト、リストのタプル、タプル、タプルのタプル、タプルのリスト、多次元配列など# dtype データ型、任意# order 任意。'C' と 'F' の2つのオプションがあり、それぞれ行優先と列優先を表し、メモリ上のデータの格納順序を決定します。# 使用例:import numpy as np# リストx = [1,2,3]a = np.asarray(x)print (a)# タプルx = (1,2,3)a = np.asarray(x)print (a)# タプルのリストx = [(1,2,3),(4,5)]a = np.asarray(x)print (a)x = [1,2,3]a = np.asarray(x, dtype = float)print (a) -
numpy.frombuffer
numpy.frombuffer は動的配列を実現するために用いられます。
numpy.frombuffer は buffer 入力パラメータを受け取り、ストリームとして読み込んで ndarray オブジェクトへ変換します。
注意:buffer が文字列のとき、Python3 ではデフォルトで str は Unicode 型のため、元の str の前に b を付けて bytestring に変換します。
numpy.frombuffer(buffer, dtype = float, count = -1, offset = 0)# パラメータの説明:# buffer 任意のオブジェクトで、ストリームとして読み込まれます。# dtype 返される配列のデータ型、任意# count 読み込むデータ数、デフォルトは -1、すべて読み込みます# offset 読み取り開始位置、デフォルトは0。# 使用例:import numpy as nps = b'Hello World'a = np.frombuffer(s, dtype = 'S1')print (a) -
numpy.fromiter
numpy.fromiter は反復可能オブジェクトから ndarray オブジェクトを生成し、一つの1次元配列を返します。
numpy.fromiter(iterable, dtype, count=-1)# パラメータの説明:# iterable 反復可能オブジェクト# dtype 戻り値のデータ型# count 読み込むデータ数、デフォルトは-1、すべて読み込み# 使用例:import numpy as np# range 関数を使ってリストを作成list=range(5)it=iter(list)# イテレータを用いて ndarray を作成x=np.fromiter(it, dtype=float)print(x)
から数値範囲の作成
-
numpy.arange
numpy パッケージには arange 関数を用いて数値範囲を作成し ndarray オブジェクトを返します。関数の形式は次のとおりです:
start と stop で指定された範囲と step で設定された歩幅に従って、ndarray を生成します。
numpy.arange(start, stop, step, dtype)# パラメータの説明:# start 起始値、デフォルトは0# stop 終了値(含まれない)# step 歩幅、デフォルトは1# dtype 戻り値の ndarray のデータ型、指定がなければ入力データの型を使用# 使用例:import numpy as npx = np.arange(5)print (x)# dtype を設定x = np.arange(5, dtype = float)print (x)# 起始値、終止値、步長を設定x = np.arange(10,20,2)print (x) -
numpy.linspace
numpy.linspace 関数は、等差数列からなる1次元配列を作成するためのものです。形式は以下のとおりです:
np.linspace(start, stop, num=50, endpoint=True, retstep=False, dtype=None)# パラメータの説明:# start シリーズの開始値# stop シリーズの終了値。endpoint が true の場合、この値は数列に含まれます# num 生成する等間隔のサンプル数、デフォルトは50# endpoint true の場合 stop 値を数列に含めます。デフォルトは True。# retstep True の場合、生成された配列に間隔が表示されます。 False の場合は表示されません。# dtype ndarray のデータ型# 使用例:import numpy as npa = np.linspace(1,10,10)print(a)a = np.linspace(1,1,10)print(a)a = np.linspace(10, 20, 5, endpoint = False)print(a)a =np.linspace(1,10,10,retstep= True)print(a)b =np.linspace(1,10,10).reshape([10,1])print(b) -
numpy.logspace
numpy.logspace 関数は等比数列を作成します。形式は以下のとおりです:
np.logspace(start, stop, num=50, endpoint=True, base=10.0, dtype=None)# パラメータの説明:# start 系列の開始値は base ** start# stop 系列の終了値は base ** stop。endpoint が true の場合、この値は数列に含まれます# num 生成する等歩長のサンプル数、デフォルトは50# endpoint true の場合、stop 値を数列に含めます、デフォルトは True。# base 対数の底数。# dtype ndarray のデータ型# 使用例:import numpy as np# デフォルトの底は 10a = np.logspace(1.0, 2.0, num = 10)print (a)a = np.logspace(0,9,10,base=2)print (a)
配列のスライスとインデックス
スライスとインデックス
ndarray オブジェクトの内容は、インデックスまたはスライスを介してアクセス・変更できます。これは Python の list のスライス操作と同様です。
ndarray 配列は 0 から n の下標でインデックス可能で、スライスオブジェクトは組み込みの slice 関数を用いて start, stop 及び step を設定し、元の配列から新しい配列を切り出します。
コロン : の説明:1つのパラメータだけ置くと、そのインデックスに対応する単一要素を返します。
[2:] は、そのインデックス以降のすべての項目を抽出します。 [2:7] のように2つのパラメータを使うと、開始インデックスから停止インデックスを含まない範囲の項目を抽出します。スライスには省略記号 … も含められ、選択するタプルの長さを配列の次元と揃えることができます。 行位置で省略記号を使うと、行を含む ndarray が返されます。
import numpy as np
a = np.arange(10)s = slice(2,7,2) # インデックス 2 から 7 まで、間隔は 2print (a[s])
# あるいはコロンでスライスパラメータ start:stop:step を用いてスライス操作をすることもできますa = np.arange(10)b = a[2:7:2] # インデックス 2 から 7 まで、間隔は 2print(b)
a = np.arange(10) # [0 1 2 3 4 5 6 7 8 9]b = a[5]print(b)
print(a[2:])
print(a[2:5])
# 多次元a = np.array([[1,2,3],[3,4,5],[4,5,6]])print(a)# あるインデックスから切り取るprint('配列インデックス a[1:] から切り取る')print(a[1:])
# 省略符号a = np.array([[1,2,3],[3,4,5],[4,5,6]])print (a[...,1]) # 第2列の要素print (a[1,...]) # 第2行の要素print (a[...,1:]) # 第2列およびそれ以降の要素高度なインデックス
NumPy は一般的な Python のシーケンスよりも多くのインデックス方法を提供します。
以前に見た整数とスライスによるインデックス以外にも、整数配列インデックス、ブールインデックス、ファンシーインデックスを用いて配列の要素にアクセスできます。
NumPy の高度なインデックスは、整数配列、ブール配列、または他のシーケンスを用いて配列の要素にアクセスすることを指します。基本的なインデックスと比べて、高度なインデックスは配列内の任意の要素にアクセスでき、配列に対する複雑な操作や変更を行うことができます。
整数配列インデックス
整数配列インデックスとは、別の配列の要素へアクセスするために1つの配列を用いることを指します。この配列の各要素は、ターゲット配列のある次元上のインデックス値です。
import numpy as np
# 配列の (0,0)、(1,1) および (2,0) の位置の要素を取得x = np.array([[1, 2], [3, 4], [5, 6]])y = x[[0,1,2], [0,1,0]]print (y)
# 4x3 配列の四隅の要素を取得。 行インデックスは [0,0] と [3,3]、列インデックスは [0,2] と [0,2]x = np.array([[ 0, 1, 2],[ 3, 4, 5],[ 6, 7, 8],[ 9, 10, 11]])print ('Our array is:' )print (x)print ('\\n')rows = np.array([[0,0],[3,3]])cols = np.array([[0,2],[0,2]])y = x[rows,cols]print ('この配列の四隅の要素は:')print (y)
# スライス : または … とインデックス配列を組み合わせるa = np.array([[1,2,3], [4,5,6],[7,8,9]])b = a[1:3, 1:3]c = a[1:3,[1,2]]d = a[...,1:]print(b)print(c)print(d)ブールインデックス
ブール配列を用いてターゲット配列をインデックスできます。
ブールインデックスはブール演算(比較演算子など)により、指定条件を満たす要素の配列を取得します。
import numpy as np
x = np.array([[ 0, 1, 2],[ 3, 4, 5],[ 6, 7, 8],[ 9, 10, 11]])print ('Our array is:')print (x)print ('\\n')# 現在、5より大きい要素を出力しますprint ('大きい要素は:')print (x[x > 5])
a = np.array([np.nan, 1,2,np.nan,3,4,5])print (a[~np.isnan(a)])
a = np.array([1, 2+6j, 5, 3.5+5j])print (a[np.iscomplex(a)])ファンシーインデックス
ファンシーインデックスは、整数配列を用いてインデックスすることを指します。
ファンシーインデックスは、インデックス配列の値を対象配列のある軸の下標として用い、値を取り出します。
1次元の整数配列をインデックスとして用いる場合、対象が1次元配列ならインデックス結果は対応する位置の要素、対象が2次元配列なら対応する行になります。
ファンシーインデックスはスライスとは異なり、データを新しい配列へ常にコピーします。
-
1次元配列
1次元配列には軸が1つしかないため、 axis = 0 の軸で値を取ります:
import numpy as npx = np.arange(9,0,-1)print(x)print(x[[0,2]]) -
2次元配列
2次元配列には軸が2つあるため、 axis=0 で値を取ります:
import numpy as npx=np.arange(32).reshape((8,4))print(x)# 二次元配列の指定インデックスの行を読み取るprint("-------読み取る行-------")print (x[[4,2,1,7]])px=np.arange(32).reshape((8,4))print (x[[-4,-2,-1,-7]]) -
複数のインデックス配列の入力
np.ix_ 関数は2つの配列を入力として受け、デカルト積のマッピングを生成します。
import numpy as npx=np.arange(32).reshape((8,4))print (x[np.ix_([1,5,7,2],[0,3,1,2])])
ブロードキャスト
ブロードキャストは numpy が異なる形状(shape) の配列同士で数値計算を行う方法で、配列の算術演算は通常、対応する要素上で行われます。
もし2つの配列 a と b の形状が同じであれば、a*b の結果は a と b の対応する要素の積になります。これは次元数が同じで、各次元の長さが同じことを要求します。
計算中の2つの配列の形状が異なる場合、NumPy は自動的にブロードキャスト機構を発動します。4x3 の2次元配列と長さ 3 の1次元配列を加算する場合、配列 b を2次元方向に 4 回繰り返してから演算するのと同等です:
import numpy as numpy
a = np.array([[ 0, 0, 0], [10,10,10], [20,20,20], [30,30,30]])b = np.array([0,1,2])print(a + b)
bb = np.tile(b, (4, 1)) # b の各次元を繰り返すprint(a + bb)
ブロードキャストのルール:
- すべての入力配列を、形状が最も長い配列に合わせ、足りない部分は前に 1 を追加して埋める。
- 出力配列の形状は、入力配列の各次元の最大値になる。
- 入力配列のある次元の長さが、出力配列の対応する次元の長さと同じ、または長さが 1 のとき、その配列を計算に用いることができる。そうでない場合はエラーになる。
- 入力配列のある次元の長さが 1 の場合、その次元に沿って演算する時はこの次元の最初の値を用いる。
条件を満たさない場合、“ValueError: frames are not aligned” 例外が発生します。
配列操作
配列の反復
NumPy のイテレータオブジェクト numpy.nditer は、1つまたは複数の配列要素へ柔軟にアクセスする方法を提供します。
イテレータの最も基本的な役割は、配列要素へのアクセスを実現することです。
import numpy as np
a = np.arange(6).reshape(2,3)print ('原始数组は:')print (a,'\\n')print ('反復で要素を出力します:')for x in np.nditer(a): print (x, end=", " )print ('\\n')
for x in np.nditer(a.T): print (x, end=", " )print ('\\n')
for x in np.nditer(a.T.copy(order='C')): print (x, end=", " )print ('\\n')上述の例から、a と a.T の走査順序は同じで、メモリ上の格納順序も同じですが、a.T.copy(order = ‘C’) の走査結果は異なります。nditer はデフォルトで K 順序、つまり配列要素がメモリ上に表示されるデータにできるだけ近づくように走査します。
走査順序の制御
- for x in np.nditer(a, order=‘F’): Fortran order、すなわち列優先;
- for x in np.nditer(a.T, order=‘C’): C order、すなわち行優先;
import numpy as np
a = np.arange(0,60,5)a = a.reshape(3,4)print ('原始数组は:')print (a)print ('\\n')print ('原始配列の転置は:')b = a.Tprint (b)print ('\\n')print ('C 風順序でソート:')c = b.copy(order='C')print (c)for x in np.nditer(c): print (x, end=", " )print ('\\n')print ('F 風順序でソート:')c = b.copy(order='F')print (c)for x in np.nditer(c): print (x, end=", " )print ('\\n')# 明示的に設定して nditer が特定の順序を使用するよう強制することもできます:print ('C 風順序でソート:')for x in np.nditer(a, order = 'C'): print (x, end=", " )print ('\\n')print ('F 風順序でソート:')for x in np.nditer(a, order = 'F'): print (x, end=", " )配列要素の変更
nditer オブジェクトには another optional parameter op_flags があります。デフォルトでは、nditer は反復対象の配列を読み取り専用とみなします。配列の要素値を変更できるようにするには、readwrite または writeonly のモードを指定する必要があります。
import numpy as np
a = np.arange(0,60,5)a = a.reshape(3,4)print ('原始数组は:')print (a)print ('\\n')for x in np.nditer(a, op_flags=['readwrite']): x[...]=2*xprint ('変更後の配列は:')print (a)外部ループの使用
nditer クラスのコンストラクタには flags パラメータがあり、以下の値を受け付けます:
| パラメータ | 説明 |
|---|---|
| c_index | C 順序のインデックスを追跡できる |
| f_index | Fortran 順序のインデックスを追跡できる |
| multi_index | 各反復で1つのインデックス型を追跡 |
| external_loop | 出力の値は複数の値を持つ1次元配列で、スカラー値ではない |
import numpy as npa = np.arange(0,60,5)a = a.reshape(3,4)print ('原始数组は:')print (a)print ('\\n')print ('変更後の配列は:')for x in np.nditer(a, flags = ['external_loop'], order = 'F'): print (x, end=", " )ブロードキャスト反復
もし2つの配列がブロードキャスト可能であれば、nditer の組み合わせオブジェクトを同時に反復できます。例えば、配列 a の次元が 3x4、配列 b の次元が 1x4 の場合、以下のイテレータを使います(配列 b が a の大きさにブロードキャストされます)。
import numpy as np
a = np.arange(0,60,5)a = a.reshape(3,4)print ('第の配列は:')print (a)print ('\\n')print ('第2の配列は:')b = np.array([1, 2, 3, 4], dtype = int)print (b)print ('\\n')print ('変更後の配列は:')for x,y in np.nditer([a,b]): print ("%d:%d" % (x,y), end=", " )配列操作
形状の変更
| 関数 | 説明 | 関数 |
|---|---|---|
| reshape | データを変えずに形状を変更 | `numpy.reshape(arr, newshape, order=[‘C' |
| flat | 配列の要素イテレータ | 配列要素イテレータ(for e in a.flat:) |
| flatten | コピーを返し、コピー上の変更は元の配列に影響しない | `ndarray.flatten(order=[‘C' |
| ravel | 展開した配列を返す | `numpy.ravel(a, order=[‘C' |
配列の反転
| 関数 | 説明 | 関数 |
|---|---|---|
| transpose | 配列の次元を転置 | numpy.transpose(arr, axes) |
| ndarray.T | self.transpose() と同じ | 類似 numpy.transpose |
| rollaxis | 指定した軸を後ろへ転がす | numpy.rollaxis(arr, axis, start) |
| swapaxes | 配列の二つの軸を入れ替える | numpy.swapaxes(arr, axis1, axis2) |
次元の変更
| 関数 | 説明 | 関数 |
|---|---|---|
| broadcast | ブロードキャストを模倣するオブジェクトを作成 | この関数は2つの配列を入力として使用します |
| broadcast_to | 配列を新しい形状へブロードキャスト | numpy.broadcast_to(array, shape, subok) |
| expand_dims | 配列の形状を拡張 | numpy.expand_dims(arr, axis) |
| squeeze | 配列の形状から1次元の要素を削除 | numpy.squeeze(arr, axis) |
配列の結合
| 関数 | 説明 | 関数 |
|---|---|---|
| concatenate | 既存の軸に沿って配列列を結合 | numpy.concatenate((a1, a2, ...), axis) |
| stack | 新しい軸に沿って一連の配列を結合します。 | numpy.stack(arrays, axis) |
| hstack | 配列を水平方向に結合(列方向) | numpy.hstack(arrays) |
| vstack | 配列を垂直方向に結合(行方向) | numpy.vstack(arrays |
配列の分割
| 関数 | 説明 | 関数 |
|---|---|---|
| split | 配列を複数のサブ配列に分割します(左開右開) | numpy.split(ary, indices_or_sections, axis) |
| hsplit | 配列を水平方向に分割します(列方向) | numpy.hsplit(ary, indices_or_sections) |
| vsplit | 配列を垂直方向に分割します(行方向) | numpy.vsplit(ary, indices_or_sections) |
配列要素の追加と削除
| 関数 | 説明 | 関数 |
|---|---|---|
| resize | 指定形状の新しい配列を返す | numpy.resize(arr, shape) |
| append | 値を配列の末尾に追加 | numpy.append(arr, values, axis=None) |
| insert | 指定した軸に沿って、指定した位置の前に値を挿入 | numpy.insert(arr, obj, values, axis) |
| delete | ある軸のサブ配列を削除し、削除後の新しい配列を返す | numpy.delete(arr, obj, axis) |
| unique | 配列内の一意な要素を検索 | numpy.unique(arr, return_index, return_inverse, return_counts) |
部分信息可能已经过时