


本文主要基于黑马的redis视频 编写
redis实战-商城系统
- 短信登录:使用redis共享session来实现
- 商户查询缓存:理解缓存击穿,缓存穿透,缓存雪崩等问题
- 优惠卷秒杀:Redis的计数器功能, 结合Lua完成高性能的redis操作,同时了解Redis分布式锁的原理,包括Redis的三种消息队列
- 附近的商户:利用Redis的GEOHash来完成对于地理坐标的操作
- UV统计:使用Redis来完成统计功能
- 用户签到:Redis的BitMap数据统计功能
- 好友关注:基于Set集合的关注、取消关注,共同关注等等功能
- 打人探店:基于List来完成点赞列表的操作,同时基于SortedSet来完成点赞的排行榜功能
项目结构模型:
手机或者app端发起请求,请求我们的nginx服务器,nginx基于七层模型走的事HTTP协议,可以实现基于Lua直接绕开tomcat访问redis,也可以作为静态资源服务器,轻松扛下上万并发, 负载均衡到下游tomcat服务器,打散流量,我们都知道一台4核8G的tomcat,在优化和处理简单业务的加持下,大不了就处理1000左右的并发, 经过nginx的负载均衡分流后,利用集群支撑起整个项目,同时nginx在部署了前端项目后,更是可以做到动静分离,进一步降低tomcat服务的压力,这些功能都得靠nginx起作用,所以nginx是整个项目中重要的一环。
在tomcat支撑起并发流量后,我们如果让tomcat直接去访问Mysql,根据经验Mysql企业级服务器只要上点并发,一般是16或32 核心cpu,32 或64G内存,像企业级mysql加上固态硬盘能够支撑的并发,大概就是4000起~7000左右,上万并发, 瞬间就会让Mysql服务器的cpu,硬盘全部打满,容易崩溃,所以我们在高并发场景下,会选择使用mysql集群,同时为了进一步降低Mysql的压力,同时增加访问的性能,我们也会加入Redis,同时使用Redis集群使得Redis对外提供更好的服务。

短信登陆
通过session实现验证码
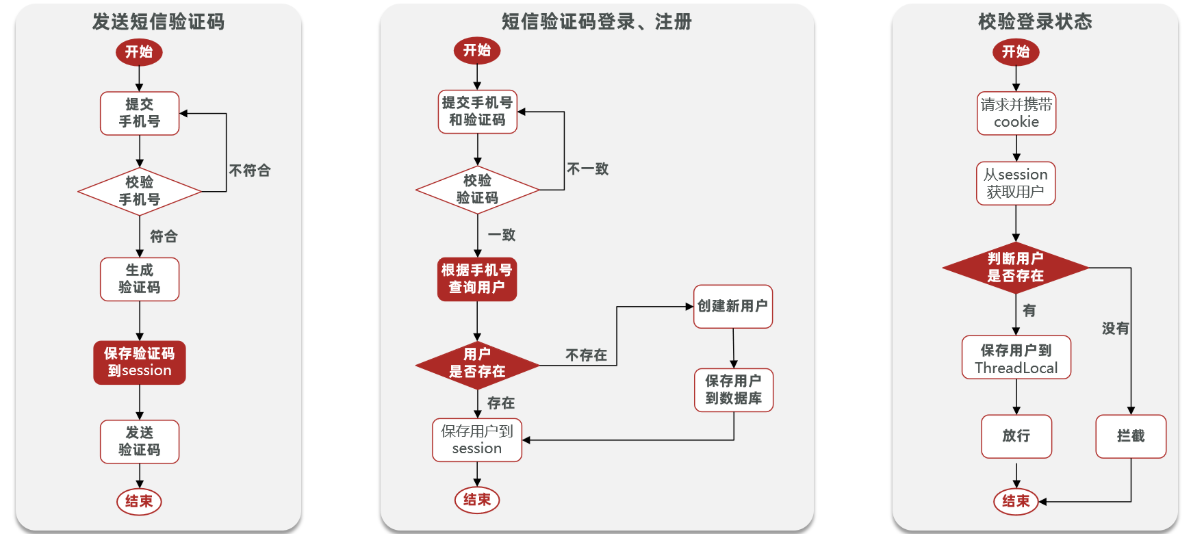
- 发送验证码
@Override public Result sendCode(String phone, HttpSession session) { // 1.校验手机号 if (RegexUtils.isPhoneInvalid(phone)) { // 2.如果不符合,返回错误信息 return Result.fail("手机号格式错误!"); } // 3.符合,生成验证码 String code = RandomUtil.randomNumbers(6);
// 4.保存验证码到 session session.setAttribute("code",code); // 5.发送验证码 log.debug("发送短信验证码成功,验证码:{}", code); // 返回ok return Result.ok(); }- 登录
@Override public Result login(LoginFormDTO loginForm, HttpSession session) { // 1.校验手机号 String phone = loginForm.getPhone(); if (RegexUtils.isPhoneInvalid(phone)) { // 2.如果不符合,返回错误信息 return Result.fail("手机号格式错误!"); } // 3.校验验证码 Object cacheCode = session.getAttribute("code"); String code = loginForm.getCode(); if(cacheCode == null || !cacheCode.toString().equals(code)){ //3.不一致,报错 return Result.fail("验证码错误"); } //一致,根据手机号查询用户 User user = query().eq("phone", phone).one();
//5.判断用户是否存在 if(user == null){ //不存在,则创建 user = createUserWithPhone(phone); } //7.保存用户信息到session中 session.setAttribute("user",user);
return Result.ok(); }- 登录拦截
拦截器代码
public class LoginInterceptor implements HandlerInterceptor {
@Override public boolean preHandle(HttpServletRequest request, HttpServletResponse response, Object handler) throws Exception { //1.获取session HttpSession session = request.getSession(); //2.获取session中的用户 Object user = session.getAttribute("user"); //3.判断用户是否存在 if(user == null){ //4.不存在,拦截,返回401状态码 response.setStatus(401); return false; } //5.存在,保存用户信息到Threadlocal UserHolder.saveUser((User)user); //6.放行 return true; }}让拦截器生效
@Configurationpublic class MvcConfig implements WebMvcConfigurer {
@Resource private StringRedisTemplate stringRedisTemplate;
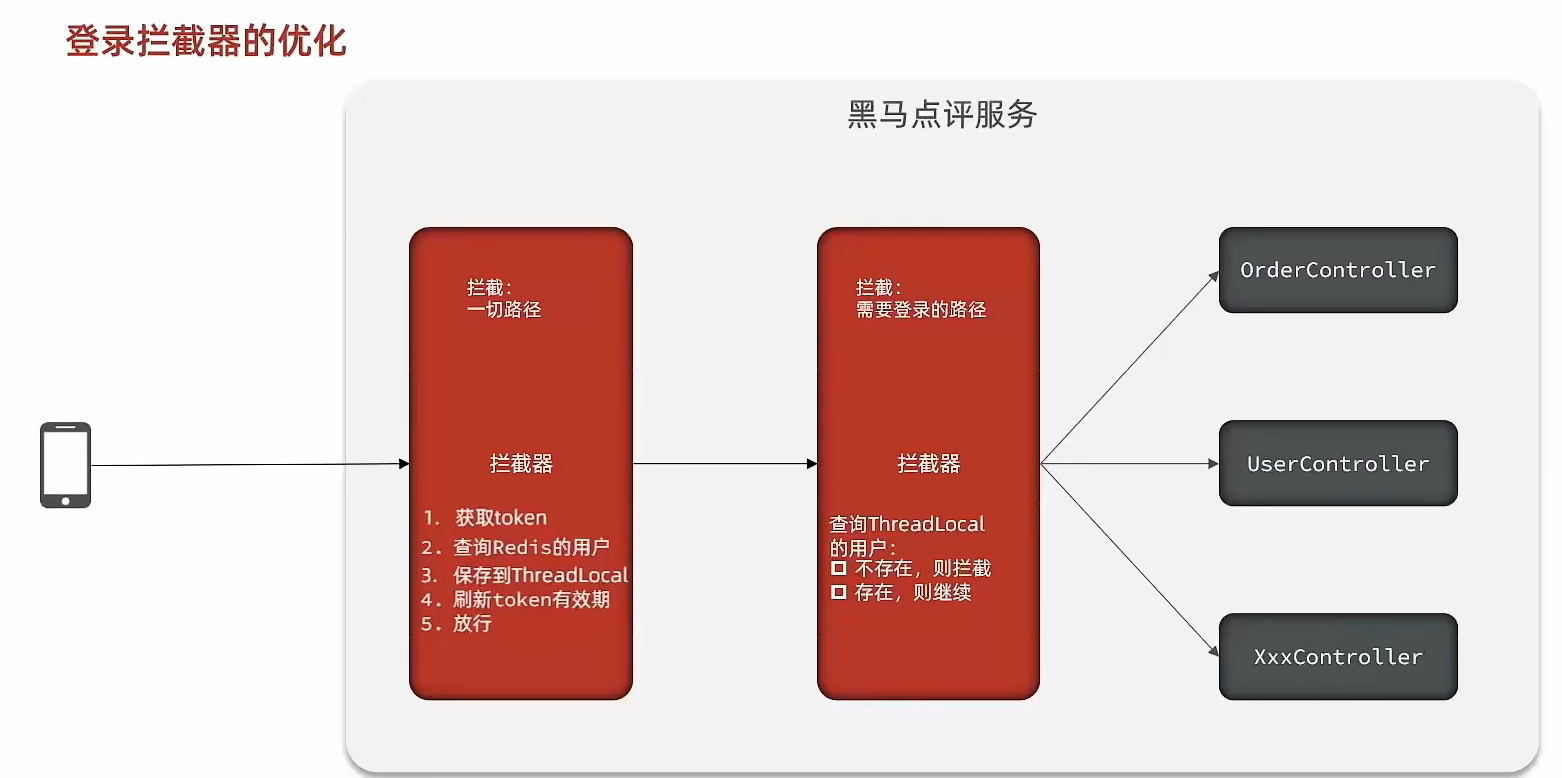
@Override public void addInterceptors(InterceptorRegistry registry) { // 登录拦截器 registry.addInterceptor(new LoginInterceptor()) .excludePathPatterns( "/shop/**", "/voucher/**", "/shop-type/**", "/upload/**", "/blog/hot", "/user/code", "/user/login" ).order(1); // token刷新的拦截器 registry.addInterceptor(new RefreshTokenInterceptor(stringRedisTemplate)).addPathPatterns("/**").order(0); }}- 修改安全返回对象
//7.保存用户信息到session中session.setAttribute("user", BeanUtils.copyProperties(user,UserDTO.class));
//5.存在,保存用户信息到ThreadlocalUserHolder.saveUser((UserDTO) user);Redis代替session实现
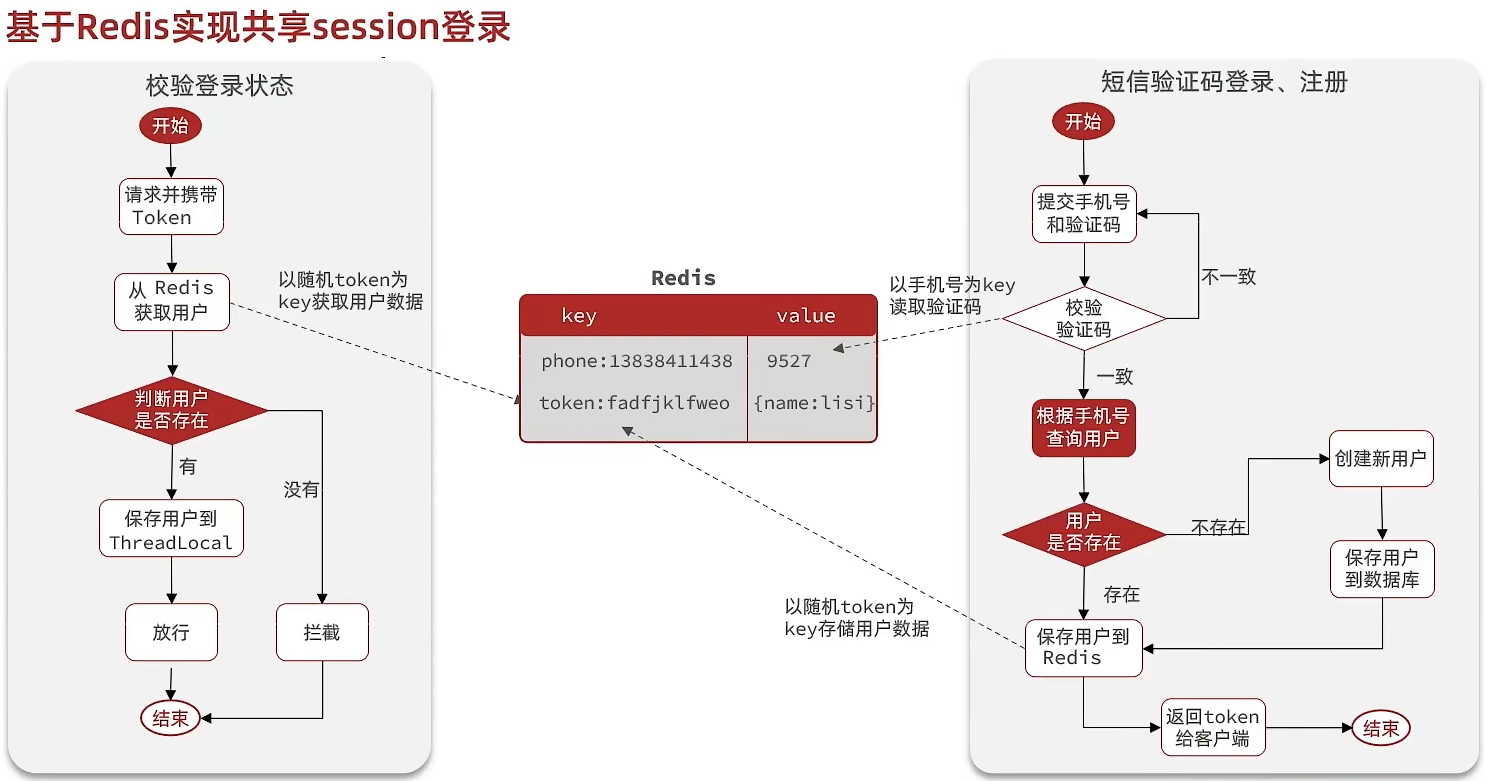
@Overridepublic Result login(LoginFormDTO loginForm, HttpSession session) { // 1.校验手机号 String phone = loginForm.getPhone(); if (RegexUtils.isPhoneInvalid(phone)) { // 2.如果不符合,返回错误信息 return Result.fail("手机号格式错误!"); } // 3.从redis获取验证码并校验 String cacheCode = stringRedisTemplate.opsForValue().get(LOGIN_CODE_KEY + phone); String code = loginForm.getCode(); if (cacheCode == null || !cacheCode.equals(code)) { // 不一致,报错 return Result.fail("验证码错误"); }
// 4.一致,根据手机号查询用户 select * from tb_user where phone = ? User user = query().eq("phone", phone).one();
// 5.判断用户是否存在 if (user == null) { // 6.不存在,创建新用户并保存 user = createUserWithPhone(phone); }
// 7.保存用户信息到 redis中 // 7.1.随机生成token,作为登录令牌 String token = UUID.randomUUID().toString(true); // 7.2.将User对象转为HashMap存储 UserDTO userDTO = BeanUtil.copyProperties(user, UserDTO.class); Map<String, Object> userMap = BeanUtil.beanToMap(userDTO, new HashMap<>(), CopyOptions.create() .setIgnoreNullValue(true) .setFieldValueEditor((fieldName, fieldValue) -> fieldValue.toString())); // 7.3.存储 String tokenKey = LOGIN_USER_KEY + token; stringRedisTemplate.opsForHash().putAll(tokenKey, userMap); // 7.4.设置token有效期 stringRedisTemplate.expire(tokenKey, LOGIN_USER_TTL, TimeUnit.MINUTES);
// 8.返回token return Result.ok(token);}状态登录刷新
RefreshTokenInterceptor
public class RefreshTokenInterceptor implements HandlerInterceptor {
private StringRedisTemplate stringRedisTemplate;
public RefreshTokenInterceptor(StringRedisTemplate stringRedisTemplate) { this.stringRedisTemplate = stringRedisTemplate; }
@Override public boolean preHandle(HttpServletRequest request, HttpServletResponse response, Object handler) throws Exception { // 1.获取请求头中的token String token = request.getHeader("authorization"); if (StrUtil.isBlank(token)) { return true; } // 2.基于TOKEN获取redis中的用户 String key = LOGIN_USER_KEY + token; Map<Object, Object> userMap = stringRedisTemplate.opsForHash().entries(key); // 3.判断用户是否存在 if (userMap.isEmpty()) { return true; } // 5.将查询到的hash数据转为UserDTO UserDTO userDTO = BeanUtil.fillBeanWithMap(userMap, new UserDTO(), false); // 6.存在,保存用户信息到 ThreadLocal UserHolder.saveUser(userDTO); // 7.刷新token有效期 stringRedisTemplate.expire(key, LOGIN_USER_TTL, TimeUnit.MINUTES); // 8.放行 return true; }
@Override public void afterCompletion(HttpServletRequest request, HttpServletResponse response, Object handler, Exception ex) throws Exception { // 移除用户 UserHolder.removeUser(); }}LoginInterceptor
public class LoginInterceptor implements HandlerInterceptor {
@Override public boolean preHandle(HttpServletRequest request, HttpServletResponse response, Object handler) throws Exception { // 1.判断是否需要拦截(ThreadLocal中是否有用户) if (UserHolder.getUser() == null) { // 没有,需要拦截,设置状态码 response.setStatus(401); // 拦截 return false; } // 有用户,则放行 return true; }}商户查询缓存
缓存(Cache),就是数据交换的缓冲区,俗称的缓存就是缓冲区内的数据,一般从数据库中获取,存储于本地代码(例如:
例1:Static final ConcurrentHashMap<K,V> map = new ConcurrentHashMap<>(); 本地用于高并发
例2:static final Cache<K,V> USER_CACHE = CacheBuilder.newBuilder().build(); 用于redis等缓存
例3:Static final Map<K,V> map = new HashMap(); 本地缓存由于其被Static修饰,所以随着类的加载而被加载到内存之中,作为本地缓存,由于其又被final修饰,所以其引用(例3)和对象(例3
浏览器缓存:主要是存在于浏览器端的缓存
- *应用层缓存:**可以分为tomcat本地缓存,比如之前提到的map,或者是使用redis作为缓存
- *数据库缓存:**在数据库中有一片空间是 buffer pool,增改查数据都会先加载到mysql的缓存中
- *CPU缓存:**当代计算机最大的问题是 cpu性能提升了,但内存读写速度没有跟上,所以为了适应当下的情况,增加了cpu的L1,L2,L3级的缓存
商户缓存
标准的操作方式就是查询数据库之前先查询缓存,如果缓存数据存在,则直接从缓存中返回,如果缓存数据不存在,再查询数据库,然后将数据存入redis。
@Overridepublic Result queryById(Long id) { String key = RedisConstants.CACHE_SHOP_KEY + id; String shopJson = stringRedisTemplate.opsForValue().get(key);
if(StrUtil.isNotBlank(shopJson)) { Shop shop = JSONUtil.toBean(shopJson,Shop.class); return Result.ok(shop); } Shop shop = getById(id); if(shop == null) { return Result.fail("店铺不存在!"); } stringRedisTemplate.opsForValue().set(key,JSONUtil.toJsonStr(shop), RedisConstants.CACHE_SHOP_TTL, TimeUnit.MINUTES);
return Result.ok(shop);}缓存数据库双写
- 缓存更新
- *内存淘汰:**redis自动进行,当redis内存达到咱们设定的max-memery的时候,会自动触发淘汰机制,淘汰掉一些不重要的数据(可以自己设置策略方式)
- *超时剔除:**当我们给redis设置了过期时间ttl之后,redis会将超时的数据进行删除,方便咱们继续使用缓存
- *主动更新:**我们可以手动调用方法把缓存删掉,通常用于解决缓存和数据库不一致问题
- 数据库缓存不一致
Cache Aside Pattern 人工编码方式:缓存调用者在更新完数据库后再去更新缓存,也称之为双写方案
Read/Write Through Pattern : 由系统本身完成,数据库与缓存的问题交由系统本身去处理
Write Behind Caching Pattern :调用者只操作缓存,其他线程去异步处理数据库,实现最终一致
- 人工编码方式
- 删除缓存还是更新缓存?
- 更新缓存:每次更新数据库都更新缓存,无效写操作较多
- 删除缓存:更新数据库时让缓存失效,查询时再更新缓存
- 如何保证缓存与数据库的操作的同时成功或失败?
- 单体系统,将缓存与数据库操作放在一个事务
- 分布式系统,利用TCC等分布式事务方案
- 先操作数据库,再删除缓存
- 删除缓存还是更新缓存?
商铺的缓存与数据库双写一致
修改ShopController中的业务逻辑,满足下面的需求:
根据id查询店铺时,如果缓存未命中,则查询数据库,将数据库结果写入缓存,并设置超时时间
根据id修改店铺时,先修改数据库,再删除缓存
// 查询添加过期时间stringRedisTemplate.opsForValue().set(key,JSONUtil.toJsonStr(shop), RedisConstants.CACHE_SHOP_TTL, TimeUnit.MINUTES);
// 添加更新方法@Override@Transactionalpublic Result update(Shop shop) { Long id = shop.getId(); if (id == null) { return Result.fail("店铺id不能为空"); } updateById(shop);
stringRedisTemplate.delete(RedisConstants.CACHE_SHOP_KEY + id); return Result.ok();
}缓存穿透
缓存穿透 :缓存穿透是指客户端请求的数据在缓存中和数据库中都不存在,这样缓存永远不会生效,这些请求都会打到数据库。
常见的解决方案有两种:
-
缓存空对象
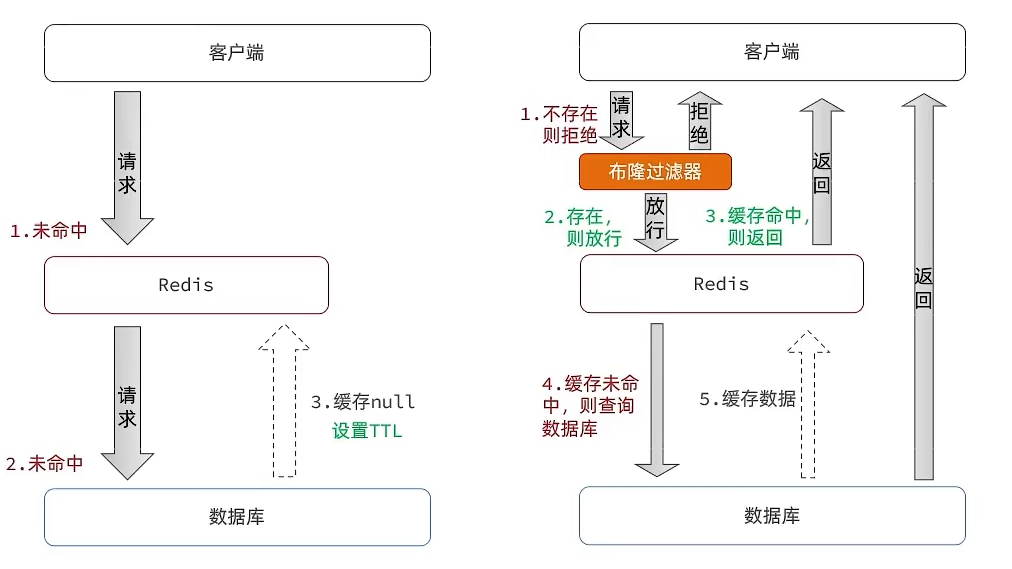
当我们客户端访问不存在的数据时,先请求redis,但是此时redis中没有数据,此时会访问到数据库,但是数据库中也没有数据,这个数据穿透了缓存,直击数据库,我们都知道数据库能够承载的并发不如redis这么高,如果大量的请求同时过来访问这种不存在的数据,这些请求就都会访问到数据库,简单的解决方案就是哪怕这个数据在数据库中也不存在,我们也把这个数据存入到redis中去,这样,下次用户过来访问这个不存在的数据,那么在redis中也能找到这个数据就不会进入到缓存了
- 优点:实现简单,维护方便
- 缺点:
- 额外的内存消耗
- 可能造成短期的不一致
-
布隆过滤
布隆过滤器其实采用的是哈希思想来解决这个问题,通过一个庞大的二进制数组,走哈希思想去判断当前这个要查询的这个数据是否存在,如果布隆过滤器判断存在,则放行,这个请求会去访问redis,哪怕此时redis中的数据过期了,但是数据库中一定存在这个数据,在数据库中查询出来这个数据后,再将其放入到redis中,假设布隆过滤器判断这个数据不存在,则直接返回
- 优点:内存占用较少,没有多余key
- 缺点:
- 实现复杂
- 存在误判可能
@Overridepublic Result queryById(Long id) { String key = RedisConstants.CACHE_SHOP_KEY + id; String shopJson = stringRedisTemplate.opsForValue().get(key);
if(StrUtil.isNotBlank(shopJson)) { Shop shop = JSONUtil.toBean(shopJson,Shop.class); return Result.ok(shop); } // 判断缓存返回是否为空值 if(shopJson != null) { return Result.fail("店铺信息不存在"); }
Shop shop = getById(id); if(shop == null) { // 将空值写入缓存中 stringRedisTemplate.opsForValue().set(key,"", RedisConstants.CACHE_NULL_TTL, TimeUnit.MINUTES); return Result.fail("店铺不存在!"); } stringRedisTemplate.opsForValue().set(key,JSONUtil.toJsonStr(shop), RedisConstants.CACHE_SHOP_TTL, TimeUnit.MINUTES);
return Result.ok(shop);}缓存穿透的解决方案有哪些?
- 缓存null值
- 布隆过滤
- 增强id的复杂度,避免被猜测id规律
- 做好数据的基础格式校验
- 加强用户权限校验
- 做好热点参数的限流
缓存雪崩
缓存雪崩是指在同一时段大量的缓存key同时失效或者Redis服务宕机,导致大量请求到达数据库,带来巨大压力。
解决方案:
- 给不同的Key的TTL添加随机值
- 利用Redis集群提高服务的可用性
- 给缓存业务添加降级限流策略
- 给业务添加多级缓存
缓存击穿
缓存击穿问题也叫热点Key问题,就是一个被高并发访问并且缓存重建业务较复杂的key突然失效了,无数的请求访问会在瞬间给数据库带来巨大的冲击。
常见的解决方案有两种:
- 互斥锁:由于保证了互斥性,所以数据一致,且实现简单,因为仅仅只需要加一把锁而已,也没其他的事情需要操心,所以没有额外的内存消耗,缺点在于有锁就有死锁问题的发生,且只能串行执行性能肯定受到影响
- 逻辑过期:线程读取过程中不需要等待,性能好,有一个额外的线程持有锁去进行重构数据,但是在重构数据完成前,其他的线程只能返回之前的数据,且实现起来麻烦
互斥锁解决缓存击穿
进行查询之后,如果从缓存没有查询到数据,则进行互斥锁的获取,获取互斥锁后,判断是否获得到了锁,如果没有获得到,则休眠,过一会再进行尝试,直到获取到锁为止,才能进行查询,如果获取到了锁的线程,再去进行查询,查询后将数据写入redis,再释放锁,返回数据,利用互斥锁就能保证只有一个线程去执行操作数据库的逻辑,防止缓存击穿
private boolean tryLock(String key) { Boolean flag = stringRedisTemplate.opsForValue().setIfAbsent(key, "1", RedisConstants.LOCK_SHOP_TTL, TimeUnit.SECONDS); return BooleanUtil.isTrue(flag);}
private void unlock(String key) { stringRedisTemplate.delete(key);}
public Shop queryWithMutex(Long id) { String key = CACHE_SHOP_KEY + id; // 1、从redis中查询商铺缓存 String shopJson = stringRedisTemplate.opsForValue().get("key"); // 2、判断是否存在 if (StrUtil.isNotBlank(shopJson)) { // 存在,直接返回 return JSONUtil.toBean(shopJson, Shop.class); } //判断命中的值是否是空值 if (shopJson != null) { //返回一个错误信息 return null; } // 4.实现缓存重构 //4.1 获取互斥锁 String lockKey = RedisConstants.LOCK_SHOP_KEY + id; Shop shop = null; try { boolean isLock = tryLock(lockKey); // 4.2 判断否获取成功 if(!isLock){ //4.3 失败,则休眠重试 Thread.sleep(50); return queryWithMutex(id); } //4.4 成功,根据id查询数据库 shop = getById(id); // 5.不存在,返回错误 if(shop == null){ //将空值写入redis stringRedisTemplate.opsForValue().set(key,"",CACHE_NULL_TTL,TimeUnit.MINUTES); //返回错误信息 return null; } //6.写入redis stringRedisTemplate.opsForValue().set(key,JSONUtil.toJsonStr(shop),CACHE_NULL_TTL,TimeUnit.MINUTES);
}catch (Exception e){ throw new RuntimeException(e); } finally { //7.释放互斥锁 unlock(lockKey); } return shop;}逻辑过期解决缓存击穿
当用户开始查询redis时,判断是否命中,如果没有命中则直接返回空数据,不查询数据库,而一旦命中后,将value取出,判断value中的过期时间是否满足,如果没有过期,则直接返回redis中的数据,如果过期,则在开启独立线程后直接返回之前的数据,独立线程去重构数据,重构完成后释放互斥锁。
@Datapublic class RedisData { private LocalDateTime expireTime; private Object data;}
private static final ExecutorService CACHE_REBUILD_EXECUTOR = Executors.newFixedThreadPool(10);
public Shop queryWithLogicalExpire(Long id) { String key = CACHE_SHOP_KEY + id; // 1.从redis查询商铺缓存 String json = stringRedisTemplate.opsForValue().get(key); // 2.判断是否存在 if (StrUtil.isBlank(json)) { return null; } // 4.命中,需要先把json反序列化为对象 RedisData redisData = JSONUtil.toBean(json, RedisData.class); Shop shop = JSONUtil.toBean((JSONObject) redisData.getData(), Shop.class); LocalDateTime expireTime = redisData.getExpireTime(); // 5.判断是否过期 if(expireTime.isAfter(LocalDateTime.now())) { // 5.1.未过期,直接返回店铺信息 return shop; } // 5.2.已过期,需要缓存重建 // 6.缓存重建 // 6.1.获取互斥锁 String lockKey = LOCK_SHOP_KEY + id; boolean isLock = tryLock(lockKey); // 6.2.判断是否获取锁成功 if (isLock){ CACHE_REBUILD_EXECUTOR.submit( ()->{
try{ //重建缓存 this.saveShop2Redis(id,20L); }catch (Exception e){ throw new RuntimeException(e); }finally { unlock(lockKey); } }); } // 6.4.返回过期的商铺信息 return shop;}
public void saveShop2Redis(Long id,Long expireSeconds) { Shop shop = getById(id);
RedisData redisData = new RedisData(); redisData.setData(shop); redisData.setExpireTime(LocalDateTime.now().plusSeconds(expireSeconds));
stringRedisTemplate.opsForValue().set(CACHE_SHOP_KEY+id,JSONUtil.toJsonStr(redisData));}封装Redis工具类
基于StringRedisTemplate封装一个缓存工具类,满足下列需求:
- 方法1:将任意Java对象序列化为json并存储在string类型的key中,并且可以设置TTL过期时间
- 方法2:将任意Java对象序列化为json并存储在string类型的key中,并且可以设置逻辑过期时间,用于处理缓
存击穿问题
- 方法3:根据指定的key查询缓存,并反序列化为指定类型,利用缓存空值的方式解决缓存穿透问题
- 方法4:根据指定的key查询缓存,并反序列化为指定类型,需要利用逻辑过期解决缓存击穿问题
@Slf4j@Componentpublic class CacheClient {
private final StringRedisTemplate stringRedisTemplate;
private static final ExecutorService CACHE_REBUILD_EXECUTOR = Executors.newFixedThreadPool(10);
public CacheClient(StringRedisTemplate stringRedisTemplate) { this.stringRedisTemplate = stringRedisTemplate; }
public void set(String key, Object value, Long time, TimeUnit unit) { stringRedisTemplate.opsForValue().set(key, JSONUtil.toJsonStr(value), time, unit); }
public void setWithLogicalExpire(String key, Object value, Long time, TimeUnit unit) { // 设置逻辑过期 RedisData redisData = new RedisData(); redisData.setData(value); redisData.setExpireTime(LocalDateTime.now().plusSeconds(unit.toSeconds(time))); // 写入Redis stringRedisTemplate.opsForValue().set(key, JSONUtil.toJsonStr(redisData)); }
public <R,ID> R queryWithPassThrough( String keyPrefix, ID id, Class<R> type, Function<ID, R> dbFallback, Long time, TimeUnit unit){ String key = keyPrefix + id; // 1.从redis查询商铺缓存 String json = stringRedisTemplate.opsForValue().get(key); // 2.判断是否存在 if (StrUtil.isNotBlank(json)) { // 3.存在,直接返回 return JSONUtil.toBean(json, type); } // 判断命中的是否是空值 if (json != null) { // 返回一个错误信息 return null; }
// 4.不存在,根据id查询数据库 R r = dbFallback.apply(id); // 5.不存在,返回错误 if (r == null) { // 将空值写入redis stringRedisTemplate.opsForValue().set(key, "", CACHE_NULL_TTL, TimeUnit.MINUTES); // 返回错误信息 return null; } // 6.存在,写入redis this.set(key, r, time, unit); return r; }
public <R, ID> R queryWithLogicalExpire( String keyPrefix, ID id, Class<R> type, Function<ID, R> dbFallback, Long time, TimeUnit unit) { String key = keyPrefix + id; // 1.从redis查询商铺缓存 String json = stringRedisTemplate.opsForValue().get(key); // 2.判断是否存在 if (StrUtil.isBlank(json)) { // 3.存在,直接返回 return null; } // 4.命中,需要先把json反序列化为对象 RedisData redisData = JSONUtil.toBean(json, RedisData.class); R r = JSONUtil.toBean((JSONObject) redisData.getData(), type); LocalDateTime expireTime = redisData.getExpireTime(); // 5.判断是否过期 if(expireTime.isAfter(LocalDateTime.now())) { // 5.1.未过期,直接返回店铺信息 return r; } // 5.2.已过期,需要缓存重建 // 6.缓存重建 // 6.1.获取互斥锁 String lockKey = LOCK_SHOP_KEY + id; boolean isLock = tryLock(lockKey); // 6.2.判断是否获取锁成功 if (isLock){ // 6.3.成功,开启独立线程,实现缓存重建 CACHE_REBUILD_EXECUTOR.submit(() -> { try { // 查询数据库 R newR = dbFallback.apply(id); // 重建缓存 this.setWithLogicalExpire(key, newR, time, unit); } catch (Exception e) { throw new RuntimeException(e); }finally { // 释放锁 unlock(lockKey); } }); } // 6.4.返回过期的商铺信息 return r; }
public <R, ID> R queryWithMutex( String keyPrefix, ID id, Class<R> type, Function<ID, R> dbFallback, Long time, TimeUnit unit) { String key = keyPrefix + id; // 1.从redis查询商铺缓存 String shopJson = stringRedisTemplate.opsForValue().get(key); // 2.判断是否存在 if (StrUtil.isNotBlank(shopJson)) { // 3.存在,直接返回 return JSONUtil.toBean(shopJson, type); } // 判断命中的是否是空值 if (shopJson != null) { // 返回一个错误信息 return null; }
// 4.实现缓存重建 // 4.1.获取互斥锁 String lockKey = LOCK_SHOP_KEY + id; R r = null; try { boolean isLock = tryLock(lockKey); // 4.2.判断是否获取成功 if (!isLock) { // 4.3.获取锁失败,休眠并重试 Thread.sleep(50); return queryWithMutex(keyPrefix, id, type, dbFallback, time, unit); } // 4.4.获取锁成功,根据id查询数据库 r = dbFallback.apply(id); // 5.不存在,返回错误 if (r == null) { // 将空值写入redis stringRedisTemplate.opsForValue().set(key, "", CACHE_NULL_TTL, TimeUnit.MINUTES); // 返回错误信息 return null; } // 6.存在,写入redis this.set(key, r, time, unit); } catch (InterruptedException e) { throw new RuntimeException(e); }finally { // 7.释放锁 unlock(lockKey); } // 8.返回 return r; }
private boolean tryLock(String key) { Boolean flag = stringRedisTemplate.opsForValue().setIfAbsent(key, "1", 10, TimeUnit.SECONDS); return BooleanUtil.isTrue(flag); }
private void unlock(String key) { stringRedisTemplate.delete(key); }}优惠券秒杀
全局同一ID
全局ID生成器,是一种在分布式系统下用来生成全局唯一ID的工具,为了增加ID的安全性,我们可以不直接使用Redis自增的数值,而是拼接一些其它信息:
ID的组成部分:符号位:1bit,永远为0
时间戳:31bit,以秒为单位,可以使用69年
序列号:32bit,秒内的计数器,支持每秒产生2^32个不同ID
@Componentpublic class RedisIdWorker { /** * 开始时间戳 */ private static final long BEGIN_TIMESTAMP = 1640995200L; /** * 序列号的位数 */ private static final int COUNT_BITS = 32;
private StringRedisTemplate stringRedisTemplate;
public RedisIdWorker(StringRedisTemplate stringRedisTemplate) { this.stringRedisTemplate = stringRedisTemplate; }
public long nextId(String keyPrefix) { // 1.生成时间戳 LocalDateTime now = LocalDateTime.now(); long nowSecond = now.toEpochSecond(ZoneOffset.UTC); long timestamp = nowSecond - BEGIN_TIMESTAMP;
// 2.生成序列号 // 2.1.获取当前日期,精确到天 String date = now.format(DateTimeFormatter.ofPattern("yyyy:MM:dd")); // 2.2.自增长 long count = stringRedisTemplate.opsForValue().increment("icr:" + keyPrefix + ":" + date);
// 3.拼接并返回 return timestamp << COUNT_BITS | count; }}添加秒杀券:
@Override@Transactionalpublic void addSeckillVoucher(Voucher voucher) { // 保存优惠券 save(voucher); // 保存秒杀信息 SeckillVoucher seckillVoucher = new SeckillVoucher(); seckillVoucher.setVoucherId(voucher.getId()); seckillVoucher.setStock(voucher.getStock()); seckillVoucher.setBeginTime(voucher.getBeginTime()); seckillVoucher.setEndTime(voucher.getEndTime()); seckillVoucherService.save(seckillVoucher); // 保存秒杀库存到Redis中 stringRedisTemplate.opsForValue().set(SECKILL_STOCK_KEY + voucher.getId(), voucher.getStock().toString());}秒杀下单
下单时需要判断两点:
- 秒杀是否开始或结束,如果尚未开始或已经结束则无法下单
- 库存是否充足,不足则无法下单
@Overridepublic Result seckillVoucher(Long voucherId) { // 1.查询优惠券 SeckillVoucher voucher = seckillVoucherService.getById(voucherId); // 2.判断秒杀是否开始 if (voucher.getBeginTime().isAfter(LocalDateTime.now())) { // 尚未开始 return Result.fail("秒杀尚未开始!"); } // 3.判断秒杀是否已经结束 if (voucher.getEndTime().isBefore(LocalDateTime.now())) { // 尚未开始 return Result.fail("秒杀已经结束!"); } // 4.判断库存是否充足 if (voucher.getStock() < 1) { // 库存不足 return Result.fail("库存不足!"); } //5,扣减库存 boolean success = seckillVoucherService.update() .setSql("stock= stock -1") .eq("voucher_id", voucherId).update(); if (!success) { //扣减库存 return Result.fail("库存不足!"); } //6.创建订单 VoucherOrder voucherOrder = new VoucherOrder(); // 6.1.订单id long orderId = redisIdWorker.nextId("order"); voucherOrder.setId(orderId); // 6.2.用户id Long userId = UserHolder.getUser().getId(); voucherOrder.setUserId(userId); // 6.3.代金券id voucherOrder.setVoucherId(voucherId); save(voucherOrder);
return Result.ok(orderId);}库存超卖
超卖问题是典型的多线程安全问题,针对这一问题的常见解决方案就是加锁
悲观锁:
悲观锁可以实现对于数据的串行化执行,比如syn,和lock都是悲观锁的代表,同时,悲观锁中又可以再细分为公平锁,非公平锁,可重入锁,等等
乐观锁:
乐观锁:会有一个版本号,每次操作数据会对版本号+1,再提交回数据时,会去校验是否比之前的版本大1 ,如果大1 ,则进行操作成功,这套机制的核心逻辑在于,如果在操作过程中,版本号只比原来大1 ,那么就意味着操作过程中没有人对他进行过修改,他的操作就是安全的,如果不大1,则数据被修改过,当然乐观锁还有一些变种的处理方式比如cas
乐观锁的典型代表:就是cas,利用cas进行无锁化机制加锁,var5 是操作前读取的内存值,while中的var1+var2 是预估值,如果预估值 == 内存值,则代表中间没有被人修改过,此时就将新值去替换 内存值
其中do while 是为了在操作失败时,再次进行自旋操作,即把之前的逻辑再操作一次。
boolean success = seckillVoucherService.update() .setSql("stock= stock -1") .eq("voucher_id", voucherId) .gt("stock",0) .update(); //where id = ? and stock > 0一人一单
基本逻辑:
// 5.一人一单逻辑// 5.1.用户idLong userId = UserHolder.getUser().getId();int count = query().eq("user_id", userId).eq("voucher_id", voucherId).count();// 5.2.判断是否存在if (count > 0) { // 用户已经购买过了 return Result.fail("用户已经购买过一次!");}并发情况:悲观锁
// maven<dependency> <groupId>org.aspectj</groupId> <artifactId>aspectjweaver</artifactId></dependency>
// Servicesynchronized(userId.toString().intern()) { //获取代理对象(事务) IVoucherOrderService proxy = (IVoucherOrderService) AopContext.currentProxy(); return proxy.createVoucherOrder(voucherId);}
@Transactionalpublic Result createVoucherOrder(Long voucherId) { // 5.一人一单逻辑 // 5.1.用户id Long userId = UserHolder.getUser().getId();
int count = query().eq("user_id", userId).eq("voucher_id", voucherId).count(); // 5.2.判断是否存在 if (count > 0) { // 用户已经购买过了 return Result.fail("用户已经购买过一次!"); }
//5,扣减库存 boolean success = seckillVoucherService.update() .setSql("stock= stock -1") .eq("voucher_id", voucherId) .gt("stock",0) .update(); //where id = ? and stock > 0 if (!success) { //扣减库存 return Result.fail("库存不足!"); } //6.创建订单 VoucherOrder voucherOrder = new VoucherOrder(); // 6.1.订单id long orderId = redisIdWorker.nextId("order"); voucherOrder.setId(orderId); // 6.2.用户id voucherOrder.setUserId(userId); // 6.3.代金券id voucherOrder.setVoucherId(voucherId); save(voucherOrder); return Result.ok(orderId);
}分布式锁
集群环境下的并发问题
由于现在我们部署了多个tomcat,每个tomcat都有一个属于自己的jvm,那么假设在服务器A的tomcat内部,有两个线程,这两个线程由于使用的是同一份代码,那么他们的锁对象是同一个,是可以实现互斥的,但是如果现在是服务器B的tomcat内部,又有两个线程,但是他们的锁对象写的虽然和服务器A一样,但是锁对象却不是同一个,所以线程3和线程4可以实现互斥,但是却无法和线程1和线程2实现互斥,这就是 集群环境下,syn锁失效的原因,在这种情况下,我们就需要使用分布式锁来解决这个问题。
分布式锁:满足分布式系统或集群模式下多进程可见并且互斥的锁。
分布式锁的核心思想就是让大家都使用同一把锁,只要大家使用的是同一把锁,那么我们就能锁住线程,不让线程进行,让程序串行执行,这就是分布式锁的核心思路
分布式锁的要求
可见性:多个线程都能看到相同的结果,注意:这个地方说的可见性并不是并发编程中指的内存可见性,只是说多个进程之间都能感知到变化的意思
互斥:互斥是分布式锁的最基本的条件,使得程序串行执行
高可用:程序不易崩溃,时时刻刻都保证较高的可用性
高性能:由于加锁本身就让性能降低,所有对于分布式锁本身需要他就较高的加锁性能和释放锁性能
安全性:安全也是程序中必不可少的一环
常见的分布式锁有三种
Mysql:mysql本身就带有锁机制,但是由于mysql性能本身一般,所以采用分布式锁的情况下,其实使用mysql作为分布式锁比较少见
Redis:redis作为分布式锁是非常常见的一种使用方式,现在企业级开发中基本都使用redis或者zookeeper作为分布式锁,利用setnx这个方法,如果插入key成功,则表示获得到了锁,如果有人插入成功,其他人插入失败则表示无法获得到锁,利用这套逻辑来实现分布式锁
Zookeeper:zookeeper也是企业级开发中较好的一个实现分布式锁的方案,利用节点的唯一性和有序性实现互斥
分布式锁实现思路
- 获取锁:
- 互斥:确保只能有一个线程获取锁
- 非阻塞:尝试一次,成功返回true,失败返回false
- 释放锁:
- 手动释放
- 超时释放:获取锁时添加一个超时时间
@Overridepublic boolean tryLock(long timeoutSec) { // 获取线程标示 Long threadId = Thread.currentThread().getId(); // 获取锁 Boolean success = stringRedisTemplate.opsForValue() .setIfAbsent(KEY_PREFIX + name, threadId + "", timeoutSec, TimeUnit.SECONDS); return Boolean.TRUE.equals(success);}
@Overridepublic void unlock() { //通过del删除锁 stringRedisTemplate.delete(KEY_PREFIX + name);}
//业务代码//创建锁对象(新增代码)SimpleRedisLock lock = new SimpleRedisLock("order:" + userId, stringRedisTemplate);//获取锁对象boolean isLock = lock.tryLock(1200);//加锁失败if (!isLock) { return Result.fail("不允许重复下单");}try { //获取代理对象(事务) IVoucherOrderService proxy = (IVoucherOrderService) AopContext.currentProxy(); return proxy.createVoucherOrder(voucherId);} finally { //释放锁 lock.unlock();}分布式锁误删
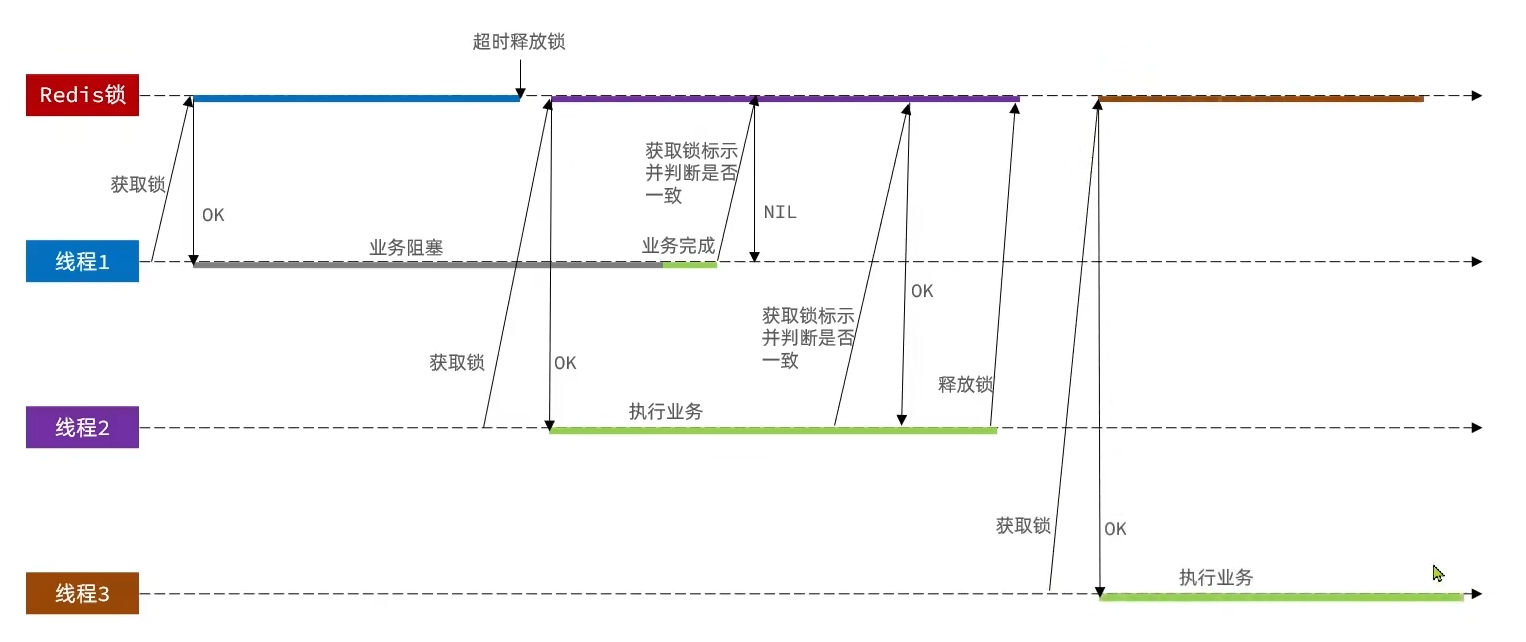
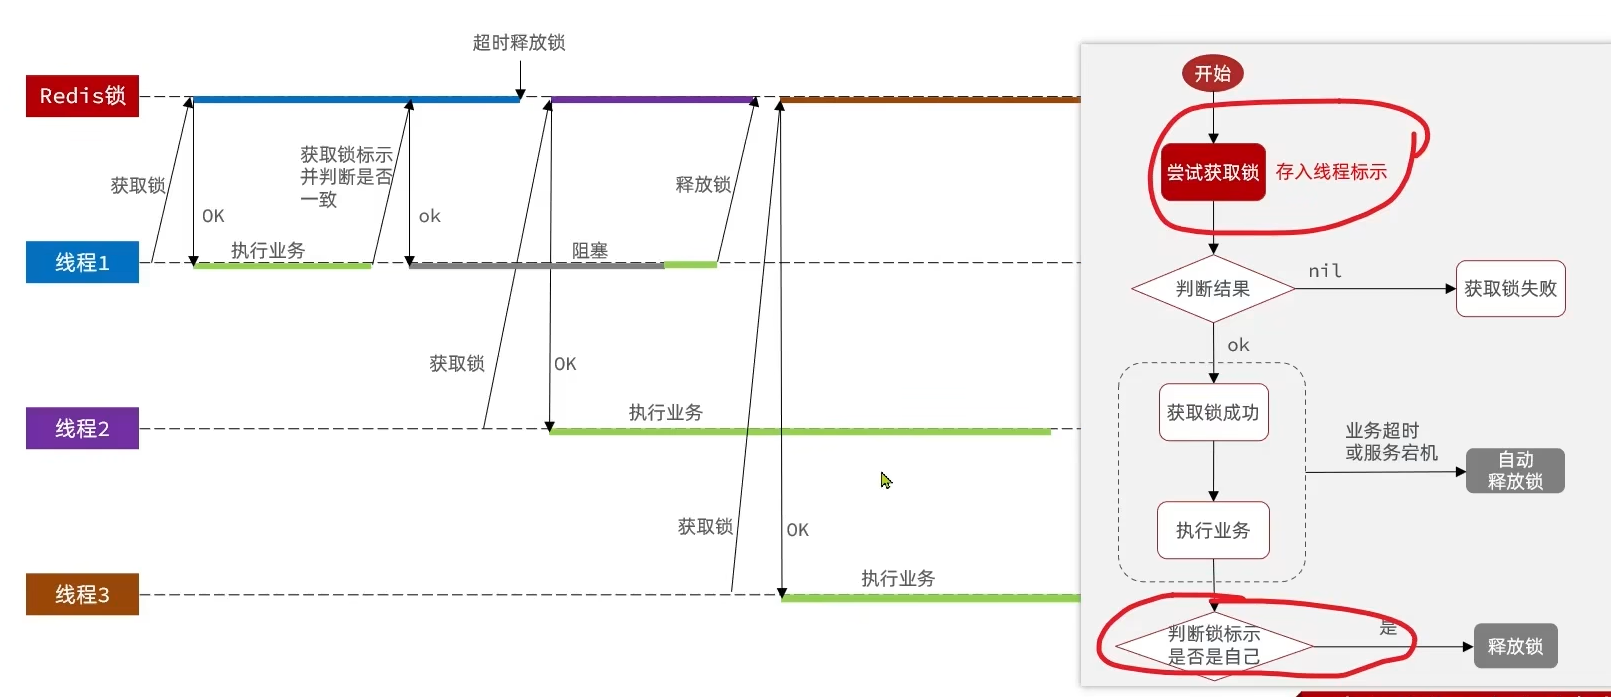
解决:在存入锁时,放入自己线程的标识,在删除锁时,判断当前这把锁的标识是不是自己存入的,如果是,则进行删除,如果不是,则不进行删除
private static final String ID_PREFIX = UUID.randomUUID().toString() + "-";@Overridepublic boolean tryLock(long timeoutSec) { // 获取线程标示 String threadId = ID_PREFIX + Thread.currentThread().getId(); // 获取锁 Boolean success = stringRedisTemplate.opsForValue() .setIfAbsent(KEY_PREFIX + name, threadId, timeoutSec, TimeUnit.SECONDS); return Boolean.TRUE.equals(success);}
@Overridepublic void unlock() { // 获取线程标示 String threadId = ID_PREFIX + Thread.currentThread().getId(); String id = stringRedisTemplate.opsForValue().get(KEY_PREFIX + name);
//通过del删除锁 if(threadId.equals(id)){ stringRedisTemplate.delete(KEY_PREFIX + name); }}分布式锁的原子性问题
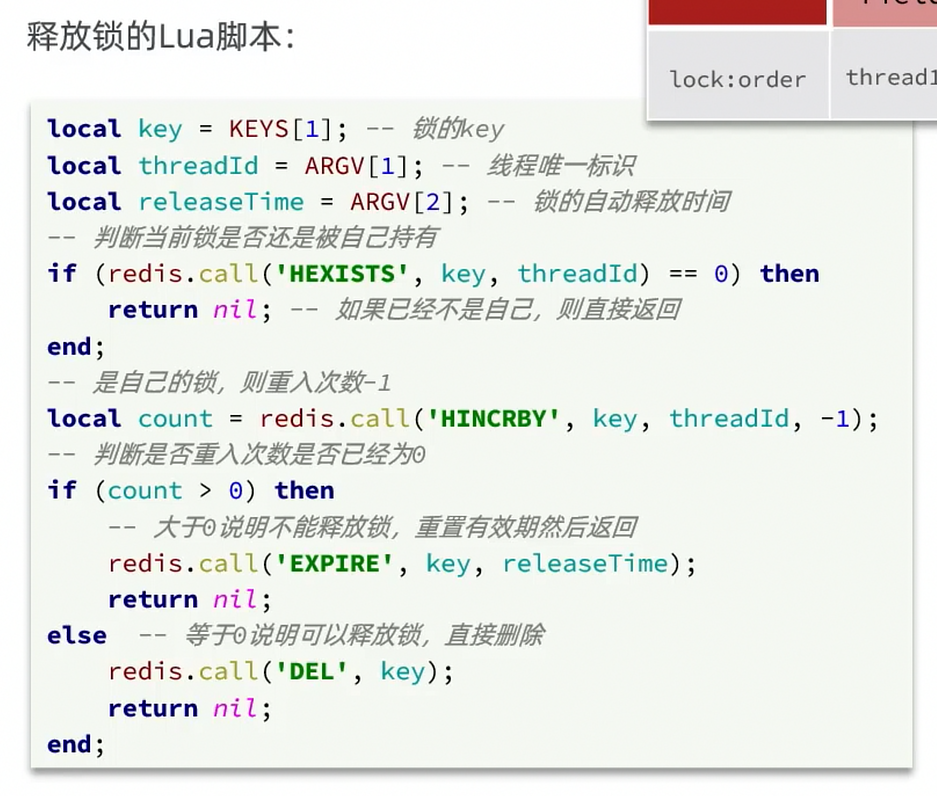
解决:Lua脚本一个脚本写入多条Redis命令
- 获取锁中的线程标示
- 判断是否与指定的标示(当前线程标示)一致
- 如果一致则释放锁(删除)
- 如果不一致则什么都不做
-- 这里的 KEYS[1] 就是锁的key,这里的ARGV[1] 就是当前线程标示-- 获取锁中的标示,判断是否与当前线程标示一致if (redis.call('GET', KEYS[1]) == ARGV[1]) then -- 一致,则删除锁 return redis.call('DEL', KEYS[1])end-- 不一致,则直接返回return 0private static final DefaultRedisScript<Long> UNLOCK_SCRIPT; static { UNLOCK_SCRIPT = new DefaultRedisScript<>(); UNLOCK_SCRIPT.setLocation(new ClassPathResource("unlock.lua")); UNLOCK_SCRIPT.setResultType(Long.class); }
public void unlock() { // 调用lua脚本 stringRedisTemplate.execute( UNLOCK_SCRIPT, Collections.singletonList(KEY_PREFIX + name), ID_PREFIX + Thread.currentThread().getId());}分布式锁 redisson
setnx的分布式锁问题:
重入问题:重入问题是指 获得锁的线程可以再次进入到相同的锁的代码块中,可重入锁的意义在于防止死锁
不可重试:是指目前的分布式只能尝试一次,我们认为合理的情况是:当线程在获得锁失败后,他应该能再次尝试获得锁。
- *超时释放:**我们在加锁时增加了过期时间,这样的我们可以防止死锁,但是如果卡顿的时间超长,虽然我们采用了lua表达式防止删锁的时候,误删别人的锁,但是毕竟没有锁住,有安全隐患
主从一致性: 如果Redis提供了主从集群,当我们向集群写数据时,主机需要异步的将数据同步给从机,而万一在同步过去之前,主机宕机了,就会出现死锁问题。
Redisson是一个在Redis的基础上实现的Java驻内存数据网格(In-Memory Data Grid)。它不仅提供了一系列的分布式的Java常用对象,还提供了许多分布式服务,其中就包含了各种分布式锁的实现。
redisson使用
<dependency> <groupId>org.redisson</groupId> <artifactId>redisson</artifactId> <version>3.13.6</version></dependency>@Configurationpublic class RedissonConfig { @Bean public RedissonClient redissonClient(){ // 配置 Config config = new Config(); config.useSingleServer().setAddress("redis://127.0.0.1:6379"); // 创建RedissonClient对象 return Redisson.create(config); }}
//创建锁对象RLock lock = redissonClient.getLock("lock:order:" + userId);//获取锁对象boolean isLock = lock.tryLock();
//加锁失败if (!isLock) { return Result.fail("不允许重复下单");}try { //获取代理对象(事务) IVoucherOrderService proxy = (IVoucherOrderService) AopContext.currentProxy(); return proxy.createVoucherOrder(voucherId);} finally { //释放锁 lock.unlock();}redisson可重入锁
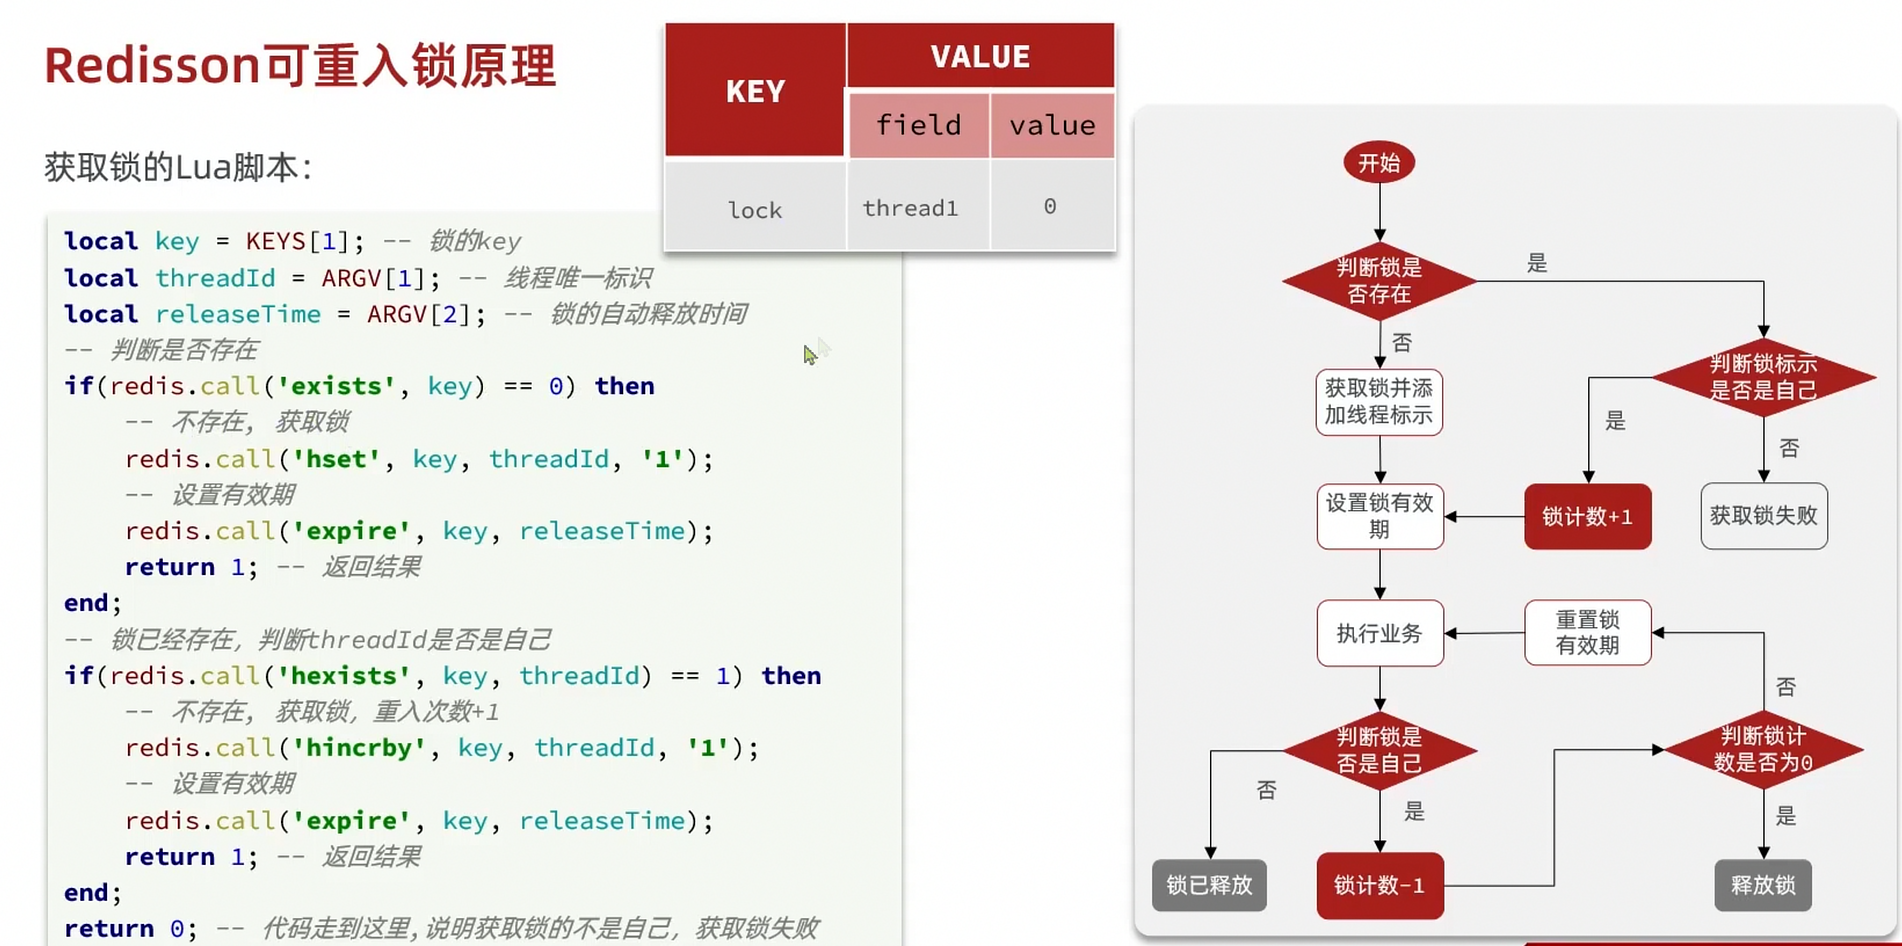
通过hash表结构记录锁的线程及重入次数
redisson锁重试和WatchDog机制
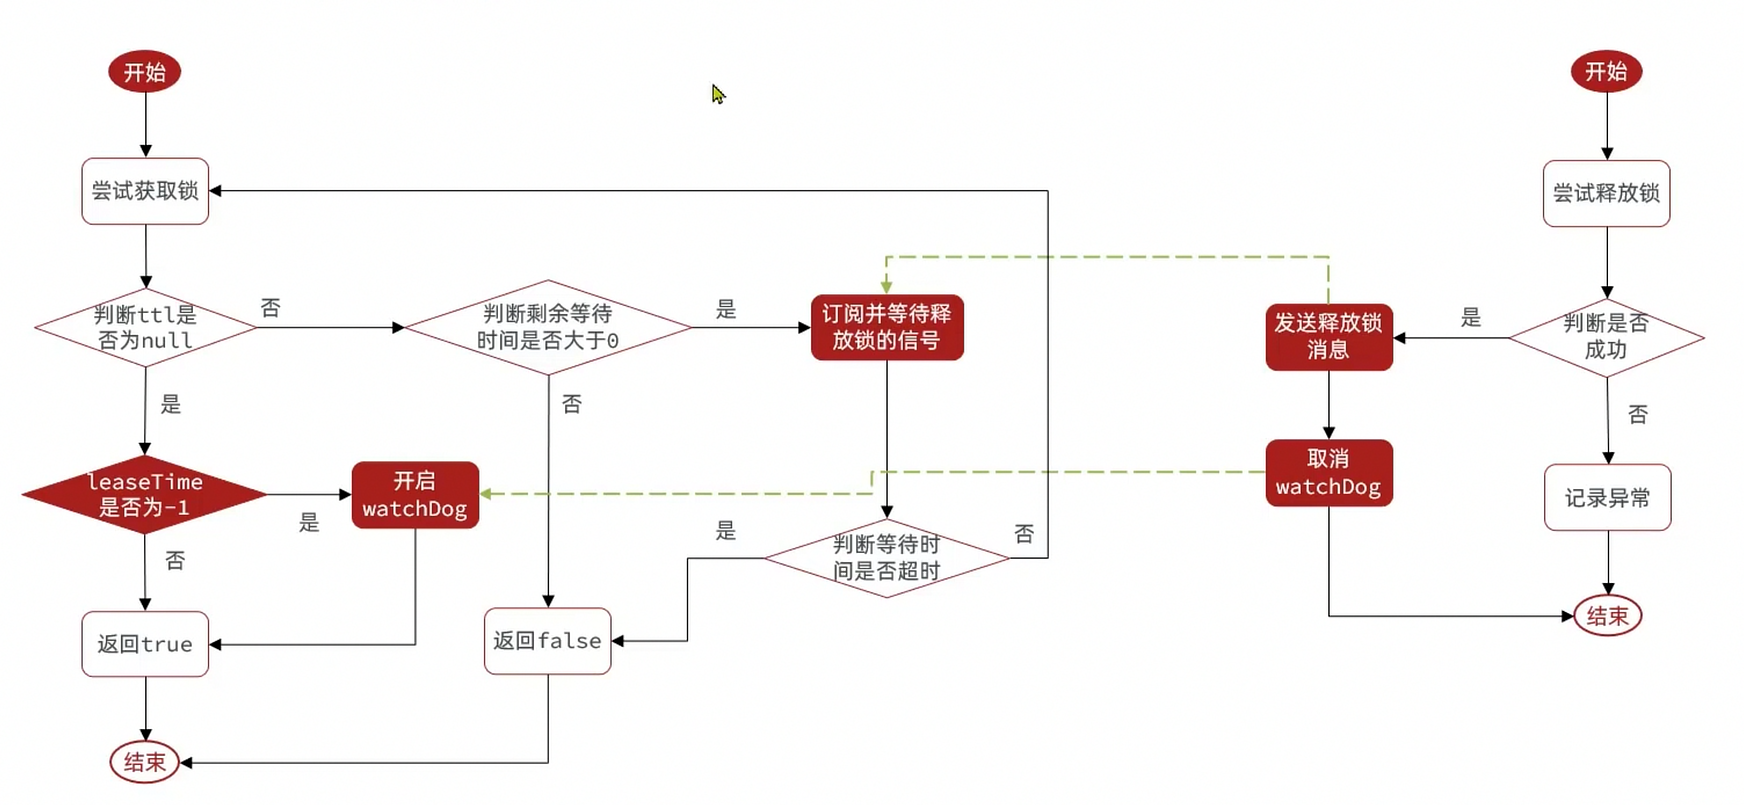
- 可重试:利用信号量和PubSub功能实现等待、唤醒,获取锁失败的重试机制
- 超时续约:利用watchDog,间隔一段时间(releaseTime/3),重置超时时间
redisson解决主从一致 - MutiLock
为了解决这个问题,redission提出来了MutiLock锁,使用这把锁咱们就不使用主从了,每个节点的地位都是一样的, 这把锁加锁的逻辑需要写入到每一个主丛节点上,只有所有的服务器都写入成功,此时才是加锁成功,假设现在某个节点挂了,那么他去获得锁的时候,只要有一个节点拿不到,都不能算是加锁成功,就保证了加锁的可靠性。
当我们去设置了多个锁时,redission会将多个锁添加到一个集合中,然后用while循环去不停去尝试拿锁,但是会有一个总共的加锁时间,这个时间是用需要加锁的个数 * 1500ms ,假设有3个锁,那么时间就是4500ms,假设在这4500ms内,所有的锁都加锁成功, 那么此时才算是加锁成功,如果在4500ms有线程加锁失败,则会再次去进行重试
秒杀优化
异步秒杀
需求:
- 新增秒杀优惠券的同时,将优惠券信息保存到Redis中
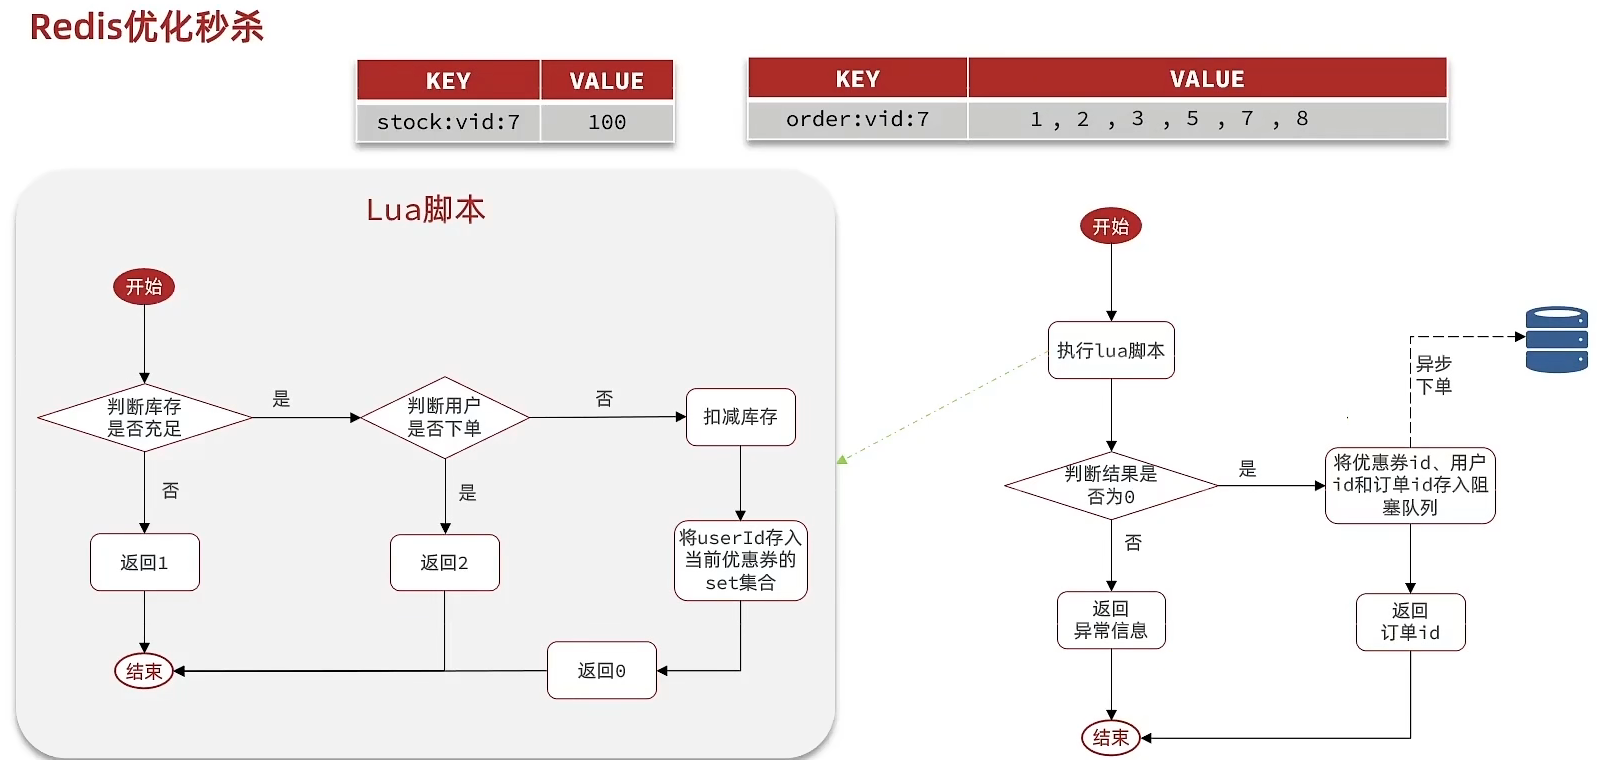
- 基于Lua脚本,判断秒杀库存、一人一单,决定用户是否抢购成功
- 如果抢购成功,将优惠券id和用户id封装后存入阻塞队列
- 开启线程任务,不断从阻塞队列中获取信息,实现异步下单功能
lua脚本判断:
-- 1.参数列表-- 1.1.优惠券idlocal voucherId = ARGV[1]-- 1.2.用户idlocal userId = ARGV[2]-- 1.3.订单idlocal orderId = ARGV[3]
-- 2.数据key-- 2.1.库存keylocal stockKey = 'seckill:stock:' .. voucherId-- 2.2.订单keylocal orderKey = 'seckill:order:' .. voucherId
-- 3.脚本业务-- 3.1.判断库存是否充足 get stockKeyif(tonumber(redis.call('get', stockKey)) <= 0) then -- 3.2.库存不足,返回1 return 1end-- 3.2.判断用户是否下单 SISMEMBER orderKey userIdif(redis.call('sismember', orderKey, userId) == 1) then -- 3.3.存在,说明是重复下单,返回2 return 2end-- 3.4.扣库存 incrby stockKey -1redis.call('incrby', stockKey, -1)-- 3.5.下单(保存用户)sadd orderKey userIdredis.call('sadd', orderKey, userId)-- 3.6.发送消息到队列中, XADD stream.orders * k1 v1 k2 v2 ...redis.call('xadd', 'stream.orders', '*', 'userId', userId, 'voucherId', voucherId, 'id', orderId)return 0阻塞队列实现:
//异步处理线程池private static final ExecutorService SECKILL_ORDER_EXECUTOR = Executors.newSingleThreadExecutor();
//在类初始化之后执行,因为当这个类初始化好了之后,随时都是有可能要执行的@PostConstructprivate void init() { SECKILL_ORDER_EXECUTOR.submit(new VoucherOrderHandler());}// 用于线程池处理的任务// 当初始化完毕后,就会去从对列中去拿信息 private class VoucherOrderHandler implements Runnable{
@Override public void run() { while (true){ try { // 1.获取队列中的订单信息 VoucherOrder voucherOrder = orderTasks.take(); // 2.创建订单 handleVoucherOrder(voucherOrder); } catch (Exception e) { log.error("处理订单异常", e); } } }
private void handleVoucherOrder(VoucherOrder voucherOrder) { //1.获取用户 Long userId = voucherOrder.getUserId(); // 2.创建锁对象 RLock redisLock = redissonClient.getLock("lock:order:" + userId); // 3.尝试获取锁 boolean isLock = redisLock.lock(); // 4.判断是否获得锁成功 if (!isLock) { // 获取锁失败,直接返回失败或者重试 log.error("不允许重复下单!"); return; } try { //注意:由于是spring的事务是放在threadLocal中,此时的是多线程,事务会失效 proxy.createVoucherOrder(voucherOrder); } finally { // 释放锁 redisLock.unlock(); } } }
// 主程序private BlockingQueue<VoucherOrder> orderTasks =new ArrayBlockingQueue<>(1024 * 1024);
@Override public Result seckillVoucher(Long voucherId) { Long userId = UserHolder.getUser().getId(); long orderId = redisIdWorker.nextId("order"); // 1.执行lua脚本 Long result = stringRedisTemplate.execute( SECKILL_SCRIPT, Collections.emptyList(), voucherId.toString(), userId.toString(), String.valueOf(orderId) ); int r = result.intValue(); // 2.判断结果是否为0 if (r != 0) { // 2.1.不为0 ,代表没有购买资格 return Result.fail(r == 1 ? "库存不足" : "不能重复下单"); } VoucherOrder voucherOrder = new VoucherOrder(); // 2.3.订单id long orderId = redisIdWorker.nextId("order"); voucherOrder.setId(orderId); // 2.4.用户id voucherOrder.setUserId(userId); // 2.5.代金券id voucherOrder.setVoucherId(voucherId); // 2.6.放入阻塞队列 orderTasks.add(voucherOrder); //3.获取代理对象 proxy = (IVoucherOrderService)AopContext.currentProxy(); //4.返回订单id return Result.ok(orderId); }
@Transactional public void createVoucherOrder(VoucherOrder voucherOrder) { Long userId = voucherOrder.getUserId(); // 5.1.查询订单 int count = query().eq("user_id", userId).eq("voucher_id", voucherOrder.getVoucherId()).count(); // 5.2.判断是否存在 if (count > 0) { // 用户已经购买过了 log.error("用户已经购买过了"); return ; }
// 6.扣减库存 boolean success = seckillVoucherService.update() .setSql("stock = stock - 1") // set stock = stock - 1 .eq("voucher_id", voucherOrder.getVoucherId()).gt("stock", 0) // where id = ? and stock > 0 .update(); if (!success) { // 扣减失败 log.error("库存不足"); return ; } save(voucherOrder); }优化思路:
- 先利用Redis完成库存余量、一人一单判断,完成抢单业务
- 再将下单业务放入阻塞队列,利用独立线程异步下单
- 基于阻塞队列的异步秒杀存在哪些问题?
- 内存限制问题
- 数据安全问题
Redis消息队列
什么是消息队列:字面意思就是存放消息的队列。最简单的消息队列模型包括3个角色:
- 消息队列:存储和管理消息,也被称为消息代理(Message Broker)
- 生产者:发送消息到消息队列
- 消费者:从消息队列获取消息并处理消息
使用队列的好处在于 解耦
Redis List消息队列
消息队列(Message Queue),字面意思就是存放消息的队列。而Redis的list数据结构是一个双向链表,很容易模拟出队列效果。
队列是入口和出口不在一边,因此我们可以利用:LPUSH 结合 RPOP、或者 RPUSH 结合 LPOP来实现。 不过要注意的是,当队列中没有消息时RPOP或LPOP操作会返回null,并不像JVM的阻塞队列那样会阻塞并等待消息。因此这里应该使用BRPOP或者BLPOP来实现阻塞效果。
优点:
- 利用Redis存储,不受限于JVM内存上限
- 基于Redis的持久化机制,数据安全性有保证
- 可以满足消息有序性
缺点:
- 无法避免消息丢失
- 只支持单消费者
Redis PubSub消息队列
PubSub(发布订阅)是Redis2.0版本引入的消息传递模型。顾名思义,消费者可以订阅一个或多个channel,生产者向对应channel发送消息后,所有订阅者都能收到相关消息。
SUBSCRIBE channel [channel] :订阅一个或多个频道 PUBLISH channel msg :向一个频道发送消息 PSUBSCRIBE pattern[pattern] :订阅与pattern格式匹配的所有频道
优点:
- 采用发布订阅模型,支持多生产、多消费
缺点:
- 不支持数据持久化
- 无法避免消息丢失
- 消息堆积有上限,超出时数据丢失
Redis 基于Stream的消息队列
Stream 是 Redis 5.0 引入的一种新数据类型,可以实现一个功能非常完善的消息队列。
xadd users * name jackxread count 1 streams users 0 -- $注意:当我们指定起始ID为$时,代表读取最新的消息,如果我们处理一条消息的过程中,又有超过1条以上的消息到达队列,则下次获取时也只能获取到最新的一条,会出现漏读消息的问题
STREAM类型消息队列的XREAD命令特点:
- 消息可回溯
- 一个消息可以被多个消费者读取
- 可以阻塞读取
- 有消息漏读的风险
消费者组
消费者组(Consumer Group):将多个消费者划分到一个组中,监听同一个队列。具备下列特点:
- 消息分流:不重复消费
- 消息标示:记录最后一个被处理的消息
- 消息确认:通过XACK确认消息,从pending-list移除
创建消费者组:
XGROUP CREATE key groupName ID [MKSTREAM]key:队列名称 groupName:消费者组名称 ID:起始ID标示,$代表队列中最后一个消息,0则代表队列中第一个消息 MKSTREAM:队列不存在时自动创建队列
从消费者组读取消息:
XREADGROUP GROUP group consumer [COUNT count] [BLOCK milliseconds] [NOACK] STREAMS key [key ...] ID [ID ...]- group:消费组名称
- consumer:消费者名称,如果消费者不存在,会自动创建一个消费者
- count:本次查询的最大数量
- BLOCK milliseconds:当没有消息时最长等待时间
- NOACK:无需手动ACK,获取到消息后自动确认
- STREAMS key:指定队列名称
- ID:获取消息的起始ID:
- ”>“:从下一个未消费的消息开始
- 其它:根据指定id从pending-list中获取已消费但未确认的消息,例如0,是从pending-list中的第一个消息开始
STREAM类型消息队列的XREADGROUP命令特点:
- 消息可回溯
- 可以多消费者争抢消息,加快消费速度
- 可以阻塞读取
- 没有消息漏读的风险
- 有消息确认机制,保证消息至少被消费一次
| List | PubSub | Stream | |
|---|---|---|---|
| 消息持久化 | 支持 | 不支持 | 支持 |
| 阻塞读取 | 支持 | 支持 | 支持 |
| 消息堆积处理 | 受限内存空间,通过多消费者加快处理 | 受限消费者缓冲区 | 受限队列长度,利用消费者组提高消费速度,减少堆积 |
| 消息确认机制 | 不支持 | 不支持 | 支持 |
| 消息回溯 | 不支持 | 不支持 | 支持 |
需求:
- 创建一个Stream类型的消息队列,名为stream.orders
- 修改之前的秒杀下单Lua脚本,在认定有抢购资格后,直接向stream.orders中添加消息,内容包含voucherId、userId、orderId
- 项目启动时,开启一个线程任务,尝试获取stream.orders中的消息,完成下单
XGROUP CREATE stream.orders g1 0 MKSTREAM # 生成消息队列private class VoucherOrderHandler implements Runnable {
@Override public void run() { while (true) { try { // 1.获取消息队列中的订单信息 XREADGROUP GROUP g1 c1 COUNT 1 BLOCK 2000 STREAMS s1 > List<MapRecord<String, Object, Object>> list = stringRedisTemplate.opsForStream().read( Consumer.from("g1", "c1"), StreamReadOptions.empty().count(1).block(Duration.ofSeconds(2)), StreamOffset.create("stream.orders", ReadOffset.lastConsumed()) ); // 2.判断订单信息是否为空 if (list == null || list.isEmpty()) { // 如果为null,说明没有消息,继续下一次循环 continue; } // 解析数据 MapRecord<String, Object, Object> record = list.get(0); Map<Object, Object> value = record.getValue(); VoucherOrder voucherOrder = BeanUtil.fillBeanWithMap(value, new VoucherOrder(), true); // 3.创建订单 createVoucherOrder(voucherOrder); // 4.确认消息 XACK stringRedisTemplate.opsForStream().acknowledge("s1", "g1", record.getId()); } catch (Exception e) { log.error("处理订单异常", e); //处理异常消息 handlePendingList(); } } }
private void handlePendingList() { while (true) { try { // 1.获取pending-list中的订单信息 XREADGROUP GROUP g1 c1 COUNT 1 BLOCK 2000 STREAMS s1 0 List<MapRecord<String, Object, Object>> list = stringRedisTemplate.opsForStream().read( Consumer.from("g1", "c1"), StreamReadOptions.empty().count(1), StreamOffset.create("stream.orders", ReadOffset.from("0")) ); // 2.判断订单信息是否为空 if (list == null || list.isEmpty()) { // 如果为null,说明没有异常消息,结束循环 break; } // 解析数据 MapRecord<String, Object, Object> record = list.get(0); Map<Object, Object> value = record.getValue(); VoucherOrder voucherOrder = BeanUtil.fillBeanWithMap(value, new VoucherOrder(), true); // 3.创建订单 createVoucherOrder(voucherOrder); // 4.确认消息 XACK stringRedisTemplate.opsForStream().acknowledge("s1", "g1", record.getId()); } catch (Exception e) { log.error("处理pendding订单异常", e); try{ Thread.sleep(20); }catch(Exception e){ e.printStackTrace(); } } } }}达人探店
发布探店笔记
探店笔记类似点评网站的评价,往往是图文结合。对应的表有两个: tb_blog:探店笔记表,包含笔记中的标题、文字、图片等 tb_blog_comments:其他用户对探店笔记的评价
- 上传、发送、查看:
@Slf4j@RestController@RequestMapping("upload")public class UploadController {
@PostMapping("blog") public Result uploadImage(@RequestParam("file") MultipartFile image) { try { // 获取原始文件名称 String originalFilename = image.getOriginalFilename(); // 生成新文件名 String fileName = createNewFileName(originalFilename); // 保存文件 image.transferTo(new File(SystemConstants.IMAGE_UPLOAD_DIR, fileName)); // 返回结果 log.debug("文件上传成功,{}", fileName); return Result.ok(fileName); } catch (IOException e) { throw new RuntimeException("文件上传失败", e); } }}
@PostMappingpublic Result saveBlog(@RequestBody Blog blog) { //获取登录用户 UserDTO user = UserHolder.getUser(); blog.setUpdateTime(user.getId()); //保存探店博文 blogService.saveBlog(blog); //返回id return Result.ok(blog.getId());}
@Overridepublic Result queryBlogById(Long id) { // 1.查询blog Blog blog = getById(id); if (blog == null) { return Result.fail("笔记不存在!"); } // 2.查询blog有关的用户 queryBlogUser(blog);
return Result.ok(blog);}-
点赞
需求:
- 同一个用户只能点赞一次,再次点击则取消点赞
- 如果当前用户已经点赞,则点赞按钮高亮显示(前端已实现,判断字段Blog类的isLike属性)
实现步骤:
- 给Blog类中添加一个isLike字段,标示是否被当前用户点赞
- 修改点赞功能,利用Redis的set集合判断是否点赞过,未点赞过则点赞数+1,已点赞过则点赞数-1
- 修改根据id查询Blog的业务,判断当前登录用户是否点赞过,赋值给isLike字段
- 修改分页查询Blog业务,判断当前登录用户是否点赞过,赋值给isLike字段
private void isBlogLiked(Blog blog) { // 1.获取登录用户 Long userId = UserHolder.getUser().getId(); // 2.判断当前登录用户是否已经点赞 String key = BLOG_LIKED_KEY + blog.getId(); Boolean isMember = stringRedisTemplate.opsForSet().isMember(key, userId.toString()); blog.setIsLike(BooleanUtil.isTrue(isMember));}
@Overridepublic Result likeBlog(Long id) { // 1.获取登录用户 Long userId = UserHolder.getUser().getId(); // 2.判断当前登录用户是否已经点赞 String key = BLOG_LIKED_KEY + id; Boolean isMember = stringRedisTemplate.opsForSet().isMember(key, userId.toString()); if(BooleanUtil.isFalse(isMember)){ //3.如果未点赞,可以点赞 //3.1 数据库点赞数+1 boolean isSuccess = update().setSql("liked = liked + 1").eq("id", id).update(); //3.2 保存用户到Redis的set集合 if(isSuccess){ stringRedisTemplate.opsForSet().add(key,userId.toString()); } }else { //4.如果已点赞,取消点赞 //4.1 数据库点赞数-1 boolean isSuccess = update().setSql("liked = liked - 1").eq("id", id).update(); //4.2 把用户从Redis的set集合移除 if (isSuccess) { stringRedisTemplate.opsForSet().remove(key, userId.toString()); } } return Result.ok();}- 点赞排行榜
修改set为sortedSet:set—>zset
Double score = stringRedisTemplate.opsForZSet().score(key, userId.toString());
stringRedisTemplate.opsForZSet().add(key, userId.toString(), System.currentTimeMillis());stringRedisTemplate.opsForZSet().remove(key, userId.toString());
// 点赞前五显示@Overridepublic Result queryBlogLikes(Long id) { String key = BLOG_LIKED_KEY + id; // 1.查询top5的点赞用户 zrange key 0 4 Set<String> top5 = stringRedisTemplate.opsForZSet().range(key, 0, 4); if (top5 == null || top5.isEmpty()) { return Result.ok(Collections.emptyList()); } // 2.解析出其中的用户id List<Long> ids = top5.stream().map(Long::valueOf).collect(Collectors.toList()); String idStr = StrUtil.join(",", ids); // 3.根据用户id查询用户 WHERE id IN ( 5 , 1 ) ORDER BY FIELD(id, 5, 1) List<UserDTO> userDTOS = userService.query() .in("id", ids).last("ORDER BY FIELD(id," + idStr + ")").list() .stream() .map(user -> BeanUtil.copyProperties(user, UserDTO.class)) .collect(Collectors.toList()); // 4.返回 return Result.ok(userDTOS);}好友关注
关注与取关
需求:基于该表数据结构,实现两个接口:
- 关注和取关接口
- 判断是否关注的接口
FollowController
//关注@PutMapping("/{id}/{isFollow}")public Result follow(@PathVariable("id") Long followUserId, @PathVariable("isFollow") Boolean isFollow) { return followService.follow(followUserId, isFollow);}//取消关注@GetMapping("/or/not/{id}")public Result isFollow(@PathVariable("id") Long followUserId) { return followService.isFollow(followUserId);}FollowService
取消关注service@Overridepublic Result isFollow(Long followUserId) { // 1.获取登录用户 Long userId = UserHolder.getUser().getId(); // 2.查询是否关注 select count(*) from tb_follow where user_id = ? and follow_user_id = ? Integer count = query().eq("user_id", userId).eq("follow_user_id", followUserId).count(); // 3.判断 return Result.ok(count > 0); }
关注service @Override public Result follow(Long followUserId, Boolean isFollow) { // 1.获取登录用户 Long userId = UserHolder.getUser().getId(); String key = "follows:" + userId; // 1.判断到底是关注还是取关 if (isFollow) { // 2.关注,新增数据 Follow follow = new Follow(); follow.setUserId(userId); follow.setFollowUserId(followUserId); boolean isSuccess = save(follow);
} else { // 3.取关,删除 delete from tb_follow where user_id = ? and follow_user_id = ? remove(new QueryWrapper<Follow>() .eq("user_id", userId).eq("follow_user_id", followUserId));
} return Result.ok(); }共同关注
set交集
FollowServiceImpl
@Overridepublic Result follow(Long followUserId, Boolean isFollow) { // 1.获取登录用户 Long userId = UserHolder.getUser().getId(); String key = "follows:" + userId; // 1.判断到底是关注还是取关 if (isFollow) { // 2.关注,新增数据 Follow follow = new Follow(); follow.setUserId(userId); follow.setFollowUserId(followUserId); boolean isSuccess = save(follow); if (isSuccess) { // 把关注用户的id,放入redis的set集合 sadd userId followerUserId stringRedisTemplate.opsForSet().add(key, followUserId.toString()); } } else { // 3.取关,删除 delete from tb_follow where user_id = ? and follow_user_id = ? boolean isSuccess = remove(new QueryWrapper<Follow>() .eq("user_id", userId).eq("follow_user_id", followUserId)); if (isSuccess) { // 把关注用户的id从Redis集合中移除 stringRedisTemplate.opsForSet().remove(key, followUserId.toString()); } } return Result.ok();}具体的关注代码:
FollowServiceImpl
@Overridepublic Result followCommons(Long id) { // 1.获取当前用户 Long userId = UserHolder.getUser().getId(); String key = "follows:" + userId; // 2.求交集 String key2 = "follows:" + id; Set<String> intersect = stringRedisTemplate.opsForSet().intersect(key, key2); if (intersect == null || intersect.isEmpty()) { // 无交集 return Result.ok(Collections.emptyList()); } // 3.解析id集合 List<Long> ids = intersect.stream().map(Long::valueOf).collect(Collectors.toList()); // 4.查询用户 List<UserDTO> users = userService.listByIds(ids) .stream() .map(user -> BeanUtil.copyProperties(user, UserDTO.class)) .collect(Collectors.toList()); return Result.ok(users);}Feed流
当我们关注了用户后,这个用户发了动态,那么我们应该把这些数据推送给用户,这个需求,其实我们又把他叫做Feed流,关注推送也叫做Feed流,直译为投喂。为用户持续的提供“沉浸式”的体验,通过无限下拉刷新获取新的信息。
Feed流产品有两种常见模式: Timeline:不做内容筛选,简单的按照内容发布时间排序,常用于好友或关注。例如朋友圈
- 优点:信息全面,不会有缺失。并且实现也相对简单
- 缺点:信息噪音较多,用户不一定感兴趣,内容获取效率低
智能排序:利用智能算法屏蔽掉违规的、用户不感兴趣的内容。推送用户感兴趣信息来吸引用户
- 优点:投喂用户感兴趣信息,用户粘度很高,容易沉迷
- 缺点:如果算法不精准,可能起到反作用
我们本次针对好友的操作,采用的就是Timeline的方式,只需要拿到我们关注用户的信息,然后按照时间排序即可
,因此采用Timeline的模式。该模式的实现方案有三种:
-
拉模式:读扩散
优点:比较节约空间,因为赵六在读信息时,并没有重复读取,而且读取完之后可以把他的收件箱进行清楚。
缺点:比较延迟,当用户读取数据时才去关注的人里边去读取数据,假设用户关注了大量的用户,那么此时就会拉取海量的内容,对服务器压力巨大。
-
推模式:写扩散
优点:时效快,不用临时拉取
缺点:内存压力大,假设一个大V写信息,很多人关注他, 就会写很多分数据到粉丝那边去
-
推拉结合:读写混合,兼具推和拉两种模式的优点
- 粉丝推送
需求:
- 修改新增探店笔记的业务,在保存blog到数据库的同时,推送到粉丝的收件箱
- 收件箱满足可以根据时间戳排序,必须用Redis的数据结构实现
- 查询收件箱数据时,可以实现分页查询
核心的意思:就是我们在保存完探店笔记后,获得到当前笔记的粉丝,然后把数据推送到粉丝的redis中去。
@Overridepublic Result saveBlog(Blog blog) { // 1.获取登录用户 UserDTO user = UserHolder.getUser(); blog.setUserId(user.getId()); // 2.保存探店笔记 boolean isSuccess = save(blog); if(!isSuccess){ return Result.fail("新增笔记失败!"); } // 3.查询笔记作者的所有粉丝 select * from tb_follow where follow_user_id = ? List<Follow> follows = followService.query().eq("follow_user_id", user.getId()).list(); // 4.推送笔记id给所有粉丝 for (Follow follow : follows) { // 4.1.获取粉丝id Long userId = follow.getUserId(); // 4.2.推送 String key = FEED_KEY + userId; stringRedisTemplate.opsForZSet().add(key, blog.getId().toString(), System.currentTimeMillis()); } // 5.返回id return Result.ok(blog.getId());}- 邮箱分页查询
- 每次查询完成后,我们要分析出查询出数据的最小时间戳,这个值会作为下一次查询的条件
- 我们需要找到与上一次查询相同的查询个数作为偏移量,下次查询时,跳过这些查询过的数据,拿到我们需要的数据
使用 ZREVRANGEBYSCORE key Max Min LIMIT offset count
@Overridepublic Result queryBlogOfFollow(Long max, Integer offset) { // 1.获取当前用户 Long userId = UserHolder.getUser().getId(); // 2.查询收件箱 ZREVRANGEBYSCORE key Max Min LIMIT offset count String key = FEED_KEY + userId; Set<ZSetOperations.TypedTuple<String>> typedTuples = stringRedisTemplate.opsForZSet() .reverseRangeByScoreWithScores(key, 0, max, offset, 2); // 3.非空判断 if (typedTuples == null || typedTuples.isEmpty()) { return Result.ok(); } // 4.解析数据:blogId、minTime(时间戳)、offset List<Long> ids = new ArrayList<>(typedTuples.size()); long minTime = 0; // 2 int os = 1; // 2 for (ZSetOperations.TypedTuple<String> tuple : typedTuples) { // 5 4 4 2 2 // 4.1.获取id ids.add(Long.valueOf(tuple.getValue())); // 4.2.获取分数(时间戳) long time = tuple.getScore().longValue(); if(time == minTime){ os++; }else{ minTime = time; os = 1; } } os = minTime != max ? os : os + offset; // 5.根据id查询blog String idStr = StrUtil.join(",", ids); List<Blog> blogs = query().in("id", ids).last("ORDER BY FIELD(id," + idStr + ")").list();
for (Blog blog : blogs) { // 5.1.查询blog有关的用户 queryBlogUser(blog); // 5.2.查询blog是否被点赞 isBlogLiked(blog); }
// 6.封装并返回 ScrollResult r = new ScrollResult(); r.setList(blogs); r.setOffset(os); r.setMinTime(minTime);
return Result.ok(r);}附近商户 GEO
GEO就是Geolocation的简写形式,代表地理坐标。Redis在3.2版本中加入了对GEO的支持,允许存储地理坐标信息,帮助我们根据经纬度来检索数据。常见的命令有:
- GEOADD:添加一个地理空间信息,包含:经度(longitude)、纬度(latitude)、值(member)
- GEODIST:计算指定的两个点之间的距离并返回
- GEOHASH:将指定member的坐标转为hash字符串形式并返回
- GEOPOS:返回指定member的坐标
- GEORADIUS:指定圆心、半径,找到该圆内包含的所有member,并按照与圆心之间的距离排序后返回。6.以后已废弃
- GEOSEARCH:在指定范围内搜索member,并按照与指定点之间的距离排序后返回。范围可以是圆形或矩形。6.2.新功能
- GEOSEARCHSTORE:与GEOSEARCH功能一致,不过可以把结果存储到一个指定的key。 6.2.新功能
导入数据
@Testvoid loadShopData() { // 1.查询店铺信息 List<Shop> list = shopService.list(); // 2.把店铺分组,按照typeId分组,typeId一致的放到一个集合 Map<Long, List<Shop>> map = list.stream().collect(Collectors.groupingBy(Shop::getTypeId)); // 3.分批完成写入Redis for (Map.Entry<Long, List<Shop>> entry : map.entrySet()) { // 3.1.获取类型id Long typeId = entry.getKey(); String key = SHOP_GEO_KEY + typeId; // 3.2.获取同类型的店铺的集合 List<Shop> value = entry.getValue(); List<RedisGeoCommands.GeoLocation<String>> locations = new ArrayList<>(value.size()); // 3.3.写入redis GEOADD key 经度 纬度 member for (Shop shop : value) { // stringRedisTemplate.opsForGeo().add(key, new Point(shop.getX(), shop.getY()), shop.getId().toString()); locations.add(new RedisGeoCommands.GeoLocation<>( shop.getId().toString(), new Point(shop.getX(), shop.getY()) )); } stringRedisTemplate.opsForGeo().add(key, locations); }}实现:
- 导入pom
<dependency> <groupId>org.springframework.boot</groupId> <artifactId>spring-boot-starter-data-redis</artifactId> <exclusions> <exclusion> <artifactId>spring-data-redis</artifactId> <groupId>org.springframework.data</groupId> </exclusion> <exclusion> <artifactId>lettuce-core</artifactId> <groupId>io.lettuce</groupId> </exclusion> </exclusions></dependency><dependency> <groupId>org.springframework.data</groupId> <artifactId>spring-data-redis</artifactId> <version>2.6.2</version></dependency><dependency> <groupId>io.lettuce</groupId> <artifactId>lettuce-core</artifactId> <version>6.1.6.RELEASE</version></dependency>- 实现功能(查询 | 分页 | 排序)
@Overridepublic Result queryShopByType(Integer typeId, Integer current, Double x, Double y) { // 1.判断是否需要根据坐标查询 if (x == null || y == null) { // 不需要坐标查询,按数据库查询 Page<Shop> page = query() .eq("type_id", typeId) .page(new Page<>(current, SystemConstants.DEFAULT_PAGE_SIZE)); // 返回数据 return Result.ok(page.getRecords()); }
// 2.计算分页参数 int from = (current - 1) * SystemConstants.DEFAULT_PAGE_SIZE; int end = current * SystemConstants.DEFAULT_PAGE_SIZE;
// 3.查询redis、按照距离排序、分页。结果:shopId、distance String key = SHOP_GEO_KEY + typeId; GeoResults<RedisGeoCommands.GeoLocation<String>> results = stringRedisTemplate.opsForGeo() // GEOSEARCH key BYLONLAT x y BYRADIUS 10 WITHDISTANCE .search( key, GeoReference.fromCoordinate(x, y), new Distance(5000), RedisGeoCommands.GeoSearchCommandArgs.newGeoSearchArgs().includeDistance().limit(end) ); // 4.解析出id if (results == null) { return Result.ok(Collections.emptyList()); } List<GeoResult<RedisGeoCommands.GeoLocation<String>>> list = results.getContent(); if (list.size() <= from) { // 没有下一页了,结束 return Result.ok(Collections.emptyList()); } // 4.1.截取 from ~ end的部分 List<Long> ids = new ArrayList<>(list.size()); Map<String, Distance> distanceMap = new HashMap<>(list.size()); list.stream().skip(from).forEach(result -> { // 4.2.获取店铺id String shopIdStr = result.getContent().getName(); ids.add(Long.valueOf(shopIdStr)); // 4.3.获取距离 Distance distance = result.getDistance(); distanceMap.put(shopIdStr, distance); }); // 5.根据id查询Shop String idStr = StrUtil.join(",", ids); List<Shop> shops = query().in("id", ids).last("ORDER BY FIELD(id," + idStr + ")").list(); for (Shop shop : shops) { shop.setDistance(distanceMap.get(shop.getId().toString()).getValue()); } // 6.返回 return Result.ok(shops);}用户签到
BitMap的操作命令有:
- SETBIT:向指定位置(offset)存入一个0或1
- GETBIT :获取指定位置(offset)的bit值
- BITCOUNT :统计BitMap中值为1的bit位的数量
- BITFIELD :操作(查询、修改、自增)BitMap中bit数组中的指定位置(offset)的值
- BITFIELD_RO :获取BitMap中bit数组,并以十进制形式返回
- BITOP :将多个BitMap的结果做位运算(与 、或、异或)
- BITPOS :查找bit数组中指定范围内第一个0或1出现的位置
签到:
@Overridepublic Result sign() { // 1.获取当前登录用户 Long userId = UserHolder.getUser().getId(); // 2.获取日期 LocalDateTime now = LocalDateTime.now(); // 3.拼接key String keySuffix = now.format(DateTimeFormatter.ofPattern(":yyyyMM")); String key = USER_SIGN_KEY + userId + keySuffix; // 4.获取今天是本月的第几天 int dayOfMonth = now.getDayOfMonth(); // 5.写入Redis SETBIT key offset 1 stringRedisTemplate.opsForValue().setBit(key, dayOfMonth - 1, true); return Result.ok();}UV统计
- UV:全称Unique Visitor,也叫独立访客量,是指通过互联网访问、浏览这个网页的自然人。1天内同一个用户多次访问该网站,只记录1次。
- PV:全称Page View,也叫页面访问量或点击量,用户每访问网站的一个页面,记录1次PV,用户多次打开页面,则记录多次PV。往往用来衡量网站的流量。
通常来说UV会比PV大很多,所以衡量同一个网站的访问量,我们需要综合考虑很多因素,所以我们只是单纯的把这两个值作为一个参考值
Hyperloglog(HLL)是从Loglog算法派生的概率算法,用于确定非常大的集合的基数。Redis中的HLL是基于string结构实现的,单个HLL的内存永远小于16kb,内存占用低。作为代价,其测量结果是概率性的,有小于0.81%的误差。
@Testvoid testHLL() { String[] users = new String[1000]; int idx = 0; for(int i= 1;i<=100000;i++){ users[idx++] = "user_" + i; if(i % 1000 == 0){ idx = 0; stringRedisTemplate.opsForHyperLogLog().add("hll1",users); } } Long size = stringRedisTemplate.opsForHyperLogLog().size("hll1"); System.out.println("size = "+ size);}This article is based primarily on HeiMa’s Redis video
Redis in Practice - Mall System
- SMS login: implemented using Redis-shared sessions
- Merchant query cache: understand issues such as cache breakdown, cache penetration, cache avalanche, etc.
- Coupon flash sale: Redis counters, combined with Lua to achieve high-performance Redis operations, while also understanding the principles of Redis distributed locks, including Redis’s three types of message queues
- Nearby merchants: use Redis GEOHash to handle geographic coordinates
- UV statistics: implement statistics using Redis
- User check-in: Redis Bitmap data statistics
- Friend follows: follow, unfollow, mutual follows, and related features based on Set
- Shop exploration: like-list operations based on List, and a like leaderboard based on SortedSet
Project structure model:
Mobile phone or app clients initiate requests to our Nginx server. Nginx, following the seven-layer model, speaks HTTP, and can directly access Redis via Lua to bypass Tomcat, or act as a static resource server, easily handling tens of thousands of concurrent connections, load balance to downstream Tomcat servers, and distribute traffic. We all know a Tomcat with 4 cores and 8G RAM, optimized for simple business logic, might handle around 1000 concurrent requests; after Nginx load balancing and downflow distribution, the project is supported by a cluster. When the frontend project is deployed, static/dynamic separation is possible, further reducing pressure on Tomcat. All these features rely on Nginx, making it a crucial part of the project.
After Tomcat handles the concurrency, if Tomcat directly accesses MySQL, based on experience, enterprise-grade MySQL servers with some concurrency typically use a 16- or 32-core CPU, 32 or 64GB memory; with SSDs, the concurrency they can sustain is around 4,000–7,000, and tens of thousands of concurrency can overwhelm CPU and disks, causing crashes. Therefore, in high-concurrency scenarios we choose MySQL clustering, and to further reduce MySQL pressure and improve access performance, we also add Redis, and use Redis clustering to provide better external service.
SMS login
Verifications via session
- Send verification code
@Override public Result sendCode(String phone, HttpSession session) { // 1. Validate phone number if (RegexUtils.isPhoneInvalid(phone)) { // 2. If not valid, return error return Result.fail("手机号格式错误!"); } // 3. Valid, generate verification code String code = RandomUtil.randomNumbers(6);
// 4. Save verification code to session session.setAttribute("code",code); // 5. Send verification code log.debug("发送短信验证码成功,验证码:{}", code); // Return ok return Result.ok(); }- Login
@Override public Result login(LoginFormDTO loginForm, HttpSession session) { // 1. Validate phone number String phone = loginForm.getPhone(); if (RegexUtils.isPhoneInvalid(phone)) { // 2. If not valid, return error return Result.fail("手机号格式错误!"); } // 3. Validate verification code Object cacheCode = session.getAttribute("code"); String code = loginForm.getCode(); if(cacheCode == null || !cacheCode.toString().equals(code)){ // 3. Not match, error return Result.fail("验证码错误"); } // Match, query user by phone User user = query().eq("phone", phone).one();
// 5. Check if user exists if(user == null){ // If not, create user = createUserWithPhone(phone); } // 7. Save user info to session session.setAttribute("user",user);
return Result.ok(); }- Login interception
Interceptor code
public class LoginInterceptor implements HandlerInterceptor {
@Override public boolean preHandle(HttpServletRequest request, HttpServletResponse response, Object handler) throws Exception { //1. Get session HttpSession session = request.getSession(); //2. Get user from session Object user = session.getAttribute("user"); //3. Check if user exists if(user == null){ //4. Not exist, intercept, return 401 response.setStatus(401); return false; } //5. Exists, save user info to ThreadLocal UserHolder.saveUser((User)user); //6. Let it pass return true; }}Make the interceptors effective
@Configurationpublic class MvcConfig implements WebMvcConfigurer {
@Resource private StringRedisTemplate stringRedisTemplate;
@Override public void addInterceptors(InterceptorRegistry registry) { // Login interceptor registry.addInterceptor(new LoginInterceptor()) .excludePathPatterns( "/shop/**", "/voucher/**", "/shop-type/**", "/upload/**", "/blog/hot", "/user/code", "/user/login" ).order(1); // Token refresh interceptor registry.addInterceptor(new RefreshTokenInterceptor(stringRedisTemplate)).addPathPatterns("/**").order(0); }}- Modify safe return object
//7. Save user info to sessionsession.setAttribute("user", BeanUtils.copyProperties(user,UserDTO.class));
//5. If exists, save user info to ThreadLocalUserHolder.saveUser((UserDTO) user);Redis-based session replacement
@Overridepublic Result login(LoginFormDTO loginForm, HttpSession session) { // 1. Validate phone number String phone = loginForm.getPhone(); if (RegexUtils.isPhoneInvalid(phone)) { // 2. If not valid, return error return Result.fail("手机号格式错误!"); } // 3. Retrieve verification code from Redis and validate String cacheCode = stringRedisTemplate.opsForValue().get(LOGIN_CODE_KEY + phone); String code = loginForm.getCode(); if (cacheCode == null || !cacheCode.equals(code)) { // Inconsistent, error return Result.fail("验证码错误"); }
// 4. Consistent, query user by phone User user = query().eq("phone", phone).one();
// 5. Check if user exists if (user == null) { // 6. Not exist, create new user and save user = createUserWithPhone(phone); }
// 7. Save user info to Redis // 7.1 Generate a random token as login token String token = UUID.randomUUID().toString(true); // 7.2 Convert User to HashMap for storage UserDTO userDTO = BeanUtil.copyProperties(user, UserDTO.class); Map<String, Object> userMap = BeanUtil.beanToMap(userDTO, new HashMap<>(), CopyOptions.create() .setIgnoreNullValue(true) .setFieldValueEditor((fieldName, fieldValue) -> fieldValue.toString())); // 7.3 Store String tokenKey = LOGIN_USER_KEY + token; stringRedisTemplate.opsForHash().putAll(tokenKey, userMap); // 7.4 Set token TTL stringRedisTemplate.expire(tokenKey, LOGIN_USER_TTL, TimeUnit.MINUTES);
// 8. Return token return Result.ok(token);}Refresh login status
RefreshTokenInterceptor
public class RefreshTokenInterceptor implements HandlerInterceptor {
private StringRedisTemplate stringRedisTemplate;
public RefreshTokenInterceptor(StringRedisTemplate stringRedisTemplate) { this.stringRedisTemplate = stringRedisTemplate; }
@Override public boolean preHandle(HttpServletRequest request, HttpServletResponse response, Object handler) throws Exception { // 1. Get token from request header String token = request.getHeader("authorization"); if (StrUtil.isBlank(token)) { return true; } // 2. Get user from Redis by token String key = LOGIN_USER_KEY + token; Map<Object, Object> userMap = stringRedisTemplate.opsForHash().entries(key); // 3. Check existence if (userMap.isEmpty()) { return true; } // 5. Convert hash to UserDTO UserDTO userDTO = BeanUtil.fillBeanWithMap(userMap, new UserDTO(), false); // 6. Save user to ThreadLocal UserHolder.saveUser(userDTO); // 7. Refresh token TTL stringRedisTemplate.expire(key, LOGIN_USER_TTL, TimeUnit.MINUTES); // 8. Pass return true; }
@Override public void afterCompletion(HttpServletRequest request, HttpServletResponse response, Object handler, Exception ex) throws Exception { // Remove user UserHolder.removeUser(); }}LoginInterceptor
public class LoginInterceptor implements HandlerInterceptor {
@Override public boolean preHandle(HttpServletRequest request, HttpServletResponse response, Object handler) throws Exception { // 1. Check if needs to intercept (is there a user in ThreadLocal) if (UserHolder.getUser() == null) { // Not present, intercept, set status response.setStatus(401); // Intercept return false; } // 2. Present, pass return true; }}Merchant query cache
Cache (Cache) is the data exchange buffer, commonly referred to as the buffer. It is the data in the buffer, usually fetched from the database and stored in local code (for example:
例1:Static final ConcurrentHashMap<K,V> map = new ConcurrentHashMap<>(); Local cache for high concurrency
例2:static final Cache<K,V> USER_CACHE = CacheBuilder.newBuilder().build(); Used for Redis, etc. caching
例3:Static final Map<K,V> map = new HashMap(); Local cacheBecause it is marked as Static, it is loaded into memory when the class is loaded, acting as a local cache. Since it is also marked final, the relationship between the reference (example 3: map) and the object (example 3: new HashMap()) cannot be changed, so you don’t have to worry about assignment causing cache invalidation.
Browser cache: primarily exists on the browser side
- Application layer cache: can include Tomcat local caches like the earlier mentioned map, or Redis as a cache
- Database cache: a buffer pool in the database; operations like insert/update/select are first loaded into MySQL’s cache
- CPU cache: modern computers face the issue that CPU speed increases but memory I/O does not keep up, so CPUs add L1, L2, L3 caches
Merchant cache
The standard approach is to query the database after querying the cache. If cache data exists, return directly from the cache. If not, query the database, then store the data in Redis.
@Overridepublic Result queryById(Long id) { String key = RedisConstants.CACHE_SHOP_KEY + id; String shopJson = stringRedisTemplate.opsForValue().get(key);
if(StrUtil.isNotBlank(shopJson)) { Shop shop = JSONUtil.toBean(shopJson,Shop.class); return Result.ok(shop); } Shop shop = getById(id); if(shop == null) { return Result.fail("店铺不存在!"); } stringRedisTemplate.opsForValue().set(key,JSONUtil.toJsonStr(shop), RedisConstants.CACHE_SHOP_TTL, TimeUnit.MINUTES);
return Result.ok(shop);}Cache and database write-behind
- Cache update
- *Memory eviction: Redis automatically evicts when memory reaches configured max memory; eviction policy can be set
- *TTL expiration: When TTL is set, Redis will delete expired data to free up cache space
- *Manual update: Manually invalidate or update cache to resolve cache-database inconsistency
- Database cache inconsistency
Cache Aside Pattern: manual coding approach where the cache is updated after the database update (dual-write)
Read/Write Through Pattern: handled by the system itself; database-cache issues managed by the system
Write Behind Caching Pattern: the caller only operates on the cache; another thread asynchronously updates the database to achieve eventual consistency
- Manual coding approach
- Delete cache or update cache?
- Update cache: update cache every time the database is updated; many writes
- Delete cache: when updating the database, invalidate the cache; on query, update the cache
- How to ensure cache and database operations succeed or fail together?
- Monolithic systems: put cache and database operations in a single transaction
- Distributed systems: use distributed transaction solutions like TCC
- First operate on the database, then delete the cache
- Delete cache or update cache?
Cache-database write consistency for shops
Modify the business logic in ShopController to satisfy the following requirements:
- When querying a shop by id, if the cache misses, query the database, write the result to the cache, and set an expiration
- When updating a shop by id, first update the database, then delete the cache
// Query add expirationstringRedisTemplate.opsForValue().set(key,JSONUtil.toJsonStr(shop), RedisConstants.CACHE_SHOP_TTL, TimeUnit.MINUTES);
// Add update method@Override@Transactionalpublic Result update(Shop shop) { Long id = shop.getId(); if (id == null) { return Result.fail("店铺id不能为空"); } updateById(shop);
stringRedisTemplate.delete(RedisConstants.CACHE_SHOP_KEY + id); return Result.ok();
}Cache penetration
Cache penetration: it occurs when the requested data does not exist in both the cache and the database, so the cache never becomes valid; these requests reach the database.
There are two common solutions:
-
Cache empty objects
When the client requests data that does not exist, first request Redis; if Redis has no data, it will reach the database, which also has no data; this data penetrates the cache and hits the database. We know the database’s concurrency isn’t as high as Redis, so if many requests hit this non-existent data at once, they all hit the database. A simple fix is to cache this non-existent data in Redis as well; next time, the data will be found in Redis and won’t go to the database again.
- Advantages: simple to implement, easy to maintain
- Disadvantages: extra memory consumption; may cause short-term inconsistency
-
Bloom filter
Bloom filters use hashing to reduce misses by testing membership with a large bit array. If the Bloom filter says the item exists, allow the request to Redis; even if Redis data expired, the database must contain the data, so it can be loaded and put back in Redis. If Bloom filter says the data does not exist, return immediately
- Advantages: lower memory usage, no extra keys
- Disadvantages: more complex to implement; possible false positives
@Overridepublic Result queryById(Long id) { String key = RedisConstants.CACHE_SHOP_KEY + id; String shopJson = stringRedisTemplate.opsForValue().get(key);
if(StrUtil.isNotBlank(shopJson)) { Shop shop = JSONUtil.toBean(shopJson,Shop.class); return Result.ok(shop); } // Check if cached null if(shopJson != null) { return Result.fail("店铺信息不存在"); }
Shop shop = getById(id); if(shop == null) { // Write a null to cache stringRedisTemplate.opsForValue().set(key,"", RedisConstants.CACHE_NULL_TTL, TimeUnit.MINUTES); return Result.fail("店铺不存在!"); } stringRedisTemplate.opsForValue().set(key,JSONUtil.toJsonStr(shop), RedisConstants.CACHE_SHOP_TTL, TimeUnit.MINUTES);
return Result.ok(shop);}What are the solutions to cache penetration?
- Cache null values
- Bloom filters
- Increase id complexity to avoid guessing id patterns
- Validate data format thoroughly
- Strengthen user authorization checks
- Rate-limit hot parameters
Cache avalanche
Cache avalanche is when many cache keys expire at the same time or Redis service goes down, causing many requests to hit the database and apply huge pressure.
Solutions:
- Add random variations to TTLs for different keys
- Use Redis clustering to improve service availability
- Add downgrade and rate-limiting strategies to cache
- Introduce multi-level caching
Cache breakdown
Cache breakdown, also called hot-key problem, occurs when a heavily accessed key with a complex rebuild process suddenly becomes invalid, causing many requests to hit the database at once.
Two common solutions:
- Mutex lock: guarantees mutual exclusion, simple to implement with a single lock, no extra memory; downside: locks can cause deadlock and serial execution
- Logical expiration: threads can read without waiting; one thread holds a lock to rebuild data; while rebuilding, other threads may return old data; more complex to implement
Mutex lock to solve cache breakdown
During a query, if the cache misses, acquire a mutex lock; if the lock cannot be acquired, sleep briefly and retry until obtained; once the lock is obtained, query the database, write to Redis, release the lock, and return data. This ensures only one thread rebuilds the cache.
private boolean tryLock(String key) { Boolean flag = stringRedisTemplate.opsForValue().setIfAbsent(key, "1", RedisConstants.LOCK_SHOP_TTL, TimeUnit.SECONDS); return BooleanUtil.isTrue(flag);}
private void unlock(String key) { stringRedisTemplate.delete(key);}
public Shop queryWithMutex(Long id) { String key = CACHE_SHOP_KEY + id; // 1. query Redis String shopJson = stringRedisTemplate.opsForValue().get("key"); // 2. check exists if (StrUtil.isNotBlank(shopJson)) { // exists, return return JSONUtil.toBean(shopJson, Shop.class); } // check if value is empty if (shopJson != null) { // return error return null; } // 4. rebuild cache // 4.1 get mutex String lockKey = RedisConstants.LOCK_SHOP_KEY + id; Shop shop = null; try { boolean isLock = tryLock(lockKey); // 4.2 if not acquired if(!isLock){ // 4.3 sleep and retry Thread.sleep(50); return queryWithMutex(id); } // 4.4 acquired, query DB shop = getById(id); // 5. null existence if(shop == null){ // write empty stringRedisTemplate.opsForValue().set(key,"",CACHE_NULL_TTL,TimeUnit.MINUTES); // return error return null; } // 6. write to Redis stringRedisTemplate.opsForValue().set(key,JSONUtil.toJsonStr(shop),CACHE_NULL_TTL,TimeUnit.MINUTES);
}catch (Exception e){ throw new RuntimeException(e); } finally { // 7. release lock unlock(lockKey); } return shop;}Logical expiration to solve cache breakdown
When a user starts querying Redis, if cache miss, return empty data; once a value is hit, take it out and check if the expiration time has passed. If not expired, return data from Redis; if expired, spawn a separate thread to rebuild the data, and release the mutex after rebuilding.
@Datapublic class RedisData { private LocalDateTime expireTime; private Object data;}
private static final ExecutorService CACHE_REBUILD_EXECUTOR = Executors.newFixedThreadPool(10);
public Shop queryWithLogicalExpire(Long id) { String key = CACHE_SHOP_KEY + id; // 1. query Redis for cache String json = stringRedisTemplate.opsForValue().get(key); // 2. check existence if (StrUtil.isBlank(json)) { return null; } // 4. hit: deserialize to object RedisData redisData = JSONUtil.toBean(json, RedisData.class); Shop shop = JSONUtil.toBean((JSONObject) redisData.getData(), Shop.class); LocalDateTime expireTime = redisData.getExpireTime(); // 5. check expiration if(expireTime.isAfter(LocalDateTime.now())) { // 5.1 not expired, return return shop; } // 5.2 expired: trigger cache rebuild // 6. rebuild cache // 6.1 get mutex String lockKey = LOCK_SHOP_KEY + id; boolean isLock = tryLock(lockKey); // 6.2 if acquired if (isLock){ CACHE_REBUILD_EXECUTOR.submit( ()->{
try{ // rebuild cache this.saveShop2Redis(id,20L); }catch (Exception e){ throw new RuntimeException(e); }finally { unlock(lockKey); } }); } // 6.4 return expired data return shop;}
public void saveShop2Redis(Long id,Long expireSeconds) { Shop shop = getById(id);
RedisData redisData = new RedisData(); redisData.setData(shop); redisData.setExpireTime(LocalDateTime.now().plusSeconds(expireSeconds));
stringRedisTemplate.opsForValue().set(CACHE_SHOP_KEY+id,JSONUtil.toJsonStr(redisData));}Encapsulated Redis utility class
Encapsulate a cache utility class based on StringRedisTemplate to meet the following requirements:
- Method 1: Serialize any Java object to JSON and store it in a string-type key, with TTL expiration
- Method 2: Serialize any Java object to JSON and store it in a string-type key, with a logical expiration time to handle cache breakdown
- Method 3: Query the cache by a given key and deserialize to a specified type, using a cache-null value to solve cache penetration
- Method 4: Query the cache by a given key and deserialize to a specified type, using a logical expiration to solve cache breakdown
@Slf4j@Componentpublic class CacheClient {
private final StringRedisTemplate stringRedisTemplate;
private static final ExecutorService CACHE_REBUILD_EXECUTOR = Executors.newFixedThreadPool(10);
public CacheClient(StringRedisTemplate stringRedisTemplate) { this.stringRedisTemplate = stringRedisTemplate; }
public void set(String key, Object value, Long time, TimeUnit unit) { stringRedisTemplate.opsForValue().set(key, JSONUtil.toJsonStr(value), time, unit); }
public void setWithLogicalExpire(String key, Object value, Long time, TimeUnit unit) { // set logical expiration RedisData redisData = new RedisData(); redisData.setData(value); redisData.setExpireTime(LocalDateTime.now().plusSeconds(unit.toSeconds(time))); // write to Redis stringRedisTemplate.opsForValue().set(key, JSONUtil.toJsonStr(redisData)); }
public <R,ID> R queryWithPassThrough( String keyPrefix, ID id, Class<R> type, Function<ID, R> dbFallback, Long time, TimeUnit unit){ String key = keyPrefix + id; // 1. query Redis String json = stringRedisTemplate.opsForValue().get(key); // 2. check if (StrUtil.isNotBlank(json)) { // 3. exists, return return JSONUtil.toBean(json, type); } // check if empty value if (json != null) { // return null return null; }
// 4. not exist, query DB R r = dbFallback.apply(id); // 5. not exist if (r == null) { // cache null stringRedisTemplate.opsForValue().set(key, "", CACHE_NULL_TTL, TimeUnit.MINUTES); return null; } // 6. exist, write to Redis this.set(key, r, time, unit); return r; }
public <R, ID> R queryWithLogicalExpire( String keyPrefix, ID id, Class<R> type, Function<ID, R> dbFallback, Long time, TimeUnit unit) { String key = keyPrefix + id; // 1. query cache String json = stringRedisTemplate.opsForValue().get(key); // 2. check if (StrUtil.isBlank(json)) { return null; } // 4. hit, deserialize RedisData redisData = JSONUtil.toBean(json, RedisData.class); R r = JSONUtil.toBean((JSONObject) redisData.getData(), type); LocalDateTime expireTime = redisData.getExpireTime(); // 5. check expiration if(expireTime.isAfter(LocalDateTime.now())) { return r; } // 6. expired: rebuild String lockKey = LOCK_SHOP_KEY + id; boolean isLock = tryLock(lockKey); if (isLock){ CACHE_REBUILD_EXECUTOR.submit(() -> { try { R newR = dbFallback.apply(id); this.setWithLogicalExpire(key, newR, time, unit); } catch (Exception e) { throw new RuntimeException(e); }finally { unlock(lockKey); } }); } return r; }
public <R, ID> R queryWithMutex( String keyPrefix, ID id, Class<R> type, Function<ID, R> dbFallback, Long time, TimeUnit unit) { String key = keyPrefix + id; // 1. query Redis String shopJson = stringRedisTemplate.opsForValue().get(key); // 2. check if (StrUtil.isNotBlank(shopJson)) { // 3. exists return JSONUtil.toBean(shopJson, type); } // check if empty if (shopJson != null) { return null; }
// 4. rebuild String lockKey = LOCK_SHOP_KEY + id; R r = null; try { boolean isLock = tryLock(lockKey); if (!isLock) { Thread.sleep(50); return queryWithMutex(keyPrefix, id, type, dbFallback, time, unit); } r = dbFallback.apply(id); if (r == null) { stringRedisTemplate.opsForValue().set(key, "", CACHE_NULL_TTL, TimeUnit.MINUTES); return null; } this.set(key, r, time, unit); } catch (InterruptedException e) { throw new RuntimeException(e); }finally { unlock(lockKey); } return r; }
private boolean tryLock(String key) { Boolean flag = stringRedisTemplate.opsForValue().setIfAbsent(key, "1", 10, TimeUnit.SECONDS); return BooleanUtil.isTrue(flag); }
private void unlock(String key) { stringRedisTemplate.delete(key); }}Coupon Flash Sale
Global ID generation
Global ID generator is a tool used in distributed systems to generate globally unique IDs. To increase ID security, we can avoid directly using Redis’ auto-increment values and instead concatenate additional information:
ID composition: Sign bit: 1 bit, always 0
Timestamp: 31 bits, in seconds, covers about 69 years
Sequence: 32 bits, per-second counter, supports up to 2^32 IDs per second
@Componentpublic class RedisIdWorker { /** * Starting timestamp */ private static final long BEGIN_TIMESTAMP = 1640995200L; /** * Bits for the sequence */ private static final int COUNT_BITS = 32;
private StringRedisTemplate stringRedisTemplate;
public RedisIdWorker(StringRedisTemplate stringRedisTemplate) { this.stringRedisTemplate = stringRedisTemplate; }
public long nextId(String keyPrefix) { // 1. Generate timestamp LocalDateTime now = LocalDateTime.now(); long nowSecond = now.toEpochSecond(ZoneOffset.UTC); long timestamp = nowSecond - BEGIN_TIMESTAMP;
// 2. Generate sequence // 2.1. Get current date, daily granularity String date = now.format(DateTimeFormatter.ofPattern("yyyy:MM:dd")); // 2.2. Auto-increment long count = stringRedisTemplate.opsForValue().increment("icr:" + keyPrefix + ":" + date);
// 3. Assemble and return return timestamp << COUNT_BITS | count; }}Add flash-sale voucher:
@Override@Transactionalpublic void addSeckillVoucher(Voucher voucher) { // Save voucher save(voucher); // Save seckill info SeckillVoucher seckillVoucher = new SeckillVoucher(); seckillVoucher.setVoucherId(voucher.getId()); seckillVoucher.setStock(voucher.getStock()); seckillVoucher.setBeginTime(voucher.getBeginTime()); seckillVoucher.setEndTime(voucher.getEndTime()); seckillVoucherService.save(seckillVoucher); // Save stock to Redis stringRedisTemplate.opsForValue().set(SECKILL_STOCK_KEY + voucher.getId(), voucher.getStock().toString());}Seckill ordering
When placing an order, two checks are needed:
- Whether the seckill has started or ended; if not started or already ended, cannot place order
- Whether stock is sufficient; insufficient stock cannot place order
@Overridepublic Result seckillVoucher(Long voucherId) { // 1. Query voucher SeckillVoucher voucher = seckillVoucherService.getById(voucherId); // 2. Check if seckill started if (voucher.getBeginTime().isAfter(LocalDateTime.now())) { // Not started yet return Result.fail("秒杀尚未开始!"); } // 3. Check if seckill ended if (voucher.getEndTime().isBefore(LocalDateTime.now())) { // Already ended return Result.fail("秒杀已经结束!"); } // 4. Check stock if (voucher.getStock() < 1) { // Out of stock return Result.fail("库存不足!"); } //5, Deduct stock boolean success = seckillVoucherService.update() .setSql("stock= stock -1") .eq("voucher_id", voucherId).update(); if (!success) { // Deduction failed return Result.fail("库存不足!"); } //6. Create order VoucherOrder voucherOrder = new VoucherOrder(); // 6.1 Order ID long orderId = redisIdWorker.nextId("order"); voucherOrder.setId(orderId); // 6.2 User ID Long userId = UserHolder.getUser().getId(); voucherOrder.setUserId(userId); // 6.3 Voucher ID voucherOrder.setVoucherId(voucherId); save(voucherOrder);
return Result.ok(orderId);}Inventory oversell
Oversell is a classic multi-threading safety issue. Common solutions involve locking.
Pessimistic lock:
Pessimistic locks serialize access to data, e.g., synchronized or lock is a representative; within pessimistic locks you can have fair, unfair, reentrant locks, etc.
Optimistic lock:
Optimistic locking uses a version number; each data operation increments the version by 1; when committing, validate that the version increased by 1; if so, the operation succeeds. If not, the data has been modified. There are variants like CAS.
A typical example of optimistic locking is CAS, which uses CAS for lock-free locking; var5 is the memory value read before, var1+var2 in the loop is the predicted value; if predicted equals memory, it means no one modified it; then replace the memory value.
boolean success = seckillVoucherService.update() .setSql("stock= stock -1") .eq("voucher_id", voucherId) .gt("stock",0) .update(); //where id = ? and stock > 0One person, one order
Basic logic:
// 5. One person, one order logic// 5.1. User IDLong userId = UserHolder.getUser().getId();int count = query().eq("user_id", userId).eq("voucher_id", voucherId).count();// 5.2. Check existenceif (count > 0) { // User has already purchased return Result.fail("用户已经购买过一次!");}Concurrency: Pessimistic lock
<!-- maven --><dependency> <groupId>org.aspectj</groupId> <artifactId>aspectjweaver</artifactId></dependency>
// Servicesynchronized(userId.toString().intern()) { // Get proxy object (transaction) IVoucherOrderService proxy = (IVoucherOrderService) AopContext.currentProxy(); return proxy.createVoucherOrder(voucherId);}
@Transactionalpublic Result createVoucherOrder(Long voucherId) { // 5. One person, one order logic // 5.1. User ID Long userId = UserHolder.getUser().getId();
int count = query().eq("user_id", userId).eq("voucher_id", voucherId).count(); // 5.2. Check existence if (count > 0) { // User has already purchased return Result.fail("用户已经购买过一次!"); }
//5, Deduct stock boolean success = seckillVoucherService.update() .setSql("stock= stock -1") .eq("voucher_id", voucherId) .gt("stock",0) .update(); //where id = ? and stock > 0 if (!success) { // Deduction failed return Result.fail("库存不足!"); } //6. Create order VoucherOrder voucherOrder = new VoucherOrder(); // 6.1: Order ID long orderId = redisIdWorker.nextId("order"); voucherOrder.setId(orderId); // 6.2: User ID voucherOrder.setUserId(userId); // 6.3: Voucher ID voucherOrder.setVoucherId(voucherId); save(voucherOrder); return Result.ok(orderId);
}Distributed locks
Concurrency in a clustered environment
Because we deploy multiple Tomcat instances, each with its own JVM, even if two threads inside Tomcat A share the same code, their lock objects are the same, enabling mutual exclusion within A. But Tomcat B also has two threads with the same code, and their lock objects are not the same as A’s; thus threads in B cannot coordinate with A. This is why locks from a single JVM (synchronized) fail in a cluster; distributed locks are needed.
Distributed lock: a lock that is visible across processes in a distributed system or cluster and ensures mutual exclusion.
Requirements for distributed locks
- Visibility: multiple threads can see the same result. Note: this visibility refers to inter-process visibility, not the memory visibility in concurrent programming.
- Mutual exclusion: the lock ensures serial execution.
- High availability: the program remains available; not easily crashed.
- High performance: locking and unlocking should be fast.
Three common distributed locks
- MySQL: MySQL has locking, but its inherent performance is limited; distributed locks with MySQL are rare
- Redis: Redis-based distributed locks are very common. Use setnx; if the key insert succeeds, the lock is acquired; if someone else inserts, lock acquisition fails; this is the basis for distributed locking
- Zookeeper: Zookeeper is another mature approach for distributed locks, using node uniqueness and ordering to implement mutual exclusion
Distributed lock implementation approach
- Acquire lock:
- Mutex: ensure only one thread can acquire the lock
- Non-blocking: try once; success returns true; failure returns false
- Release lock:
- Manual release
- Timeout release: add a timeout when acquiring the lock
@Overridepublic boolean tryLock(long timeoutSec) { // Get thread identifier Long threadId = Thread.currentThread().getId(); // Acquire lock Boolean success = stringRedisTemplate.opsForValue() .setIfAbsent(KEY_PREFIX + name, threadId + "", timeoutSec, TimeUnit.SECONDS); return Boolean.TRUE.equals(success);}
@Overridepublic void unlock() { // Delete lock by key stringRedisTemplate.delete(KEY_PREFIX + name);}
// Business code// Create a lock object (new code)SimpleRedisLock lock = new SimpleRedisLock("order:" + userId, stringRedisTemplate);// Acquire lockboolean isLock = lock.tryLock(1200);// If lock failsif (!isLock) { return Result.fail("不允许重复下单");}try { // Get proxy object (transaction) IVoucherOrderService proxy = (IVoucherOrderService) AopContext.currentProxy(); return proxy.createVoucherOrder(voucherId);} finally { // Release lock lock.unlock();}Distributed lock mis-deletion
Solution: store a unique identifier in the lock when acquiring; when deleting, check if the current lock’s identifier matches the one stored. If it matches, delete; otherwise do not delete.
private static final String ID_PREFIX = UUID.randomUUID().toString() + "-";@Overridepublic boolean tryLock(long timeoutSec) { // Get thread identifier String threadId = ID_PREFIX + Thread.currentThread().getId(); // Acquire lock Boolean success = stringRedisTemplate.opsForValue() .setIfAbsent(KEY_PREFIX + name, threadId, timeoutSec, TimeUnit.SECONDS); return Boolean.TRUE.equals(success);}
@Overridepublic void unlock() { // Get thread identifier String threadId = ID_PREFIX + Thread.currentThread().getId(); String id = stringRedisTemplate.opsForValue().get(KEY_PREFIX + name);
// Delete lock if this thread holds it if(threadId.equals(id)){ stringRedisTemplate.delete(KEY_PREFIX + name); }}Distributed lock atomicity issue
Solution: a Lua script that executes multiple Redis commands atomically
- Get the thread identifier inside the lock
- Check if it matches the current thread’s identifier
- If matches, release the lock (delete)
- If not, do nothing
-- KEYS[1] is the lock key; ARGV[1] is the current thread identifier-- Get the lock's identifier and compareif (redis.call('GET', KEYS[1]) == ARGV[1]) then -- If matches, delete the lock return redis.call('DEL', KEYS[1])end-- If not matched, returnreturn 0private static final DefaultRedisScript<Long> UNLOCK_SCRIPT; static { UNLOCK_SCRIPT = new DefaultRedisScript<>(); UNLOCK_SCRIPT.setLocation(new ClassPathResource("unlock.lua")); UNLOCK_SCRIPT.setResultType(Long.class); }
public void unlock() { // Call Lua script stringRedisTemplate.execute( UNLOCK_SCRIPT, Collections.singletonList(KEY_PREFIX + name), ID_PREFIX + Thread.currentThread().getId());}Redisson distributed lock
setnx-based distributed lock issues:
Reentrancy: The lock can be re-entered by the same thread; reentrant locks prevent deadlocks.
Non-retryable: The current distributed lock can only attempt once; a reasonable expectation is that after failing to acquire the lock, a thread should be able to retry.
- Timeout release: We add a timeout when locking to prevent deadlocks; but if a stall lasts too long, the safety risk remains even though Lua is used to prevent deleting others’ locks during unlock.
Master-slave consistency: If Redis is deployed in a master-slave cluster, the master asynchronously replicates to slaves; if the master crashes before replication completes, deadlock can occur.
Redisson is a Java in-memory data grid built on Redis. It provides distributed Java objects and services, including various distributed locks.
Using Redisson
<dependency> <groupId>org.redisson</groupId> <artifactId>redisson</artifactId> <version>3.13.6</version></dependency>@Configurationpublic class RedissonConfig { @Bean public RedissonClient redissonClient(){ // Configuration Config config = new Config(); config.useSingleServer().setAddress("redis://127.0.0.1:6379"); // Create RedissonClient object return Redisson.create(config); }}
// Create lock objectRLock lock = redissonClient.getLock("lock:order:" + userId);// Acquire lockboolean isLock = lock.tryLock();
// If failed to lockif (!isLock) { return Result.fail("不允许重复下单");}try { // Get proxy object (transaction) IVoucherOrderService proxy = (IVoucherOrderService) AopContext.currentProxy(); return proxy.createVoucherOrder(voucherId);} finally { // Release lock lock.unlock();}Redisson reentrant locks
Lock information is stored in a hash structure to record thread and reentrancy counts.
Redisson lock retry and WatchDog mechanism
- Retry: use semaphores and Pub/Sub to implement waiting, waking, and retrying when lock acquisition fails
- Timeout extension: use a WatchDog to periodically extend the lock expiry time
Redisson solves master-slave consistency - MutiLock
To address this, Redisson introduces MutiLock. With this lock, you don’t rely on master-slave; every node has equal status. The locking logic must be written across all master nodes; only when all servers succeed writing does the lock succeed. If any node fails to acquire, the lock is not considered acquired, ensuring reliability.
When multiple locks are set, Redisson adds them to a collection and uses a loop to keep trying to acquire locks. There is a total locking time, calculated as the number of locks times 1500 ms. If all locks succeed within this time, the lock is considered acquired; if any fail within the time, retries occur.
Seckill optimization
Asynchronous seckill
Requirements:
- When adding a new seckill coupon, also save the coupon information to Redis
- Use Lua script to check seckill stock and one-per-person order, determining whether the user succeeded
- If successful, encapsulate coupon ID and user ID and store into a blocking queue
- Start a thread task on startup to continuously fetch messages from the blocking queue and place orders
XGROUP CREATE stream.orders g1 0 MKSTREAM # Create message queueprivate class VoucherOrderHandler implements Runnable {
@Override public void run() { while (true) { try { // 1. Fetch order info from stream List<MapRecord<String, Object, Object>> list = stringRedisTemplate.opsForStream().read( Consumer.from("g1", "c1"), StreamReadOptions.empty().count(1).block(Duration.ofSeconds(2)), StreamOffset.create("stream.orders", ReadOffset.lastConsumed()) ); // 2. Check if there is data if (list == null || list.isEmpty()) { // No messages continue; } // Parse data MapRecord<String, Object, Object> record = list.get(0); Map<Object, Object> value = record.getValue(); VoucherOrder voucherOrder = BeanUtil.fillBeanWithMap(value, new VoucherOrder(), true); // 3. Create order createVoucherOrder(voucherOrder); // 4. Acknowledge stringRedisTemplate.opsForStream().acknowledge("s1", "g1", record.getId()); } catch (Exception e) { log.error("处理订单异常", e); // Handle exceptional messages handlePendingList(); } } }
private void handlePendingList() { while (true) { try { // 1. Get pending list List<MapRecord<String, Object, Object>> list = stringRedisTemplate.opsForStream().read( Consumer.from("g1", "c1"), StreamReadOptions.empty().count(1), StreamOffset.create("stream.orders", ReadOffset.from("0")) ); // 2. Check if (list == null || list.isEmpty()) { break; } // Parse MapRecord<String, Object, Object> record = list.get(0); Map<Object, Object> value = record.getValue(); VoucherOrder voucherOrder = BeanUtil.fillBeanWithMap(value, new VoucherOrder(), true); // 3. Create order createVoucherOrder(voucherOrder); // 4. Acknowledge stringRedisTemplate.opsForStream().acknowledge("s1", "g1", record.getId()); } catch (Exception e) { log.error("处理pendding订单异常", e); try{ Thread.sleep(20); }catch(Exception e){ e.printStackTrace(); } } } }}Influencer Store Visits
Publish store visit notes
Store visit notes are similar to reviews on review sites, typically a mix of images and text. There are two related tables: tb_blog: store visit notes table, including the note’s title, text, images, etc. tb_blog_comments: other users’ comments on the store notes
- Upload, send, view:
@Slf4j@RestController@RequestMapping("upload")public class UploadController {
@PostMapping("blog") public Result uploadImage(@RequestParam("file") MultipartFile image) { try { // Get original filename String originalFilename = image.getOriginalFilename(); // Generate new filename String fileName = createNewFileName(originalFilename); // Save file image.transferTo(new File(SystemConstants.IMAGE_UPLOAD_DIR, fileName)); // Return result log.debug("文件上传成功,{}", fileName); return Result.ok(fileName); } catch (IOException e) { throw new RuntimeException("文件上传失败", e); } }}
@PostMappingpublic Result saveBlog(@RequestBody Blog blog) { // Get logged-in user UserDTO user = UserHolder.getUser(); blog.setUpdateTime(user.getId()); // Save store visit blog blogService.saveBlog(blog); // Return id return Result.ok(blog.getId());}
@Overridepublic Result queryBlogById(Long id) { // 1. Query blog Blog blog = getById(id); if (blog == null) { return Result.fail("笔记不存在!"); } // 2. Query blog's related user queryBlogUser(blog);
return Result.ok(blog);}-
Like
Requirements:
- The same user can like only once; clicking again cancels the like
- If the current user has already liked it, the like button should be highlighted (frontend implemented; determined by Blog’s isLike field)
Implementation steps:
- Add an isLike field to Blog to indicate whether the current user has liked it
- Modify the like feature to use Redis sets to determine if liked; if not liked, increment like count; if already liked, decrement
- Modify the query for Blog by id to determine whether the current logged-in user has liked it, set isLike
- Modify the paginated query for Blog to determine whether the current logged-in user has liked it, set isLike
private void isBlogLiked(Blog blog) { // 1. Get logged-in user Long userId = UserHolder.getUser().getId(); // 2. Check if current user has liked String key = BLOG_LIKED_KEY + blog.getId(); Boolean isMember = stringRedisTemplate.opsForSet().isMember(key, userId.toString()); blog.setIsLike(BooleanUtil.isTrue(isMember));}
@Overridepublic Result likeBlog(Long id) { // 1. Get logged-in user Long userId = UserHolder.getUser().getId(); // 2. Check if user has liked String key = BLOG_LIKED_KEY + id; Boolean isMember = stringRedisTemplate.opsForSet().isMember(key, userId.toString()); if(BooleanUtil.isFalse(isMember)){ // 3. If not liked, like // 3.1 DB like count +1 boolean isSuccess = update().setSql("liked = liked + 1").eq("id", id).update(); // 3.2 Save to Redis set if(isSuccess){ stringRedisTemplate.opsForSet().add(key,userId.toString()); } }else { // 4. If already liked, cancel like // 4.1 DB like count -1 boolean isSuccess = update().setSql("liked = liked - 1").eq("id", id).update(); // 4.2 Remove from Redis set if (isSuccess) { stringRedisTemplate.opsForSet().remove(key, userId.toString()); } } return Result.ok();}- Like leaderboard
Change from set to sorted set: set -> zset
Double score = stringRedisTemplate.opsForZSet().score(key, userId.toString());
stringRedisTemplate.opsForZSet().add(key, userId.toString(), System.currentTimeMillis());stringRedisTemplate.opsForZSet().remove(key, userId.toString());
// Top 5 likes display@Overridepublic Result queryBlogLikes(Long id) { String key = BLOG_LIKED_KEY + id; // 1. Top 5 likers: zrange Set<String> top5 = stringRedisTemplate.opsForZSet().range(key, 0, 4); if (top5 == null || top5.isEmpty()) { return Result.ok(Collections.emptyList()); } // 2. Extract user IDs List<Long> ids = top5.stream().map(Long::valueOf).collect(Collectors.toList()); String idStr = StrUtil.join(",", ids); // 3. Query users by ID List<UserDTO> userDTOS = userService.query() .in("id", ids).last("ORDER BY FIELD(id," + idStr + ")").list() .stream() .map(user -> BeanUtil.copyProperties(user, UserDTO.class)) .collect(Collectors.toList()); // 4. Return return Result.ok(userDTOS);}Friends/Follows
Follow / Unfollow
Requirement: implement two interfaces based on the data structure:
- Follow and unfollow interfaces
- Check whether a user is following another user
FollowController
// Follow@PutMapping("/{id}/{isFollow}")public Result follow(@PathVariable("id") Long followUserId, @PathVariable("isFollow") Boolean isFollow) { return followService.follow(followUserId, isFollow);}// Unfollow@GetMapping("/or/not/{id}")public Result isFollow(@PathVariable("id") Long followUserId) { return followService.isFollow(followUserId);}FollowService
// Unfollow service@Overridepublic Result isFollow(Long followUserId) { // 1. Get logged-in user Long userId = UserHolder.getUser().getId(); // 2. Check if following Integer count = query().eq("user_id", userId).eq("follow_user_id", followUserId).count(); // 3. Return return Result.ok(count > 0); }
// Follow service @Override public Result follow(Long followUserId, Boolean isFollow) { // 1. Get logged-in user Long userId = UserHolder.getUser().getId(); String key = "follows:" + userId; // 1. Determine follow or unfollow if (isFollow) { // 2. Follow, add data Follow follow = new Follow(); follow.setUserId(userId); follow.setFollowUserId(followUserId); boolean isSuccess = save(follow);
} else { // 3. Unfollow, delete remove(new QueryWrapper<Follow>() .eq("user_id", userId).eq("follow_user_id", followUserId));
} return Result.ok(); }Mutual follows
set intersection
FollowServiceImpl
@Overridepublic Result follow(Long followUserId, Boolean isFollow) { // 1. Get current user Long userId = UserHolder.getUser().getId(); String key = "follows:" + userId; // 1. Determine follow or unfollow if (isFollow) { // 2. Follow, add data Follow follow = new Follow(); follow.setUserId(userId); follow.setFollowUserId(followUserId); boolean isSuccess = save(follow); if (isSuccess) { // Put followed user's id into Redis set stringRedisTemplate.opsForSet().add(key, followUserId.toString()); } } else { // 3. Unfollow, delete boolean isSuccess = remove(new QueryWrapper<Follow>() .eq("user_id", userId).eq("follow_user_id", followUserId)); if (isSuccess) { // Remove from Redis set stringRedisTemplate.opsForSet().remove(key, followUserId.toString()); } } return Result.ok();}Specific follow code:
FollowServiceImpl
@Overridepublic Result followCommons(Long id) { // 1. Get current user Long userId = UserHolder.getUser().getId(); String key = "follows:" + userId; // 2. Intersection String key2 = "follows:" + id; Set<String> intersect = stringRedisTemplate.opsForSet().intersect(key, key2); if (intersect == null || intersect.isEmpty()) { // No intersection return Result.ok(Collections.emptyList()); } // 3. Parse IDs List<Long> ids = intersect.stream().map(Long::valueOf).collect(Collectors.toList()); // 4. Query users List<UserDTO> users = userService.listByIds(ids) .stream() .map(user -> BeanUtil.copyProperties(user, UserDTO.class)) .collect(Collectors.toList()); return Result.ok(users);}Feed flow
When we follow a user and that user posts, we should push the updates to the followers. This feature is often called a Feed, i.e., Feed flow; it provides a continuously immersive experience via consuming feeds with infinite scrolling.
There are two common feed modes:
Timeline: no content filtering; sorts by creation time; used for friends or follows, e.g., Moments
- Pros: complete information; no content misses; simple to implement
- Cons: more noise; users may not be interested; slower content retrieval
Smart ranking: use intelligent algorithms to filter out inappropriate or uninteresting content; push content the user is interested in
- Pros: push content users like; high engagement
- Cons: if the algorithm isn’t precise, it may backfire
For our follower-based operation, we use Timeline mode: fetch followed users’ infos and sort by time
There are three implementation approaches:
-
Pull model (read diffusion)
Pros: space-efficient (no duplication in readers’ inbox); Cons: latency high; reading data requires pulling many items; large follower base implies heavy server load
-
Push model (write diffusion)
Pros: timely; no need to pull
Cons: heavy memory pressure; if a KOL posts, many followers receive data
-
Push-pull hybrid: combine both advantages
- Fan pushing
Requirements:
- Modify the blog creation flow: when saving to DB, also push to fans’ inboxes
- The inbox must be sortable by timestamp; Redis data structures must be used
- When querying inbox data, support pagination
Core idea: after saving the store visit note, obtain the note’s fans and push the data into fans’ Redis data structures.
@Overridepublic Result saveBlog(Blog blog) { // 1. Get logged-in user UserDTO user = UserHolder.getUser(); blog.setUserId(user.getId()); // 2. Save the blog note boolean isSuccess = save(blog); if(!isSuccess){ return Result.fail("新增笔记失败!"); } // 3. Query all fans of the author List<Follow> follows = followService.query().eq("follow_user_id", user.getId()).list(); // 4. Push blog id to all fans' inboxes for (Follow follow : follows) { // 4.1 Get fan id Long userId = follow.getUserId(); // 4.2 Push String key = FEED_KEY + userId; stringRedisTemplate.opsForZSet().add(key, blog.getId().toString(), System.currentTimeMillis()); } // 5. Return id return Result.ok(blog.getId());}- Inbox pagination query
Using ZREVRANGEBYSCORE key Max Min LIMIT offset count
@Overridepublic Result queryBlogOfFollow(Long max, Integer offset) { // 1. Get current user Long userId = UserHolder.getUser().getId(); // 2. Query inbox: ZREVRANGEBYSCORE key Max Min LIMIT offset count String key = FEED_KEY + userId; Set<ZSetOperations.TypedTuple<String>> typedTuples = stringRedisTemplate.opsForZSet() .reverseRangeByScoreWithScores(key, 0, max, offset, 2); // 3. Non-empty check if (typedTuples == null || typedTuples.isEmpty()) { return Result.ok(); } // 4. Parse data: blogId, minTime, offset List<Long> ids = new ArrayList<>(typedTuples.size()); long minTime = 0; // 2 int os = 1; // 2 for (ZSetOperations.TypedTuple<String> tuple : typedTuples) { // 5 4 4 2 2 // 4.1 Get id ids.add(Long.valueOf(tuple.getValue())); // 4.2 Get distance/time long time = tuple.getScore().longValue(); if(time == minTime){ os++; }else{ minTime = time; os = 1; } } os = minTime != max ? os : os + offset; // 5. Query blogs by id String idStr = StrUtil.join(",", ids); List<Blog> blogs = query().in("id", ids).last("ORDER BY FIELD(id," + idStr + ")").list(); for (Blog blog : blogs) { // 5.1 Query blog's user queryBlogUser(blog); // 5.2 Check if blog is liked isBlogLiked(blog); }
// 6. Return ScrollResult r = new ScrollResult(); r.setList(blogs); r.setOffset(os); r.setMinTime(minTime);
return Result.ok(r);}Nearby Merchants GEO
GEO is short for Geolocation, representing geographic coordinates. Redis 3.2 added GEO support to store geospatial info; we can search data by longitude and latitude. Common commands:
- GEOADD: add a geospatial item; fields: longitude, latitude, member
- GEODIST: calculate distance between two points
- GEOHASH: convert a member’s coordinates to a hash string
- GEOPOS: return coordinates of specified members
- GEORADIUS: find all members within a circle around a center, sorted by distance
- GEOSEARCH: search within a range around a point; results sorted by distance; range can be circular or rectangular
- GEOSEARCHSTORE: same as GEOSEARCH, but store results to a specified key
Import data
@Testvoid loadShopData() { // 1. Query shop info List<Shop> list = shopService.list(); // 2. Group by typeId Map<Long, List<Shop>> map = list.stream().collect(Collectors.groupingBy(Shop::getTypeId)); // 3. Write Redis in batches for (Map.Entry<Long, List<Shop>> entry : map.entrySet()) { // 3.1 Get type id Long typeId = entry.getKey(); String key = SHOP_GEO_KEY + typeId; // 3.2 Get shops of the same type List<Shop> value = entry.getValue(); List<RedisGeoCommands.GeoLocation<String>> locations = new ArrayList<>(value.size()); // 3.3 Write to Redis GEOADD key longitude latitude member for (Shop shop : value) { // stringRedisTemplate.opsForGeo().add(key, new Point(shop.getX(), shop.getY()), shop.getId().toString()); locations.add(new RedisGeoCommands.GeoLocation<>( shop.getId().toString(), new Point(shop.getX(), shop.getY()) )); } stringRedisTemplate.opsForGeo().add(key, locations); }}Implementation:
- Add dependencies
<dependency> <groupId>org.springframework.boot</groupId> <artifactId>spring-boot-starter-data-redis</artifactId> <exclusions> <exclusion> <artifactId>spring-data-redis</artifactId> <groupId>org.springframework.data</groupId> </exclusion> <exclusion> <artifactId>lettuce-core</artifactId> <groupId>io.lettuce</groupId> </exclusion> </exclusions></dependency><dependency> <groupId>org.springframework.data</groupId> <artifactId>spring-data-redis</artifactId> <version>2.6.2</version></dependency><dependency> <groupId>io.lettuce</groupId> <artifactId>lettuce-core</artifactId> <version>6.1.6.RELEASE</version></dependency>- Implement features (Query | Pagination | Sorting)
@Overridepublic Result queryShopByType(Integer typeId, Integer current, Double x, Double y) { // 1. Check if need coordinate-based query if (x == null || y == null) { // No coordinate-based query; query by database Page<Shop> page = query() .eq("type_id", typeId) .page(new Page<>(current, SystemConstants.DEFAULT_PAGE_SIZE)); // Return data return Result.ok(page.getRecords()); }
// 2. Compute pagination parameters int from = (current - 1) * SystemConstants.DEFAULT_PAGE_SIZE; int end = current * SystemConstants.DEFAULT_PAGE_SIZE;
// 3. Query Redis, sort by distance, paginate. Result: shopId, distance String key = SHOP_GEO_KEY + typeId; GeoResults<RedisGeoCommands.GeoLocation<String>> results = stringRedisTemplate.opsForGeo() // GEOSEARCH key BYLONLAT x y BYRADIUS 10 WITHDISTANCE .search( key, GeoReference.fromCoordinate(x, y), new Distance(5000), RedisGeoCommands.GeoSearchCommandArgs.newGeoSearchArgs().includeDistance().limit(end) ); // 4. Parse IDs if (results == null) { return Result.ok(Collections.emptyList()); } List<GeoResults.GeoLocation<String>> content = results.getContent().stream() .map(GeoResult::getContent) .collect(Collectors.toList());
List<GeoResult<RedisGeoCommands.GeoLocation<String>>> list = results.getContent(); if (list.size() <= from) { // No next page return Result.ok(Collections.emptyList()); } // 4.1 Take the from ~ end portion List<Long> ids = new ArrayList<>(list.size()); Map<String, Distance> distanceMap = new HashMap<>(list.size()); list.stream().skip(from).forEach(result -> { // 4.2 Get shop id String shopIdStr = result.getContent().getName(); ids.add(Long.valueOf(shopIdStr)); // 4.3 Get distance Distance distance = result.getDistance(); distanceMap.put(shopIdStr, distance); }); // 5. Query Shop by IDs String idStr = StrUtil.join(",", ids); List<Shop> shops = query().in("id", ids).last("ORDER BY FIELD(id," + idStr + ")").list(); for (Shop shop : shops) { shop.setDistance(distanceMap.get(shop.getId().toString()).getValue()); } // 6. Return return Result.ok(shops);}User check-in
Bitmap operations include:
- SETBIT: store 0 or 1 at a given offset
- GETBIT: get the bit value at an offset
- BITCOUNT: count bits set to 1
- BITFIELD: get, set, or increment a bitfield value at an offset
- BITFIELD_RO: get bitfield as decimal
- BITOP: bitwise operations on multiple bitmaps
- BITPOS: find the first 0 or 1 in a range of bits
Check-in:
@Overridepublic Result sign() { // 1. Get current user Long userId = UserHolder.getUser().getId(); // 2. Get date LocalDateTime now = LocalDateTime.now(); // 3. Build key String keySuffix = now.format(DateTimeFormatter.ofPattern(":yyyyMM")); String key = USER_SIGN_KEY + userId + keySuffix; // 4. Determine which day of the month today is int dayOfMonth = now.getDayOfMonth(); // 5. Write to Redis: SETBIT key offset 1 stringRedisTemplate.opsForValue().setBit(key, dayOfMonth - 1, true); return Result.ok();}UV statistics
- UV stands for Unique Visitor; also called unique visitors. It counts distinct humans visiting a site within a time period.
- PV stands for Page View; counts page visits. Each page view by a user counts as one PV. Used to measure site traffic.
Generally UV is larger than PV, so they are used as reference values.
HyperLogLog (HLL) is a probabilistic counting algorithm derived from the LogLog method, used to estimate cardinalities of very large datasets. Redis HLL is implemented on top of strings; a single HLL uses less than 16 KB of memory, with low memory usage. As a trade-off, its measurement is probabilistic with an error of less than 0.81%.
@Testvoid testHLL() { String[] users = new String[1000]; int idx = 0; for(int i= 1;i<=100000;i++){ users[idx++] = "user_" + i; if(i % 1000 == 0){ idx = 0; stringRedisTemplate.opsForHyperLogLog().add("hll1",users); } } Long size = stringRedisTemplate.opsForHyperLogLog().size("hll1"); System.out.println("size = "+ size);}本文は黒馬のredis動画を基に作成しました
redis実戦-モールシステム
- SMSログイン:Redisでセッションを共有して実現
- 商人検索キャッシュ:キャッシュのキャッシュ撃穿、キャッシュ透過、キャッシュ崩壊などの問題を理解する
- クーポン秒殺:Redisのカウンター機能を使い、Luaと組み合わせて高性能なRedis操作を実現すると同時に、Redisの分散ロックの原理を理解する。Redisの3つのメッセージキューを含む
- 近くの商店:RedisのGEOHashを活用して地理座標の操作を実現
- UV統計:Redisを用いて統計機能を実現
- ユーザーサインイン:RedisのBitmapデータ統計機能
- 友達フォロー:Set集合を基にしたフォロー、フォロー解除、相互フォローなどの機能
- 店を探る:Listを基にいいねリストの操作を実現、さらにSortedSetを用いていいねのランキング機能を実現
プロジェクト構造モデル:
スマホ端末またはアプリからリクエストを発し、私たちのnginxサーバにアクセスします。nginxは7層モデルに基づくHTTPプロトコルを使用し、Luaを使ってTomcatを経由せずRedisにアクセスすることも可能ですし、静的リソースサーバとしても機能します。数万の同時接続を楽に処理し、下流のTomcatサーバへロードバランスで振り分け、トラフィックを分散します。我々が知っている通り、4コア8GBのTomcatは、最適化と単純なビジネス処理の支援を受けても、最大で約1000程度の同時実行を処理します。nginxのロードバランシングと流量分散を経て、クラスターがプロジェクト全体を支えます。同時に、フロントエンドプロジェクトをデプロイした後のnginxは、動的資源と静的資源を分離でき、Tomcatサーバの負荷をさらに低減します。これらの機能はすべてnginxが機能することで実現しますので、nginxはプロジェクト全体で重要な要素です。
Tomcatが並行トラフィックを支えるようになった後、Tomcatを直接MySQLにアクセスさせる場合、経験則としてエンタープライズ向けMySQLサーバは、ある程度の同時実行が増えると、一般的には16コアまたは32コアのCPU、32GBまたは64GBのメモリを必要とします。エンタープライズ級のMySQLにSSDを組み合わせると、想定される並行度はおおよそ4000~7000程度、1万を超える同時接続になると、瞬時にMySQLサーバのCPUとディスクが満杯となり、クラッシュしやすくなります。したがって高い並行シナリオではMySQLクラスターを採用します。さらにMySQLの負荷を低減し、アクセス性能を向上させるため、Redisを導入します。また、Redisクラスターを使用してRedisが外部に対してより良いサービスを提供します。
SMSログイン
セッションを介した検証コード実装
- 検証コードを送信
@Override public Result sendCode(String phone, HttpSession session) { // 1.電話番号の検証 if (RegexUtils.isPhoneInvalid(phone)) { // 2.条件を満たさない場合、エラーメッセージを返す return Result.fail("手机号格式错误!"); } // 3.条件を満たす場合、検証コードを生成 String code = RandomUtil.randomNumbers(6);
// 4.セッションに検証コードを保存 session.setAttribute("code",code); // 5.検証コードを送信 log.debug("发送短信验证码成功,验证码:{}", code); // OKを返す return Result.ok(); }- ログイン
@Override public Result login(LoginFormDTO loginForm, HttpSession session) { // 1.電話番号の検証 String phone = loginForm.getPhone(); if (RegexUtils.isPhoneInvalid(phone)) { // 2.条件を満たさない場合、エラーメッセージを返す return Result.fail("手机号格式错误!"); } // 3.検証コードの検証 Object cacheCode = session.getAttribute("code"); String code = loginForm.getCode(); if(cacheCode == null || !cacheCode.toString().equals(code)){ //3.不一致、エラー return Result.fail("验证码错误"); } // 一致、電話番号でユーザーを検索 User user = query().eq("phone", phone).one();
//5.ユーザーの存在を判断 if(user == null){ // 存在しない場合、作成 user = createUserWithPhone(phone); } //7.セッションにユーザー情報を保存 session.setAttribute("user",user);
return Result.ok(); }- ログインインターセプター
インターセプターコード
public class LoginInterceptor implements HandlerInterceptor {
@Override public boolean preHandle(HttpServletRequest request, HttpServletResponse response, Object handler) throws Exception { //1.セッションを取得 HttpSession session = request.getSession(); //2.セッション内のユーザーを取得 Object user = session.getAttribute("user"); //3.ユーザーの存在を判定 if(user == null){ //4.存在しない場合、インターセプト response.setStatus(401); return false; } //5.存在する場合、ThreadLocalへ保存 UserHolder.saveUser((User)user); //6.通過 return true; }}拡張を有効化
@Configurationpublic class MvcConfig implements WebMvcConfigurer {
@Resource private StringRedisTemplate stringRedisTemplate;
@Override public void addInterceptors(InterceptorRegistry registry) { // ログインインターセプター registry.addInterceptor(new LoginInterceptor()) .excludePathPatterns( "/shop/**", "/voucher/**", "/shop-type/**", "/upload/**", "/blog/hot", "/user/code", "/user/login" ).order(1); // トークン更新インターセプター registry.addInterceptor(new RefreshTokenInterceptor(stringRedisTemplate)).addPathPatterns("/**").order(0); }}- 安全返却オブジェクトの変更
//7.保存ユーザー情報をsessionへsession.setAttribute("user", BeanUtils.copyProperties(user,UserDTO.class));
//5.存在時、ThreadLocalへユーザー情報を保存UserHolder.saveUser((UserDTO) user);Redisを代替するセッション実装
@Overridepublic Result login(LoginFormDTO loginForm, HttpSession session) { // 1.電話番号の検証 String phone = loginForm.getPhone(); if (RegexUtils.isPhoneInvalid(phone)) { // 2.不適合の場合エラーを返す return Result.fail("手机号格式错误!"); } // 3.Redisから検証コードを取得して検証 String cacheCode = stringRedisTemplate.opsForValue().get(LOGIN_CODE_KEY + phone); String code = loginForm.getCode(); if (cacheCode == null || !cacheCode.equals(code)) { // 不一致、エラー return Result.fail("验证码错误"); }
// 4.一致、電話番号でユーザーを検索 User user = query().eq("phone", phone).one();
// 5.判断して存在しなければ新規作成 if (user == null) { user = createUserWithPhone(phone); }
// 7.ユーザー情報をRedisに保存 // 7.1.トークンをランダム生成、ログイントークンとして使用 String token = UUID.randomUUID().toString(true); // 7.2.UserオブジェクトをHashMapへ変換して保存 UserDTO userDTO = BeanUtil.copyProperties(user, UserDTO.class); Map<String, Object> userMap = BeanUtil.beanToMap(userDTO, new HashMap<>(), CopyOptions.create() .setIgnoreNullValue(true) .setFieldValueEditor((fieldName, fieldValue) -> fieldValue.toString())); // 7.3.保存 String tokenKey = LOGIN_USER_KEY + token; stringRedisTemplate.opsForHash().putAll(tokenKey, userMap); // 7.4.有効期限を設定 stringRedisTemplate.expire(tokenKey, LOGIN_USER_TTL, TimeUnit.MINUTES);
// 8.トークンを返す return Result.ok(token);}状态ログインのリフレッシュ
RefreshTokenInterceptor
public class RefreshTokenInterceptor implements HandlerInterceptor {
private StringRedisTemplate stringRedisTemplate;
public RefreshTokenInterceptor(StringRedisTemplate stringRedisTemplate) { this.stringRedisTemplate = stringRedisTemplate; }
@Override public boolean preHandle(HttpServletRequest request, HttpServletResponse response, Object handler) throws Exception { // 1.リクエストヘッダからtokenを取得 String token = request.getHeader("authorization"); if (StrUtil.isBlank(token)) { return true; } // 2.TOKENを基にRedisのユーザーを取得 String key = LOGIN_USER_KEY + token; Map<Object, Object> userMap = stringRedisTemplate.opsForHash().entries(key); // 3.ユーザーが存在するか if (userMap.isEmpty()) { return true; } // 5.HashデータをUserDTOへ変換 UserDTO userDTO = BeanUtil.fillBeanWithMap(userMap, new UserDTO(), false); // 6.存在する場合、ThreadLocalへ保存 UserHolder.saveUser(userDTO); // 7.トークン有効期限を更新 stringRedisTemplate.expire(key, LOGIN_USER_TTL, TimeUnit.MINUTES); // 8.直ちにリクエストを通過 return true; }
@Override public void afterCompletion(HttpServletRequest request, HttpServletResponse response, Object handler, Exception ex) throws Exception { // ユーザーを削除 UserHolder.removeUser(); }}LoginInterceptor
public class LoginInterceptor implements HandlerInterceptor {
@Override public boolean preHandle(HttpServletRequest request, HttpServletResponse response, Object handler) throws Exception { // 1. ThreadLocalにユーザーが存在するかを判断 if (UserHolder.getUser() == null) { // ない場合、401を設定して遮断 response.setStatus(401); return false; } // ある場合、通過 return true; }}商户検索キャッシュ
**キャッシュ(Cache)は、データの交換のためのバッファであり、一般にキャッシュとは「バッファ内のデータ」のことを指します。通常、データベースから取得したデータをローカルのコードに格納します(例:
例1:Static final ConcurrentHashMap<K,V> map = new ConcurrentHashMap<>(); 本地用于高并发
例2:static final Cache<K,V> USER_CACHE = CacheBuilder.newBuilder().build(); 用于redis等缓存
例3:Static final Map<K,V> map = new HashMap(); 本地缓存)そのままです)そのため Staticで修飄されているので、クラスがロードされる際にメモリへロードされ、ローカルキャッシュとして機能します。また final修飾によって参照とオブジェクトの関係が固定され、代入によるキャッシュの無効化を心配する必要が少なくなります。
ブラウザキャッシュ:主にブラウザ側に存在するキャッシュ
- *アプリケーション層キャッシュ:Tomcatのローカルキャッシュ(先に述べたmap)やRedisをキャッシュとして使用することができます
- *データベースキャッシュ:データベースにはバッファプールという領域があり、データの追加・変更・検索はまずMySQLのキャッシュへロードされます
- *CPUキャッシュ:現代のコンピュータで最も大きい課題はCPUの性能向上にもかかわらず、メモリの読み書き速度が追いついていない点です。したがって現在の状況に適応するため、CPUのL1、L2、L3キャッシュを追加しました
商户缓存
標準の操作は、データベースを問合せる前にまずキャッシュを問合せます。キャッシュデータが存在すればキャッシュから直接返します。キャッシュデータが存在しない場合はデータベースを問合せ、データをRedisに格納します。
@Overridepublic Result queryById(Long id) { String key = RedisConstants.CACHE_SHOP_KEY + id; String shopJson = stringRedisTemplate.opsForValue().get(key);
if(StrUtil.isNotBlank(shopJson)) { Shop shop = JSONUtil.toBean(shopJson,Shop.class); return Result.ok(shop); } Shop shop = getById(id); if(shop == null) { return Result.fail("店铺不存在!"); } stringRedisTemplate.opsForValue().set(key,JSONUtil.toJsonStr(shop), RedisConstants.CACHE_SHOP_TTL, TimeUnit.MINUTES);
return Result.ok(shop);}キャッシュとデータベースの二重書き
- キャッシュ更新
- メモリ淘汰:Redisは自動的に行います。Redisのメモリが設定したmax-memoryに達すると、自動的に淘汰機構を発動して重要でないデータを削除します(戦略は自分で設定可能)
- タイムアウト除去:RedisにTTLを設定した場合、期限切れデータを削除してキャッシュの継続利用を容易にします
- アクティブ更新:キャッシュを手動で削除する方法を呼び出します。通常はキャッシュとデータベースの不一致問題を解決するため
- データベースキャッシュの不一致
Cache Aside Patternは手動コード方式。キャッシュの呼び出し元がデータベースを更新した後、キャッシュを更新します。いわゆるダブルライト方式です。
Read/Write Through Patternはシステム自体が実行します。データベースとキャッシュの問題をシステム自体で処理します。
Write Behind Caching Patternは、呼出元がキャッシュのみを操作し、他のスレッドがデータベースを非同期に処理して最終的に一貫性を実現します。
- 人工的なコーディング方式
- キャッシュを削除するべきか、更新するべきか?
- 更新キャッシュ:データベースを更新するたびキャッシュを更新します。無効な書き込み操作が多い
- キャッシュを削除:データベースを更新する際にキャッシュを無効化し、クエリ時に再度キャッシュを更新
- キャッシュとデータベースの操作を同時に成功させるには?
- 単一システムでは、キャッシュとデータベース操作を1つのトランザクションに置く
- 分散システムではTCC等の分散トランザクションを活用
- 先にデータベースを操作し、次にキャッシュを削除
- キャッシュを削除するべきか、更新するべきか?
商铺のキャッシュとデータベースの二重書きの整合性
ShopControllerのビジネスロジックを修正して、以下の要件を満たすようにします:
IDで店舗を検索した場合、キャッシュがヒットしない場合はデータベースを検索し、データベースの結果をキャッシュへ書き込み、TTLを設定します
IDで店舗を更新した場合、まずデータベースを更新し、その後キャッシュを削除します
// クエリ時に期限を取得stringRedisTemplate.opsForValue().set(key,JSONUtil.toJsonStr(shop), RedisConstants.CACHE_SHOP_TTL, TimeUnit.MINUTES);
// 更新メソッドの追加@Override@Transactionalpublic Result update(Shop shop) { Long id = shop.getId(); if (id == null) { return Result.fail("店铺id不能为空"); } updateById(shop);
stringRedisTemplate.delete(RedisConstants.CACHE_SHOP_KEY + id); return Result.ok();
}キャッシュ透過
- キャッシュ透過:キャッシュ透過とは、キャッシュにもデータベースにも要求されるデータが存在しない状態を指します。この場合、キャッシュは有効にはなりません。全てのリクエストがデータベースに到達します。
よくある解決策は2つです:
-
キャッシュの空オブジェクト
クライアントが存在しないデータにアクセスする場合、最初にRedisを参照しますが、データがRedisに存在しません。この場合データベースにもデータが存在しなく、データ透過が起こります。データがデータベースにも存在しない場合でも、Redisにこのデータを保存します。次回同じデータを参照する際にはRedisで見つかるため、キャッシュには再びアクセスされず、データベースへのアクセスを回避できます。
- 利点:実装は簡単、保守性が高い
- 欠点:
- 追加のメモリ消費
- 短期的な一貫性の崩れの可能性
-
ブルームフィルター
ブルームフィルターはハッシュの考え方を用いて問題を解決します。巨大な2進配列を用い、ハッシュで現在検索対象のデータが存在するかを判断します。ブルームフィルターが存在すると判断した場合、そのデータは存在するものとして通過します。このリクエストはRedisへ行きます。Redisのデータが期限切れであっても、データベースには必ずそのデータが存在します。データベースでデータを取得してRedisへ戻します。ブルームフィルターが存在しないと判断した場合は直接戻します。
- 利点:メモリ使用量が少なく、余分なキーがない
- 欠点:
- 実装が複雑
- 誤判定の可能性がある
@Overridepublic Result queryById(Long id) { String key = RedisConstants.CACHE_SHOP_KEY + id; String shopJson = stringRedisTemplate.opsForValue().get(key);
if(StrUtil.isNotBlank(shopJson)) { Shop shop = JSONUtil.toBean(shopJson,Shop.class); return Result.ok(shop); } // キャッシュが空値かどうかを判定 if(shopJson != null) { return Result.fail("店铺信息不存在"); }
Shop shop = getById(id); if(shop == null) { // 空値をキャッシュに書き込む stringRedisTemplate.opsForValue().set(key,"", RedisConstants.CACHE_NULL_TTL, TimeUnit.MINUTES); return Result.fail("店铺不存在!"); } stringRedisTemplate.opsForValue().set(key,JSONUtil.toJsonStr(shop), RedisConstants.CACHE_SHOP_TTL, TimeUnit.MINUTES);
return Result.ok(shop);}キャッシュ透過の解決策は何ですか?
- キャッシュのnull値
- ブルームフィルター
- idの複雑性を高め、推測されにくくする
- データの基本フォーマット検証を徹底する
- ユーザー権限の検証を強化する
- ホットパラメータのレート制限を設ける
キャッシュ崩壊
キャッシュ崩壊は、同時期に大量のキャッシュキーが同時に失効する、またはRedisサービスがダウンして大量のリクエストがデータベースへ到達し、巨大な負荷を引き起こす状態を指します。
解決策:
- 異なるキーごとにTTLの乱数を付与する
- Redisクラスタを活用してサービスの可用性を高める
- キャッシュビジネスにデグレードとレート制限の戦略を追加する
- ビジネスに多段キャッシュを追加する
キャッシュ撃穿
キャッシュ撃穿問題、別名ホットキー問題は、高負荷でアクセスされ、キャッシュ再構築の処理が複雑なキーが突然失効した場合に、多数のリクエストがデータベースへ即座に大きな衝撃を与えます。
よくある解決策は二つです:
- 排他ロック:排他性を保証するため、データの整合性が保たれ、実装が簡単です。ロックを1つだけ追加するだけで、他の処理は特に配慮する必要がなく、追加のメモリ消費はありません。欠点はロックがあるとデッドロックの問題が発生する可能性があり、基本的に直列実行になるためパフォーマンスに影響が出ます。
- 論理有効期限:スレッドの読み取り中に待つ必要がなく、高速です。データの再構築を行う別スレッドがあらかじめロックを保持し、データの再構築完了まで他のスレッドは以前のデータを返すだけです。実装は少し複雑です。
排他ロックでキャッシュ撃穿を解決
検索後、キャッシュにデータがなければ排他ロックを取得します。ロックを取得したら、ロックを取得できたかを判定します。取得できなかった場合は待機して再試行します。ロックを取得したスレッドが再度検索を実行し、結果をRedisへ書き込み、ロックを解放してデータを返します。排他ロックを使うことで、同時にデータベースへアクセスする数を1に抑え、キャッシュ撃穿を防ぎます。
private boolean tryLock(String key) { Boolean flag = stringRedisTemplate.opsForValue().setIfAbsent(key, "1", RedisConstants.LOCK_SHOP_TTL, TimeUnit.SECONDS); return BooleanUtil.isTrue(flag);}
private void unlock(String key) { stringRedisTemplate.delete(key);}
public Shop queryWithMutex(Long id) { String key = CACHE_SHOP_KEY + id; // 1、Redisから店舗キャッシュを取得 String shopJson = stringRedisTemplate.opsForValue().get("key"); // 2、存在判定 if (StrUtil.isNotBlank(shopJson)) { // 存在、直接返す return JSONUtil.toBean(shopJson, Shop.class); } // 命中値が空値かどうかを判定 if (shopJson != null) { // エラー情報を返す return null; } // 4.キャッシュ再構築の実装 //4.1 排他ロックを取得 String lockKey = RedisConstants.LOCK_SHOP_KEY + id; Shop shop = null; try { boolean isLock = tryLock(lockKey); // 4.2 取得成功か判定 if(!isLock){ // 4.3 失敗、スリープしてリトライ Thread.sleep(50); return queryWithMutex(id); } // 4.4 ロック取得成功、DBを検索 shop = getById(id); // 5.存在しない場合、空値をRedisへ書き込み if(shop == null){ stringRedisTemplate.opsForValue().set(key,"",CACHE_NULL_TTL,TimeUnit.MINUTES); return null; } // 6. Redisへ書き込み stringRedisTemplate.opsForValue().set(key,JSONUtil.toJsonStr(shop),CACHE_NULL_TTL,TimeUnit.MINUTES);
}catch (Exception e){ throw new RuntimeException(e); } finally { // 7.排他ロックを解放 unlock(lockKey); } return shop;}論理有効期限でキャッシュ撃穿を解決
ユーザーがRedisを検索開始時、ヒットしない場合は空データを返します。ヒットした場合、値を取り出し、値の有効期限が満たされているかを判定します。未だ有効ならRedisのデータをそのまま返します。期限切れの場合、独立したスレッドを起動してデータを再構築します。再構築完了後、排他ロックを解放します。
@Datapublic class RedisData { private LocalDateTime expireTime; private Object data;}
private static final ExecutorService CACHE_REBUILD_EXECUTOR = Executors.newFixedThreadPool(10);
public Shop queryWithLogicalExpire(Long id) { String key = CACHE_SHOP_KEY + id; // 1. RedisからJSONを取得 String json = stringRedisTemplate.opsForValue().get(key); // 2. 存在判定 if (StrUtil.isBlank(json)) { return null; } // 4.ヒットしたので、JSONをオブジェクトへデシリアライズ RedisData redisData = JSONUtil.toBean(json, RedisData.class); Shop shop = JSONUtil.toBean((JSONObject) redisData.getData(), Shop.class); LocalDateTime expireTime = redisData.getExpireTime(); // 5.期限判定 if(expireTime.isAfter(LocalDateTime.now())) { // 5.1 未期限、直接返す return shop; } // 5.2 期限切れ、キャッシュ再構築が必要 // 6. キャッシュ再構築 // 6.1 排他ロックを取得 String lockKey = LOCK_SHOP_KEY + id; boolean isLock = tryLock(lockKey); // 6.2 ロック取得判定 if (isLock){ CACHE_REBUILD_EXECUTOR.submit( ()->{
try{ // キャッシュを再構築 this.saveShop2Redis(id,20L); }catch (Exception e){ throw new RuntimeException(e); }finally { unlock(lockKey); } }); } // 6.4 期限切れの店舗情報を返す return shop;}
public void saveShop2Redis(Long id,Long expireSeconds) { Shop shop = getById(id);
RedisData redisData = new RedisData(); redisData.setData(shop); redisData.setExpireTime(LocalDateTime.now().plusSeconds(expireSeconds));
stringRedisTemplate.opsForValue().set(CACHE_SHOP_KEY+id,JSONUtil.toJsonStr(redisData));}Redisツールクラスのカプセル化
StringRedisTemplateをベースに、以下の要件を満たすキャッシュツールクラスをラップします:
- 方法1:任意のJavaオブジェクトをJSONに直列化して、TTLを設定してstring型キーに格納
- 方法2:任意のJavaオブジェクトをJSONに直列化して、string型キーに格納、論理的な有効期限を設定してキャッシュ撃穿を処理
- 方法3:指定のキーでキャッシュを検索し、指定型へデシリアライズ。キャッシュ空値を利用してキャッシュ透過を解決
- 方法4:指定のキーでキャッシュを検索し、指定型へデシリアライズ。論理的有効期限を活用してキャッシュ撃穿を解決
@Slf4j@Componentpublic class CacheClient {
private final StringRedisTemplate stringRedisTemplate;
private static final ExecutorService CACHE_REBUILD_EXECUTOR = Executors.newFixedThreadPool(10);
public CacheClient(StringRedisTemplate stringRedisTemplate) { this.stringRedisTemplate = stringRedisTemplate; }
public void set(String key, Object value, Long time, TimeUnit unit) { stringRedisTemplate.opsForValue().set(key, JSONUtil.toJsonStr(value), time, unit); }
public void setWithLogicalExpire(String key, Object value, Long time, TimeUnit unit) { // 論理有効期限を設定 RedisData redisData = new RedisData(); redisData.setData(value); redisData.setExpireTime(LocalDateTime.now().plusSeconds(unit.toSeconds(time))); // Redisへ書き込み stringRedisTemplate.opsForValue().set(key, JSONUtil.toJsonStr(redisData)); }
public <R,ID> R queryWithPassThrough( String keyPrefix, ID id, Class<R> type, Function<ID, R> dbFallback, Long time, TimeUnit unit){ String key = keyPrefix + id; // 1.Redisからキャッシュを取得 String json = stringRedisTemplate.opsForValue().get(key); // 2.存在判定 if (StrUtil.isNotBlank(json)) { // 3.存在、型へ変換して返す return JSONUtil.toBean(json, type); } // キャッシュが空値かどうか if (json != null) { // エラーを返す return null; }
// 4.存在しない場合、DBを照会 R r = dbFallback.apply(id); // 5.存在しなければ、空値をキャッシュへ if (r == null) { stringRedisTemplate.opsForValue().set(key, "", CACHE_NULL_TTL, TimeUnit.MINUTES); return null; } // 6.存在する場合、Redisへ書き込み this.set(key, r, time, unit); return r; }
public <R, ID> R queryWithLogicalExpire( String keyPrefix, ID id, Class<R> type, Function<ID, R> dbFallback, Long time, TimeUnit unit) { String key = keyPrefix + id; // 1.Redisからキャッシュを取得 String json = stringRedisTemplate.opsForValue().get(key); // 2.存在判定 if (StrUtil.isBlank(json)) { return null; } // 4.ヒット、先にJSONをオブジェクトへデシリアライズ RedisData redisData = JSONUtil.toBean(json, RedisData.class); R r = JSONUtil.toBean((JSONObject) redisData.getData(), type); LocalDateTime expireTime = redisData.getExpireTime(); // 5.期限判定 if(expireTime.isAfter(LocalDateTime.now())) { // 5.1 未期限、返す return r; } // 5.2 期限切れ、キャッシュ再構築 // 6. キャッシュ再構築 // 6.1 排他ロックを取得 String lockKey = LOCK_SHOP_KEY + id; boolean isLock = tryLock(lockKey); // 6.2 ロックが取得できた場合、再構築を開始 if (isLock){ CACHE_REBUILD_EXECUTOR.submit(() -> { try { // DB照会 R newR = dbFallback.apply(id); // 再構築 this.setWithLogicalExpire(key, newR, time, unit); } catch (Exception e) { throw new RuntimeException(e); }finally { // ロックを解放 unlock(lockKey); } }); } // 6.4 期限切れのデータを返す return r; }
public <R, ID> R queryWithMutex( String keyPrefix, ID id, Class<R> type, Function<ID, R> dbFallback, Long time, TimeUnit unit) { String key = keyPrefix + id; // 1.Redisからキャッシュを取得 String shopJson = stringRedisTemplate.opsForValue().get(key); // 2.存在判定 if (StrUtil.isNotBlank(shopJson)) { // 3.存在、型へ変換して返す return JSONUtil.toBean(shopJson, type); } // キャッシュが空値かどうか if (shopJson != null) { // エラーを返す return null; }
// 4.キャッシュ再構築 // 4.1 排他ロックを取得 String lockKey = LOCK_SHOP_KEY + id; R r = null; try { boolean isLock = tryLock(lockKey); // 4.2 取得成功か判定 if (!isLock) { // 4.3 ロック取得失敗、待機して再試行 Thread.sleep(50); return queryWithMutex(keyPrefix, id, type, dbFallback, time, unit); } // 4.4 ロック取得成功、DBを検索 r = dbFallback.apply(id); // 5.存在しなければ、空値をRedisへ if (r == null) { stringRedisTemplate.opsForValue().set(key, "", CACHE_NULL_TTL, TimeUnit.MINUTES); return null; } // 6.存在する場合、Redisへ書き込み this.set(key, r, time, unit); } catch (InterruptedException e) { throw new RuntimeException(e); }finally { // 7.ロックを解放 unlock(lockKey); } // 8.返す return r; }
private boolean tryLock(String key) { Boolean flag = stringRedisTemplate.opsForValue().setIfAbsent(key, "1", 10, TimeUnit.SECONDS); return BooleanUtil.isTrue(flag); }
private void unlock(String key) { stringRedisTemplate.delete(key); }}クーポン秒殺
グローバルID
グローバルIDジェネレータは、分散システムでグローバルに一意なIDを生成するツールです。IDの安全性を高めるため、Redisの自動インクリメント値を直接使うのではなく、他の情報を組み合わせて作成します:
IDの構成要素:符号ビット:1bit、常に0
タイムスタンプ:31bit、秒単位で69年分使用可能
シーケンス番号:32bit、秒内のカウントで、毎秒2^32個の異なるIDを生成
@Componentpublic class RedisIdWorker { /** * 開始時間のタイムスタンプ */ private static final long BEGIN_TIMESTAMP = 1640995200L; /** * シーケンスのビット数 */ private static final int COUNT_BITS = 32;
private StringRedisTemplate stringRedisTemplate;
public RedisIdWorker(StringRedisTemplate stringRedisTemplate) { this.stringRedisTemplate = stringRedisTemplate; }
public long nextId(String keyPrefix) { // 1. 時間スタンプを生成 LocalDateTime now = LocalDateTime.now(); long nowSecond = now.toEpochSecond(ZoneOffset.UTC); long timestamp = nowSecond - BEGIN_TIMESTAMP;
// 2. シーケンスを生成 // 2.1 日付を日付で取得(日付まで) String date = now.format(DateTimeFormatter.ofPattern("yyyy:MM:dd")); // 2.2 自動増分 long count = stringRedisTemplate.opsForValue().increment("icr:" + keyPrefix + ":" + date);
// 3. 結合して返却 return timestamp << COUNT_BITS | count; }}秒殺券を追加:
@Override@Transactionalpublic void addSeckillVoucher(Voucher voucher) { // クーポンを保存 save(voucher); // 秒殺情報を保存 SeckillVoucher seckillVoucher = new SeckillVoucher(); seckillVoucher.setVoucherId(voucher.getId()); seckillVoucher.setStock(voucher.getStock()); seckillVoucher.setBeginTime(voucher.getBeginTime()); seckillVoucher.setEndTime(voucher.getEndTime()); seckillVoucherService.save(seckillVoucher); // 秒殺在庫をRedisに保存 stringRedisTemplate.opsForValue().set(SECKILL_STOCK_KEY + voucher.getId(), voucher.getStock().toString());}秒殺注文
注文時には2点を判定します:
- 秒殺が開始しているか、終了しているか。開始前または終了済みなら注文不可
- 在庫が十分か。不足なら注文不可
@Overridepublic Result seckillVoucher(Long voucherId) { // 1.クーポンを検索 SeckillVoucher voucher = seckillVoucherService.getById(voucherId); // 2.秒殺が開始しているかを判定 if (voucher.getBeginTime().isAfter(LocalDateTime.now())) { // 開始前 return Result.fail("秒杀尚未开始!"); } // 3.秒杀が終っているかを判定 if (voucher.getEndTime().isBefore(LocalDateTime.now())) { // 終了 return Result.fail("秒杀已经结束!"); } // 4.在庫が十分か if (voucher.getStock() < 1) { // 在庫不足 return Result.fail("库存不足!"); } //5.在庫をデクリメント boolean success = seckillVoucherService.update() .setSql("stock= stock -1") .eq("voucher_id", voucherId).update(); if (!success) { // 在庫不足 return Result.fail("库存不足!"); } //6.注文を作成 VoucherOrder voucherOrder = new VoucherOrder(); // 6.1.注文ID long orderId = redisIdWorker.nextId("order"); voucherOrder.setId(orderId); // 6.2.ユーザーID Long userId = UserHolder.getUser().getId(); voucherOrder.setUserId(userId); // 6.3.クーポンID voucherOrder.setVoucherId(voucherId); save(voucherOrder);
return Result.ok(orderId);}在庫過剰販売
過剰販売は典型的なマルチスレッド安全問題です。この問題に対する一般的な解決策はロックを使用することです。
悲観的ロック:
悲観的ロックはデータの直列実行を実現します。たとえば、synやlockなどが代表例です。公平ロック、非公平ロック、再入可能ロックなどに細分化できます。
楽観的ロック:
楽観的ロックにはバージョン番号があり、データ操作の際にバージョンを+1します。データをコミットする時に、前のバージョンと比較して1だけ増えていれば成功とします。この仕組みの核心は、操作中に他の人が変更していなければ安全とみなせる点です。CASなどの変形があります。
楽観的ロックの典型はCASで、CASを用いた無ロック機構のロックを実現します。var5は操作前に読み取ったメモリ値、while内のvar1+var2は推定値です。推定値がメモリ値と等しければ途中で他の人に変更されていないことを意味し、新しい値をメモリ値と置換します。
このdo-whileは、操作に失敗した場合に再試行するためのループです。
boolean success = seckillVoucherService.update() .setSql("stock= stock -1") .eq("voucher_id", voucherId) .gt("stock",0) .update(); //where id = ? and stock > 0一人一注文
基本ロジック:
// 5. 一人一注文ロジック// 5.1. ユーザーIDLong userId = UserHolder.getUser().getId();int count = query().eq("user_id", userId).eq("voucher_id", voucherId).count();// 5.2. 存在判定if (count > 0) { // ユーザーはすでに購入済み return Result.fail("用户已经购买过一次!");}同時実行時の挙動:悲観ロック
// maven<dependency> <groupId>org.aspectj</groupId> <artifactId>aspectjweaver</artifactId></dependency>
// Servicesynchronized(userId.toString().intern()) { // 代理オブジェクトを取得(トランザクション) IVoucherOrderService proxy = (IVoucherOrderService) AopContext.currentProxy(); return proxy.createVoucherOrder(voucherId);}
@Transactionalpublic Result createVoucherOrder(Long voucherId) { // 5.一人一注文ロジック // 5.1. ユーザーID Long userId = UserHolder.getUser().getId();
int count = query().eq("user_id", userId).eq("voucher_id", voucherId).count(); // 5.2. 存在判定 if (count > 0) { // ユーザーはすでに購入済み return Result.fail("用户已经购买过一次!"); }
//5、在庫を減らす boolean success = seckillVoucherService.update() .setSql("stock= stock -1") .eq("voucher_id", voucherId) .gt("stock",0) .update(); //where id = ? and stock > 0 if (!success) { // 在庫不足 return Result.fail("库存不足!"); } //6. 注文を作成 VoucherOrder voucherOrder = new VoucherOrder(); // 6.1.注文ID long orderId = redisIdWorker.nextId("order"); voucherOrder.setId(orderId); // 6.2.ユーザーID voucherOrder.setUserId(userId); // 6.3.クーポンID voucherOrder.setVoucherId(voucherId); save(voucherOrder); return Result.ok(orderId);
}分散ロック
クラスタ環境での同時実行の問題
現在、複数のTomcatをデプロイしているため、各Tomcatには独自のJVMがあります。サーバAのTomcat内には2つのスレッドがあり、同じコードを共有しているため、ロックオブジェクトは同じです。しかし、サーバBのTomcat内にも2つのスレッドがあり、ロックオブジェクトは同じように見えますが、実際には別のロックである可能性があります。したがって、Thread 3とThread 4は相互排他を実現しますが、Thread 1とThread 2とは排他できません。これがクラスタ環境での同期ロックが機能しない原因です。この問題を解決するには分散ロックを使用する必要があります。
分散ロック:分散システムまたはクラスタモードで複数プロセス間の可視性と排他性を満たすロック。
分散ロックの核心思想は、全員が同じロックを使うこと、同じロックを使えばスレッドをロックして並列実行を制御できるということです。
分散ロックの要件
可視性:複数のスレッドが同じ結果を見られること。ここでの可視性は並行プログラミングにおけるメモリ可視性を指すわけではなく、複数のプロセス間で変化を認識できることを意味します
排他性:分散ロックの最も基本的な条件で、プログラムの実行を直列化します
高可用性:プログラムが崩れにくく、常に高い可用性を保証します
高性能:ロックそのものがパフォーマンス低下を伴うため、分散ロックは高いロック性能と解放性能を求められます
安全性:プログラムには必須の要素です
一般的な分散ロックは3種類
Mysql:MySQL自体にロック機構はありますが、性能が一般的なため、分散ロックとして使われることは少ないです
Redis:Redisを分散ロックとして使うのが非常に一般的です。現在の企業向け開発では、ほとんどRedisやZookeeperを分散ロックとして使用します。setnxを利用します。キーの挿入に成功すればロックを得たことになり、他の人が挿入に失敗すればロックを得られません。これを利用して分散ロックを実現します
Zookeeper:Zookeeperはエンタープライズ級の分散ロック実装として良い選択肢のひとつです。ノードの一意性と有序性を利用して排他を実現します
分散ロックの実装思想
- ロック取得:
- 排他性:ただ1つのスレッドだけがロックを取得できるようにする
- 非ブロッキング:試行は一度だけ行い、成功ならtrue、失敗ならfalse
- ロック解放:
- 手動解放
- タイムアウト解放:ロック取得時にタイムアウトを設定する
@Overridepublic boolean tryLock(long timeoutSec) { // 取得中のスレッドIDを取得 Long threadId = Thread.currentThread().getId(); // ロックを取得 Boolean success = stringRedisTemplate.opsForValue() .setIfAbsent(KEY_PREFIX + name, threadId + "", timeoutSec, TimeUnit.SECONDS); return Boolean.TRUE.equals(success);}
@Overridepublic void unlock() { // ロックを削除 stringRedisTemplate.delete(KEY_PREFIX + name);}
// ビジネスコード// ロックオブジェクトを作成(新しいコード)SimpleRedisLock lock = new SimpleRedisLock("order:" + userId, stringRedisTemplate);// ロックを取得boolean isLock = lock.tryLock(1200);// ロック取得に失敗if (!isLock) { return Result.fail("不允许重复下单");}try { // プロキシオブジェクトを取得(トランザクション) IVoucherOrderService proxy = (IVoucherOrderService) AopContext.currentProxy(); return proxy.createVoucherOrder(voucherId);} finally { // ロックを解放 lock.unlock();}分散ロックの誤削除
解決策:ロックを格納する際には自分のスレッド識別子を格納し、ロックを削除する際には現在のロックの識別子が自分のものかを判定します。自分のものであれば削除し、そうでなければ削除しません。
private static final String ID_PREFIX = UUID.randomUUID().toString() + "-";@Overridepublic boolean tryLock(long timeoutSec) { // 取得中のスレッド識別子を取得 String threadId = ID_PREFIX + Thread.currentThread().getId(); // ロックを取得 Boolean success = stringRedisTemplate.opsForValue() .setIfAbsent(KEY_PREFIX + name, threadId, timeoutSec, TimeUnit.SECONDS); return Boolean.TRUE.equals(success);}
@Overridepublic void unlock() { // 取得中のスレッド識別子を取得 String threadId = ID_PREFIX + Thread.currentThread().getId(); String id = stringRedisTemplate.opsForValue().get(KEY_PREFIX + name);
// ロックを削除 if(threadId.equals(id)){ stringRedisTemplate.delete(KEY_PREFIX + name); }}分散ロックの原子性の問題
解決:Luaスクリプトを1つのスクリプトとして複数のRedisコマンドを書き込む
- ロックの識別子を取得
- 指定された識別子(現在のスレッド識別子)と一致するか判定
- 一致すればロックを解放(削除)
- 一致しなければ何も行わない
-- ここで KEYS[1] はロックのキー、ARGV[1] は現在のスレッド識別子-- ロックの識別子を取得し、現在の識別子と一致するか判定if (redis.call('GET', KEYS[1]) == ARGV[1]) then -- 一致、ロックを削除 return redis.call('DEL', KEYS[1])end-- 一致しなければ、何も返さないreturn 0private static final DefaultRedisScript<Long> UNLOCK_SCRIPT; static { UNLOCK_SCRIPT = new DefaultRedisScript<>(); UNLOCK_SCRIPT.setLocation(new ClassPathResource("unlock.lua")); UNLOCK_SCRIPT.setResultType(Long.class); }
public void unlock() { // Luaスクリプトを呼び出す stringRedisTemplate.execute( UNLOCK_SCRIPT, Collections.singletonList(KEY_PREFIX + name), ID_PREFIX + Thread.currentThread().getId());}分散ロック Redisson
setnxを用いた分散ロックの課題:
再入:ロックを取得したスレッドは、同じロックのコードブロックへ再び入ることができます。再入可能なロックはデッドロックを防ぐ意味があります。
再試行不可:現在の分散ロックは一度だけ試行する仕様です。合理的なケースとして、スレッドがロック取得に失敗した場合、再度ロックを取得できるべきです。
- タイムアウト解放: ロック取得時に有効期限を設定しているため、デッドロックを防げますが、カードタイムが長すぎる場合、ロックは実際には保持されていない可能性があり、安全性の問題が生じます。
マスター/スレーブ整合性: Redisがマスター/スレーブのクラスターを提供している場合、クラスターへデータを書き込むと、マスターは非同期でスレーブへデータを同期します。同期される前にマスターがダウンすると、死鎖の問題が発生する可能性があります。
RedissonはRedisを利用したJavaのメモリ内データグリッド(In-Memory Data Grid)であり、分散ロックの他にも様々な分散サービスを提供します。
redissonの使用
<dependency> <groupId>org.redisson</groupId> <artifactId>redisson</artifactId> <version>3.13.6</version></dependency>@Configurationpublic class RedissonConfig { @Bean public RedissonClient redissonClient(){ // 設定 Config config = new Config(); config.useSingleServer().setAddress("redis://127.0.0.1:6379"); // RedissonClientオブジェクトを作成 return Redisson.create(config); }}
//ロックオブジェクトを作成RLock lock = redissonClient.getLock("lock:order:" + userId);//ロックを取得boolean isLock = lock.tryLock();
//ロック取得に失敗if (!isLock) { return Result.fail("不允许重复下单");}try { //代理オブジェクトを取得(トランザクション) IVoucherOrderService proxy = (IVoucherOrderService) AopContext.currentProxy(); return proxy.createVoucherOrder(voucherId);} finally { //ロックを解放 lock.unlock();}redissonの再入可能ロック
ハッシュテーブル構造を用いてロックのスレッドと再入回数を管理します
redissonのロック再試行とWatchDogメカニズム
- 再試行:シグナルとPubSub機能を利用して待機・ウェイクアップを実現し、ロック取得失敗時のリトライ機能
- タイムアウト更新:WatchDogを利用して一定時間おきに(releaseTime/3)、タイムアウトを更新
redissonでの主/従整合性解決 - MutiLock
この問題を解決するため、redissonはMutiLockロックを提案します。これを使えば主従は不要になり、各ノードは同等の立場を持ちます。このロックのロック処理は全てのマスタースレーブノードへ書き込む必要があり、全てのサーバーへの書き込みが成功した時点でロック成功とみなします。もしあるノードが落ちた場合でも、他のノードがロックを取得できなければロックは成功とはみなされず、ロックの信頼性を保証します。
複数のロックを設定すると、Redissonはこれらを1つの集合へ追加し、whileループでロック取得を継続します。ただし、総ロック時間は必要なロック数×1500msです。ロックが3つある場合は4500msとなります。すべてのロックがこの期間内に取得できればロック成功、それ以外は再試行します。
秒殺の最適化
非同期秒殺
要件:
- 新しい秒殺クーポンを追加する際、クーポン情報をRedisに保存
- Luaスクリプトを基に、秒殺在庫と1人1注文を判定し、ユーザーの購入可否を決定
- 購入成功の場合、クーポンIDとユーザーIDをパッケージ化してブロックキューへ格納
- スレッドタスクを開始して、ブロックキューから情報を継続的に取得し、非同期で注文を実現
Luaスクリプトによる判定:
-- 1.パラメータリスト-- 1.1. クーポンIDlocal voucherId = ARGV[1]-- 1.2. ユーザーIDlocal userId = ARGV[2]-- 1.3. 注文IDlocal orderId = ARGV[3]
-- 2.データキー-- 2.1. 在庫キーlocal stockKey = 'seckill:stock:' .. voucherId-- 2.2. 注文キーlocal orderKey = 'seckill:order:' .. voucherId
-- 3.スクリプトのビジネス-- 3.1. 在庫が充足しているかif(tonumber(redis.call('get', stockKey)) <= 0) then -- 3.2. 在庫不足、1を返す return 1end-- 3.2. ユーザーが既に注文しているかif(redis.call('sismember', orderKey, userId) == 1) then -- 3.3. 存在する、重複注文とみなし、2を返す return 2end-- 3.4. 在庫を減らすredis.call('incrby', stockKey, -1)-- 3.5. 注文(ユーザーを保存)sadd orderKey userIdredis.call('sadd', orderKey, userId)-- 3.6. メッセージをキューへ送信、XADD stream.orders * k1 v1 k2 v2 ...redis.call('xadd', 'stream.orders', '*', 'userId', userId, 'voucherId', voucherId, 'id', orderId)return 0阻塞キューによる実装:
// 非同期処理用スレッドプールprivate static final ExecutorService SECKILL_ORDER_EXECUTOR = Executors.newSingleThreadExecutor();
// クラス初期化後に実行、クラスが初期化されたら、いつでも実行され得る@PostConstructprivate void init() { SECKILL_ORDER_EXECUTOR.submit(new VoucherOrderHandler());}// スレッドプールで実行するタスク// 初期化完了後、キューから情報を取得する private class VoucherOrderHandler implements Runnable{
@Override public void run() { while (true){ try { // 1.キューの注文情報を取得 XREADGROUP GROUP g1 c1 COUNT 1 BLOCK 2000 STREAMS s1 > List<MapRecord<String, Object, Object>> list = stringRedisTemplate.opsForStream().read( Consumer.from("g1", "c1"), StreamReadOptions.empty().count(1).block(Duration.ofSeconds(2)), StreamOffset.create("stream.orders", ReadOffset.lastConsumed()) ); // 2.注文情報が空かを判定 if (list == null || list.isEmpty()) { // nullの場合、メッセージが無いとみなし、次のループへ continue; } // データを解析 MapRecord<String, Object, Object> record = list.get(0); Map<Object, Object> value = record.getValue(); VoucherOrder voucherOrder = BeanUtil.fillBeanWithMap(value, new VoucherOrder(), true); // 3.注文を作成 createVoucherOrder(voucherOrder); // 4.メッセージの確認 XACK stringRedisTemplate.opsForStream().acknowledge("s1", "g1", record.getId()); } catch (Exception e) { log.error("处理订单异常", e); // 異常メッセージを処理 handlePendingList(); } } }
private void handlePendingList() { while (true) { try { // 1. pending-list の情報を取得 XREADGROUP GROUP g1 c1 COUNT 1 BLOCK 2000 STREAMS s1 0 List<MapRecord<String, Object, Object>> list = stringRedisTemplate.opsForStream().read( Consumer.from("g1", "c1"), StreamReadOptions.empty().count(1), StreamOffset.create("stream.orders", ReadOffset.from("0")) ); // 2.注文情報が空かを判定 if (list == null || list.isEmpty()) { // nullの場合、異常データが無いので終了 break; } // データを解析 MapRecord<String, Object, Object> record = list.get(0); Map<Object, Object> value = record.getValue(); VoucherOrder voucherOrder = BeanUtil.fillBeanWithMap(value, new VoucherOrder(), true); // 3.注文を作成 createVoucherOrder(voucherOrder); // 4.メッセージの確認 XACK stringRedisTemplate.opsForStream().acknowledge("s1", "g1", record.getId()); } catch (Exception e) { log.error("处理pendding订单异常", e); try{ Thread.sleep(20); }catch(Exception e){ e.printStackTrace(); } } } }}ダントン探店
探店ノートを公開
探店ノートはレビューサイトの評価に似ており、しばしば画像と文章の組み合わせです。対応するテーブルは2つあります: tb_blog:探店ノートのテーブル。ノートのタイトル、本文、画像などを含む tb_blog_comments:探店ノートに対する他ユーザーの評価
- アップロード、送信、閲覧:
@Slf4j@RestController@RequestMapping("upload")public class UploadController {
@PostMapping("blog") public Result uploadImage(@RequestParam("file") MultipartFile image) { try { // 元のファイル名を取得 String originalFilename = image.getOriginalFilename(); // 新しいファイル名を生成 String fileName = createNewFileName(originalFilename); // ファイルを保存 image.transferTo(new File(SystemConstants.IMAGE_UPLOAD_DIR, fileName)); // 結果を返す log.debug("ファイル上传成功,{}", fileName); return Result.ok(fileName); } catch (IOException e) { throw new RuntimeException("ファイル上传失败", e); } }}
@PostMappingpublic Result saveBlog(@RequestBody Blog blog) { // ログインユーザーを取得 UserDTO user = UserHolder.getUser(); blog.setUpdateTime(user.getId()); // 探店ノートを保存 blogService.saveBlog(blog); // IDを返す return Result.ok(blog.getId());}
@Overridepublic Result queryBlogById(Long id) { // 1.ブログを検索 Blog blog = getById(id); if (blog == null) { return Result.fail("笔记不存在!"); } // 2.ブログに関連するユーザーを検索 queryBlogUser(blog);
return Result.ok(blog);}-
いいね
要件:
- 同一ユーザーは1回だけいいねでき、再度クリックするといいねを取り消します
- 現在のユーザーがすでにいいねしている場合、いいねボタンはハイライト表示されます(フロントエンドは既に実装済み。BlogクラスのisLike属性で判断)
実装手順:
- BlogクラスにisLikeフィールドを追加し、現在のユーザーがいいねしたかを示す
- いいね機能を変更し、RedisのSet集合を利用して「いいね済みかどうか」を判定。未いいねなら+1、既にいいねしている場合は-1
- idでBlogを検索する処理を変更し、現在のログインユーザーがいいね済みかを判定してisLikeへ設定
- Blogをページングして検索する処理を変更し、現在のログインユーザーがいいね済みかを判定してisLikeへ設定
private void isBlogLiked(Blog blog) { // 1.ログインユーザーを取得 Long userId = UserHolder.getUser().getId(); // 2.現在のログインユーザーがいいね済みかを判断 String key = BLOG_LIKED_KEY + blog.getId(); Boolean isMember = stringRedisTemplate.opsForSet().isMember(key, userId.toString()); blog.setIsLike(BooleanUtil.isTrue(isMember));}
@Overridepublic Result likeBlog(Long id) { // 1.ユーザーを取得 Long userId = UserHolder.getUser().getId(); // 2.現在のユーザーがいいね済みかを判定 String key = BLOG_LIKED_KEY + id; Boolean isMember = stringRedisTemplate.opsForSet().isMember(key, userId.toString()); if(BooleanUtil.isFalse(isMember)){ // 3.未いいねなら、いいねを追加 // 3.1 データベースのいいね数を+1 boolean isSuccess = update().setSql("liked = liked + 1").eq("id", id).update(); // 3.2 RedisのSetにユーザーを追加 if(isSuccess){ stringRedisTemplate.opsForSet().add(key,userId.toString()); } }else { // 4.すでにいいね済み、取り消し // 4.1 DBのいいね数を-1 boolean isSuccess = update().setSql("liked = liked - 1").eq("id", id).update(); // 4.2 RedisのSet集合からユーザーを削除 if (isSuccess) { stringRedisTemplate.opsForSet().remove(key, userId.toString()); } } return Result.ok();}- いいねランキング
setをsortedSetへ変更:set → zset
Double score = stringRedisTemplate.opsForZSet().score(key, userId.toString());
stringRedisTemplate.opsForZSet().add(key, userId.toString(), System.currentTimeMillis());stringRedisTemplate.opsForZSet().remove(key, userId.toString());
// いいねのトップ5表示@Overridepublic Result queryBlogLikes(Long id) { String key = BLOG_LIKED_KEY + id; // 1.トップ5のいいねユーザーを取得 Set<String> top5 = stringRedisTemplate.opsForZSet().range(key, 0, 4); if (top5 == null || top5.isEmpty()) { return Result.ok(Collections.emptyList()); } // 2.ユーザーIDを抽出 List<Long> ids = top5.stream().map(Long::valueOf).collect(Collectors.toList()); String idStr = StrUtil.join(",", ids); // 3.ユーザーを検索 List<UserDTO> userDTOS = userService.query() .in("id", ids).last("ORDER BY FIELD(id," + idStr + ")").list() .stream() .map(user -> BeanUtil.copyProperties(user, UserDTO.class)) .collect(Collectors.toList()); // 4.返却 return Result.ok(userDTOS);}友達フォロー
フォローとアンフォロー
要件:このテーブル構造に基づき、2つのエンドポイントを実装します。
- フォローとフォロー解除のエンドポイント
- フォローしているかを判定するエンドポイント
FollowController
// フォロー@PutMapping("/{id}/{isFollow}")public Result follow(@PathVariable("id") Long followUserId, @PathVariable("isFollow") Boolean isFollow) { return followService.follow(followUserId, isFollow);}// アンフォロー@GetMapping("/or/not/{id}")public Result isFollow(@PathVariable("id") Long followUserId) { return followService.isFollow(followUserId);}FollowService
取消关注service@Overridepublic Result isFollow(Long followUserId) { // 1.ログインユーザーを取得 Long userId = UserHolder.getUser().getId(); // 2.フォローしているかを検索 select count(*) from tb_follow where user_id = ? and follow_user_id = ? Integer count = query().eq("user_id", userId).eq("follow_user_id", followUserId).count(); // 3.判定 return Result.ok(count > 0); }
关注service @Override public Result follow(Long followUserId, Boolean isFollow) { // 1.ログインユーザーを取得 Long userId = UserHolder.getUser().getId(); String key = "follows:" + userId; // 1.フォローかフォロー解除かを判定 if (isFollow) { // 2.フォロー、データを追加 Follow follow = new Follow(); follow.setUserId(userId); follow.setFollowUserId(followUserId); boolean isSuccess = save(follow);
} else { // 3.フォロー解除、削除 remove(new QueryWrapper<Follow>() .eq("user_id", userId).eq("follow_user_id", followUserId));
} return Result.ok(); }共同フォロー(共通フォロー)
setの共通要素
FollowServiceImpl
@Overridepublic Result follow(Long followUserId, Boolean isFollow) { // 1.ログインユーザーを取得 Long userId = UserHolder.getUser().getId(); String key = "follows:" + userId; // 1.フォローかフォロー解除かを判定 if (isFollow) { // 2.フォロー、データを追加 Follow follow = new Follow(); follow.setUserId(userId); follow.setFollowUserId(followUserId); boolean isSuccess = save(follow); if (isSuccess) { // フォローしたユーザーIDをRedisのSet集合へ追加 sadd userId followerUserId stringRedisTemplate.opsForSet().add(key, followUserId.toString()); } } else { // 3.フォロー解除、削除 boolean isSuccess = remove(new QueryWrapper<Follow>() .eq("user_id", userId).eq("follow_user_id", followUserId)); if (isSuccess) { // Redisの集合からフォローしたユーザーIDを削除 stringRedisTemplate.opsForSet().remove(key, followUserId.toString()); } } return Result.ok();}具体のフォローコード:
FollowServiceImpl
@Overridepublic Result followCommons(Long id) { // 1.現在のユーザーを取得 Long userId = UserHolder.getUser().getId(); String key = "follows:" + userId; // 2.交差集合を求める String key2 = "follows:" + id; Set<String> intersect = stringRedisTemplate.opsForSet().intersect(key, key2); if (intersect == null || intersect.isEmpty()) { // 交差なし return Result.ok(Collections.emptyList()); } // 3.交差集合のIDを解析 List<Long> ids = intersect.stream().map(Long::valueOf).collect(Collectors.toList()); // 4.ユーザーを検索 List<UserDTO> users = userService.listByIds(ids) .stream() .map(user -> BeanUtil.copyProperties(user, UserDTO.class)) .collect(Collectors.toList()); return Result.ok(users);}Feedフロー
私たちが特定のユーザーをフォローした後、そのユーザーが投稿をすると、これらのデータをフォロワーへプッシュする必要があります。この機能はFeedフローと呼ばれ、フォロー通知とも呼ばれます。ユーザーへ没入型の体験を継続的に提供するため、無限スクロールで新しい情報を取得します。
Feedフローには、TimelineとSmart排序という2つの一般的な模式があります:
- Timeline:内容のフィルタを行わず、公開時刻で単純にソートします。友人・フォロー対象に多く使用されます。
- 利点:情報が全体的、欠損がない。実装が比較的簡単
- 欠点:情報ノイズが多く、ユーザーの関心が薄い可能性、データ取得の効率が低い
- Smart排序:アルゴリズムで違反・関心の薄い内容を除外します。ユーザーが興味を持つ情報をプッシュして、ユーザーの関心を引きつけます
- 利点:ユーザーの関心が高い情報を提供し、粘着性が高い
- 欠点:アルゴリズムが正確でない場合、逆効果になる可能性
今回、友人の操作に対してはTimeline方式を採用します。フォローしているユーザーの情報を取得し、時系列で並べるだけです。
Timelineモードの実現方法は3つあります:
-
プルモード(Pullの拡散)
- 利点:スペースを節約、読み取り時に重複読み取りがなく、読み終えたら受信箱をクリアできる
- 欠点:遅延が大きい。ユーザーがデータを読む時にフォローしている人のデータを読みに行く。フォロー人数が多いと大量のデータを取得することになり、サーバーへの負荷が大きい
-
プッシュモード(Pushの拡散)
- 利点:時效性が高い。再取得の必要が少ない
- 欠点:メモリの負荷が大きい。大きなインフルエンサーが情報を流す場合、多くのファンへ分データを書き込むことになる
-
プッシュ・プル併用:読み書きの両方の長所を活用
- ファン通知
要件:
- 新規の探店ノートを追加する際、ノートをDBへ保存すると同時にファンの受信箱へプッシュします
- 受信箱はタイムスタンプでソート可能で、Redisのデータ構造を使って実現します
- 受信箱データを照会する際にページネーションを実装します
要旨:探店ノートを保存した後、現在のノートのファンを取得し、そのデータをファンのRedisへプッシュします。
@Overridepublic Result saveBlog(Blog blog) { // 1.ログインユーザーを取得 UserDTO user = UserHolder.getUser(); blog.setUserId(user.getId()); // 2.探店ノートを保存 boolean isSuccess = save(blog); if(!isSuccess){ return Result.fail("新增笔记失败!"); } // 3.作者の全ファンを取得 select * from tb_follow where follow_user_id = ? List<Follow> follows = followService.query().eq("follow_user_id", user.getId()).list(); // 4.ノートIDを全ファンへプッシュ for (Follow follow : follows) { // 4.1.ファンIDを取得 Long userId = follow.getUserId(); // 4.2.プッシュ String key = FEED_KEY + userId; stringRedisTemplate.opsForZSet().add(key, blog.getId().toString(), System.currentTimeMillis()); } // 5.返却 return Result.ok(blog.getId());}- 受信箱のページネーション検索
- 使用するZREVRANGEBYSCORE key Max Min LIMIT offset count
@Overridepublic Result queryBlogOfFollow(Long max, Integer offset) { // 1.現在のユーザーを取得 Long userId = UserHolder.getUser().getId(); // 2.受信箱を検索、距離でソート、ページング String key = FEED_KEY + userId; Set<ZSetOperations.TypedTuple<String>> typedTuples = stringRedisTemplate.opsForZSet() .reverseRangeByScoreWithScores(key, 0, max, offset, 2); // 3.空判定 if (typedTuples == null || typedTuples.isEmpty()) { return Result.ok(); } // 4.データを解析:blogId、minTime(タイムスタンプ)、offset List<Long> ids = new ArrayList<>(typedTuples.size()); long minTime = 0; // 2 int os = 1; // 2 for (ZSetOperations.TypedTuple<String> tuple : typedTuples) { // 5 4 4 2 2 // 4.1. IDを取得 ids.add(Long.valueOf(tuple.getValue())); // 4.3. 距離を取得(タイムスタンプ) long time = tuple.getScore().longValue(); if(time == minTime){ os++; }else{ minTime = time; os = 1; } } os = minTime != max ? os : os + offset; // 5. IDを用いてBlogを検索 String idStr = StrUtil.join(",", ids); List<Blog> blogs = query().in("id", ids).last("ORDER BY FIELD(id," + idStr + ")").list(); for (Blog blog : blogs) { // 5.1. ブログ関連ユーザーを検索 queryBlogUser(blog); // 5.2. ブログがいいねされたかを確認 isBlogLiked(blog); }
// 6. ラップして返却 ScrollResult r = new ScrollResult(); r.setList(blogs); r.setOffset(os); r.setMinTime(minTime);
return Result.ok(r);}近くの商店 GEO
GEOはGeolocationの略で、地理座標を表します。Redisは3.2以降GEOサポートを追加し、経度・緯度・メンバーを格納し、緯度経度に基づく検索を支援します。一般的なコマンドは以下のとおりです:
- GEOADD:地理空間情報を追加。経度、緯度、メンバー
- GEODIST:指定した2点間の距離を計算して返す
- GEOHASH:指定メンバーの座標をハッシュ文字列形式へ変換して返す
- GEOPOS:指定メンバーの座標を返す
- GEORADIUS:円の中心と半径を指定して、その円内に含まれる全メンバーを距離の順に返す。6.以降は廃止
- GEOSEARCH:指定された範囲内でメンバーを検索し、指定点との距離でソートして返す。範囲は円形または長方形。6.2 新機能
- GEOSEARCHSTORE:GEOSEARCH機能と同様だが、結果を指定のキーに格納できる。 6.2 新機能
データ導入
@Testvoid loadShopData() { // 1.店舗情報を検索 List<Shop> list = shopService.list(); // 2.タイプ別に店舗をグループ化。typeIdが同じものを1つの集合へ Map<Long, List<Shop>> map = list.stream().collect(Collectors.groupingBy(Shop::getTypeId)); // 3.バッチでRedisへ書き込み for (Map.Entry<Long, List<Shop>> entry : map.entrySet()) { // 3.1.タイプIDを取得 Long typeId = entry.getKey(); String key = SHOP_GEO_KEY + typeId; // 3.2.同タイプの店舗集合を取得 List<Shop> value = entry.getValue(); List<RedisGeoCommands.GeoLocation<String>> locations = new ArrayList<>(value.size()); // 3.3. Redis GEOADD key 経度 纬度 member を書き込み for (Shop shop : value) { // stringRedisTemplate.opsForGeo().add(key, new Point(shop.getX(), shop.getY()), shop.getId().toString()); locations.add(new RedisGeoCommands.GeoLocation<>( shop.getId().toString(), new Point(shop.getX(), shop.getY()) )); } stringRedisTemplate.opsForGeo().add(key, locations); }}実装:
- pomの導入
<dependency> <groupId>org.springframework.boot</groupId> <artifactId>spring-boot-starter-data-redis</artifactId> <exclusions> <exclusion> <artifactId>spring-data-redis</artifactId> <groupId>org.springframework.data</groupId> </exclusion> <exclusion> <artifactId>lettuce-core</artifactId> <groupId>io.lettuce</groupId> </exclusions> </exclusions></dependency><dependency> <groupId>org.springframework.data</groupId> <artifactId>spring-data-redis</artifactId> <version>2.6.2</version></dependency><dependency> <groupId>io.lettuce</groupId> <artifactId>lettuce-core</artifactId> <version>6.1.6.RELEASE</version></dependency>- 実装機能(検索 | ページング | ソート)
@Overridepublic Result queryShopByType(Integer typeId, Integer current, Double x, Double y) { // 1.座標ベース検索が必要か判断 if (x == null || y == null) { // 座標検索なし、DBで検索 Page<Shop> page = query() .eq("type_id", typeId) .page(new Page<>(current, SystemConstants.DEFAULT_PAGE_SIZE)); // データを返す return Result.ok(page.getRecords()); }
// 2.ページングパラメータを計算 int from = (current - 1) * SystemConstants.DEFAULT_PAGE_SIZE; int end = current * SystemConstants.DEFAULT_PAGE_SIZE;
// 3.Redisを検索、距離でソート、ページング。結果は shopId、distance String key = SHOP_GEO_KEY + typeId; GeoResults<RedisGeoCommands.GeoLocation<String>> results = stringRedisTemplate.opsForGeo() // GEOSEARCH key BYLONLAT x y BYRADIUS 10 WITHDISTANCE .search( key, GeoReference.fromCoordinate(x, y), new Distance(5000), RedisGeoCommands.GeoSearchCommandArgs.newGeoSearchArgs().includeDistance().limit(end) ); // 4. idを解析 if (results == null) { return Result.ok(Collections.emptyList()); } List<GeoResult<RedisGeoCommands.GeoLocation<String>>> list = results.getContent(); if (list.size() <= from) { // 次のページはない return Result.ok(Collections.emptyList()); } // 4.1. from ~ endを取得 List<Long> ids = new ArrayList<>(list.size()); Map<String, Distance> distanceMap = new HashMap<>(list.size()); list.stream().skip(from).forEach(result -> { // 4.2. 店舗IDを取得 String shopIdStr = result.getContent().getName(); ids.add(Long.valueOf(shopIdStr)); // 4.3. 距離を取得 Distance distance = result.getDistance(); distanceMap.put(shopIdStr, distance); }); // 5. idからShopを検索 String idStr = StrUtil.join(",", ids); List<Shop> shops = query().in("id", ids).last("ORDER BY FIELD(id," + idStr + ")").list(); for (Shop shop : shops) { shop.setDistance(distanceMap.get(shop.getId().toString()).getValue()); } // 6.返却 return Result.ok(shops);}ユーザーのサインイン
BitMapの操作コマンドには以下があります:
- SETBIT:指定位置(offset)に0または1を格納
- GETBIT:指定位置のビット値を取得
- BITCOUNT:Bitmap内の1のビット数をカウント
- BITFIELD:Bitmapの特定位置の値を操作(照会・変更・自動増分)
- BITFIELD_RO:Bitmapのビット配列を10進で返す
- BITOP:複数のBitmapのビット演算(AND、OR、XOR)
- BITPOS:ビット配列の指定範囲で1または0が初めて現れる位置を検索
サインイン:
@Overridepublic Result sign() { // 1.現在のログインユーザーを取得 Long userId = UserHolder.getUser().getId(); // 2.日付を取得 LocalDateTime now = LocalDateTime.now(); // 3.キーを組み立て String keySuffix = now.format(DateTimeFormatter.ofPattern(":yyyyMM")); String key = USER_SIGN_KEY + userId + keySuffix; // 4.本日が今月の何日目かを取得 int dayOfMonth = now.getDayOfMonth(); // 5.RedisへSETBIT、オフセットは dayOfMonth - 1 stringRedisTemplate.opsForValue().setBit(key, dayOfMonth - 1, true); return Result.ok();}UV統計
- UV:Unique Visitor(ユニーク訪問者)。同一人物が1日内に何度訪問しても1回としてカウントします。
- PV:Page View。サイトのページを閲覧するごとに1回としてカウントします。
一般的にはUVはPVよりも大きくなるケースが多いです。従って、同じサイトの訪問量を評価する際には、これら2つの値を参考値として扱います。
HyperLogLog(HLL)は、Loglogアルゴリズムを派生させた確率的アルゴリズムで、非常に大規模な集合の基数を推定します。RedisのHLLはstring構造に基づいており、単一のHLLはメモリが常に16KB未満、メモリ使用量が低いです。その代償として、測定結果は確率的で、誤差は0.81%未満の可能性があります。
@Testvoid testHLL() { String[] users = new String[1000]; int idx = 0; for(int i= 1;i<=100000;i++){ users[idx++] = "user_" + i; if(i % 1000 == 0){ idx = 0; stringRedisTemplate.opsForHyperLogLog().add("hll1",users); } } Long size = stringRedisTemplate.opsForHyperLogLog().size("hll1"); System.out.println("size = "+ size);}部分信息可能已经过时