


消息队列-RabbitMQ
认识MQ
同步和异步通讯
微服务间通讯有同步和异步两种方式:
同步通讯:就像打电话,需要实时响应。
异步通讯:就像发邮件,不需要马上回复。
同步通讯
同步调用的优点:
- 时效性较强,可以立即得到结果
同步调用的问题:
- 耦合度高
- 性能和吞吐能力下降
- 有额外的资源消耗
- 有级联失败问题
异步通讯
异步调用则可以避免上述问题:
我们以购买商品为例,用户支付后需要调用订单服务完成订单状态修改,调用物流服务,从仓库分配响应的库存并准备发货。
在事件模式中,支付服务是事件发布者(publisher),在支付完成后只需要发布一个支付成功的事件(event),事件中带上订单id。订单服务和物流服务是事件订阅者(Consumer),订阅支付成功的事件,监听到事件后完成自己业务即可。
为了解除事件发布者与订阅者之间的耦合,两者并不是直接通信,而是有一个中间人(Broker)。发布者发布事件到Broker,不关心谁来订阅事件。订阅者从Broker订阅事件,不关心谁发来的消息。

Broker 是一个像数据总线一样的东西,所有的服务要接收数据和发送数据都发到这个总线上,这个总线就像协议一样,让服务间的通讯变得标准和可控。
好处:
- 吞吐量提升:无需等待订阅者处理完成,响应更快速
- 故障隔离:服务没有直接调用,不存在级联失败问题
- 调用间没有阻塞,不会造成无效的资源占用
- 耦合度极低,每个服务都可以灵活插拔,可替换
- 流量削峰:不管发布事件的流量波动多大,都由Broker接收,订阅者可以按照自己的速度去处理事件
缺点:
- 架构复杂了,业务没有明显的流程线,不好管理
- 需要依赖于Broker的可靠、安全、性能
MQ技术对比
MQ,中文是消息队列(MessageQueue),字面来看就是存放消息的队列。也就是事件驱动架构中的Broker。
比较常见的MQ实现:
- ActiveMQ
- RabbitMQ
- RocketMQ
- Kafka
几种常见MQ的对比:
| RabbitMQ | ActiveMQ | RocketMQ | Kafka | |
|---|---|---|---|---|
| 公司/社区 | Rabbit | Apache | 阿里 | Apache |
| 开发语言 | Erlang | Java | Java | Scala&Java |
| 协议支持 | AMQP,XMPP,SMTP,STOMP | OpenWire,STOMP,REST,XMPP,AMQP | 自定义协议 | 自定义协议 |
| 可用性 | 高 | 一般 | 高 | 高 |
| 单机吞吐量 | 一般 | 差 | 高 | 非常高 |
| 消息延迟 | 微秒级 | 毫秒级 | 毫秒级 | 毫秒以内 |
| 消息可靠性 | 高 | 一般 | 高 | 一般 |
追求可用性:Kafka、 RocketMQ 、RabbitMQ
追求可靠性:RabbitMQ、RocketMQ
追求吞吐能力:RocketMQ、Kafka
追求消息低延迟:RabbitMQ、Kafka
快速入门
RabbitMQ安装
通过docker安装:
先确定版本拉取镜像,再运行安装命令即可
docker pull rabbitmq:${your_version}
docker run \\ -e RABBITMQ_DEFAULT_USER=${your_name} \\ -e RABBITMQ_DEFAULT_PASS=${your_pwd} \\ --name mq \\ --hostname mq1 \\ -p 15672:15672 \\ -p 5672:5672 \\ -d \\ rabbitmq:${your_version}
# 如果出现安装后网页无法访问docker exec -it rabbitMQ bashrabbitmq-plugins ebable rabbitmq_management # 开启组件
echo management_agent.disable_metrics_collector = false > management_agent.disable_metrics_collector.conf集群配置
- 普通模式:普通模式集群不进行数据同步,每个MQ都有自己的队列、数据信息(其它元数据信息如交换机等会同步)。例如我们有2个MQ:mq1,和mq2,如果你的消息在mq1,而你连接到了mq2,那么mq2会去mq1拉取消息,然后返回给你。如果mq1宕机,消息就会丢失。
- 镜像模式:与普通模式不同,队列会在各个mq的镜像节点之间同步,因此你连接到任何一个镜像节点,均可获取到消息。而且如果一个节点宕机,并不会导致数据丢失。不过,这种方式增加了数据同步的带宽消耗。
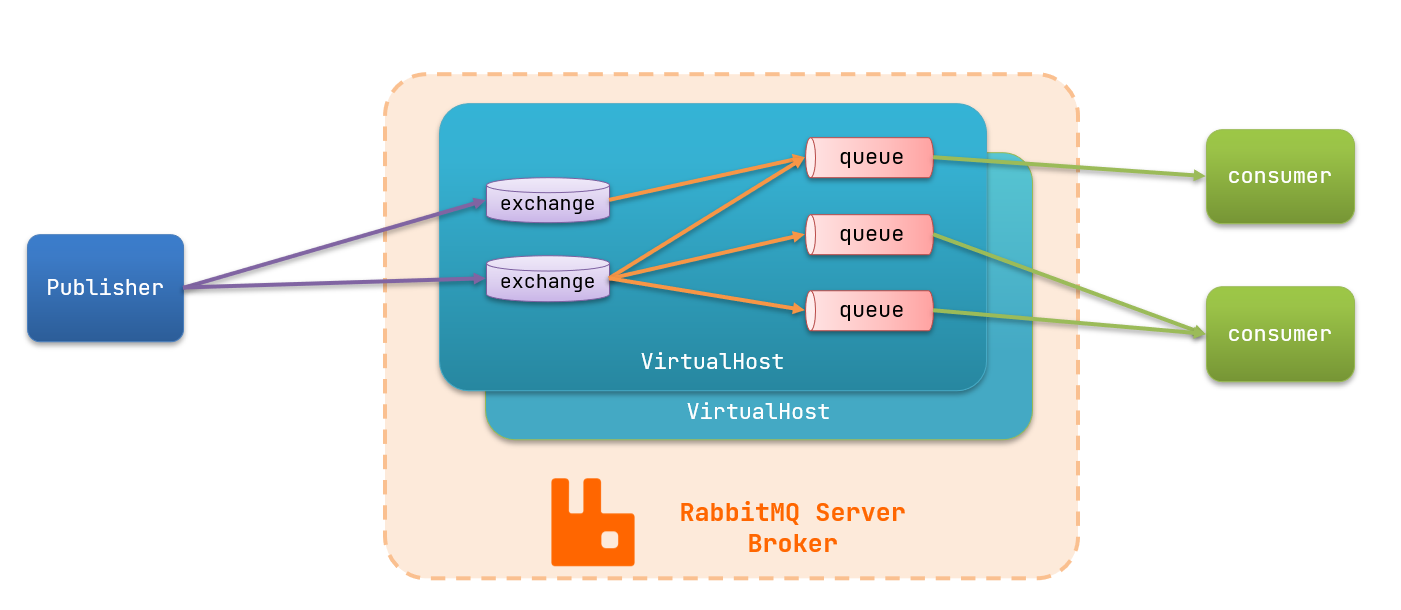
RabbitMQ中的一些角色:
- publisher:生产者
- consumer:消费者
- exchange:交换机,负责消息路由
- queue:队列,存储消息
- virtualHost:虚拟主机,隔离不同租户的exchange、queue、消息的隔离
RabbitMQ消息模型
RabbitMQ官方提供了5个不同的Demo示例,对应了不同的消息模型
- 基本消息队列
- 工作消息队列
发布订阅,交换机类型:
- Fanout Exchange:广播
- Direct Exchange:路由
- Topic Exchange:主题
入门案例
官方的HelloWorld是基于最基础的消息队列模型来实现的,只包括三个角色:
- publisher:消息发布者,将消息发送到队列queue
- queue:消息队列,负责接受并缓存消息
- consumer:订阅队列,处理队列中的消息
publisher实现
思路:
- 建立连接
- 创建Channel
- 声明队列
- 发送消息
- 关闭连接和channel
代码实现:
package cn.itcast.mq.helloworld;
import com.rabbitmq.client.Channel;import com.rabbitmq.client.Connection;import com.rabbitmq.client.ConnectionFactory;import org.junit.Test;
import java.io.IOException;import java.util.concurrent.TimeoutException;
public class PublisherTest { @Test public void testSendMessage() throws IOException, TimeoutException { // 1.建立连接 ConnectionFactory factory = new ConnectionFactory(); // 1.1.设置连接参数,分别是:主机名、端口号、vhost、用户名、密码 factory.setHost("192.168.150.101"); factory.setPort(5672); factory.setVirtualHost("/"); factory.setUsername("itcast"); factory.setPassword("123321"); // 1.2.建立连接 Connection connection = factory.newConnection();
// 2.创建通道Channel Channel channel = connection.createChannel();
// 3.创建队列 String queueName = "simple.queue"; channel.queueDeclare(queueName, false, false, false, null);
// 4.发送消息 String message = "hello, rabbitmq!"; channel.basicPublish("", queueName, null, message.getBytes()); System.out.println("发送消息成功:【" + message + "】");
// 5.关闭通道和连接 channel.close(); connection.close();
}}consumer实现
代码思路:
- 建立连接
- 创建Channel
- 声明队列
- 订阅消息
代码实现:
package cn.itcast.mq.helloworld;
import com.rabbitmq.client.*;
import java.io.IOException;import java.util.concurrent.TimeoutException;
public class ConsumerTest {
public static void main(String[] args) throws IOException, TimeoutException { // 1.建立连接 ConnectionFactory factory = new ConnectionFactory(); // 1.1.设置连接参数,分别是:主机名、端口号、vhost、用户名、密码 factory.setHost("192.168.150.101"); factory.setPort(5672); factory.setVirtualHost("/"); factory.setUsername("itcast"); factory.setPassword("123321"); // 1.2.建立连接 Connection connection = factory.newConnection();
// 2.创建通道Channel Channel channel = connection.createChannel();
// 3.创建队列 String queueName = "simple.queue"; channel.queueDeclare(queueName, false, false, false, null);
// 4.订阅消息 channel.basicConsume(queueName, true, new DefaultConsumer(channel){ @Override public void handleDelivery(String consumerTag, Envelope envelope, AMQP.BasicProperties properties, byte[] body) throws IOException { // 5.处理消息 String message = new String(body); System.out.println("接收到消息:【" + message + "】"); } }); System.out.println("等待接收消息。。。。"); }}SpringAMQP
SpringAMQP是基于RabbitMQ封装的一套模板,并且还利用SpringBoot对其实现了自动装配,使用起来非常方便
SpringAMQP提供了三个功能:
- 自动声明队列、交换机及其绑定关系
- 基于注解的监听器模式,异步接收消息
- 封装了RabbitTemplate工具,用于发送消息
Basic Queue 简单队列模型
引入依赖
<!--AMQP依赖,包含RabbitMQ--><dependency> <groupId>org.springframework.boot</groupId> <artifactId>spring-boot-starter-amqp</artifactId></dependency>消息发送
首先配置MQ地址,在publisher服务的application.yml中添加配置:
spring: rabbitmq: host: 192.168.150.101 # 主机名 port: 5672 # 端口 virtual-host: / # 虚拟主机 username: itcast # 用户名 password: 123321 # 密码然后在publisher服务中编写测试类SpringAmqpTest,并利用RabbitTemplate实现消息发送:
package cn.itcast.mq.spring;
import org.junit.Test;import org.junit.runner.RunWith;import org.springframework.amqp.rabbit.core.RabbitTemplate;import org.springframework.beans.factory.annotation.Autowired;import org.springframework.boot.test.context.SpringBootTest;import org.springframework.test.context.junit4.SpringRunner;
@RunWith(SpringRunner.class)@SpringBootTestpublic class SpringAmqpTest {
@Autowired private RabbitTemplate rabbitTemplate;
@Test public void testSimpleQueue() { // 队列名称 String queueName = "simple.queue"; // 消息 String message = "hello, spring amqp!"; // 发送消息 rabbitTemplate.convertAndSend(queueName, message); }}消息接收
首先配置MQ地址,在consumer服务的application.yml中添加配置:
spring: rabbitmq: host: 192.168.150.101 # 主机名 port: 5672 # 端口 virtual-host: / # 虚拟主机 username: itcast # 用户名 password: 123321 # 密码然后在consumer服务的cn.itcast.mq.listener包中新建一个类SpringRabbitListener,代码如下:
package cn.itcast.mq.listener;
import org.springframework.amqp.rabbit.annotation.RabbitListener;import org.springframework.stereotype.Component;
@Componentpublic class SpringRabbitListener {
@RabbitListener(queues = "simple.queue") public void listenSimpleQueueMessage(String msg) throws InterruptedException { System.out.println("spring 消费者接收到消息:【" + msg + "】"); }}WorkQueue
Work queues,也被称为(Task queues),任务模型。简单来说就是让多个消费者绑定到一个队列,共同消费队列中的消息。
当消息处理比较耗时的时候,可能生产消息的速度会远远大于消息的消费速度。长此以往,消息就会堆积越来越多,无法及时处理。此时就可以使用work 模型,多个消费者共同处理消息处理,速度就能大大提高了。
消息发送
这次我们循环发送,模拟大量消息堆积现象。
在publisher服务中的SpringAmqpTest类中添加一个测试方法:
/** * workQueue * 向队列中不停发送消息,模拟消息堆积。 */@Testpublic void testWorkQueue() throws InterruptedException { // 队列名称 String queueName = "simple.queue"; // 消息 String message = "hello, message_"; for (int i = 0; i < 50; i++) { // 发送消息 rabbitTemplate.convertAndSend(queueName, message + i); Thread.sleep(20); }}消息接收
要模拟多个消费者绑定同一个队列,我们在consumer服务的SpringRabbitListener中添加2个新的方法:
@RabbitListener(queues = "simple.queue")public void listenWorkQueue1(String msg) throws InterruptedException { System.out.println("消费者1接收到消息:【" + msg + "】" + LocalTime.now()); Thread.sleep(20);}
@RabbitListener(queues = "simple.queue")public void listenWorkQueue2(String msg) throws InterruptedException { System.err.println("消费者2........接收到消息:【" + msg + "】" + LocalTime.now()); Thread.sleep(200);}配置优化
启动ConsumerApplication后,在执行publisher服务中刚刚编写的发送测试方法testWorkQueue。
可以看到消费者1很快完成了自己的25条消息。消费者2却在缓慢的处理自己的25条消息。
也就是说消息是平均分配给每个消费者,并没有考虑到消费者的处理能力。这样显然是有问题的。
在spring中有一个简单的配置,可以解决这个问题。我们修改consumer服务的application.yml文件,添加配置:
spring: rabbitmq: listener: simple: prefetch: 1 # 每次只能获取一条消息,处理完成才能获取下一个消息发布/订阅
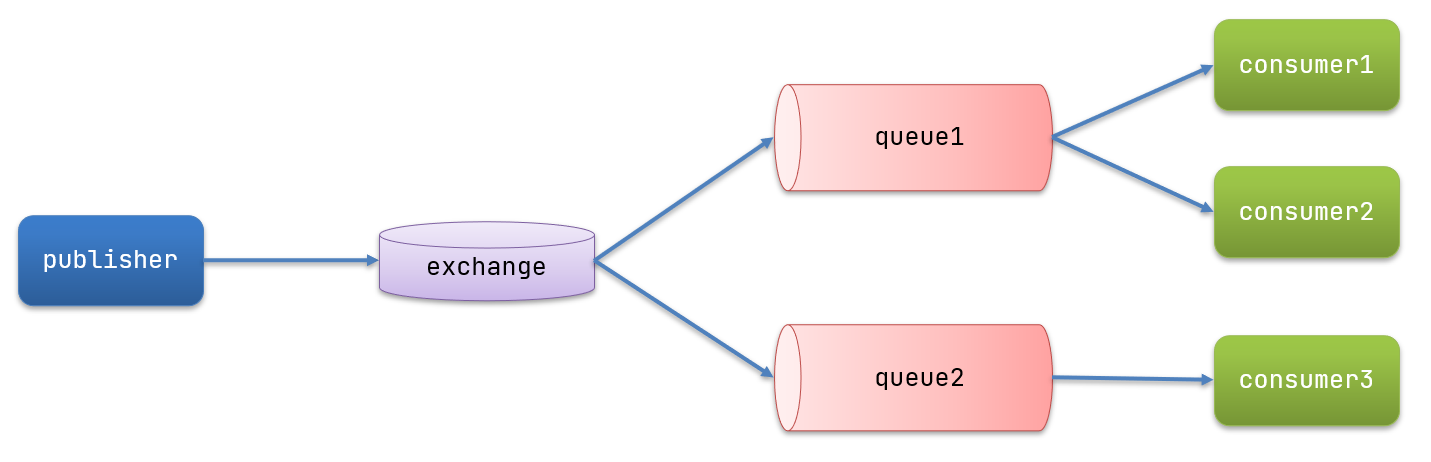
在订阅模型中,多了一个exchange角色,而且过程略有变化:
- Publisher:生产者,也就是要发送消息的程序,但是不再发送到队列中,而是发给X(交换机)
- Exchange:交换机,图中的X。一方面,接收生产者发送的消息。另一方面,知道如何处理消息,例如递交给某个特别队列、递交给所有队列、或是将消息丢弃。到底如何操作,取决于Exchange的类型。Exchange有以下3种类型:
- Fanout:广播,将消息交给所有绑定到交换机的队列
- Direct:定向,把消息交给符合指定routing key 的队列
- Topic:通配符,把消息交给符合routing pattern(路由模式) 的队列
- Consumer:消费者,与以前一样,订阅队列,没有变化
- Queue:消息队列也与以前一样,接收消息、缓存消息。
Exchange(交换机)只负责转发消息,不具备存储消息的能力,因此如果没有任何队列与Exchange绑定,或者没有符合路由规则的队列,那么消息会丢失!
Fanout
在广播模式下,消息发送流程是这样的:
- 可以有多个队列
- 每个队列都要绑定到Exchange(交换机)
- 生产者发送的消息,只能发送到交换机,交换机来决定要发给哪个队列,生产者无法决定
- 交换机把消息发送给绑定过的所有队列
- 订阅队列的消费者都能拿到消息
测试计划是这样的:
- 创建一个交换机 itcast.fanout,类型是Fanout
- 创建两个队列fanout.queue1和fanout.queue2,绑定到交换机itcast.fanout
声明队列和交换机
Spring提供了一个接口Exchange,来表示所有不同类型的交换机
在consumer中创建一个类,声明队列和交换机:
package cn.itcast.mq.config;
import org.springframework.amqp.core.Binding;import org.springframework.amqp.core.BindingBuilder;import org.springframework.amqp.core.FanoutExchange;import org.springframework.amqp.core.Queue;import org.springframework.context.annotation.Bean;import org.springframework.context.annotation.Configuration;
@Configurationpublic class FanoutConfig { /** * 声明交换机 * @return Fanout类型交换机 */ @Bean public FanoutExchange fanoutExchange(){ return new FanoutExchange("itcast.fanout"); }
/** * 第1个队列 */ @Bean public Queue fanoutQueue1(){ return new Queue("fanout.queue1"); }
/** * 绑定队列和交换机 */ @Bean public Binding bindingQueue1(Queue fanoutQueue1, FanoutExchange fanoutExchange){ return BindingBuilder.bind(fanoutQueue1).to(fanoutExchange); }
/** * 第2个队列 */ @Bean public Queue fanoutQueue2(){ return new Queue("fanout.queue2"); }
/** * 绑定队列和交换机 */ @Bean public Binding bindingQueue2(Queue fanoutQueue2, FanoutExchange fanoutExchange){ return BindingBuilder.bind(fanoutQueue2).to(fanoutExchange); }}消息发送
在publisher服务的SpringAmqpTest类中添加测试方法:
@Testpublic void testFanoutExchange() { // 队列名称 String exchangeName = "itcast.fanout"; // 消息 String message = "hello, everyone!"; rabbitTemplate.convertAndSend(exchangeName, "", message);}消息接收
在consumer服务的SpringRabbitListener中添加两个方法,作为消费者:
@RabbitListener(queues = "fanout.queue1")public void listenFanoutQueue1(String msg) { System.out.println("消费者1接收到Fanout消息:【" + msg + "】");}
@RabbitListener(queues = "fanout.queue2")public void listenFanoutQueue2(String msg) { System.out.println("消费者2接收到Fanout消息:【" + msg + "】");}交换机的作用是什么?
- 接收publisher发送的消息
- 将消息按照规则路由到与之绑定的队列
- 不能缓存消息,路由失败,消息丢失
- FanoutExchange的会将消息路由到每个绑定的队列
声明队列、交换机、绑定关系的Bean是什么?
- Queue
- FanoutExchange
- Binding
Direct
在Fanout模式中,一条消息,会被所有订阅的队列都消费。但是,在某些场景下,我们希望不同的消息被不同的队列消费。这时就要用到Direct类型的Exchange。
在Direct模型下:
- 队列与交换机的绑定,不能是任意绑定了,而是要指定一个
RoutingKey(路由key) - 消息的发送方在 向 Exchange发送消息时,也必须指定消息的
RoutingKey。 - Exchange不再把消息交给每一个绑定的队列,而是根据消息的
Routing Key进行判断,只有队列的Routingkey与消息的Routing key完全一致,才会接收到消息
案例需求如下:
- 利用@RabbitListener声明Exchange、Queue、RoutingKey
- 在consumer服务中,编写两个消费者方法,分别监听direct.queue1和direct.queue2
- 在publisher中编写测试方法,向itcast. direct发送消息
基于注解声明队列和交换机
基于@Bean的方式声明队列和交换机比较麻烦,Spring还提供了基于注解方式来声明。
在consumer的SpringRabbitListener中添加两个消费者,同时基于注解来声明队列和交换机:
@RabbitListener(bindings = @QueueBinding( value = @Queue(name = "direct.queue1"), exchange = @Exchange(name = "itcast.direct", type = ExchangeTypes.DIRECT), key = {"red", "blue"}))public void listenDirectQueue1(String msg){ System.out.println("消费者接收到direct.queue1的消息:【" + msg + "】");}
@RabbitListener(bindings = @QueueBinding( value = @Queue(name = "direct.queue2"), exchange = @Exchange(name = "itcast.direct", type = ExchangeTypes.DIRECT), key = {"red", "yellow"}))public void listenDirectQueue2(String msg){ System.out.println("消费者接收到direct.queue2的消息:【" + msg + "】");}消息发送
在publisher服务的SpringAmqpTest类中添加测试方法:
@Testpublic void testSendDirectExchange() { // 交换机名称 String exchangeName = "itcast.direct"; // 消息 String message = "红色警报!日本乱排核废水,导致海洋生物变异,惊现哥斯拉!"; // 发送消息 rabbitTemplate.convertAndSend(exchangeName, "red", message);}描述下Direct交换机与Fanout交换机的差异?
- Fanout交换机将消息路由给每一个与之绑定的队列
- Direct交换机根据RoutingKey判断路由给哪个队列
- 如果多个队列具有相同的RoutingKey,则与Fanout功能类似
基于@RabbitListener注解声明队列和交换机有哪些常见注解?
- @Queue
- @Exchange
Topic
说明
Topic类型的Exchange与Direct相比,都是可以根据RoutingKey把消息路由到不同的队列。只不过Topic类型Exchange可以让队列在绑定Routing key 的时候使用通配符!
Routingkey 一般都是有一个或多个单词组成,多个单词之间以”.”分割,例如: item.insert
通配符规则:
#:匹配一个或多个词
- :匹配不多不少恰好1个词
举例:
item.#:能够匹配item.spu.insert 或者 item.spu
item.*:只能匹配item.spu
实现思路如下:
- 并利用@RabbitListener声明Exchange、Queue、RoutingKey
- 在consumer服务中,编写两个消费者方法,分别监听topic.queue1和topic.queue2
- 在publisher中编写测试方法,向itcast. topic发送消息
消息发送
在publisher服务的SpringAmqpTest类中添加测试方法:
/** * topicExchange */@Testpublic void testSendTopicExchange() { // 交换机名称 String exchangeName = "itcast.topic"; // 消息 String message = "This is a impossible land!"; // 发送消息 rabbitTemplate.convertAndSend(exchangeName, "china.news", message);}消息接收
在consumer服务的SpringRabbitListener中添加方法:
@RabbitListener(bindings = @QueueBinding( value = @Queue(name = "topic.queue1"), exchange = @Exchange(name = "itcast.topic", type = ExchangeTypes.TOPIC), key = "china.#"))public void listenTopicQueue1(String msg){ System.out.println("消费者接收到topic.queue1的消息:【" + msg + "】");}
@RabbitListener(bindings = @QueueBinding( value = @Queue(name = "topic.queue2"), exchange = @Exchange(name = "itcast.topic", type = ExchangeTypes.TOPIC), key = "#.news"))public void listenTopicQueue2(String msg){ System.out.println("消费者接收到topic.queue2的消息:【" + msg + "】");}描述下Direct交换机与Topic交换机的差异?
- Topic交换机接收的消息RoutingKey必须是多个单词,以
*.**分割 - Topic交换机与队列绑定时的bindingKey可以指定通配符
#:代表0个或多个词- :代表1个词
消息转换器
之前说过,Spring会把你发送的消息序列化为字节发送给MQ,接收消息的时候,还会把字节反序列化为Java对象。
只不过,默认情况下Spring采用的序列化方式是JDK序列化。众所周知,JDK序列化存在下列问题:
- 数据体积过大
- 有安全漏洞
- 可读性差
测试默认转换器
我们修改消息发送的代码,发送一个Map对象:
@Testpublic void testSendMap() throws InterruptedException { // 准备消息 Map<String,Object> msg = new HashMap<>(); msg.put("name", "Jack"); msg.put("age", 21); // 发送消息 rabbitTemplate.convertAndSend("simple.queue","", msg);}发送的信息:
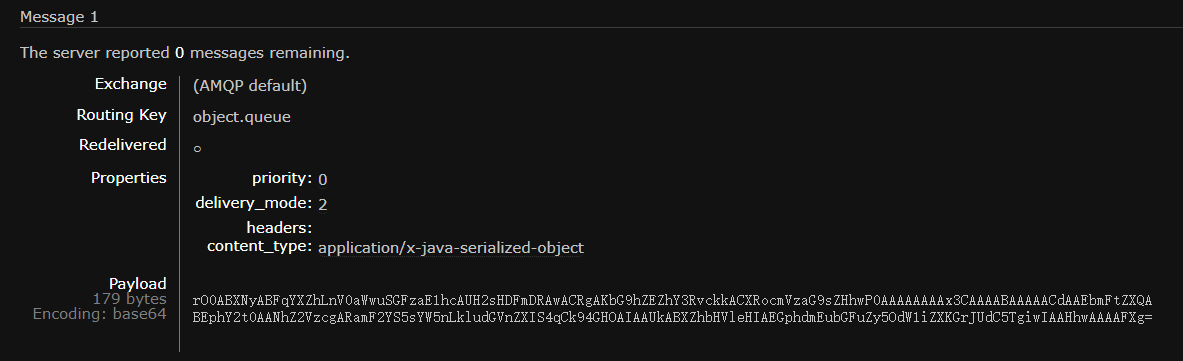
配置JSON转换器
显然,JDK序列化方式并不合适。我们希望消息体的体积更小、可读性更高,因此可以使用JSON方式来做序列化和反序列化。
在publisher和consumer两个服务中都引入依赖:
<dependency> <groupId>com.fasterxml.jackson.dataformat</groupId> <artifactId>jackson-dataformat-xml</artifactId> <version>2.9.10</version></dependency>配置消息转换器。
在启动类中添加一个Bean即可:
@Beanpublic MessageConverter jsonMessageConverter(){ return new Jackson2JsonMessageConverter();}Message Queue - RabbitMQ
Getting to Know MQ
Synchronous and Asynchronous Communication
There are two modes of communication between microservices: synchronous and asynchronous.
Synchronous communication: like making a phone call, requires real-time response.
Asynchronous communication: like sending an email, no immediate reply required.
Synchronous Communication
Advantages of synchronous calls:
- Higher immediacy; results can be obtained right away
Problems with synchronous calls:
- High coupling
- Decreased performance and throughput
- Additional resource consumption
- Cascading failure issues
Asynchronous Communication
Asynchronous calls can avoid the above issues:
Take purchasing goods as an example: after the user pays, we need to call the order service to update the order status, call the logistics service, allocate the corresponding stock from the warehouse, and prepare for shipment.
In event-driven mode, the payment service is the event publisher; after payment is completed, it only needs to publish a payment-success event (event), with the order ID included. The order service and logistics service are event subscribers (Consumers); they subscribe to the payment success event and, upon receiving it, complete their own business logic.
To decouple publishers and subscribers, there is a broker in between. The publisher publishes events to the Broker, not worrying about who subscribes. The subscriber subscribes to events from the Broker, not worrying about who sent the message.
Broker is something like a data bus; every service sends data to and receives data from this bus. This bus, like a protocol, makes inter-service communication standard and controllable.
Benefits:
- Throughput increases: no need to wait for subscribers to finish processing; responses are faster
- Fault isolation: services do not call each other directly; no cascading failures
- Non-blocking calls between services; no wasted resource occupancy
- Very low coupling; each service can be flexibly plugged in or replaced
- Traffic shaping: regardless of publish traffic fluctuations, the Broker receives it, and subscribers process at their own pace
Drawbacks:
- Architecture becomes more complex; business processes lack an obvious flow, making management harder
- Requires Broker reliability, security, and performance
MQ Technology Comparison
MQ, in Chinese, means Message Queue; literally, a queue that stores messages. It is the broker in an event-driven architecture.
Common MQ implementations:
- ActiveMQ
- RabbitMQ
- RocketMQ
- Kafka
Comparison of common MQs:
| RabbitMQ | ActiveMQ | RocketMQ | Kafka | |
|---|---|---|---|---|
| Company/Community | Rabbit | Apache | Alibaba | Apache |
| Programming Language | Erlang | Java | Java | Scala & Java |
| Protocol Support | AMQP, XMPP, SMTP, STOMP | OpenWire, STOMP, REST, XMPP, AMQP | Custom protocol | Custom protocol |
| Availability | High | Moderate | High | High |
| Single-node Throughput | Moderate | Poor | High | Very High |
| Message Latency | Microseconds | Milliseconds | Milliseconds | Less than a millisecond |
| Message Reliability | High | Moderate | High | Moderate |
Availability-focused: Kafka, RocketMQ, RabbitMQ
Reliability-focused: RabbitMQ, RocketMQ
Throughput-focused: RocketMQ, Kafka
Low-latency-focused: RabbitMQ, Kafka
Quick Start
Installing RabbitMQ
Install via Docker:
First determine the version, pull the image, then run the install commands
docker pull rabbitmq:${your_version}
docker run \\ -e RABBITMQ_DEFAULT_USER=${your_name} \\ -e RABBITMQ_DEFAULT_PASS=${your_pwd} \\ --name mq \\ --hostname mq1 \\ -p 15672:15672 \\ -p 5672:5672 \\ -d \\ rabbitmq:${your_version}
# If the web page after install cannot be accesseddocker exec -it rabbitMQ bashrabbitmq-plugins ebable rabbitmq_management # enable the plugin
echo management_agent.disable_metrics_collector = false > management_agent.disable_metrics_collector.confCluster configuration
- Normal mode: In normal mode clustering, data is not synchronized. Each MQ has its own queue and data (other metadata such as exchanges are synchronized). For example, if we have two MQs: mq1 and mq2, and your message is on mq1 but you are connected to mq2, mq2 will pull the message from mq1 and return it to you. If mq1 goes down, the messages will be lost.
- Mirror mode: Unlike normal mode, queues are synchronized across the mirror nodes of each MQ, so you can connect to any mirror node and obtain the messages. Also, if a node goes down, data will not be lost. However, this mode increases the bandwidth consumption for data synchronization.
Some roles in RabbitMQ:
- publisher: producer
- consumer: consumer
- exchange: exchange, responsible for message routing
- queue: queue, stores messages
- virtualHost: virtual host, isolates exchanges, queues, and messages for different tenants
RabbitMQ Messaging Model
The RabbitMQ official documentation provides five different demo examples corresponding to different messaging models
- Basic Queue
- Work Queue
Publish/Subscribe, Exchange types:
- Fanout Exchange: Broadcast
- Direct Exchange: Routing
- Topic Exchange: Topic
Getting Started Case
The official HelloWorld is implemented based on the simplest messaging queue model and includes three roles:
- publisher: the message publisher, sends messages to the queue
- queue: message queue, receives and caches messages
- consumer: subscribes to the queue, processes messages in the queue
Publisher Implementation
Approach:
- Establish a connection
- Create a Channel
- Declare a queue
- Send a message
- Close the connection and channel
Code implementation:
package cn.itcast.mq.helloworld;
import com.rabbitmq.client.Channel;import com.rabbitmq.client.Connection;import com.rabbitmq.client.ConnectionFactory;import org.junit.Test;
import java.io.IOException;import java.util.concurrent.TimeoutException;
public class PublisherTest { @Test public void testSendMessage() throws IOException, TimeoutException { // 1.建立连接 ConnectionFactory factory = new ConnectionFactory(); // 1.1.设置连接参数,分别是:主机名、端口号、vhost、用户名、密码 factory.setHost("192.168.150.101"); factory.setPort(5672); factory.setVirtualHost("/"); factory.setUsername("itcast"); factory.setPassword("123321"); // 1.2.建立连接 Connection connection = factory.newConnection();
// 2.创建通道Channel Channel channel = connection.createChannel();
// 3.创建队列 String queueName = "simple.queue"; channel.queueDeclare(queueName, false, false, false, null);
// 4.发送消息 String message = "hello, rabbitmq!"; channel.basicPublish("", queueName, null, message.getBytes()); System.out.println("发送消息成功:【" + message + "】");
// 5.关闭通道和连接 channel.close(); connection.close();
}}Consumer Implementation
Code idea:
- Establish a connection
- Create a Channel
- Declare a queue
- Subscribe to messages
Code implementation:
package cn.itcast.mq.helloworld;
import com.rabbitmq.client.*;
import java.io.IOException;import java.util.concurrent.TimeoutException;
public class ConsumerTest {
public static void main(String[] args) throws IOException, TimeoutException { // 1.建立连接 ConnectionFactory factory = new ConnectionFactory(); // 1.1.设置连接参数,分别是:主机名、端口号、vhost、用户名、密码 factory.setHost("192.168.150.101"); factory.setPort(5672); factory.setVirtualHost("/"); factory.setUsername("itcast"); factory.setPassword("123321"); // 1.2.建立连接 Connection connection = factory.newConnection();
// 2.创建通道Channel Channel channel = connection.createChannel();
// 3.创建队列 String queueName = "simple.queue"; channel.queueDeclare(queueName, false, false, false, null);
// 4.订阅消息 channel.basicConsume(queueName, true, new DefaultConsumer(channel){ @Override public void handleDelivery(String consumerTag, Envelope envelope, AMQP.BasicProperties properties, byte[] body) throws IOException { // 5.处理消息 String message = new String(body); System.out.println("接收到消息:【" + message + "】"); } }); System.out.println("等待接收消息。。。。"); }}Spring AMQP
Spring AMQP is a template packaged on top of RabbitMQ, and it also leverages Spring Boot for automatic configuration, making it very convenient to use.
Spring AMQP provides three features:
- Auto-declare queues, exchanges, and their bindings
- Annotation-based listener pattern for asynchronous message reception
- Wraps the RabbitTemplate tool for sending messages
Basic Queue
Dependency Introduction
<!--AMQP依赖,包含RabbitMQ--><dependency> <groupId>org.springframework.boot</groupId> <artifactId>spring-boot-starter-amqp</artifactId></dependency>Sending Messages
First configure the MQ address; add the configuration in the publisher service’s application.yml:
spring: rabbitmq: host: 192.168.150.101 # Host port: 5672 # Port virtual-host: / # Virtual host username: itcast # Username password: 123321 # PasswordThen in the publisher service, write a test class SpringAmqpTest and use RabbitTemplate to send messages:
package cn.itcast.mq.spring;
import org.junit.Test;import org.junit.runner.RunWith;import org.springframework.amqp.rabbit.core.RabbitTemplate;import org.springframework.beans.factory.annotation.Autowired;import org.springframework.boot.test.context.SpringBootTest;import org.springframework.test.context.junit4.SpringRunner;
@RunWith(SpringRunner.class)@SpringBootTestpublic class SpringAmqpTest {
@Autowired private RabbitTemplate rabbitTemplate;
@Test public void testSimpleQueue() { // 队列名称 String queueName = "simple.queue"; // 消息 String message = "hello, spring amqp!"; // 发送消息 rabbitTemplate.convertAndSend(queueName, message); }}Receiving Messages
First configure the MQ address; add the configuration in the consumer service’s application.yml:
spring: rabbitmq: host: 192.168.150.101 # Host port: 5672 # Port virtual-host: / # Virtual host username: itcast # Username password: 123321 # PasswordThen in the consumer service, create a class SpringRabbitListener in the cn.itcast.mq.listener package, as shown below:
package cn.itcast.mq.listener;
import org.springframework.amqp.rabbit.annotation.RabbitListener;import org.springframework.stereotype.Component;
@Componentpublic class SpringRabbitListener {
@RabbitListener(queues = "simple.queue") public void listenSimpleQueueMessage(String msg) throws InterruptedException { System.out.println("spring 消费者接收到消息:【" + msg + "】"); }}WorkQueue
Work queues, also known as (Task queues), are a task model. Put simply, it means that multiple consumers are bound to one queue to collectively consume messages from the queue.
When message processing is time-consuming, production rate may far exceed consumption rate. Over time, messages accumulate and cannot be processed in time. In this case, you can use the work model, where multiple consumers collectively process messages, greatly increasing speed.
Sending Messages
This time we loop to send, simulating a large amount of message buildup.
In the publisher service’s SpringAmqpTest class, add a test method:
/** * workQueue * 向队列中不停发送消息,模拟消息堆积。 */@Testpublic void testWorkQueue() throws InterruptedException { // 队列名称 String queueName = "simple.queue"; // 消息 String message = "hello, message_"; for (int i = 0; i < 50; i++) { // 发送消息 rabbitTemplate.convertAndSend(queueName, message + i); Thread.sleep(20); }}Receiving Messages
To simulate multiple consumers bound to the same queue, add two new methods in the consumer service’s SpringRabbitListener:
@RabbitListener(queues = "simple.queue")public void listenWorkQueue1(String msg) throws InterruptedException { System.out.println("消费者1接收到消息:【" + msg + "】" + LocalTime.now()); Thread.sleep(20);}
@RabbitListener(queues = "simple.queue")public void listenWorkQueue2(String msg) throws InterruptedException { System.err.println("消费者2........接收到消息:【" + msg + "】" + LocalTime.now()); Thread.sleep(200);}Configuration Optimization
After starting the ConsumerApplication, run the sending test method testWorkQueue in the publisher service.
You will see Consumer 1 quickly finishing its 25 messages, while Consumer 2 processes its 25 messages slowly.
In other words, messages are distributed evenly among consumers, without considering each consumer’s processing capacity. This is clearly problematic.
There is a simple Spring configuration to address this issue. Modify the consumer service’s application.yml and add:
spring: rabbitmq: listener: simple: prefetch: 1 # Only fetch one message at a time; fetch the next only after processing the current onePublish/Subscribe
In the publish/subscriber model, there is an extra Exchange role, and the process changes slightly:
- Publisher: the producer, the program that sends messages, but it no longer sends to a queue; it sends to X (the Exchange)
- Exchange: the Exchange, the X in the diagram. On one hand, it receives messages from producers. On the other hand, it knows how to process messages, for example by delivering to a particular queue, delivering to all queues, or discarding messages. Exactly how it operates depends on the Exchange type. Exhanges come in three types:
- Fanout: broadcast; deliver messages to all queues bound to the Exchange
- Direct: routing; deliver messages to queues that match the specified routing key
- Topic: wildcard; deliver messages to queues that match routing patterns (routing patterns)
- Consumer: consumer, as before, subscribes to queues; no change
- Queue: message queue, as before, receives and caches messages
Exchange only forwards messages; it does not store messages. Therefore, if there are no queues bound to the Exchange, or if no queues match the routing rules, messages will be lost!
Fanout
In broadcast mode, the message sending flow is:
- There can be multiple queues
- Each queue must be bound to an Exchange
- The producer’s message can only be sent to the Exchange; the Exchange decides which queue to send to; the producer cannot decide
- The Exchange sends the message to all bound queues
- Consumers subscribed to the queues can receive the messages
The test plan is as follows:
- Create an Exchange itcast.fanout of type Fanout
- Create two queues fanout.queue1 and fanout.queue2, bound to the Exchange itcast.fanout
Declaring Queues and Exchanges
Spring provides an interface Exchange to represent all different exchange types
In the consumer, create a class that declares the queues and exchanges:
package cn.itcast.mq.config;
import org.springframework.amqp.core.Binding;import org.springframework.amqp.core.BindingBuilder;import org.springframework.amqp.core.FanoutExchange;import org.springframework.amqp.core.Queue;import org.springframework.context.annotation.Bean;import org.springframework.context.annotation.Configuration;
@Configurationpublic class FanoutConfig { /** * 声明交换机 * @return Fanout类型交换机 */ @Bean public FanoutExchange fanoutExchange(){ return new FanoutExchange("itcast.fanout"); }
/** * 第1个队列 */ @Bean public Queue fanoutQueue1(){ return new Queue("fanout.queue1"); }
/** * 绑定队列和交换机 */ @Bean public Binding bindingQueue1(Queue fanoutQueue1, FanoutExchange fanoutExchange){ return BindingBuilder.bind(fanoutQueue1).to(fanoutExchange); }
/** * 第2个队列 */ @Bean public Queue fanoutQueue2(){ return new Queue("fanout.queue2"); }
/** * 绑定队列和交换机 */ @Bean public Binding bindingQueue2(Queue fanoutQueue2, FanoutExchange fanoutExchange){ return BindingBuilder.bind(fanoutQueue2).to(fanoutExchange); }}Sending Messages
In the publisher service’s SpringAmqpTest class, add a test method:
@Testpublic void testFanoutExchange() { // 队列名称 String exchangeName = "itcast.fanout"; // 消息 String message = "hello, everyone!"; rabbitTemplate.convertAndSend(exchangeName, "", message);}Receiving Messages
In the consumer service’s SpringRabbitListener, add two methods as consumers:
@RabbitListener(queues = "fanout.queue1")public void listenFanoutQueue1(String msg) { System.out.println("消费者1接收到Fanout消息:【" + msg + "】");}
@RabbitListener(queues = "fanout.queue2")public void listenFanoutQueue2(String msg) { System.out.println("消费者2接收到Fanout消息:【" + msg + "】");}What is the role of the Exchange?
- Receive messages sent by publishers
- Route messages to bound queues according to rules
- Cannot cache messages; routing failures cause message loss
- FanoutExchange will route messages to every bound queue
What are the Beans that declare queues, exchanges, and bindings?
- Queue
- FanoutExchange
- Binding
Direct
In Fanout mode, a message is consumed by all subscribed queues. But in some scenarios, we want different messages to be consumed by different queues. This is where Direct type Exchange is used.
In Direct model:
- The binding between the queue and the Exchange cannot be arbitrary; you must specify a RoutingKey
- The sender when sending to the Exchange must also specify the message’s RoutingKey
- The Exchange no longer sends the message to every bound queue; it routes based on the message’s RoutingKey; only queues whose RoutingKey matches exactly will receive the message
Case requirements are as follows:
- Use @RabbitListener to declare the Exchange, Queue, RoutingKey
- In the consumer service, write two consumer methods, listening on direct.queue1 and direct.queue2
- In the publisher, write a test method to send a message to itcast.direct
Declaring Queues and Exchanges with Annotations
Declaring queues and exchanges via @Bean is more cumbersome; Spring also provides annotation-based declarations.
In the consumer’s SpringRabbitListener, add two consumers, also declaring queues and exchanges via annotations:
@RabbitListener(bindings = @QueueBinding( value = @Queue(name = "direct.queue1"), exchange = @Exchange(name = "itcast.direct", type = ExchangeTypes.DIRECT), key = {"red", "blue"}))public void listenDirectQueue1(String msg){ System.out.println("消费者接收到direct.queue1的消息:【" + msg + "】");}
@RabbitListener(bindings = @QueueBinding( value = @Queue(name = "direct.queue2"), exchange = @Exchange(name = "itcast.direct", type = ExchangeTypes.DIRECT), key = {"red", "yellow"}))public void listenDirectQueue2(String msg){ System.out.println("消费者接收到direct.queue2的消息:【" + msg + "】");}Sending Messages
In the publisher service’s SpringAmqpTest class, add a test method:
@Testpublic void testSendDirectExchange() { // 交换机名称 String exchangeName = "itcast.direct"; // 消息 String message = "红色警报!日本乱排核废水,导致海洋生物变异,惊现哥斯拉!"; // 发送消息 rabbitTemplate.convertAndSend(exchangeName, "red", message);}Describe the differences between Direct and Fanout exchanges?
- Fanout exchanges route messages to every queue bound to them
- Direct exchanges route based on the RoutingKey to a specific queue
- If multiple queues share the same RoutingKey, it behaves similarly to Fanout
What common annotations exist for declaring queues and exchanges with @RabbitListener?
- @Queue
- @Exchange
Topic
Explanation
The Topic type of Exchange, compared with Direct, can route messages to different queues based on the RoutingKey. However, a Topic Exchange allows the binding key to use wildcards!
RoutingKey generally consists of one or more words, separated by dots, for example: item.insert
Wildcard rules:
Examples:
- item.# can match item.spu.insert or item.spu
- item.* can only match item.spu
Implementation approach:
- Use @RabbitListener to declare Exchange, Queue, RoutingKey
- In the consumer service, write two consumers, listening on topic.queue1 and topic.queue2
- In the publisher, write a test method to send a message to itcast.topic
Sending Messages
In the publisher service’s SpringAmqpTest class, add a test method:
/** * topicExchange */@Testpublic void testSendTopicExchange() { // 交换机名称 String exchangeName = "itcast.topic"; // 消息 String message = "This is a impossible land!"; // 发送消息 rabbitTemplate.convertAndSend(exchangeName, "china.news", message);}Receiving Messages
In the consumer service’s SpringRabbitListener, add methods:
@RabbitListener(bindings = @QueueBinding( value = @Queue(name = "topic.queue1"), exchange = @Exchange(name = "itcast.topic", type = ExchangeTypes.TOPIC), key = "china.#"))public void listenTopicQueue1(String msg){ System.out.println("消费者接收到topic.queue1的消息:【" + msg + "】");}
@RabbitListener(bindings = @QueueBinding( value = @Queue(name = "topic.queue2"), exchange = @Exchange(name = "itcast.topic", type = ExchangeTypes.TOPIC), key = "#.news"))public void listenTopicQueue2(String msg){ System.out.println("消费者接收到topic.queue2的消息:【" + msg + "】");}Describe the differences between Direct and Topic exchanges?
- The RoutingKey for Topic exchanges must consist of multiple words, separated by dots
- When binding a queue to a Topic exchange, the bindingKey can include wildcards
#represents zero or more words*represents exactly one word
Message Converters
Earlier it was mentioned that Spring serializes the messages you send into bytes to send to the MQ, and when receiving, it deserializes the bytes back into Java objects.
However, by default Spring uses Java Serialization (JDK serialization). As is well known, JDK serialization has the following issues:
- Large payload size
- Security vulnerabilities
- Poor readability
Testing Default Converter
We modify the message sending code to send a Map object:
@Testpublic void testSendMap() throws InterruptedException { // Prepare message Map<String,Object> msg = new HashMap<>(); msg.put("name", "Jack"); msg.put("age", 21); // Send message rabbitTemplate.convertAndSend("simple.queue","", msg);}Sending the message:
Configuring JSON Converter
Clearly, the JDK serialization method is not suitable. We want smaller message bodies and better readability, so we can use JSON for serialization and deserialization.
Add dependencies in both the publisher and consumer services:
<dependency> <groupId>com.fasterxml.jackson.dataformat</groupId> <artifactId>jackson-dataformat-xml</artifactId> <version>2.9.10</version></dependency>Configure the message converter.
Add a Bean in the startup class:
@Beanpublic MessageConverter jsonMessageConverter(){ return new Jackson2JsonMessageConverter();}消息队列-RabbitMQ
认识MQ
同步和异步通讯
マイクロサービス間の通信には同期と非同期の2つの方式があります:
同期通信:電話のように、リアルタイムで応答を必要とします。
非同期通信:メールのように、すぐに返信を求めません。
同步通讯
同期呼び出しの利点:
- 即時性が高く、すぐに結果を得られる
同期呼び出しの問題:
- 結合度が高い
- パフォーマンスとスループットが低下
- 追加のリソース消費がある
- 連鎖的な失敗の問題がある
异步通讯
非同期呼び出しは上記の問題を回避します:
私たちは商品を購入するケースを例として挙げます。ユーザーが支払った後、注文サービスを呼び出して注文状況の変更を完了し、物流サービスを呼び出して倉庫から在庫を割り当て、出荷準備を行います。
イベント駆動モードでは、支払いサービスがイベントの発行者(publisher)で、支払い完了後に支払い成功イベント(event)を発行します。イベントには注文IDが含まれます。注文サービスと物流サービスはイベント購読者(Consumer)で、支払い成功イベントを購読し、イベントを検知したらそれぞれの業務を完了します。
イベント発行者と購読者の結合を解消するため、直接の通信は行われず、中間者(Broker)が存在します。発行者はイベントをBrokerに発行しますが、誰が購読するかは関心を持ちません。購読者はBrokerからイベントを購読し、誰が送ってきた消息かを気にせず処理します。
Brokerはデータ的な総線のようなもので、全サービスがデータを受け取り、データを送るためにこの総線に送ります。この総線はまるでプロトコルのように、サービス間の通信を標準化・制御可能にします。
好处:
- 吞吐量向上:サブスクライバーの処理完了を待たずに応答が速くなる
- 故障隔离:サービスが直接呼び出されず、連鎖的な失敗の問題がない
- 呼び出し間にブロックがなく、無駄なリソース占用が発生しない
- 耦合度が非常に低く、各サービスは柔軟に挿抜・置換が可能
- 流量削峰:イベントの発行量の変動に関係なく、Brokerが受け取り、サブスクライバーは自分の速度で処理できる
缺点:
- アーキテクチャが複雑になり、ビジネスの明確なフローがなく、管理が難しくなる
- Brokerの信頼性・セキュリティ・性能に依存する
MQ技術对比
MQ、中文はメッセージキュー(MessageQueue)で、字面通りメッセージを格納するキューです。すなわちイベント駆動アーキテクチャのブローカーです。
比較的よく使われるMQ実装:
- ActiveMQ
- RabbitMQ
- RocketMQ
- Kafka
いくつかのメジャーなMQの比較:
| RabbitMQ | ActiveMQ | RocketMQ | Kafka | |
|---|---|---|---|---|
| 会社/コミュニティ | Rabbit | Apache | 阿里 | Apache |
| 開発言語 | Erlang | Java | Java | Scala&Java |
| プロトコルサポート | AMQP,XMPP,SMTP,STOMP | OpenWire,STOMP,REST,XMPP,AMQP | 自定义协议 | 自定义协议 |
| 可用性 | 高 | 一般 | 高 | 高 |
| シングルノード吞吐量 | 一般 | 差 | 高 | 非常高 |
| メッセージ遅延 | 微秒級 | 毫秒級 | 毫秒級 | 毫秒以下 |
| メッセージ信頼性 | 高 | 一般 | 高 | 一般 |
追求可用性:Kafka、 RocketMQ 、RabbitMQ
追求可靠性:RabbitMQ、RocketMQ
追求吞吐能力:RocketMQ、Kafka
追求消息低遅延:RabbitMQ、Kafka
快速入门
RabbitMQ安装
通过Docker安装:
先确定版本拉取镜像,再运行安装命令即可
docker pull rabbitmq:${your_version}
docker run \\ -e RABBITMQ_DEFAULT_USER=${your_name} \\ -e RABBITMQ_DEFAULT_PASS=${your_pwd} \\ --name mq \\ --hostname mq1 \\ -p 15672:15672 \\ -p 5672:5672 \\ -d \\ rabbitmq:${your_version}
# 如果出现安装后网页无法访问docker exec -it rabbitMQ bashrabbitmq-plugins ebable rabbitmq_management # 开启组件
echo management_agent.disable_metrics_collector = false > management_agent.disable_metrics_collector.conf集群配置
- 普通模式:普通模式集群不进行数据同步,每个MQ都有自己的队列、数据信息(其它元数据信息如交换机等会同步)。例如我们有2个MQ:mq1,和mq2,如果你的消息在mq1,而你连接到了mq2,那么mq2会去mq1拉取消息,然后返回给你。如果mq1宕机,消息就会丢失。
- 镜像模式:与普通模式不同,队列会在各个mq的镜像节点之间同步,因此你连接到任何一个镜像节点,均可获取到消息。而且如果一个节点宕机,并不会导致数据丢失。不过,这种方式增加了数据同步的带宽消耗。
RabbitMQ中的一些角色:
- publisher:生产者
- consumer:消费者
- exchange:交换机,负责消息路由
- queue:队列,存储消息
- virtualHost:虚拟主机,隔离不同租户的exchange、queue、消息的隔离
RabbitMQ消息模型
RabbitMQ官方提供了5个不同的Demo示例,对应了不同的消息模型
- 基本消息队列
- 工作消息队列
发布订阅,交换机类型:
- Fanout Exchange:广播
- Direct Exchange:路由
- Topic Exchange:主题
入门案例
官方的HelloWorld是基于最基础的消息队列模型来实现的,只包括三个角色:
- publisher:消息发布者,将消息发送到队列queue
- queue:消息队列,负责接受并缓存消息
- consumer:订阅队列,处理队列中的消息
publisher实现
思路:
- 建立连接
- 创建Channel
- 声明队列
- 发送消息
- 关闭连接和channel
代码实现:
package cn.itcast.mq.helloworld;
import com.rabbitmq.client.Channel;import com.rabbitmq.client.Connection;import com.rabbitmq.client.ConnectionFactory;import org.junit.Test;
import java.io.IOException;import java.util.concurrent.TimeoutException;
public class PublisherTest { @Test public void testSendMessage() throws IOException, TimeoutException { // 1.建立连接 ConnectionFactory factory = new ConnectionFactory(); // 1.1.设置连接参数,分别是:主机名、端口号、vhost、用户名、密码 factory.setHost("192.168.150.101"); factory.setPort(5672); factory.setVirtualHost("/"); factory.setUsername("itcast"); factory.setPassword("123321"); // 1.2.建立连接 Connection connection = factory.newConnection();
// 2.创建通道Channel Channel channel = connection.createChannel();
// 3.创建队列 String queueName = "simple.queue"; channel.queueDeclare(queueName, false, false, false, null);
// 4.发送消息 String message = "hello, rabbitmq!"; channel.basicPublish("", queueName, null, message.getBytes()); System.out.println("发送消息成功:【" + message + "】");
// 5.关闭通道和连接 channel.close(); connection.close();
}}consumer实现
代码思路:
- 建立连接
- 创建Channel
- 声明队列
- 订阅消息
代码实现:
package cn.itcast.mq.helloworld;
import com.rabbitmq.client.*;
import java.io.IOException;import java.util.concurrent.TimeoutException;
public class ConsumerTest {
public static void main(String[] args) throws IOException, TimeoutException { // 1.建立连接 ConnectionFactory factory = new ConnectionFactory(); // 1.1.设置连接参数,分别是:主机名、端口号、vhost、用户名、密码 factory.setHost("192.168.150.101"); factory.setPort(5672); factory.setVirtualHost("/"); factory.setUsername("itcast"); factory.setPassword("123321"); // 1.2.建立连接 Connection connection = factory.newConnection();
// 2.创建通道Channel Channel channel = connection.createChannel();
// 3.创建队列 String queueName = "simple.queue"; channel.queueDeclare(queueName, false, false, false, null);
// 4.订阅消息 channel.basicConsume(queueName, true, new DefaultConsumer(channel){ @Override public void handleDelivery(String consumerTag, Envelope envelope, AMQP.BasicProperties properties, byte[] body) throws IOException { // 5.处理消息 String message = new String(body); System.out.println("接收到消息:【" + message + "】"); } }); System.out.println("等待接收消息。。。。"); }}SpringAMQP
SpringAMQPはRabbitMQをベースにしたテンプレートのセットで、Spring Bootを利用した自動設定も実現しており、使い勝手が非常に良いです。
SpringAMQPは3つの機能を提供します:
- 自動的にキュー、エクスチェンジおよびそれらの結合を宣言する
- アノテーションベースのリスナー模式、非同期でメッセージを受信する
- RabbitTemplateツールをラップして、メッセージを送信する
Basic Queue 簡易キュー模型
依存関係の追加
<!--AMQP依存,RabbitMQを含む--><dependency> <groupId>org.springframework.boot</groupId> <artifactId>spring-boot-starter-amqp</artifactId></dependency>消息发送
まずMQアドレスを設定します。publisherサービスの application.yml に設定を追加します:
spring: rabbitmq: host: 192.168.150.101 # ホスト名 port: 5672 # ポート virtual-host: / # 仮想ホスト username: itcast # ユーザー名 password: 123321 # パスワード次に publisher サービスでテストクラス SpringAmqpTest を作成し、RabbitTemplate を用いてメッセージを送信します:
package cn.itcast.mq.spring;
import org.junit.Test;import org.junit.runner.RunWith;import org.springframework.amqp.rabbit.core.RabbitTemplate;import org.springframework.beans.factory.annotation.Autowired;import org.springframework.boot.test.context.SpringBootTest;import org.springframework.test.context.junit4.SpringRunner;
@RunWith(SpringRunner.class)@SpringBootTestpublic class SpringAmqpTest {
@Autowired private RabbitTemplate rabbitTemplate;
@Test public void testSimpleQueue() { // キュー名 String queueName = "simple.queue"; // メッセージ String message = "hello, spring amqp!"; // メッセージを送信 rabbitTemplate.convertAndSend(queueName, message); }}消息接收
まずMQアドレスを設定します。consumerサービスの application.yml に設定を追加します:
spring: rabbitmq: host: 192.168.150.101 # ホスト名 port: 5672 # ポート virtual-host: / # 仮想ホスト username: itcast # ユーザー名 password: 123321 # パスワード次に consumerサービスの cn.itcast.mq.listener パッケージに新しいクラス SpringRabbitListener を作成します。コードは以下のとおり:
package cn.itcast.mq.listener;
import org.springframework.amqp.rabbit.annotation.RabbitListener;import org.springframework.stereotype.Component;
@Componentpublic class SpringRabbitListener {
@RabbitListener(queues = "simple.queue") public void listenSimpleQueueMessage(String msg) throws InterruptedException { System.out.println("spring 消費者接收到消息:【" + msg + "】"); }}WorkQueue
Work queues、別名(Task queues)、タスクモデル。簡単に言えば、複数のコンシューマーを1つのキューにバインドして、キュー内のメッセージを共同で消費させます。
メッセージ処理が比較的時間を要する場合、メッセージ生成速度が消費速度を大きく上回ることがあります。長く続くと、メッセージは蓄積され、タイムリーに処理できなくなります。そのとき Work モデルを使用すると、複数のコンシューマーが共同で処理するため、速度が大幅に向上します。
消息发送
今回は大量のメッセージ蓄積現象を模倣するため、ループ送信を行います。
publisherサービスの SpringAmqpTest クラスにテストメソッドを追加します:
/** * workQueue * 向队列中不断发送消息,模拟消息堆积。 */@Testpublic void testWorkQueue() throws InterruptedException { // 队列名称 String queueName = "simple.queue"; // 消息 String message = "hello, message_"; for (int i = 0; i < 50; i++) { // 发送消息 rabbitTemplate.convertAndSend(queueName, message + i); Thread.sleep(20); }}消息接收
複数のコンシューマーが同じキューをバインドする状況を模倣するため、consumer サービスの SpringRabbitListener に2つの新しいメソッドを追加します:
@RabbitListener(queues = "simple.queue")public void listenWorkQueue1(String msg) throws InterruptedException { System.out.println("消费者1接收到消息:【" + msg + "】" + LocalTime.now()); Thread.sleep(20);}
@RabbitListener(queues = "simple.queue")public void listenWorkQueue2(String msg) throws InterruptedException { System.err.println("消费者2........接收到消息:【" + msg + "】" + LocalTime.now()); Thread.sleep(200);}配置优化
ConsumerApplication を起動した後、先ほど作成した送信テスト方法 testWorkQueue を publisher サービスで実行します。
消費者1 は自分の25件のメッセージをすぐに処理します。消費者2 は自分の25件を遅いペースで処理します。
つまり、メッセージは各コンシューマーに均等に割り当てられ、コンシューマーの処理能力を考慮していません。これは問題です。
Spring にはこの問題を解決する簡単な設定があります。consumer サービスの application.yml ファイルを編集し、設定を追加します:
spring: rabbitmq: listener: simple: prefetch: 1 # 毎回1つのメッセージのみ取得、処理完了後に次を取得発行/購読
サブスクリプションモデルでは、エクスチェンジの役割が追加され、プロセスが少し変わります:
- Publisher:プロデューサー、つまりメッセージを送信するプログラムですが、キューへ送るのではなくX(エクスチェンジ)へ送ります
- Exchange:エクスチェンジ、図のX。 一方、プロデューサーが送信するメッセージを受け取り、もう一方、どのように処理するかを知っています。例えば、特定のキューへ配布、すべてのキューへ配布、またはメッセージを破棄します。動作はExchangeのタイプに依存します。Exchangeには以下の3種類があります:
- Fanout:ブロードキャスト、メッセージをすべてのバインドされたキューへ渡す
- Direct:ルーティング、指定された routing key のキューへ渡す
- Topic:トピック、routing pattern にマッチするキューへ渡す
- Consumer:コンシューマー、従来と同様、キューを購読します
- Queue:メッセージキュー、従来どおり、メッセージを受信・キャッシュします。
Exchange(交換機)はメッセージを転送するだけで、メッセージを保存する能力はないため、もしキューがExchangeにバインドされていない、またはルーティング規則に合致するキューが存在しない場合、メッセージは失われます!
Fanout
ブロードキャストモードでは、メッセージ送信の流れは次のとおりです:
- 複数のキューを持つことができる
- 各キューは Exchange(エクスチェンジ)にバインドされている必要がある
- 送信者が送るメッセージは交換機にのみ送られ、交換機がどのキューへ送るかを決定します。送信者には決定権がない
- 交換機はバインド済みのすべてのキューへメッセージを送信する
- サブスクライブしているコンシューマーは全員メッセージを受け取れる
テスト計画は以下のとおりです:
- 交換機 itcast.fanout、タイプは Fanout を作成
- キュー fanout.queue1 と fanout.queue2 を作成し、交換機 itcast.fanout にバインド
声明队列和交换机
Spring は Exchange という、すべての異なるタイプの交換機を表すインタフェースを提供します
consumer 側で、キューと交換機を宣言するクラスを作成します:
package cn.itcast.mq.config;
import org.springframework.amqp.core.Binding;import org.springframework.amqp.core.BindingBuilder;import org.springframework.amqp.core.FanoutExchange;import org.springframework.amqp.core.Queue;import org.springframework.context.annotation.Bean;import org.springframework.context.annotation.Configuration;
@Configurationpublic class FanoutConfig { /** * 声明交换机 * @return Fanout类型交换機 */ @Bean public FanoutExchange fanoutExchange(){ return new FanoutExchange("itcast.fanout"); }
/** * 第1个队列 */ @Bean public Queue fanoutQueue1(){ return new Queue("fanout.queue1"); }
/** * 绑定队列和交换机 */ @Bean public Binding bindingQueue1(Queue fanoutQueue1, FanoutExchange fanoutExchange){ return BindingBuilder.bind(fanoutQueue1).to(fanoutExchange); }
/** * 第2个队列 */ @Bean public Queue fanoutQueue2(){ return new Queue("fanout.queue2"); }
/** * 绑定队列和交换机 */ @Bean public Binding bindingQueue2(Queue fanoutQueue2, FanoutExchange fanoutExchange){ return BindingBuilder.bind(fanoutQueue2).to(fanoutExchange); }}消息发送
publisher サービスの SpringAmqpTest クラスにテストメソッドを追加します:
@Testpublic void testFanoutExchange() { // 交換機名称 String exchangeName = "itcast.fanout"; // メッセージ String message = "hello, everyone!"; rabbitTemplate.convertAndSend(exchangeName, "", message);}消息接收
consumer サービスの SpringRabbitListener に2つのメソッドを追加して、コンシューマーとして動作させます:
@RabbitListener(queues = "fanout.queue1")public void listenFanoutQueue1(String msg) { System.out.println("消费者1接收到Fanout消息:【" + msg + "】");}
@RabbitListener(queues = "fanout.queue2")public void listenFanoutQueue2(String msg) { System.out.println("消费者2接收到Fanout消息:【" + msg + "】");}交換機の役割は何ですか?
- Publisher が送信したメッセージを受け取る
- メッセージを規則に従って、結合されているキューへルーティングする
- メッセージをキャッシュできず、ルーティング失敗時にはメッセージが失われる
- FanoutExchange はメッセージを結合された全てのキューへルーティングします
声明队列、交换机、绑定关系のBeanは何ですか?
- Queue
- FanoutExchange
- Binding
Direct
Fanoutモードでは、1つのメッセージはすべての購読キューで消費されます。しかし、特定の場面では、異なるメッセージを異なるキューで消費したい場合があります。そんなとき Direct 型の Exchange を使用します。
Direct モデルでは:
- キューとエクスチェンジの結合は任意の結合ではなく、RoutingKey(ルーティングキー)を指定する必要があります
- メッセージの送信元は Exchange にメッセージを送信する際、必ず RoutingKey を指定します
- Exchange は全てのバインドされたキューへメッセージを渡すのではなく、メッセージの Routing Key に基づいて、キューの RoutingKey がメッセージの Routing Key と完全一致する場合のみ受信します
ケースの要求は以下のとおりです。
- @RabbitListener を用いて Exchange、Queue、RoutingKey を宣言する
- consumer サービスで、direct.queue1 と direct.queue2 をリッスンする2つのコンシューマーを作成する
- publisher でテストメソッドを作成し、itcast.direct にメッセージを送信する
基于注解声明队列和交换机
@Bean ベースの宣言は煩雑なので、Spring はアノテーションベースの宣言も提供します。
consumer の SpringRabbitListener に、2つのコンシューマーを追加し、アノテーションを用いてキューとエクスチェンジを宣言します:
@RabbitListener(bindings = @QueueBinding( value = @Queue(name = "direct.queue1"), exchange = @Exchange(name = "itcast.direct", type = ExchangeTypes.DIRECT), key = {"red", "blue"}))public void listenDirectQueue1(String msg){ System.out.println("消费者接收到direct.queue1の消息:【" + msg + "】");}
@RabbitListener(bindings = @QueueBinding( value = @Queue(name = "direct.queue2"), exchange = @Exchange(name = "itcast.direct", type = ExchangeTypes.DIRECT), key = {"red", "yellow"}))public void listenDirectQueue2(String msg){ System.out.println("消费者接收到direct.queue2の消息:【" + msg + "】");}消息发送
publisherサービスの SpringAmqpTest クラスにテストメソッドを追加します:
@Testpublic void testSendDirectExchange() { // 交換機名称 String exchangeName = "itcast.direct"; // メッセージ String message = "紅色警報!日本乱排核廃水,导致海洋生物变异,惊现哥斯拉!"; // 发送消息 rabbitTemplate.convertAndSend(exchangeName, "red", message);}Direct交換機とFanout交換機の差異を説明してください。
- Fanout交換機はメッセージをすべてのバインドされたキューへルーティングします
- Direct交換機は RoutingKey によってどのキューへルーティングするかを判断します
- 複数のキューが同じ RoutingKey を持つ場合、Fanout の機能に近い
基于@RabbitListener注解声明队列和交换机有哪些常见注解?
- @Queue
- @Exchange
Topic
说明
Topicタイプの Exchange は、Direct と比較しても、RoutingKey に基づいてメッセージを異なるキューへルーティングできます。ただし Topic タイプの Exchange は、キューを Routing Key にバインドする際にワイルドカードを使用できます!
RoutingKey は一般に1語以上で、複数語は「.」で区切られます。例: item.insert
ワイルドカード規則:
#:0語以上をマッチ
*:ちょうど1語にマッチ
例:
item.#:item.spu.insert や item.spu にマッチ
item.*:item.spu にのみマッチします
実装方針は以下のとおり:
- @RabbitListener を用いて Exchange、Queue、RoutingKey を宣言します
- consumer サービスで、topic.queue1 と topic.queue2 をそれぞれ監視する2つのコンシューマーを作成します
- publisher でテストメソッドを作成し、itcast.topic にメッセージを送信します
消息发送
publisherサービスのSpringAmqpTestクラスにテスト方法を追加します:
/** * topicExchange */@Testpublic void testSendTopicExchange() { // 交換機名称 String exchangeName = "itcast.topic"; // メッセージ String message = "This is a impossible land!"; // 发送消息 rabbitTemplate.convertAndSend(exchangeName, "china.news", message);}消息接收
consumerサービスの SpringRabbitListener にメソッドを追加します:
@RabbitListener(bindings = @QueueBinding( value = @Queue(name = "topic.queue1"), exchange = @Exchange(name = "itcast.topic", type = ExchangeTypes.TOPIC), key = "china.#"))public void listenTopicQueue1(String msg){ System.out.println("消费者接收到topic.queue1の消息:【" + msg + "】");}
@RabbitListener(bindings = @QueueBinding( value = @Queue(name = "topic.queue2"), exchange = @Exchange(name = "itcast.topic", type = ExchangeTypes.TOPIC), key = "#.news"))public void listenTopicQueue2(String msg){ System.out.println("消费者接收到topic.queue2の消息:【" + msg + "】");}Direct交換機とTopic交換機の差異を説明してください?
- Topic交換機は受け取るメッセージの RoutingKey が複数の語で成り立ち、
*.**のように分割されます - Topic交換機とキューを結ぶときの bindingKey はワイルドカードを指定できます
#:0語以上*:1語
消息转换器
以前に述べたように、Spring は送信するメッセージをバイト列にシリアライズして MQ に送信し、受信時にはそのバイト列を Java オブジェクトにデシリアライズします。
ただし、デフォルトでは Spring が使用するシリアライズ方式は JDK シリアライズです。ご存知のとおり、JDK シリアライズには以下の問題があります:
- データサイズが大きい
- セキュリティ上の脆弱性がある
- 読みやすさが低い
デフォルト変換器のテスト
メッセージ送信コードを変更し、Map オブジェクトを送信します:
@Testpublic void testSendMap() throws InterruptedException { // 準備メッセージ Map<String,Object> msg = new HashMap<>(); msg.put("name", "Jack"); msg.put("age", 21); // 送信 rabbitTemplate.convertAndSend("simple.queue","", msg);}送信された情報:
JSON変換器の設定
明らかに JDK シリアライズは適切ではありません。メッセージ本体のサイズを小さくし、可読性を高めるため、JSON 形式をシリアライズ・デシリアライズに用います。
publisher と consumer の2つのサービスの両方に依存関係を追加します:
<dependency> <groupId>com.fasterxml.jackson.dataformat</groupId> <artifactId>jackson-dataformat-xml</artifactId> <version>2.9.10</version></dependency>メッセージ変換器を設定します。
起動クラスに Bean を追加するだけです:
@Beanpublic MessageConverter jsonMessageConverter(){ return new Jackson2JsonMessageConverter();}部分信息可能已经过时