


docker
什么是Docker
微服务虽然具备各种各样的优势,但服务的拆分通用给部署带来了很大的麻烦。
- 分布式系统中,依赖的组件非常多,不同组件之间部署时往往会产生一些冲突。
- 在数百上千台服务中重复部署,环境不一定一致,会遇到各种问题
应用部署的环境问题
大型项目组件较多,运行环境也较为复杂,部署时会碰到一些问题:
- 依赖关系复杂,容易出现兼容性问题
- 开发、测试、生产环境有差异
例如一个项目中,部署时需要依赖于node.js、Redis、RabbitMQ、MySQL等,这些服务部署时所需要的函数库、依赖项各不相同,甚至会有冲突。给部署带来了极大的困难。
docker解决依赖兼容问题
而Docker确巧妙的解决了这些问题,Docker是如何实现的呢?
Docker为了解决依赖的兼容问题的,采用了两个手段:
- 将应用的Libs(函数库)、Deps(依赖)、配置与应用一起打包
- 将每个应用放到一个隔离容器去运行,避免互相干扰
这样打包好的应用包中,既包含应用本身,也保护应用所需要的Libs、Deps,无需再操作系统上安装这些,自然就不存在不同应用之间的兼容问题了。
Docker解决操作系统环境差异
要解决不同操作系统环境差异问题,必须先了解操作系统结构。以一个Ubuntu操作系统为例,结构包括:
- 计算机硬件:例如CPU、内存、磁盘等
- 系统内核:所有Linux发行版的内核都是Linux,例如CentOS、Ubuntu、Fedora等。内核可以与计算机硬件交互,对外提供内核指令,用于操作计算机硬件。
- 系统应用:操作系统本身提供的应用、函数库。这些函数库是对内核指令的封装,使用更加方便。
应用于计算机交互的流程如下:
1)应用调用操作系统应用(函数库),实现各种功能
2)系统函数库是对内核指令集的封装,会调用内核指令
3)内核指令操作计算机硬件
Docker如何解决不同系统环境的问题?
- Docker将用户程序与所需要调用的系统(比如Ubuntu)函数库一起打包
- Docker运行到不同操作系统时,直接基于打包的函数库,借助于操作系统的Linux内核来运行
Docker是一个快速交付应用、运行应用的技术,具备下列优势:
- 可以将程序及其依赖、运行环境一起打包为一个镜像,可以迁移到任意Linux操作系统
- 运行时利用沙箱机制形成隔离容器,各个应用互不干扰
- 启动、移除都可以通过一行命令完成,方便快捷
Docker和虚拟机的区别
Docker可以让一个应用在任何操作系统中非常方便的运行。而虚拟机也能在一个操作系统中,运行另外一个操作系统,保护系统中的任何应用。
- 虚拟机(virtual machine)是在操作系统中模拟硬件设备,然后运行另一个操作系统,比如在 Windows 系统里面运行 Ubuntu 系统,这样就可以运行任意的Ubuntu应用了。
- Docker仅仅是封装函数库,并没有模拟完整的操作系统
| 特性 | Docker | 虚拟机 |
|---|---|---|
| 性能 | 接近原生 | 性能较差 |
| 硬盘占用 | 一般为MB | 一般为GB |
| 启动 | 秒级 | 分钟级 |
Docker和虚拟机的差异:
- docker是一个系统进程;虚拟机是在操作系统中的操作系统
- docker体积小、启动速度快、性能好;虚拟机体积大、启动速度慢、性能一般
Docker架构
镜像和容器
Docker中有几个重要的概念:
- 镜像(Image):Docker将应用程序及其所需的依赖、函数库、环境、配置等文件打包在一起,称为镜像。
- 容器(Container):镜像中的应用程序运行后形成的进程就是容器,只是Docker会给容器进程做隔离,对外不可见。
一切应用最终都是代码组成,都是硬盘中的一个个的字节形成的文件。只有运行时,才会加载到内存,形成进程。
而镜像,就是把一个应用在硬盘上的文件、及其运行环境、部分系统函数库文件一起打包形成的文件包。这个文件包是只读的。
容器呢,就是将这些文件中编写的程序、函数加载到内存中允许,形成进程,只不过要隔离起来。因此一个镜像可以启动多次,形成多个容器进程。
DockerHub
开源应用程序非常多,打包这些应用往往是重复的劳动。为了避免这些重复劳动,人们就会将自己打包的应用镜像,例如Redis、MySQL镜像放到网络上,共享使用,就像GitHub的代码共享一样。
- DockerHub:DockerHub是一个官方的Docker镜像的托管平台。这样的平台称为Docker Registry。
- 国内也有类似于DockerHub 的公开服务,比如 网易云镜像服务、阿里云镜像库等。
我们一方面可以将自己的镜像共享到DockerHub,另一方面也可以从DockerHub拉取镜像
Docker架构
我们要使用Docker来操作镜像、容器,就必须要安装Docker。
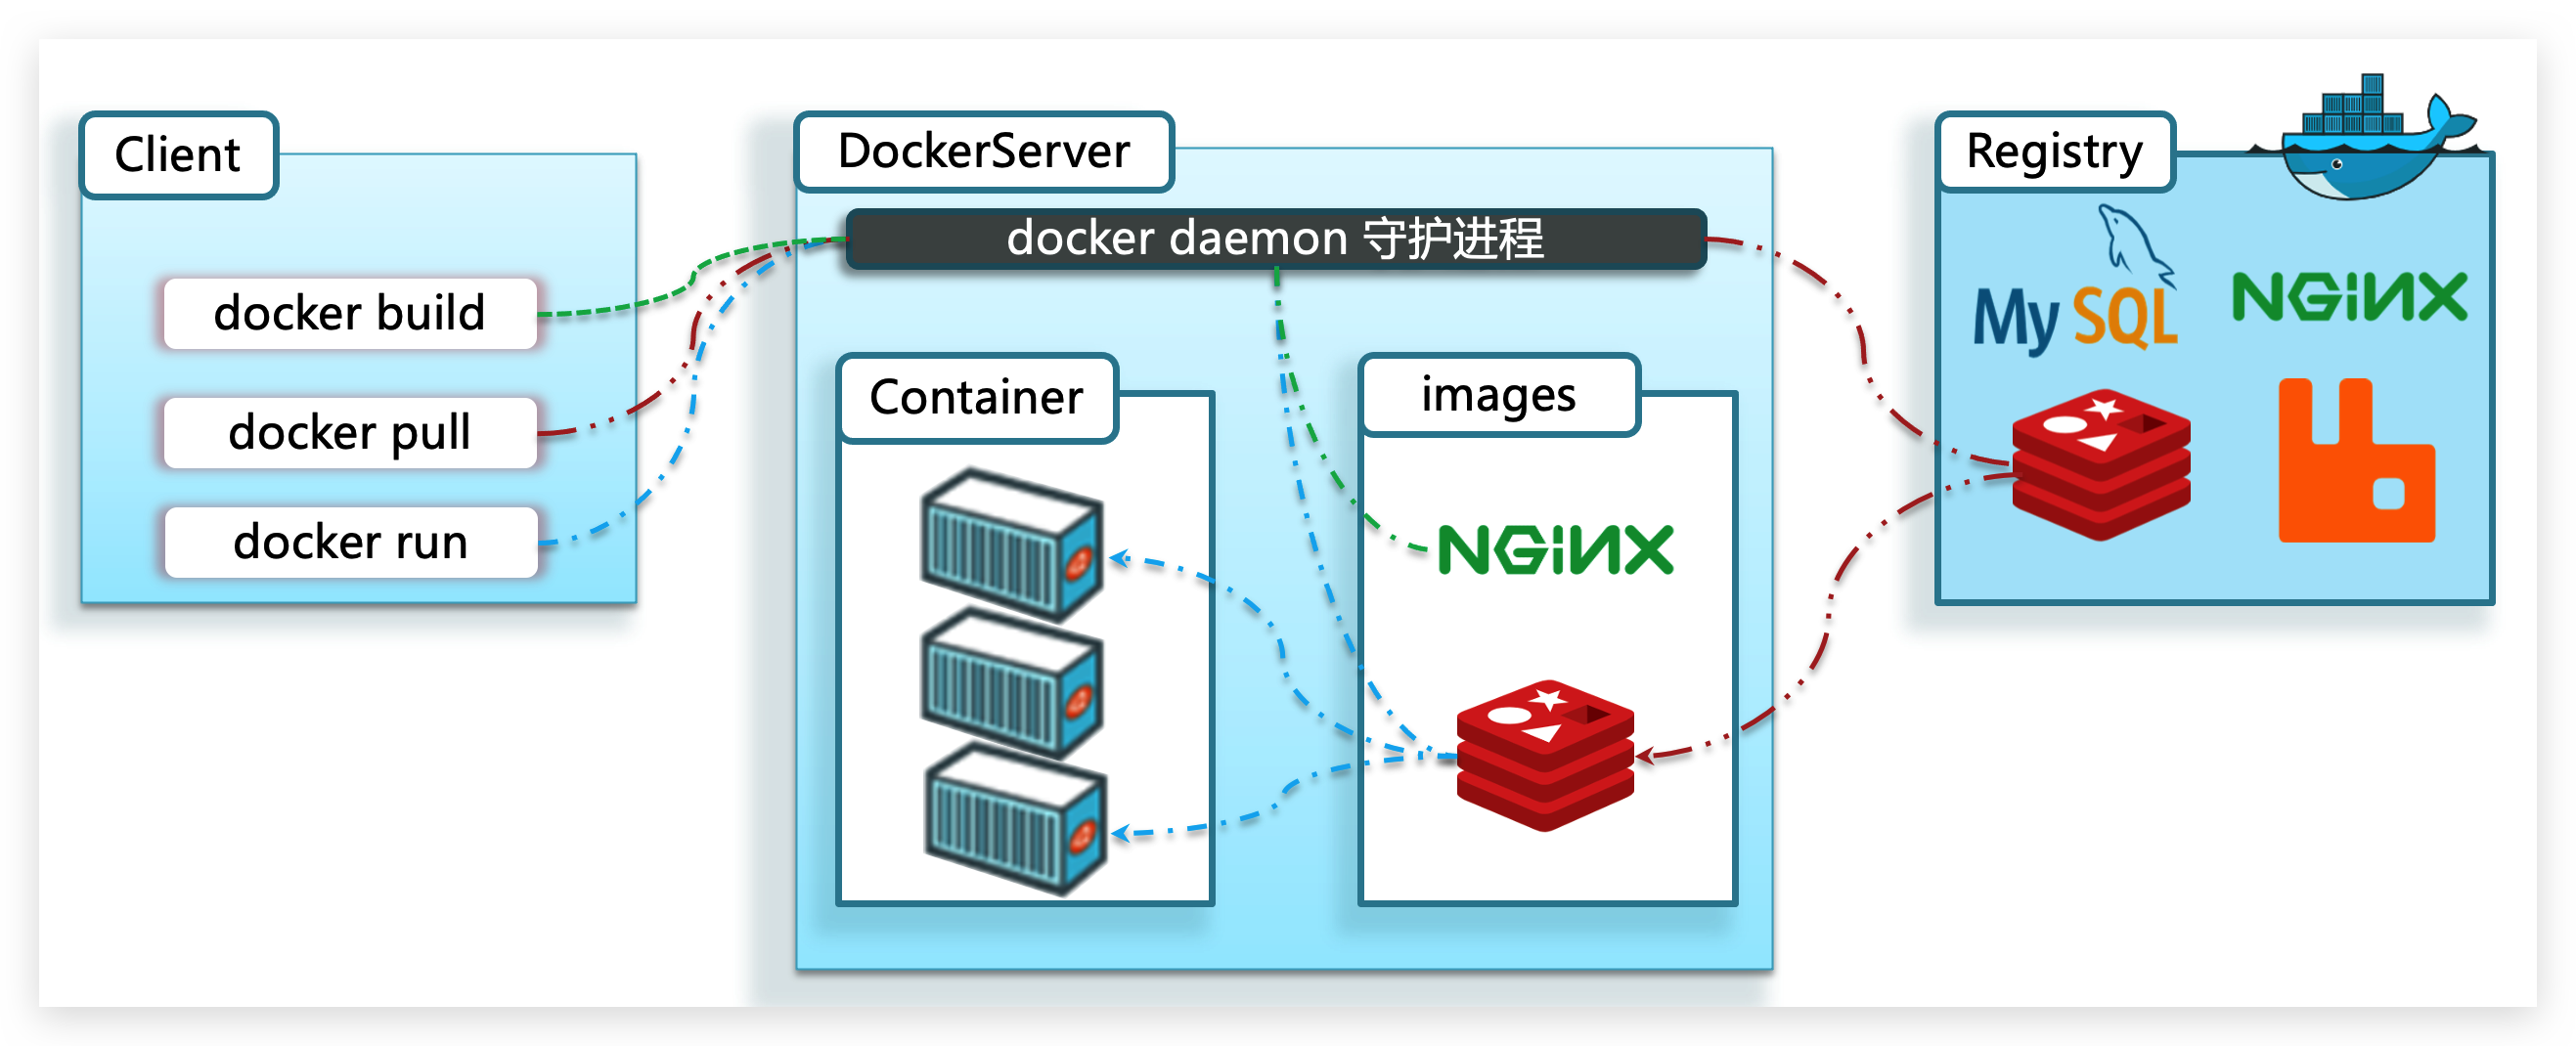
Docker是一个CS架构的程序,由两部分组成:
- 服务端(server):Docker守护进程,负责处理Docker指令,管理镜像、容器等
- 客户端(client):通过命令或RestAPI向Docker服务端发送指令。可以在本地或远程向服务端发送指令。
Docker的基本操作
镜像操作
镜像名称
首先来看下镜像的名称组成:
- 镜名称一般分两部分组成:[repository]:[tag]。
- 在没有指定tag时,默认是latest,代表最新版本的镜像
镜像命令
常见的镜像操作命令如图
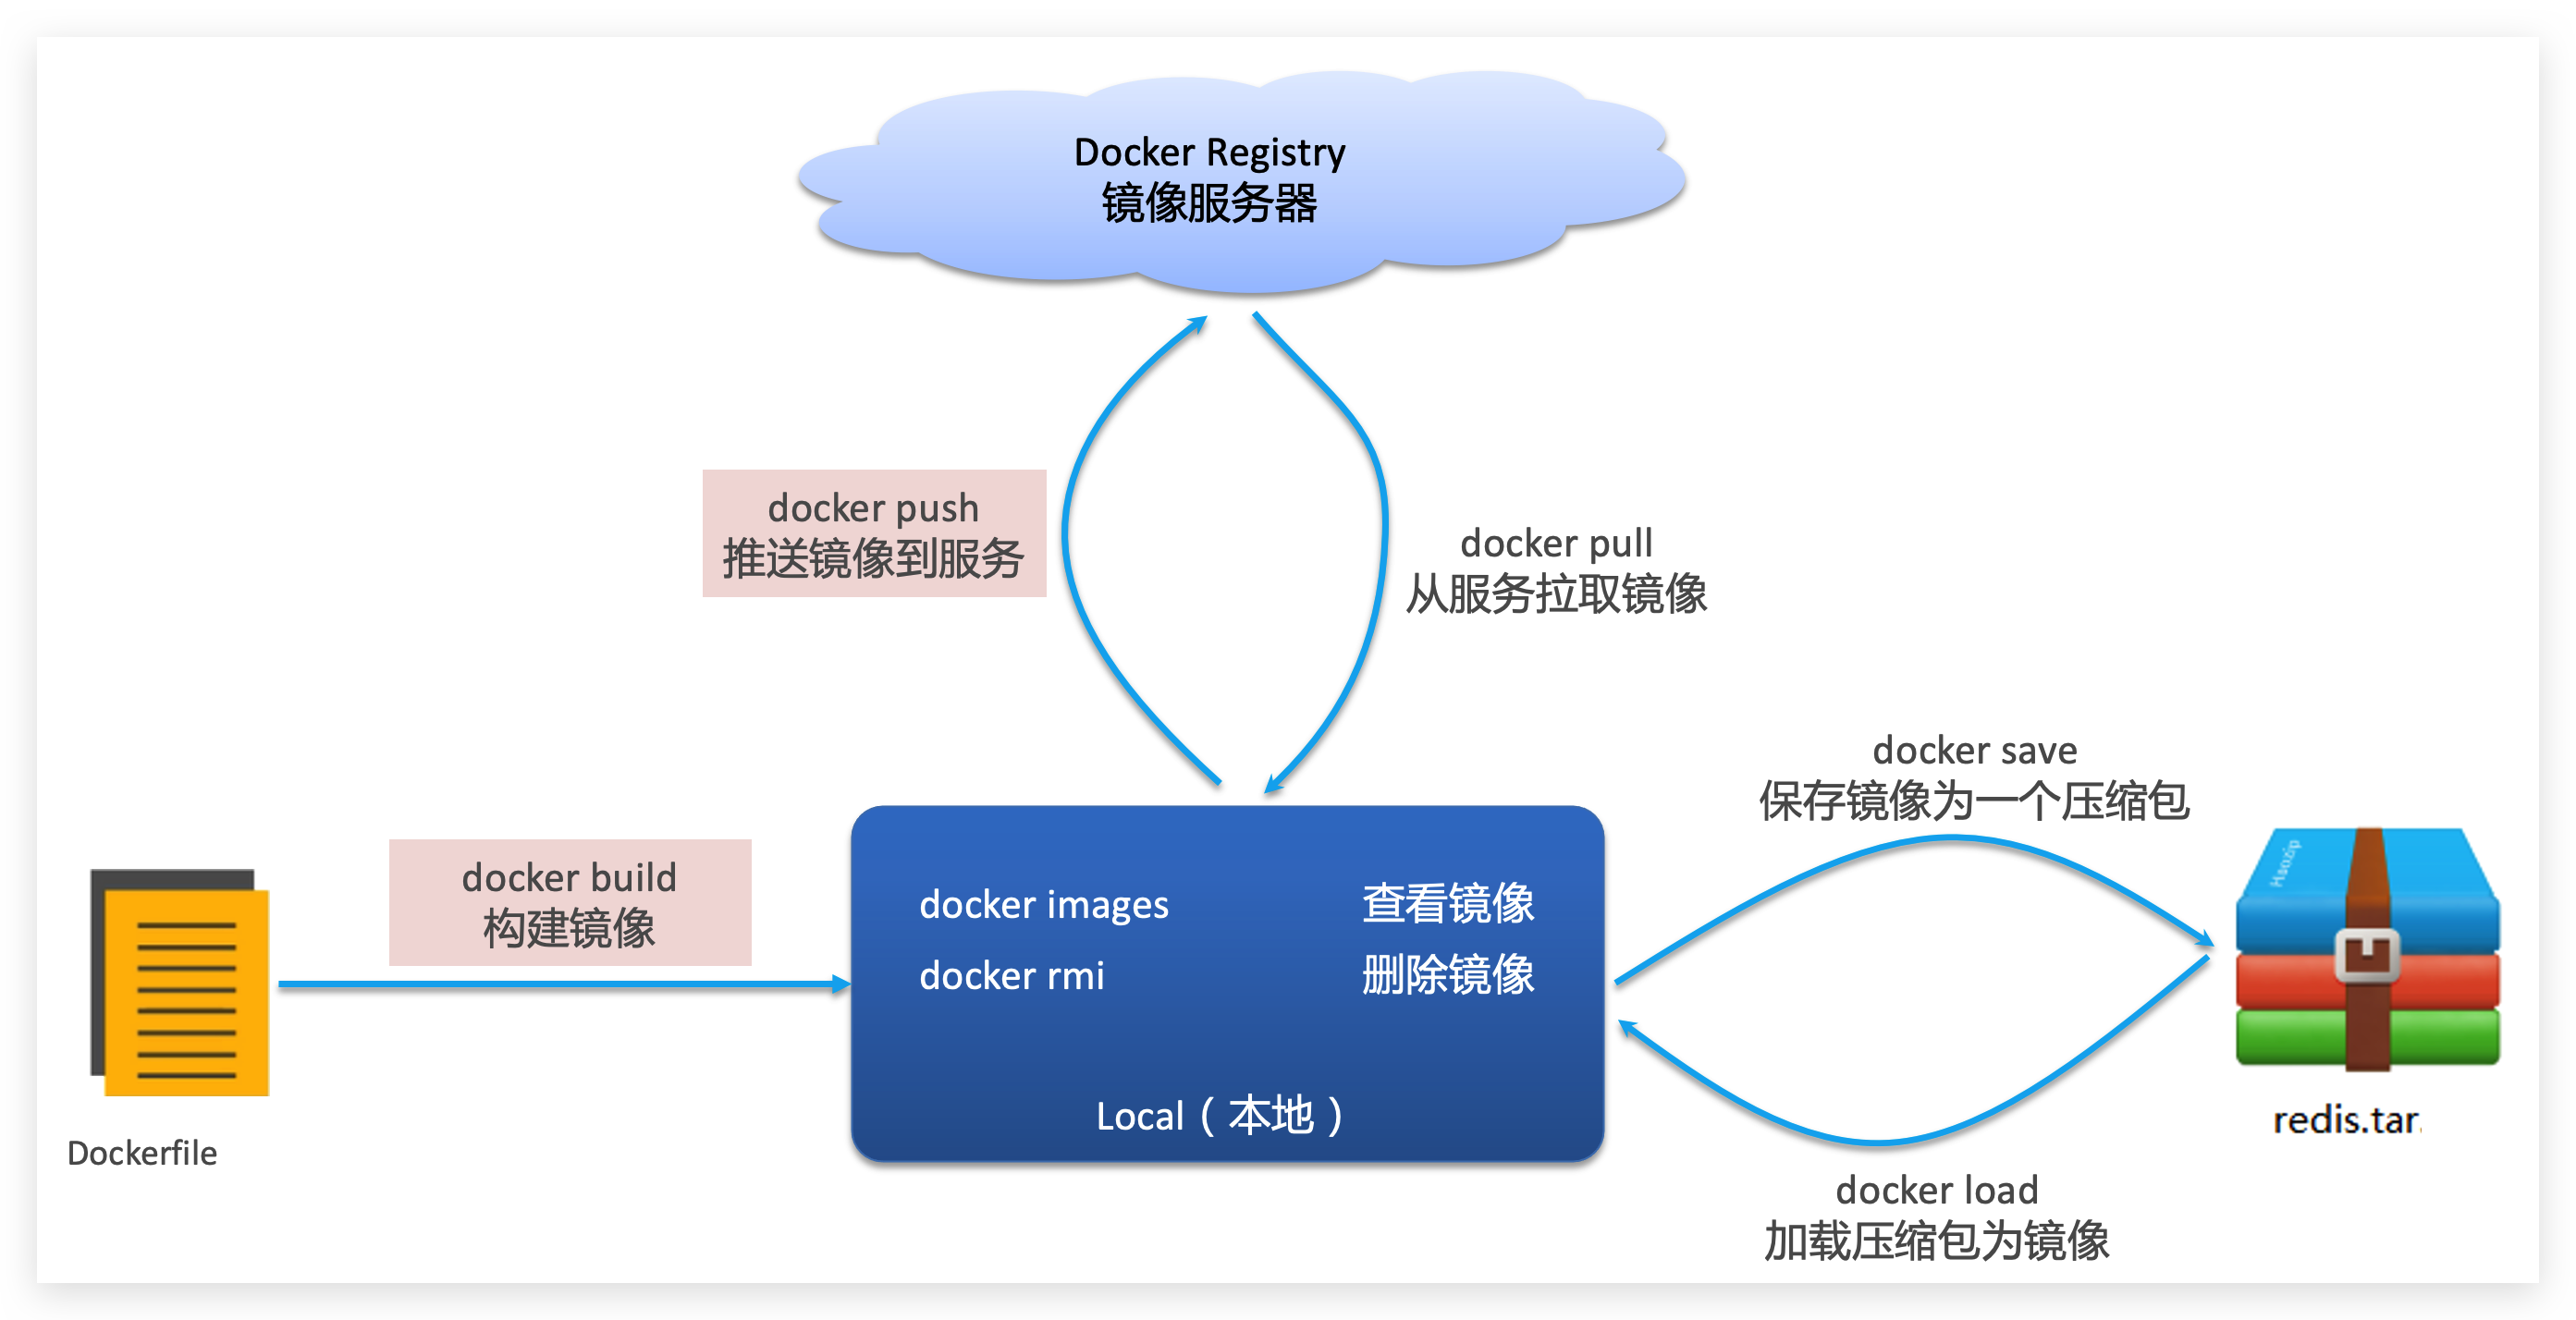
docker pull nginx # 拉取镜像docker images # 查看拉取的镜像
# docker save -o [保存的目标文件名称] [镜像名称]docker save -o nginx.tar nginx:latest # 保存镜像docker rmi nginx:latest # 删除镜像docker load -i nginx.tar # 加载镜像容器操作
容器保护三个状态:
- 运行:进程正常运行
- 暂停:进程暂停,CPU不再运行,并不释放内存
- 停止:进程终止,回收进程占用的内存、CPU等资源
容器相关命令
-
docker run:创建并运行一个容器,处于运行状态
docker run --name containerName -p 80:80 -d nginx- docker run :创建并运行一个容器
- -name : 给容器起一个名字,比如叫做mn
- p :将宿主机端口与容器端口映射,冒号左侧是宿主机端口,右侧是容器端口
- d:后台运行容器
- nginx:镜像名称,例如nginx
-
docker pause:让一个运行的容器暂停
-
docker unpause:让一个容器从暂停状态恢复运行
-
docker stop:停止一个运行的容器
-
docker start:让一个停止的容器再次运行
-
docker rm:删除一个容器
-
docker exec:进入容器
docker exec -it mn bash- docker exec :进入容器内部,执行一个命令
- it : 给当前进入的容器创建一个标准输入、输出终端,允许我们与容器交互
- mn :要进入的容器的名称
- bash:进入容器后执行的命令,bash是一个linux终端交互命令
容器内部会模拟一个独立的Linux文件系统,看起来如同一个linux服务器一样
docker run命令的常见参数
- -name:指定容器名称
- p:指定端口映射
- d:让容器后台运行
查看容器日志的命令:
- docker logs
- 添加 -f 参数可以持续查看日志
查看容器状态:
- docker ps
- docker ps -a 查看所有容器,包括已经停止的
数据卷(容器数据管理)
在之前的nginx案例中,修改nginx的html页面时,需要进入nginx内部。并且因为没有编辑器,修改文件也很麻烦。
这就是因为容器与数据(容器内文件)耦合带来的后果。
要解决这个问题,必须将数据与容器解耦,这就要用到数据卷了。
什么是数据卷
- *数据卷(volume)**是一个虚拟目录,指向宿主机文件系统中的某个目录。
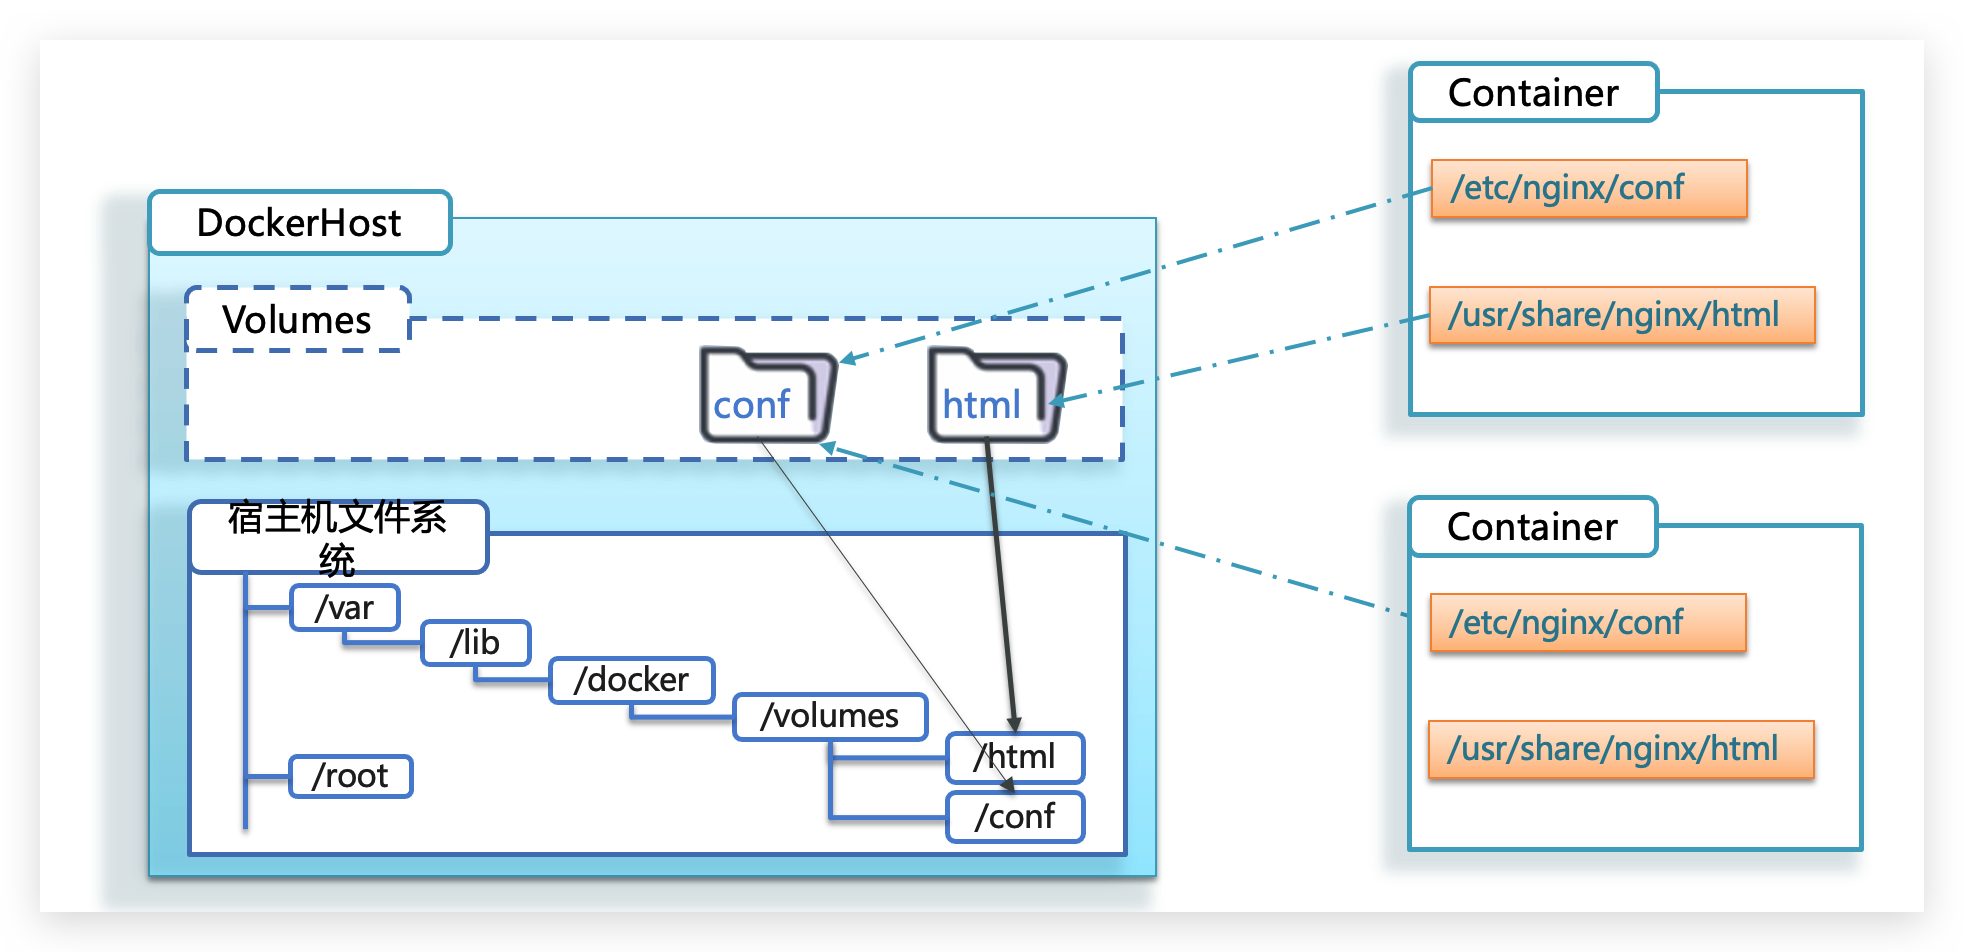
一旦完成数据卷挂载,对容器的一切操作都会作用在数据卷对应的宿主机目录了。
这样,我们操作宿主机的/var/lib/docker/volumes/html目录,就等于操作容器内的/usr/share/nginx/html目录了
数据集操作命令
数据卷操作的基本语法如下:
docker volume [COMMAND]docker volume命令是数据卷操作,根据命令后跟随的command来确定下一步的操作:
- create 创建一个volume
- inspect 显示一个或多个volume的信息
- ls 列出所有的volume
- prune 删除未使用的volume
- rm 删除一个或多个指定的volume
创建和查看数据卷
需求:创建一个数据卷,并查看数据卷在宿主机的目录位置
- 创建数据卷
docker volume create html- 查看所有数据
docker volume ls- 查看数据卷详细信息卷
docker volume inspect html创建的html这个数据卷关联的宿主机目录为/var/lib/docker/volumes/html/_data目录。
挂载数据卷
我们在创建容器时,可以通过 -v 参数来挂载一个数据卷到某个容器内目录,命令格式如下:
docker run \\ --name mn \\ -v html:/root/html \\ -p 8080:80 nginx \\这里的-v就是挂载数据卷的命令:
v html:/root/htm:把html数据卷挂载到容器内的/root/html这个目录中
容器不仅仅可以挂载数据卷,也可以直接挂载到宿主机目录上。关联关系如下:
- 带数据卷模式:宿主机目录 —> 数据卷 ---> 容器内目录
- 直接挂载模式:宿主机目录 ---> 容器内目录
docker安装MySQL5.7:
# --privileged=true参数,让容器拥有真正的root权限docker run --privileged=true --name mysql5.7 -p 3307:3306 \\-e MYSQL_ROOT_PASSWORD=123456 -d \\-v /mydata/mysql/data:/var/lib/mysql \\-v /mydata/mysql/conf:/etc/mysql \\-v /mydata/mysql/log:/var/log/mysql \\mysql:5.7docker run的命令中通过 -v 参数挂载文件或目录到容器中:
- v volume名称:容器内目录
- v 宿主机文件:容器内文
- v 宿主机目录:容器内目录
数据卷挂载与目录直接挂载的
- 数据卷挂载耦合度低,由docker来管理目录,但是目录较深,不好找
- 目录挂载耦合度高,需要我们自己管理目录,不过目录容易寻找查看
Dockerfile自定义镜像
常见的镜像在DockerHub就能找到,但是我们自己写的项目就必须自己构建镜像了。
而要自定义镜像,就必须先了解镜像的结构才行。
镜像结构
镜像是将应用程序及其需要的系统函数库、环境、配置、依赖打包而成。
简单来说,镜像就是在系统函数库、运行环境基础上,添加应用程序文件、配置文件、依赖文件等组合,然后编写好启动脚本打包在一起形成的文件。
我们要构建镜像,其实就是实现上述打包的过程。
Dockerfile语法
构建自定义的镜像时,并不需要一个个文件去拷贝,打包。
我们只需要告诉Docker,我们的镜像的组成,需要哪些BaseImage、需要拷贝什么文件、需要安装什么依赖、启动脚本是什么,将来Docker会帮助我们构建镜像。
而描述上述信息的文件就是Dockerfile文件。
Dockerfile就是一个文本文件,其中包含一个个的指令(Instruction),用指令来说明要执行什么操作来构建镜像。每一个指令都会形成一层Layer。
| 指令 | 说明 | 示例 |
|---|---|---|
| FROM | 指定基础镜像 | FROM centos:6 |
| ENV | 设置环境变量 | ENV key value |
| COPY | 拷贝本地文件到镜像指定目录 | COPY ./mysql-5.7.rpm /tmp |
| RUN | 执行Liunx shell命令 | RUN yum install gcc |
| EXPOSE | 指定运行监听端口,给使用者看 | EXPOSE 8080 |
| ENTRYPOINT | 镜像中应用的启动命令,容器运行时调用 | ENTRYPOINT java -jar xx.jar |
构建Java项目
基于java8构建Java项目
构建java项目的镜像,可以在已经准备了JDK的基础镜像基础上构建。
-
编写Dockerfile文件:
- 基于java:8-alpine作为基础镜像
- 将app.jar拷贝到镜像中
- 暴露端口
- 编写入口ENTRYPOINT
FROM java:8-alpineCOPY ./app.jar /tmp/app.jarEXPOSE 8090ENTRYPOINT java -jar /tmp/app.jar -
使用docker build命令构建镜像
-
使用docker run创建容器并运行
Docker-Compose
Docker Compose可以基于Compose文件帮我们快速的部署分布式应用,而无需手动一个个创建和运行容器!
初识DockerCompose
Compose文件是一个文本文件,通过指令定义集群中的每个容器如何运行。格式如下:
version: "3.8" services: mysql: image: mysql:5.7.25 environment: MYSQL_ROOT_PASSWORD: 123 volumes: - "/tmp/mysql/data:/var/lib/mysql" - "/tmp/mysql/conf/hmy.cnf:/etc/mysql/conf.d/hmy.cnf" web: build: . ports: - "8090:8090"上面的Compose文件就描述一个项目,其中包含两个容器:
- mysql:一个基于
mysql:5.7.25镜像构建的容器,并且挂载了两个目录 - web:一个基于
docker build临时构建的镜像容器,映射端口时8090
其实DockerCompose文件可以看做是将多个docker run命令写到一个文件,只是语法稍有差异。
部署微服务集群
需求:将之前学习的cloud-demo微服务集群利用DockerCompose部署
实现思路:
-
编写docker-compose文件
version: "3.2"services:nacos:image: nacos/nacos-serverenvironment:MODE: standaloneports:- "8848:8848"mysql:image: mysql:5.7.25environment:MYSQL_ROOT_PASSWORD: 123volumes:- "$PWD/mysql/data:/var/lib/mysql"- "$PWD/mysql/conf:/etc/mysql/conf.d/"userservice:build: ./user-serviceorderservice:build: ./order-servicegateway:build: ./gatewayports:- "10010:10010"其中包含5个service服务:
nacos:作为注册中心和配置中心image: nacos/nacos-server: 基于nacos/nacos-server镜像构建environment:环境变量MODE: standalone:单点模式启动
ports:端口映射,这里暴露了8848端口
mysql:数据库image: mysql:5.7.25:镜像版本是mysql:5.7.25environment:环境变量MYSQL_ROOT_PASSWORD: 123:设置数据库root账户的密码为123
volumes:数据卷挂载,这里挂载了mysql的data、conf目录,其中有我提前准备好的数据
userservice、orderservice、gateway:都是基于Dockerfile临时构建的
-
修改自己的cloud-demo项目,将数据库、nacos地址都命名为docker-compose中的服务名
因为微服务将来要部署为docker容器,而容器之间互联不是通过IP地址,而是通过容器名。这里我们将order-service、user-service、gateway服务的mysql、nacos地址都修改为基于容器名的访问。
spring:datasource:url: jdbc:mysql://mysql:3306/cloud_order?useSSL=falseusername: rootpassword: 123driver-class-name: com.mysql.jdbc.Driverapplication:name: orderservicecloud:nacos:server-addr: nacos:8848 # nacos服务地址 -
使用maven打包工具,将项目中的每个微服务都打包为app.jar
接下来需要将我们的每个微服务都打包。因为之前查看到Dockerfile中的jar包名称都是app.jar,因此我们的每个微服务都需要用这个名称。
可以通过修改pom.xml中的打包名称来实现,每个微服务都需要修改:
<build><!-- 服务打包的最终名称 --><finalName>app</finalName><plugins><plugin><groupId>org.springframework.boot</groupId><artifactId>spring-boot-maven-plugin</artifactId></plugin></plugins></build> -
将打包好的app.jar拷贝到cloud-demo中的每一个对应的子目录中
-
将cloud-demo上传至虚拟机,利用
docker-compose up -d来部署
Docker镜像仓库
推送拉取镜像
推送镜像到私有镜像服务必须先tag,步骤如下:
- 重新tag本地镜像,名称前缀为私有仓库的地址:192.168.150.101:8080/
docker tag nginx:latest 192.168.150.101:8080/nginx:1.0- 推送镜像
docker push 192.168.150.101:8080/nginx:1.0- 拉取镜像
docker pull 192.168.150.101:8080/nginx:1.0Docker
What is Docker
Microservices, while offering many advantages, bring deployment headaches due to service decomposition.
- In a distributed system, there are many dependencies; different components often clash during deployment.
- Repeating deployments across hundreds or thousands of services may not yield consistent environments, leading to various issues.
Environment issues for application deployment
Large projects have many components and complex runtime environments, so deployment often runs into issues:
- Complex dependencies can easily lead to compatibility problems
- Development, testing, and production environments differ from each other
For example, a project may depend on Node.js, Redis, RabbitMQ, MySQL, and more. The libraries and dependencies required by these services differ from each other and may even conflict, which makes deployment very difficult.
How Docker Solves Dependency Compatibility Issues
Docker happens to solve these problems very well. How does it do that?
Docker uses two methods to solve dependency compatibility issues:
- Package the application’s Libs (libraries), Deps (dependencies), and configuration together with the application
- Run each application in an isolated container to avoid interference
This packaged application bundle includes both the application itself and the Libs/Deps it requires, so you no longer need to install them separately on the operating system. Naturally, compatibility conflicts between applications are avoided.
How Docker Solves OS Environment Differences
To solve differences between operating system environments, we first need to understand the OS structure. Taking Ubuntu as an example, it consists of:
- Computer hardware: CPU, memory, disk, etc.
- System kernel: All Linux distributions use the Linux kernel (e.g. CentOS, Ubuntu, Fedora). The kernel interacts with hardware and exposes kernel instructions for operating hardware.
- System applications: Applications and libraries provided by the OS itself. These libraries wrap kernel instructions to make them easier to use.
The interaction flow between applications and the computer is as follows:
-
Applications call OS-provided applications (libraries) to implement various functions
-
System libraries wrap the kernel instruction set and invoke kernel instructions
-
Kernel instructions operate the computer hardware
How does Docker solve cross-system environment issues?
- Docker packages the user program together with the required system libraries (for example, Ubuntu libraries)
- When Docker runs on different operating systems, it uses the packaged libraries while relying on the host OS’s Linux kernel
Docker is a technology for quickly delivering and running applications, with the following advantages:
- It can package a program, its dependencies, and runtime environment into an image that can be migrated to any Linux operating system
- At runtime it uses sandboxing to create isolated containers so applications do not interfere with each other
- Startup and removal can both be done with a single command, which is convenient and efficient
Differences Between Docker and Virtual Machines
Docker allows an application to run very conveniently across operating systems. Virtual machines can also run another operating system on top of a host OS and run applications inside it.
- Virtual machine (
virtual machine) simulates hardware devices inside an operating system and then runs another operating system, e.g. running Ubuntu inside Windows, so you can run arbitrary Ubuntu applications. - Docker only packages libraries and dependencies; it does not simulate a complete operating system.
| Feature | Docker | Virtual Machine |
|---|---|---|
| Performance | Near-native | Lower |
| Disk usage | Usually MB | Usually GB |
| Startup time | Seconds | Minutes |
Differences between Docker and virtual machines:
- Docker is a system process; a virtual machine is effectively another OS running inside the host OS
- Docker is smaller, starts faster, and performs better; VMs are larger, start slower, and generally perform worse
Docker Architecture
Images and Containers
There are several important concepts in Docker:
- Image: Docker packages an application together with its dependencies, libraries, environment, configuration, and related files into an image.
- Container: The process formed when an application in an image runs is a container. Docker isolates the container process so it is not directly visible externally.
At the end of the day, applications are made of code, and code is stored as files (bytes on disk). Only when running are they loaded into memory and become processes.
An image is a read-only package formed by bundling an application’s files on disk, its runtime environment, and some system library files.
A container loads the programs/functions in those files into memory and runs them as processes, while isolating them. Therefore, one image can be started multiple times to form multiple container processes.
DockerHub
There are many open-source applications, and packaging them repeatedly is wasted effort. To avoid this, people publish the application images they package (such as Redis and MySQL images) online for sharing, similar to code sharing on GitHub.
- DockerHub: DockerHub is the official hosting platform for Docker images. Platforms like this are called Docker Registries.
- There are also public services similar to DockerHub, such as NetEase Cloud Image Service and Alibaba Cloud Image Repository.
We can both publish our own images to DockerHub and pull images from DockerHub.
Docker Architecture
To use Docker to manage images and containers, we must first install Docker.
Docker follows a client-server architecture and consists of two parts:
- Server: the Docker daemon, responsible for handling Docker commands and managing images/containers
- Client: sends commands to the Docker server through CLI commands or REST API. It can send commands locally or remotely.
Basic Docker Operations
Image Operations
Image Names
Let’s first look at how image names are composed:
- Image names are generally made of two parts:
[repository]:[tag]. - If no
tagis specified, the default islatest, representing the latest version of the image.
Image Commands
Common image operations are shown below.
docker pull nginx # 拉取镜像docker images # 查看拉取的镜像
# docker save -o [保存的目标文件名称] [镜像名称]docker save -o nginx.tar nginx:latest # 保存镜像docker rmi nginx:latest # 删除镜像docker load -i nginx.tar # 加载镜像Container Operations
Containers generally have three states:
- Running: the process is running normally
- Paused: the process is paused, CPU execution stops, but memory is not released
- Stopped: the process is terminated, and memory/CPU resources are reclaimed
Container-Related Commands
-
docker run: Create and run a container, entering the running statedocker run --name containerName -p 80:80 -d nginxdocker run: Create and run a container--name: Give the container a name, e.g.mn-p: Map host port to container port; left side is host port, right side is container port-d: Run the container in the backgroundnginx: Image name, e.g.nginx
-
docker pause: Pause a running container -
docker unpause: Resume a paused container -
docker stop: Stop a running container -
docker start: Start a stopped container again -
docker rm: Delete a container -
docker exec: Enter a containerdocker exec -it mn bashdocker exec: Enter the container and execute a command-it: Create a stdin/stdout terminal for interactionmn: The name of the container to enterbash: The command executed after entering the container;bashis a Linux shell command
Inside the container, Docker presents an isolated Linux filesystem that looks like a standalone Linux server.
Common parameters of the docker run command
--name: Specify the container name-p: Specify port mapping-d: Run the container in the background
Command for viewing container logs:
- docker logs
- Add the
-fparameter to continuously follow logs
Commands for checking container status:
- docker ps
docker ps -ato view all containers, including stopped ones
Volumes (Container Data Management)
In the earlier nginx example, to modify nginx’s HTML page, we had to enter the nginx container. And since there was no editor inside, modifying files was inconvenient.
This is a consequence of coupling the container with the data (files inside the container).
To solve this problem, we must decouple data from containers, and for that we use volumes.
What Is a Volume
- Data volume (volume): A virtual directory that points to some directory on the host filesystem.
Once volume mounting is complete, all operations on the container path affect the corresponding host directory behind the volume.
In this way, operating on /var/lib/docker/volumes/html on the host is equivalent to operating on /usr/share/nginx/html inside the container.
Volume Operation Commands
The basic syntax for volume operations is as follows:
docker volume [COMMAND]the docker volume command is used for volume operations, and the action depends on the command that follows:
create: create a volumeinspect: show information about one or more volumesls: list all volumesprune: remove unused volumesrm: remove one or more specified volumes
Create and Inspect Volumes
Goal: Create a volume and check its directory location on the host machine.
- Create a volume
docker volume create html- View all volumes
docker volume ls- View detailed information for a volume
docker volume inspect htmlThe host directory corresponding to the created html volume is /var/lib/docker/volumes/html/_data.
Mounting Volumes
When creating a container, we can use the -v parameter to mount a volume to a directory inside the container, using the following format:
docker run \\ --name mn \\ -v html:/root/html \\ -p 8080:80 nginx \\Here, -v is the volume-mount option:
-v html:/root/html: mount thehtmlvolume to/root/htmlinside the container
A container can mount not only volumes, but also host directories directly. The relationships are:
- Volume mode: host directory —> volume ---> container directory
- Direct bind mount mode: host directory —> container directory
Install MySQL 5.7 with Docker:
# --privileged=true参数,让容器拥有真正的root权限docker run --privileged=true --name mysql5.7 -p 3307:3306 \\-e MYSQL_ROOT_PASSWORD=123456 -d \\-v /mydata/mysql/data:/var/lib/mysql \\-v /mydata/mysql/conf:/etc/mysql \\-v /mydata/mysql/log:/var/log/mysql \\mysql:5.7In the docker run command, the -v parameter can mount files or directories into the container:
-v <volume-name>:<container-dir>-v <host-file>:<container-file>-v <host-dir>:<container-dir>
Volume mounts vs direct directory mounts:
- Volume mounts have lower coupling. Docker manages the directories, but the paths are deeper and harder to find.
- Directory mounts have higher coupling because we manage the directories ourselves, but the paths are easier to locate and inspect.
Custom Images with Dockerfile
Common images can be found on DockerHub, but for our own projects we usually need to build images ourselves.
To customize an image, we first need to understand image structure.
Image Structure
An image packages an application together with the system libraries, environment, configuration, and dependencies it needs.
In simple terms, an image is built by combining system libraries and runtime environment with application files, configuration files, dependency files, and a startup script, then packaging them together.
Building an image is essentially implementing this packaging process.
Dockerfile Syntax
When building a custom image, we do not need to manually copy and package files one by one.
We only need to tell Docker what the image consists of, which BaseImage to use, what files to copy, what dependencies to install, and what the startup script is. Docker will build the image for us.
The file that describes this information is the Dockerfile.
A Dockerfile is a text file containing instructions, which describe what operations to execute in order to build the image. Each instruction forms one layer.
| Instruction | Description | Example |
|---|---|---|
| FROM | Specify base image | FROM centos:6 |
| ENV | Set environment variables | ENV key value |
| COPY | Copy local files to a target directory in the image | COPY ./mysql-5.7.rpm /tmp |
| RUN | Execute Linux shell commands | RUN yum install gcc |
| EXPOSE | Declare listening port for users/reference | EXPOSE 8080 |
| ENTRYPOINT | Application startup command called when the container runs | ENTRYPOINT java -jar xx.jar |
Building a Java Project
Build a Java project based on Java 8.
To build a Java project image, we can build on top of a base image that already contains the JDK.
-
Write a Dockerfile:
- Use
java:8-alpineas the base image - Copy
app.jarinto the image - Expose the port
- Write the
ENTRYPOINT
FROM java:8-alpineCOPY ./app.jar /tmp/app.jarEXPOSE 8090ENTRYPOINT java -jar /tmp/app.jar - Use
-
Use
docker buildto build the image -
Use
docker runto create and run the container
Docker-Compose
Docker Compose can help us quickly deploy distributed applications based on a Compose file, without manually creating and running containers one by one.
Docker Compose Basics
A Compose file is a text file that defines how each container in the cluster runs. The format is as follows:
version: "3.8" services: mysql: image: mysql:5.7.25 environment: MYSQL_ROOT_PASSWORD: 123 volumes: - "/tmp/mysql/data:/var/lib/mysql" - "/tmp/mysql/conf/hmy.cnf:/etc/mysql/conf.d/hmy.cnf" web: build: . ports: - "8090:8090"The Compose file above describes a project that contains two containers:
mysql: a container built from themysql:5.7.25image and mounted with two directoriesweb: a container image built temporarily viadocker build, with port8090mapped
A Docker Compose file can be viewed as multiple docker run commands written into one file, with only slight syntax differences.
Deploy a Microservice Cluster
Goal: Deploy the previously learned cloud-demo microservice cluster using Docker Compose.
Implementation approach:
-
Write a
docker-composefileversion: "3.2"services:nacos:image: nacos/nacos-serverenvironment:MODE: standaloneports:- "8848:8848"mysql:image: mysql:5.7.25environment:MYSQL_ROOT_PASSWORD: 123volumes:- "$PWD/mysql/data:/var/lib/mysql"- "$PWD/mysql/conf:/etc/mysql/conf.d/"userservice:build: ./user-serviceorderservice:build: ./order-servicegateway:build: ./gatewayports:- "10010:10010"It contains 5 services:
nacos: works as the registry and configuration centerimage: nacos/nacos-server: based on thenacos/nacos-serverimageenvironment: environment variablesMODE: standalone: start in standalone mode
ports: port mapping, exposing port8848
mysql: databaseimage: mysql:5.7.25: image versionmysql:5.7.25environment: environment variablesMYSQL_ROOT_PASSWORD: 123: sets the MySQL root password to123
volumes: data volume mounts for mysqldataandconf, including prepared data
userservice,orderservice,gateway: all are built temporarily from Dockerfiles
-
Modify your
cloud-demoproject so that database and nacos addresses use the service names defined indocker-composeBecause the microservices will be deployed as Docker containers, inter-container communication uses container names rather than IP addresses. Here we change the
mysqlandnacosaddresses inorder-service,user-service, andgatewayto container-name-based addresses.spring:datasource:url: jdbc:mysql://mysql:3306/cloud_order?useSSL=falseusername: rootpassword: 123driver-class-name: com.mysql.jdbc.Driverapplication:name: orderservicecloud:nacos:server-addr: nacos:8848 # nacos服务地址 -
Use Maven to package each microservice in the project as
app.jarNext we need to package each microservice. Since the jar name expected by the Dockerfile is
app.jar, each microservice needs to use this name.This can be done by changing the package final name in
pom.xml; each microservice needs this modification:<build><!-- 服务打包的最终名称 --><finalName>app</finalName><plugins><plugin><groupId>org.springframework.boot</groupId><artifactId>spring-boot-maven-plugin</artifactId></plugin></plugins></build> -
Copy the packaged
app.jarinto each corresponding subdirectory incloud-demo -
Upload
cloud-demoto the VM and deploy withdocker-compose up -d
Docker Image Registry
Push and Pull Images
To push an image to a private image registry, you must tag it first. The steps are:
- Retag the local image, prefixing the name with the private registry address:
192.168.150.101:8080/
docker tag nginx:latest 192.168.150.101:8080/nginx:1.0- Push the image
docker push 192.168.150.101:8080/nginx:1.0- Pull the image
docker pull 192.168.150.101:8080/nginx:1.0Docker
Dockerとは
マイクロサービスはさまざまな利点を持つ一方で、サービスを分割するとデプロイメントには共通して大きな手間が生じます。
- 分散システムでは依存するコンポーネントが非常に多く、異なるコンポーネントをデプロイする際にしばしば衝突が生じます。
- 数百〜千台規模のサービスを繰り返し展開する際、環境が必ずしも一致せず、さまざまな問題に遭遇します。
アプリケーションデプロイの環境問題
大型プロジェクトは部品が多く、実行環境も複雑で、デプロイ時にいくつかの問題に直面します:
- 依存関係が複雑で、互換性の問題が発生しやすい
- 開発、テスト、本番環境に差異がある
例えばあるプロジェクトでは、デプロイ時に node.js、Redis、RabbitMQ、MySQL などの依存関係が必要となり、それらのサービスが必要とするライブラリや依存関係はそれぞれ異なり、時には衝突さえ生じます。デプロイには非常に大きな困難をもたらします。
Dockerは依存互換性の問題を解決します
Dockerはこの問題を巧みに解決します。Dockerはどのように実現しているのでしょうか?
Dockerは依存の互換性問題を解決するため、2つの手段を採用しています:
- アプリの Libs(ライブラリ)、Deps(依存関係)、設定をアプリと一緒にパッケージ化する
- 各アプリを分離されたコンテナに入れて実行し、互いの干渉を避ける
このようにパッケージ化されたアプリパッケージには、アプリ自体だけでなく、アプリが必要とする Libs、Deps も含まれており、OS 上にそれらを再度インストールする必要はなくなるため、異なるアプリ間の互換性の問題は自然と解消されます。
DockerはOS環境差異を解決します
OS環境の差異問題を解決するには、まずOSの構造を理解する必要があります。Ubuntu を例にとると、構造は以下のとおりです:
- コンピュータハードウェア:例えば CPU、メモリ、ディスクなど
- システムカーネル:すべての Linux ディストリビューションのカーネルは Linux であり、CentOS、Ubuntu、Fedora など。カーネルはハードウェアとやり取りし、外部にカーネル命令を提供してハードウェアを操作します
- システムアプリケーション:OS 自体が提供するアプリケーション、ライブラリ。これらのライブラリはカーネル命令のラッパーで、より使いやすくなっています
コンピュータとの対話の流れは次のとおりです:
1)アプリがOSアプリケーション(ライブラリ)を呼び出してさまざまな機能を実現する
2)システムライブラリはカーネル命令セットのラッパーで、カーネル命令を呼び出す
3)カーネル命令が計算機ハードウェアを操作する
Dockerは異なるOS環境の問題をどう解決するのか?
- Dockerはユーザーのプログラムと、呼び出す必要のあるシステム(例えば Ubuntu)のライブラリを一緒にパッケージ化する
- Dockerを別のOSで実行する場合、パッケージ化されたライブラリを直接基にして、OSのLinuxカーネルを借りて実行する
Dockerはアプリケーションを迅速に提供・実行する技術で、以下の利点を備えています:
- プログラムとその依存関係、実行環境を1つのイメージにパッケージ化でき、任意の Linux OS へ移行可能
- 実行時にはサンドボックス機構により隔離されたコンテナを作成し、各アプリは互いに干渉しません
- 起動・削除は1行のコマンドで完了でき、便利で迅速
Dockerと仮想マシンの違い
Dockerは1つのアプリケーションを任意のOSで非常に便利に実行できます。一方、仮想マシンも1つのOS上で別のOSを実行して、システム内のアプリケーションを保護します。
- 仮想マシン(virtual machine)はOS上でハードウェアを模倣し、別のOSを実行します。たとえば Windows 上で Ubuntu を動かし、Ubuntu のアプリを任意に実行できます。
- Dockerは単にライブラリをパッケージ化しているだけで、完全なOSを模倣しているわけではありません
| 特性 | Docker | 仮想マシン |
|---|---|---|
| 性能 | ネイティブに近い | 性能は劣る |
| ハードディスク使用量 | 一般的にはMB | 一般的にはGB |
| 起動 | 秒単位 | 分単位 |
Dockerと仮想マシンの違い:
- dockerはシステムプロセス;仮想マシンはOS内の別のOS
- dockerはコンパクトで起動速度が速く、性能が良い;仮想マシンはサイズが大きく、起動が遅く、性能は普通
Dockerアーキテクチャ
イメージとコンテナ
Dockerにはいくつかの重要な概念があります:
- イメージ(Image):Dockerはアプリケーションとその依存関係、ライブラリ、環境、設定などのファイルをひとまとめにパッケージ化するイメージと呼びます。
- コンテナ(Container):イメージの中でアプリケーションが実行されて形成されるプロセスはコンテナです。Dockerはコンテナプロセスを分離し、外部からは見えません。
すべてのアプリケーションは最終的にコードで構成され、ハードディスク上の1つずつのバイトで形成されるファイルです。実行時に初めてメモリへロードされ、プロセスを形成します。
そしてイメージは、アプリケーションのハードディスク上のファイルとその実行環境、部分的なシステムライブラリを一緒にパッケージ化して形成されるファイルパッケージです。このファイルパッケージは読み取り専用です。
コンテナは、これらのファイルに含まれるプログラムや関数をメモリへロードして実行を許可しますが、分離されます。従って1つ의イメージを複数回起動して、複数のコンテナプロセスを形成します。
Docker Hub
オープンソースのアプリケーションは非常に多く、それらをパッケージ化する作業は繰り返しになります。この繰り返し作業を避けるため、人々は自分でパッケージ化したアプリのイメージ(例:Redis、MySQL のイメージ)をネット上に公開・共有します。GitHub のコード共有のように。
- Docker Hub:Docker Hubは公式の Docker イメージをホストするプラットフォームです。このようなプラットフォームは Docker Registry と呼ばれます。
- 国内にも Docker Hub に類似した公開サービスがあり、例えば 网易云镜像服务、Alibaba Cloud イメージライブラリ などがあります。
私たちは一方で自分のイメージを Docker Hub に共有することができ、他方で Docker Hub からイメージをプルすることもできます。
Dockerアーキテクチャ
イメージやコンテナを操作するには、Docker をインストールしておく必要があります。
DockerはCSアーキテクチャのプログラムで、2つの部分から成り立っています:
- サーバー(server):Docker デーモン、Docker の指示を処理し、イメージ・コンテナなどを管理します
- クライアント(client):コマンドや RestAPI を通じて Docker サーバーへ指示を送ります。ローカルまたはリモートでサービスへ指示を送れます
Dockerの基本操作
イメージ操作
イメージ名
まずイメージ名の構成を見てみましょう:
- イメージ名は通常2つの部分で構成されます:[repository]:[tag]
- tag が未指定の場合、デフォルトは latest で、最新バージョンのイメージを表します
イメージコマンド
一般的なイメージ操作コマンドは図のとおりです
docker pull nginx # イメージを取得docker images # 取得したイメージを表示
# docker save -o [保存の対象ファイル名] [イメージ名]docker save -o nginx.tar nginx:latest # イメージを保存docker rmi nginx:latest # イメージを削除docker load -i nginx.tar # イメージを読み込むコンテナ操作
コンテナは3つの状態を保護します:
- 実行中:プロセスが正常に動作
- 一時停止:プロセスが一時停止、CPUは動作せず、メモリは解放されません
- 停止:プロセスが終了、プロセスが占有していたメモリ、CPU などのリソースを回収
コンテナ関連コマンド
- docker run:1つのコンテナを作成して実行、実行状態へ
docker run --name containerName -p 80:80 -d nginx- docker run:1つのコンテナを作成して実行
- -name : コンテナに名前を付ける、例えば mn
- -p :ホストとコンテナのポートをマッピング。コロン左がホスト、右がコンテナ
- -d:バックグラウンドで実行
- nginx:イメージ名、例として nginx
- docker pause:実行中のコンテナを一時停止
- docker unpause:一時停止状態から再開
- docker stop:実行中のコンテナを停止
- docker start:停止したコンテナを再度実行
- docker rm:コンテナを削除
- docker exec: コンテナへ入る
docker exec -it mn bash- docker exec:コンテナ内部に入り、コマンドを実行
- -i -t:現在入っているコンテナに標準入力・出力端末を作成し、コンテナと対話可能にする
- mn:入るコンテナの名前
- bash:コンテナ内で実行するコマンド。bashは Linux の端末対話コマンド
コンテナ内部には独立したLinuxファイルシステムが模倣され、まるで別の Linux サーバーのように見えます
docker run コマンドの一般的なパラメータ
- -name:コンテナ名を指定
- -p:ポートマッピングを指定
- -d:コンテナをバックグラウンドで実行
コンテナのログを表示するコマンド:
- docker logs
- -f を追加すると、ログを継続的に表示できます
コンテナの状態を確認する:
- docker ps
- docker ps -a は停止済みを含むすべてのコンテナを表示
データボリューム(コンテナデータ管理)
以前の nginx のケースでは、nginx 内部へ入って html を修正する必要がありました。編集用のエディタがないため、ファイルの修正も煩雑です。
これが、コンテナとデータ(コンテナ内ファイル)が結びついてしまう結果です。
この問題を解決するには、データとコンテナをデカップリングする必要があり、データボリュームを使います。
データボリュームとは
- *データボリューム(volume)**は仮想ディレクトリで、ホストマシンのファイルシステム内の特定のディレクトリを指します。
データボリュームのマウントが完了すると、コンテナへのすべての操作はデータボリュームに対応するホスト側のディレクトリに作用します。
このように、ホストの /var/lib/docker/volumes/html ディレクトリを操作すれば、コンテナ内の /usr/share/nginx/html ディレクトリを操作したことになります
データセット操作コマンド
データボリューム操作の基本的な構文は以下のとおりです:
docker volume [COMMAND]docker volume コマンドはデータボリューム操作で、続く command によって次の操作を決定します:
- create:1つのボリュームを作成
- inspect:1つまたは複数のボリュームの情報を表示
- ls:すべてのボリュームを列挙
- prune:未使用のボリュームを削除
- rm:指定した1つまたは複数のボリュームを削除
データボリュームの作成と確認
要件:データボリュームを作成し、ホストマシン上のディレクトリ位置を確認します
- データボリュームを作成
docker volume create html- すべてのデータを表示
docker volume ls- データボリュームの詳細情報を表示
docker volume inspect html作成された html データボリュームが関連付けるホスト側のディレクトリは /var/lib/docker/volumes/html/_data ディレクトリです。
データボリュームのマウント
コンテナを作成する際に、-v パラメータを使ってデータボリュームをコンテナ内の特定のディレクトリにマウントできます。コマンドの形式は以下のとおりです:
docker run \\ --name mn \\ -v html:/root/html \\ -p 8080:80 nginx \\ここでの -v はデータボリュームをマウントするコマンドです:
-v html:/root/html:html データボリュームをコンテナ内の /root/html ディレクトリにマウント
コンテナはデータボリュームだけでなく、ホストマシンのディレクトリにも直接マウントできます。関連付けは以下のとおりです:
- データボリュームモード:ホストディレクトリ —> データボリューム ---> コンテナ内ディレクトリ
- 直接マウントモード:ホストディレクトリ —> コンテナ内ディレクトリ
dockerはMySQL 5.7 をインストールする:
# --privileged=true パラメータで、コンテナに真の root 権限を付与docker run --privileged=true --name mysql5.7 -p 3307:3306 \\-e MYSQL_ROOT_PASSWORD=123456 -d \\-v /mydata/mysql/data:/var/lib/mysql \\-v /mydata/mysql/conf:/etc/mysql \\-v /mydata/mysql/log:/var/log/mysql \\mysql:5.7docker run のコマンドの中で -v パラメータを使ってファイルやディレクトリをコンテナにマウントします:
- -v ボリューム名:コンテナ内ディレクトリ
- -v ホストファイル:コンテナ内のファイル
- -v ホストディレクトリ:コンテナ内ディレクトリ
データボリュームのマウントとディレクトリ直接マウントの
- データボリュームマウントは結合度が低く、Docker がディレクトリを管理しますが、ディレクトリが深くて見つけにくいです
- ディレクトリ直接マウントは結合度が高く、ディレクトリを自分で管理する必要がありますが、ディレクトリは探しやすく閲覧しやすいです
Dockerfileによるカスタムイメージ
一般的なイメージは Docker Hub で見つけられますが、私たちの自作プロジェクトの場合は自分でイメージを構築する必要があります。
そしてカスタムイメージを作るには、まずイメージの構造を理解する必要があります。
イメージの構造
イメージはアプリケーションと、それに必要なシステムライブラリ、環境、設定、依存関係をパックして作られています。
簡単に言うと、イメージはシステムライブラリ・実行環境を基盤として、アプリケーションファイル・設定ファイル・依存ファイルなどを追加して、起動スクリプトを用意してパッケージ化したファイルです。
イメージを構築することは、上述のパッケージ化のプロセスを実現することです。
Dockerfileの文法
カスタムイメージを構築する際、一つ一つのファイルをコピーしてパッケージ化する必要はありません。
私たちはDockerに、イメージの構成、どのBaseImageが必要か、どんなファイルをコピーするか、どの依存をインストールするか、起動スクリプトは何か、将来 Docker がイメージを構築してくれることを伝えるだけです。
この情報を記述するファイルがDockerfileです。
Dockerfile はテキストファイルで、複数の**指令(Instruction)**を含み、指令を用いてイメージを構築する操作を説明します。各指令は1つのLayerを形成します。
| 指令 | 説明 | サンプル |
|---|---|---|
| FROM | 基礎イメージを指定 | FROM centos:6 |
| ENV | 環境変数を設定 | ENV key value |
| COPY | ローカルファイルをイメージの指定ディレクトリへコピー | COPY ./mysql-5.7.rpm /tmp |
| RUN | Linux のシェルコマンドを実行 | RUN yum install gcc |
| EXPOSE | 実行時の待機ポートを指定(利用者に表示) | EXPOSE 8080 |
| ENTRYPOINT | イメージ内アプリの起動コマンド、コンテナ実行時に呼ばれる | ENTRYPOINT java -jar xx.jar |
Java プロジェクトの構築
Java 8 をベースに Java プロジェクトを構築
Java プロジェクトのイメージを構築するには、すでに JDK が用意された基盤イメージの上に構築できます。
- Dockerfile を作成:
- java:8-alpine を基礎イメージとして使用
- app.jar をイメージにコピー
- ポートを公開
- エントリーポイントを記述
FROM java:8-alpineCOPY ./app.jar /tmp/app.jarEXPOSE 8090ENTRYPOINT java -jar /tmp/app.jar- docker build コマンドでイメージを構築
- docker run でコンテナを作成して実行
Docker-Compose
Docker Compose は Compose ファイルを基に、分散アプリケーションを迅速にデプロイすることができ、手動でコンテナを1つずつ作成して実行する必要はありません!
Docker Compose 初識
Compose ファイルはテキストファイルで、クラスター内の各コンテナをどう動作させるかを指示で定義します。形式は以下のとおり:
version: "3.8" services: mysql: image: mysql:5.7.25 environment: MYSQL_ROOT_PASSWORD: 123 volumes: - "/tmp/mysql/data:/var/lib/mysql" - "/tmp/mysql/conf/hmy.cnf:/etc/mysql/conf.d/hmy.cnf" web: build: . ports: - "8090:8090"上記の Compose ファイルは、2つのコンテナを含むプロジェクトを説明しています:
- mysql:
mysql:5.7.25イメージを基に構築されたコンテナで、2つのディレクトリをマウントしています - web:
docker buildによって一時的に構築されたイメージのコンテナで、ポートマッピングは 8090
実際には Docker Compose ファイルは、複数の docker run コマンドを1つのファイルに書き換えたものと見なせます。文法は少し異なるだけです。
マイクロサービスクラスタのデプロイ
要件:これまで学んだ cloud-demo のマイクロサービスクラスタを Docker Compose でデプロイ
実装方針:
- docker-compose ファイルを作成
version: "3.2"
services: nacos: image: nacos/nacos-server environment: MODE: standalone ports: - "8848:8848" mysql: image: mysql:5.7.25 environment: MYSQL_ROOT_PASSWORD: 123 volumes: - "$PWD/mysql/data:/var/lib/mysql" - "$PWD/mysql/conf:/etc/mysql/conf.d/" userservice: build: ./user-service orderservice: build: ./order-service gateway: build: ./gateway ports: - "10010:10010"この中には5つの service が含まれています:
nacos:登録センターと設定センターとしてimage: nacos/nacos-server:nacos/nacos-server イメージを基に構築environment:環境変数MODE: standalone:単一ノード起動
ports:ポートマッピング、ここでは 8848 を公開
mysql:データベースimage: mysql:5.7.25:イメージのバージョンは mysql:5.7.25environment:環境変数MYSQL_ROOT_PASSWORD: 123:データベースの root アカウントのパスワードを 123 に設定
volumes:データボリュームのマウント。ここでは mysql の data、conf ディレクトリをマウントしており、事前に用意したデータを含む
userservice、orderservice、gateway:すべて Dockerfile を基に一時的に構築
- 自分の cloud-demo プロジェクトを修正し、データベースと nacos のアドレスを docker-compose のサービス名で指定
マイクロサービスは将来的に Docker コンテナとしてデプロイされ、コンテナ同士の連携は IP アドレスではなくコンテナ名で行われるため、order-service、user-service、gateway の mysql、nacos のアドレスをコンテナ名ベースのアクセスに変更します。
spring: datasource: url: jdbc:mysql://mysql:3306/cloud_order?useSSL=false username: root password: 123 driver-class-name: com.mysql.jdbc.Driver application: name: orderservice cloud: nacos: server-addr: nacos:8848 # nacosサービス地址- Maven のビルドツールを使って、各マイクロサービスを app.jar にパッケージ化
次に、それぞれのマイクロサービスをパッケージ化します。以前の Dockerfile での jar 名が app.jar であることを考慮すると、各マイクロサービスはこの名前を使う必要があります。
以下を変更します:
<build> <!-- サービスの最終的なパッケージ名 --> <finalName>app</finalName> <plugins> <plugin> <groupId>org.springframework.boot</groupId> <artifactId>spring-boot-maven-plugin</artifactId> </plugin> </plugins></build>-
パッケージ化した app.jar を cloud-demo の各対応するサブディレクトリにコピー
-
cloud-demo を仮想マシンへアップロードし、
docker-compose up -dでデプロイ
Dockerイメージリポジトリ
イメージのプッシュとプル
私用のイメージリポジトリへイメージをプッシュするには、先にタグ付けを行う必要があります。手順は以下のとおり:
- ローカルイメージのタグを再設定する。名前のプレフィックスは私有リポジトリのアドレス:192.168.150.101:8080/
docker tag nginx:latest 192.168.150.101:8080/nginx:1.0- イメージをプッシュ
docker push 192.168.150.101:8080/nginx:1.0- イメージをプル
docker pull 192.168.150.101:8080/nginx:1.0部分信息可能已经过时