认识微服务
单体架构
将业务的所有功能集中在一个项目中开发,打成一个包部署。
优点:
- 架构简单
- 部署成本低
缺点:
- 耦合度高(维护困难、升级困难)
分布式架构
根据业务功能对系统做拆分,每个业务功能模块作为独立项目开发,称为一个服务。
优点:
- 降低服务耦合
- 有利于服务升级和拓展
缺点:
- 服务调用关系错综复杂
分布式架构虽然降低了服务耦合,但是服务拆分时也有很多问题需要思考:
- 服务拆分的粒度如何界定?
- 服务之间如何调用?
- 服务的调用关系如何管理?
人们需要制定一套行之有效的标准来约束分布式架构。
微服务
微服务的架构特征:
- 单一职责:微服务拆分粒度更小,每一个服务都对应唯一的业务能力,做到单一职责
- 自治:团队独立、技术独立、数据独立,独立部署和交付
- 面向服务:服务提供统一标准的接口,与语言和技术无关
- 隔离性强:服务调用做好隔离、容错、降级,避免出现级联问题
微服务的上述特性其实是在给分布式架构制定一个标准,进一步降低服务之间的耦合度,提供服务的独立性和灵活性。做到高内聚,低耦合。
因此,可以认为微服务是一种经过良好架构设计的分布式架构方案 。
SpringCloud
SpringCloud是目前国内使用最广泛的微服务框架。官网地址:https://spring.io/projects/spring-cloud。
SpringCloud集成了各种微服务功能组件,并基于SpringBoot实现了这些组件的自动装配,从而提供了良好的开箱即用体验。
组件包括:
- 服务注册发现:
Eureka、Nacos、Consul - 服务远程调用:
OpenFeign、Dubbo - 服务链路监控:
Zipkin、Sleuth - 统一配置管理:
SpringCloudConfig、Nacos - 统一网关路由:
SpringCloudGateway、Zuul - 流控、降级、保护:
Hystix、Sentinel
服务的拆分和远程调用
服务拆分原则:
- 不同微服务,不要重复开发相同业务
- 微服务数据独立,不要访问其它微服务的数据库
- 微服务可以将自己的业务暴露为接口,供其它微服务调用
服务间远程调用
通过调用RestTemplate来实现
-
在启动项中注册RestTamplate实例
@Beanpublic RestTemplate restTemplate() {return new RestTemplate();} -
服务中调用
@Autowiredprivate RestTemplate restTemplate;public Order queryOrderById(Long orderId) {// 1.查询订单Order order = orderMapper.findById(orderId);// 2. 远程查询UserString url = "<http://localhost:8081/user/>" + order.getUserId();User user = restTemplate.getForObject(url, User.class);// 3. 存入orderorder.setUser(user);// 4.返回return order;}
提供者与消费者
在服务调用关系中,会有两个不同的角色:
服务提供者:一次业务中,被其它微服务调用的服务。(提供接口给其它微服务)
服务消费者:一次业务中,调用其它微服务的服务。(调用其它微服务提供的接口)
Eureka注册中心
Eureka结构和作用
注册中心用来解决消费者远端调用存在部署了多个实例的服务提供者。

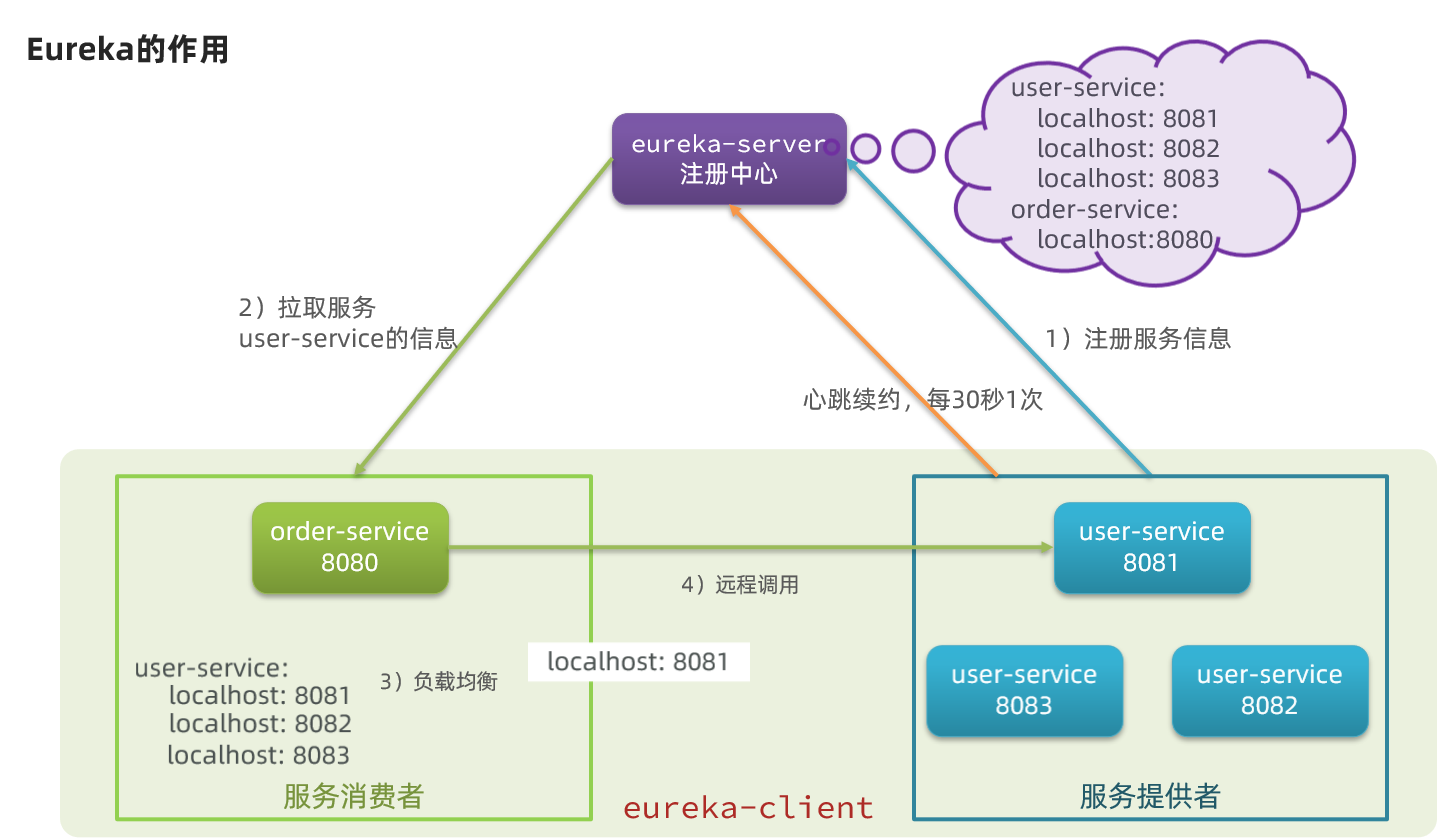
- 问题1:order-service如何得知user-service实例地址?
- user-service服务实例启动后,将自己的信息注册到eureka-server(Eureka服务端)。这个叫服务注册
- eureka-server保存服务名称到服务实例地址列表的映射关系
- order-service根据服务名称,拉取实例地址列表。这个叫服务发现或服务拉取
- 问题2:order-service如何从多个user-service实例中选择具体的实例?
- order-service从实例列表中利用负载均衡算法选中一个实例地址
- 向该实例地址发起远程调用
- 问题3:order-service如何得知某个user-service实例是否依然健康,是不是已经宕机?
- user-service会每隔一段时间(默认30秒)向eureka-server发起请求,报告自己状态,称为心跳
- 当超过一定时间没有发送心跳时,eureka-server会认为微服务实例故障,将该实例从服务列表中剔除
- order-service拉取服务时,就能将故障实例排除了
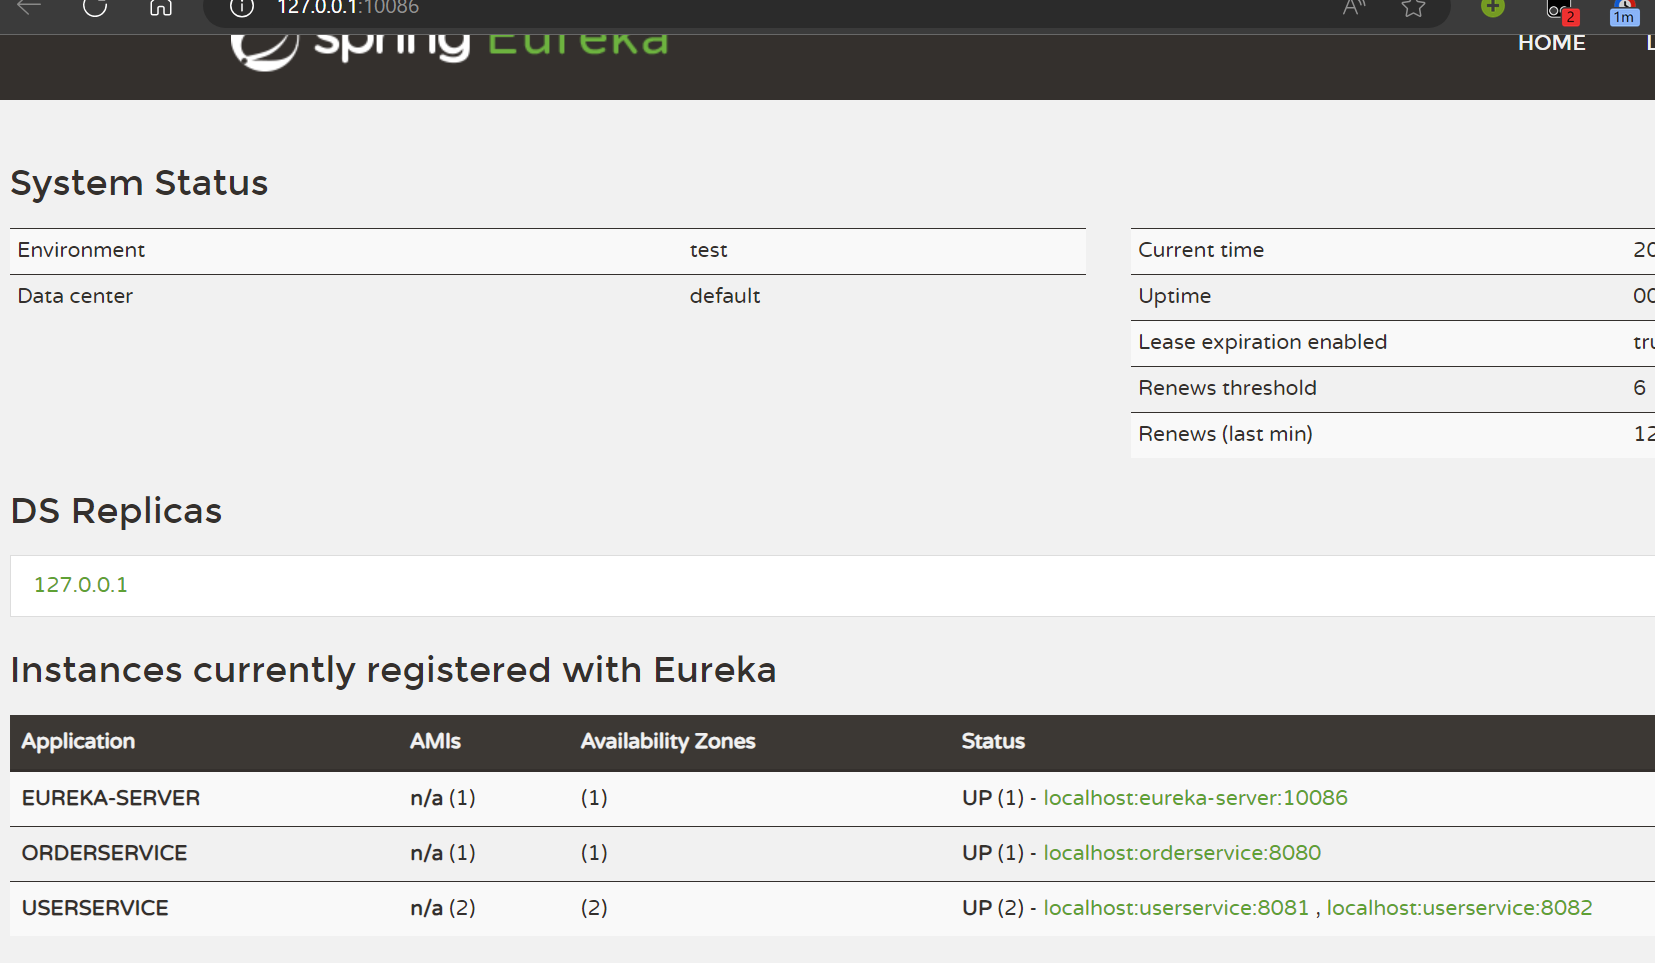
搭建Eureka-Server
- 创建euraka-server服务
在父工程下创建子模块,maven项目
- 导入eureka依赖 - server
<dependency> <groupId>org.springframework.cloud</groupId> <artifactId>spring-cloud-starter-netflix-eureka-server</artifactId></dependency>- 编写启动类
添加@EnableEurekaServer注解,开启Eureka注册中心功能
@SpringBootApplication@EnableEurekaServerpublic class EurekaApplication { public static void main(String[] args) { SpringApplication.run(EurekaApplication.class, args); }}- 编写配置文件
server: port: 10086spring: application: name: eureka-servereureka: client: service-url: defaultZone: <http://127.0.0.1:10086/eureka>- 启动服务
访问设置的Eureka服务路径

服务注册
- 依赖导入 - client
<dependency> <groupId>org.springframework.cloud</groupId> <artifactId>spring-cloud-starter-netflix-eureka-client</artifactId></dependency>- 配置文件
spring: application: name: userserviceeureka: client: service-url: defaultZone: <http://127.0.0.1:10086/eureka>- 启动多个服务实例
SpringBoot中复制启动配置,VM options中配置-Dserver.port=8082
服务发现
作为消费者的order-service前两步与提供者一致。
- 服务拉取与负载均衡
负载均衡:在restTemplate的Bean中添加@LoadBalanced注解即可
@Bean@LoadBalancedpublic RestTemplate restTemplate(){ return new RestTemplate();}获取服务:
public Order queryOrderById(Long orderId) { // 1.查询订单 Order order = orderMapper.findById(orderId); // 2. 远程查询User// String url = "<http://localhost:8081/user/>" + order.getUserId(); String url = "<http://userservice/user/>" + order.getUserId(); User user = restTemplate.getForObject(url, User.class); // 3. 存入order order.setUser(user); // 4.返回 return order;}spring会自动帮助我们从eureka-server端,根据userservice这个服务名称,获取实例列表,而后完成负载均衡。
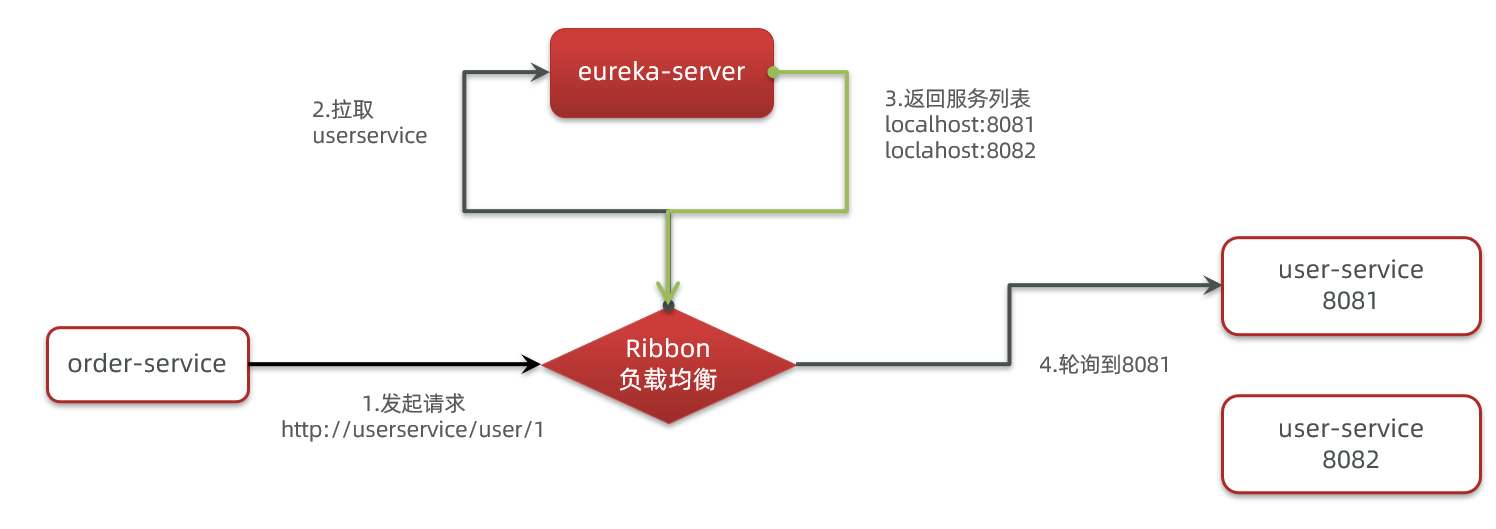
Ribbon负载均衡
负载均衡原理
SpringCloud底层其实是利用了一个名为Ribbon的组件,来实现负载均衡功能的。
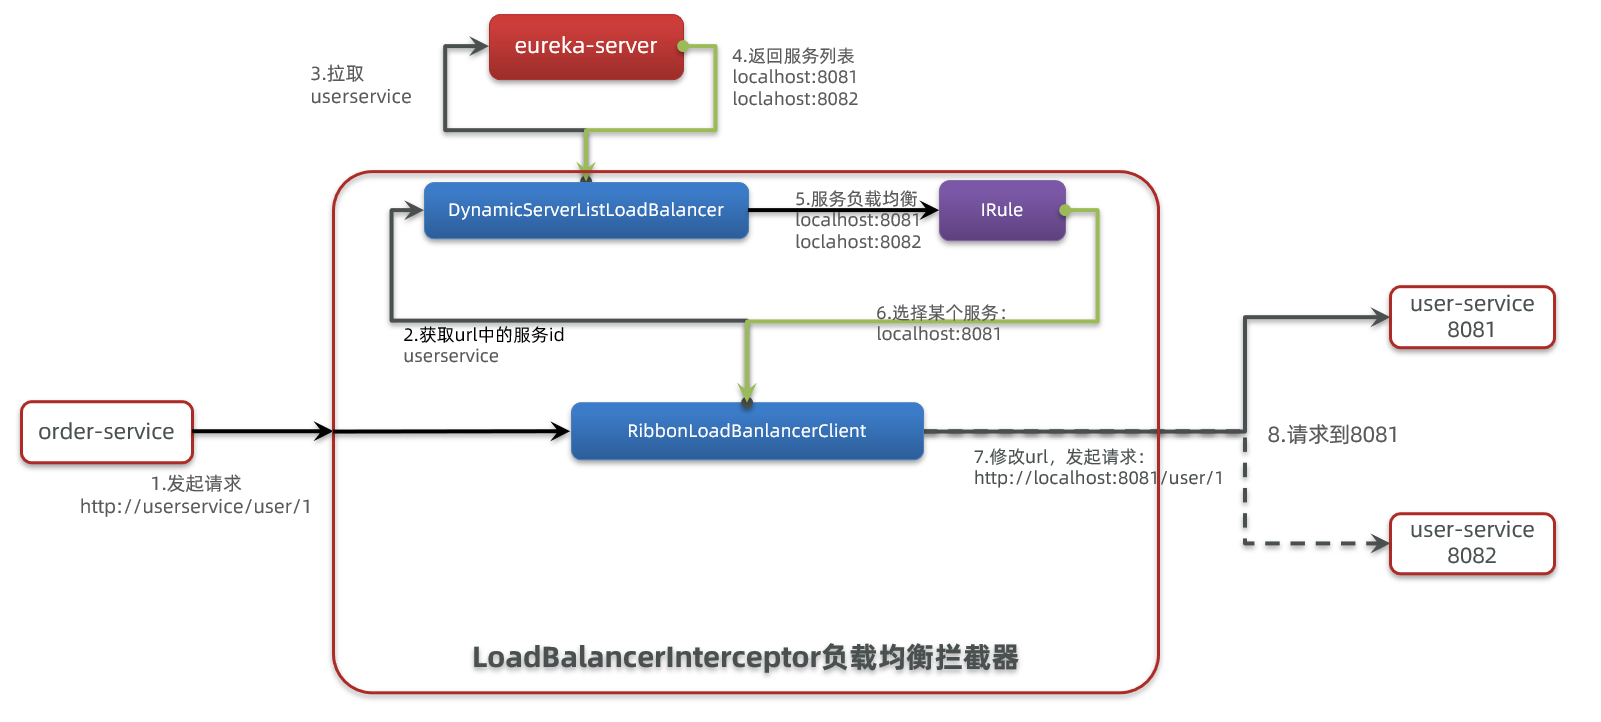
SpringCloud实现
SpringCloudRibbon的底层采用了一个拦截器,拦截了RestTemplate发出的请求,对地址做了修改。
基本流程如下:
- 拦截我们的
RestTemplate请求http://userservice/user/1 RibbonLoadBalancerClient会从请求url中获取服务名称,也就是user-serviceDynamicServerListLoadBalancer根据user-service到eureka拉取服务列表- eureka返回列表,localhost:8081、localhost:8082
IRule利用内置负载均衡规则,从列表中选择一个,例如localhost:8081RibbonLoadBalancerClient修改请求地址,用localhost:8081替代userservice,得到http://localhost:8081/user/1,发起真实请求

负载均衡策略
负载均衡的规则都定义在IRule接口中,而IRule有很多不同的实现类。
| 内置负载均衡规则类 | 规则描述 |
|---|---|
| RoundRobinRule | 简单轮询服务列表来选择服务器。它是Ribbon默认的负载均衡规则。 |
| AvailabilityFilteringRule | 对以下两种服务器进行忽略: (1)在默认情况下,这台服务器如果3次连接失败,这台服务器就会被设置为“短路”状态。短路状态将持续30秒,如果再次连接失败,短路的持续时间就会几何级地增加。 (2)并发数过高的服务器。如果一个服务器的并发连接数过高,配置了AvailabilityFilteringRule规则的客户端也会将其忽略。并发连接数的上限,可以由客户端的 |
| WeightedResponseTimeRule | 为每一个服务器赋予一个权重值。服务器响应时间越长,这个服务器的权重就越小。这个规则会随机选择服务器,这个权重值会影响服务器的选择。 |
| ZoneAvoidanceRule | 以区域可用的服务器为基础进行服务器的选择。使用Zone对服务器进行分类,这个Zone可以理解为一个机房、一个机架等。而后再对Zone内的多个服务做轮询。 |
| BestAvailableRule | 忽略那些短路的服务器,并选择并发数较低的服务器。 |
| RandomRule | 随机选择一个可用的服务器。 |
| RetryRule | 重试机制的选择逻辑 |
自定义负载均衡策略
通过定义IRule实现可以修改负载均衡规则,有两种方式:
- 代码方式:在order-service中的
OrderApplication类中,定义一个新的IRule:
@Beanpublic IRule randomRule(){ return new RandomRule();}- 配置文件方式:在order-service的application.yml文件中,添加新的配置也可以修改规则:
userservice: # 给某个微服务配置负载均衡规则,这里是userservice服务 ribbon: NFLoadBalancerRuleClassName: com.netflix.loadbalancer.RandomRule # 负载均衡规则饥饿加载
Ribbon默认是采用懒加载,即第一次访问时才会去创建LoadBalanceClient,请求时间会很长。
而饥饿加载则会在项目启动时创建,降低第一次访问的耗时,通过下面配置开启饥饿加载:
ribbon: eager-load: enabled: true clients: userserviceNacos注册中心
Nacos是阿里巴巴的产品,现在是SpringCloud中的一个组件。相比Eureka功能更加丰富,在国内受欢迎程度较高。
参考官方文档Nacos 快速开始安装即可
Nacos是SpringCloudAlibaba的组件,而SpringCloudAlibaba也遵循SpringCloud中定义的服务注册、服务发现规范。因此使用Nacos和使用Eureka对于微服务来说,并没有太大区别。
主要差异在于:
- 依赖不同
- 服务地址不同
服务注册到Nacos
引入依赖
在cloud-demo父工程的pom文件中的<dependencyManagement>中引入SpringCloudAlibaba的依赖:
<dependency> <groupId>com.alibaba.cloud</groupId> <artifactId>spring-cloud-alibaba-dependencies</artifactId> <version>2.2.6.RELEASE</version> <type>pom</type> <scope>import</scope></dependency>然后在user-service和order-service中的pom文件中引入nacos-discovery依赖:
<dependency> <groupId>com.alibaba.cloud</groupId> <artifactId>spring-cloud-starter-alibaba-nacos-discovery</artifactId></dependency>配置nacos地址
在user-service和order-service的application.yml中添加nacos地址:
spring: cloud: nacos: server-addr: localhost:8848重启
重启微服务后,登录nacos管理页面,可以看到微服务信息
服务分级存储模型
一个服务可以有多个实例,假如这些实例分布于全国各地的不同机房,Nacos就将同一机房内的实例 划分为一个集群。
微服务互相访问时,应该尽可能访问同集群实例,因为本地访问速度更快。当本集群内不可用时,才访问其它集群。
- 配置
修改application.yml文件,添加集群配置:
spring: cloud: nacos: server-addr: localhost:8848 discovery: cluster-name: HZ # 集群名称Nacos中提供了一个NacosRule的实现,可以优先从同集群中挑选实例。
userservice: ribbon: NFLoadBalancerRuleClassName: com.alibaba.cloud.nacos.ribbon.NacosRule # 负载均衡规则- 权重配置
实际部署中会出现这样的场景:
服务器设备性能有差异,部分实例所在机器性能较好,另一些较差,我们希望性能好的机器承担更多的用户请求。
但默认情况下NacosRule是同集群内随机挑选,不会考虑机器的性能问题。
因此,Nacos提供了权重配置来控制访问频率,权重越大则访问频率越高。
-
环境隔离
Nacos提供了namespace来实现环境隔离功能。
- nacos中可以有多个namespace
- namespace下可以有group、service等
- 不同namespace之间相互隔离,例如不同namespace的服务互相不可见
-
服务实例
Nacos的服务实例分为两种l类型:
- 临时实例:如果实例宕机超过一定时间,会从服务列表剔除,默认的类型。
- 非临时实例:如果实例宕机,不会从服务列表剔除,也可以叫永久实例。
配置一个服务实例为永久实例:
spring:cloud:nacos:discovery:ephemeral: false # 设置为非临时实例
Nacos和Eureka区别
Nacos和Eureka整体结构类似,服务注册、服务拉取、心跳等待,但是也存在一些差异
- Nacos与eureka的共同点
- 都支持服务注册和服务拉取
- 都支持服务提供者心跳方式做健康检测
- Nacos与Eureka的区别
- Nacos支持服务端主动检测提供者状态:临时实例采用心跳模式,非临时实例采用主动检测模式
- 临时实例心跳不正常会被剔除,非临时实例则不会被剔除
- Nacos支持服务列表变更的消息推送模式,服务列表更新更及时
- Nacos集群默认采用AP方式,当集群中存在非临时实例时,采用CP模式;Eureka采用AP方式
Nacos配置管理
当微服务部署的实例越来越多,达到数十、数百时,逐个修改微服务配置就会让人抓狂,而且很容易出错。我们需要一种统一配置管理方案,可以集中管理所有实例的配置。
Nacos一方面可以将配置集中管理,另一方可以在配置变更时,及时通知微服务,实现配置的热更新。
从微服务拉取配置
微服务要拉取nacos中管理的配置,并且与本地的application.yml配置合并,才能完成项目启动。
但如果尚未读取application.yml,又如何得知nacos地址呢?
因此spring引入了一种新的配置文件:bootstrap.yaml文件,会在application.yml之前被读取
- 导入nacos-config依赖
<!--nacos配置管理依赖--><dependency> <groupId>com.alibaba.cloud</groupId> <artifactId>spring-cloud-starter-alibaba-nacos-config</artifactId></dependency>- 添加bootstrap.yml
spring: application: name: userservice # 服务名称 profiles: active: dev #开发环境,这里是dev cloud: nacos: server-addr: localhost:8848 # Nacos地址 config: file-extension: yaml # 文件后缀名这里会根据spring.cloud.nacos.server-addr获取nacos地址,再根据
${spring.application.name}-${spring.profiles.active}.${spring.cloud.nacos.config.file-extension}作为文件id,来读取配置。
- 读取nacos配置
@Value("${pattern.dateformat}")private String dateformat;
@GetMapping("now")public String now(){ return LocalDateTime.now().format(DateTimeFormatter.ofPattern(dateformat));}配置热更新
修改nacos中的配置后,微服务中无需重启即可让配置生效,也就是配置热更新。
-
方法一:添加注解
@RefreshScope -
方法二
使用
@ConfigurationProperties注解代替@Value注解。- 在user-service服务中,添加一个类,读取
patterrn.dateformat属性:
package cn.itcast.user.config;import lombok.Data;import org.springframework.boot.context.properties.ConfigurationProperties;import org.springframework.stereotype.Component;@Component@Data@ConfigurationProperties(prefix = "pattern")public class PatternProperties {private String dateformat;}- 在
UserController中使用这个类代替@Value:
@Autowiredprivate PatternProperties patternProperties;@GetMapping("now")public String now(){return LocalDateTime.now().format(DateTimeFormatter.ofPattern(patternProperties.getDateformat()));} - 在user-service服务中,添加一个类,读取
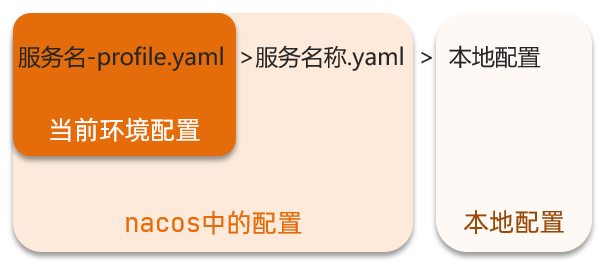
配置共享
其实微服务启动时,会去nacos读取多个配置文件,例如:
[spring.application.name]-[spring.profiles.active].yaml,例如:userservice-dev.yaml[spring.application.name].yaml,例如:userservice.yaml
而[spring.application.name].yaml不包含环境,因此可以被多个环境共享。
配置共享优先级:
当nacos、服务本地同时出现相同属性时,优先级有高低之分:

Nacos集群
通过Nginx代理多个Nacos服务器
nacos的conf中配置cluster.conf,其中添加Nacos集群地址。
Feign远程调用
RestTemplate发起远程调用的代码存在下面的问题:
- 代码可读性差,编程体验不统一
- 参数复杂URL难以维护
Feign是一个声明式的http客户端,其作用就是帮助我们优雅的实现http请求的发送,解决上面提到的问题。
Feign代替RestTemplate
-
引入依赖
<dependency><groupId>org.springframework.cloud</groupId><artifactId>spring-cloud-starter-openfeign</artifactId></dependency> -
添加注解
在启动项添加
@EnableFeignClients注解 -
编写Feign客户端
在服务中新建一个接口:
@FeignClient("userservice")public interface UserClient {@GetMapping("/user/{id}")User findById(@PathVariable("id") Long id);}这个客户端主要是基于SpringMVC的注解来声明远程调用的信息,比如:
- 服务名称:userservice
- 请求方式:GET
- 请求路径:/user/{id}
- 请求参数:Long id
- 返回值类型:User
这样,Feign就可以帮助我们发送http请求,无需自己使用RestTemplate来发送了。
-
调用
在服务类中调用方法:
@Autowiredprivate UserClient userClient;public Order queryOrderById(Long orderId) {// 1.查询订单Order order = orderMapper.findById(orderId);// 2. 远程查询UserUser user = userClient.findById(order.getUserId());// 3. 存入orderorder.setUser(user);// 4.返回return order;}
自定义配置
Feign可以支持很多的自定义配置,如下表所示:
| 类型 | 作用 | 说明 |
|---|---|---|
| feign.Logger.Level | 修改日志级别 | 包含四种不同的级别:NONE、BASIC、HEADERS、FULL |
| feign.codec.Decoder | 响应结果的解析器 | http远程调用的结果做解析,例如解析json字符串为java对象 |
| feign.codec.Encoder | 请求参数编码 | 将请求参数编码,便于通过http请求发送 |
| feign. Contract | 支持的注解格式 | 默认是SpringMVC的注解 |
| feign. Retryer | 失败重试机制 | 请求失败的重试机制,默认是没有,不过会使用Ribbon的重试 |
一般情况下,默认值就能满足我们使用,如果要自定义时,只需要创建自定义的@Bean覆盖默认Bean即可。
通过配置文件自定义
基于配置文件修改feign的日志级别可以针对单个服务:
feign: client: config: userservice: # 针对某个微服务的配置 loggerLevel: FULL # 日志级别也可以针对所有服务:
feign: client: config: default: # 这里用default就是全局配置,如果是写服务名称,则是针对某个微服务的配置 loggerLevel: FULL # 日志级别而日志的级别分为四种:
- NONE:不记录任何日志信息,这是默认值。
- BASIC:仅记录请求的方法,URL以及响应状态码和执行时间
- HEADERS:在BASIC的基础上,额外记录了请求和响应的头信息
- FULL:记录所有请求和响应的明细,包括头信息、请求体、元数据。
代码方式
也可以基于Java代码来修改日志级别,先声明一个类,然后声明一个Logger.Level的对象:
public class DefaultFeignConfiguration { @Bean public Logger.Level feignLogLevel(){ return Logger.Level.BASIC; // 日志级别为BASIC }}如果要全局生效,将其放到启动类的@EnableFeignClients这个注解中:
@EnableFeignClients(defaultConfiguration = DefaultFeignConfiguration .class)如果是局部生效,则把它放到对应的@FeignClient这个注解中:
@FeignClient(value = "userservice", configuration = DefaultFeignConfiguration .class)Feign使用优化
Feign底层发起http请求,依赖于其它的框架。其底层客户端实现包括:
- URLConnection:默认实现,不支持连接池
- Apache HttpClient :支持连接池
- OKHttp:支持连接池
因此提高Feign的性能主要手段就是使用连接池代替默认的URLConnection。
这里我们用Apache的HttpClient来演示。
- 引入依赖
在order-service的pom文件中引入Apache的HttpClient依赖:
<!--httpClient的依赖 --><dependency> <groupId>io.github.openfeign</groupId> <artifactId>feign-httpclient</artifactId></dependency>- 配置连接池
在order-service的application.yml中添加配置:
feign: client: config: default: # default全局的配置 loggerLevel: BASIC # 日志级别,BASIC就是基本的请求和响应信息 httpclient: enabled: true # 开启feign对HttpClient的支持 max-connections: 200 # 最大的连接数 max-connections-per-route: 50 # 每个路径的最大连接数总结,Feign的优化:
- 日志级别 尽量用basic
- 使用HttpClient或OKHttp代替URLConnection
- 引入feign-httpClient依赖
- 配置文件开启httpClient功能,设置连接池参数
最佳实现
Feign的客户端与服务提供者的controller代码非常相似,简化这种重复的代码编写方法如下
继承方式
一样的代码可以通过继承来共享:
- 定义一个API接口,利用定义方法,并基于SpringMVC注解做声明。
- Feign客户端和Controller都集成改接口
优点:
- 简单
- 实现了代码共享
缺点:
- 服务提供方、服务消费方紧耦合
- 参数列表中的注解映射并不会继承,因此Controller中必须再次声明方法、参数列表、注解
抽取方式
将Feign的Client抽取为独立模块,并且把接口有关的POJO、默认的Feign配置都放到这个模块中,提供给所有消费者使用。
例如,将UserClient、User、Feign的默认配置都抽取到一个feign-api包中,所有微服务引用该依赖包,即可直接使用。
实现基于抽取的最佳实践
-
抽取
创建模块feign-api
添加openfeign依赖
复制服务中的方法
-
在order-service中使用feign-api
引入依赖:
<dependency><groupId>cn.itcast.demo</groupId><artifactId>feign-api</artifactId><version>1.0</version></dependency> -
扫包问题
-
方法一:
指定Feign应该扫描的包:
@EnableFeignClients(basePackages = "cn.itcast.feign.clients") -
方式二:
指定需要加载的Client接口:
@EnableFeignClients(clients = {UserClient.class})
-
Gateway服务网关
Spring Cloud Gateway 是 Spring Cloud 的一个全新项目,该项目是基于 Spring 5.0,Spring Boot 2.0 和 Project Reactor 等响应式编程和事件流技术开发的网关,它旨在为微服务架构提供一种简单有效的统一的 API 路由管理方式。
为什么需要网关
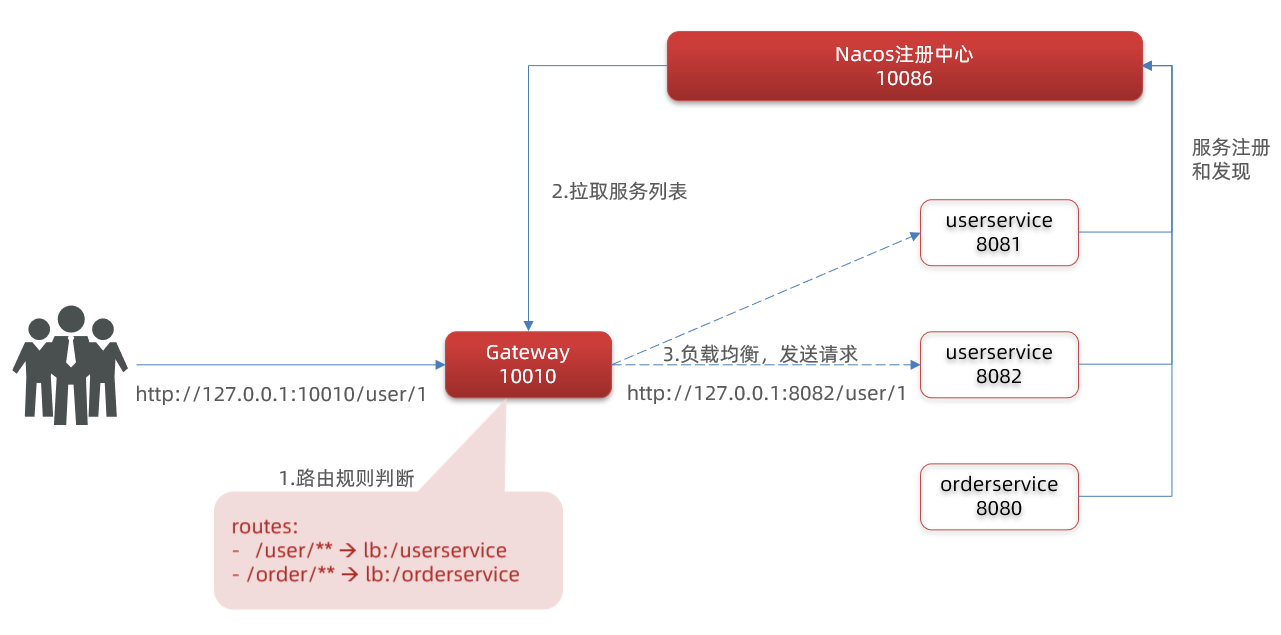
Gateway网关是我们服务的守门神,所有微服务的统一入口。
网关的核心功能特性:
- 权限控制:网关作为微服务入口,需要校验用户是是否有请求资格,如果没有则进行拦截。
- 路由和负载均衡:一切请求都必须先经过gateway,但网关不处理业务,而是根据某种规则,把请求转发到某个微服务,这个过程叫做路由。当然路由的目标服务有多个时,还需要做负载均衡。
- 限流:当请求流量过高时,在网关中按照下流的微服务能够接受的速度来放行请求,避免服务压力过大。
在SpringCloud中网关的实现包括两种:
- gateway
- zuul
Zuul是基于Servlet的实现,属于阻塞式编程。而SpringCloudGateway则是基于Spring5中提供的WebFlux,属于响应式编程的实现,具备更好的性能。
快速入门
-
创建SpringBoot工程gateway,引入网关依赖
<!--网关--><dependency><groupId>org.springframework.cloud</groupId><artifactId>spring-cloud-starter-gateway</artifactId></dependency><!--nacos服务发现依赖--><dependency><groupId>com.alibaba.cloud</groupId><artifactId>spring-cloud-starter-alibaba-nacos-discovery</artifactId></dependency> -
编写启动类
@SpringBootApplicationpublic class GatewayApplication {public static void main(String[] args) {SpringApplication.run(GatewayApplication.class, args);}} -
编写基础配置和路由规则
路由配置包括:
- 路由id:路由的唯一标示
- 路由目标(uri):路由的目标地址,http代表固定地址,lb代表根据服务名负载均衡
- 路由断言(predicates):判断路由的规则,
- 路由过滤器(filters):对请求或响应做处理
server:port: 10010 # 网关端口spring:application:name: gateway # 服务名称cloud:nacos:server-addr: localhost:8848 # nacos地址gateway:routes: # 网关路由配置- id: user-service # 路由id,自定义,只要唯一即可# uri: <http://127.0.0.1:8081> # 路由的目标地址 http就是固定地址uri: lb://userservice # 路由的目标地址 lb就是负载均衡,后面跟服务名称predicates: # 路由断言,也就是判断请求是否符合路由规则的条件- Path=/user/** # 这个是按照路径匹配,只要以/user/开头就符合要求 -
启动网关服务进行测试
重启网关,访问http://localhost:10010/user/1时,符合`/user/**`规则,请求转发到uri:[http://userservice/user/1,得到了结果:](http://userservice/user/1%EF%BC%8C%E5%BE%97%E5%88%B0%E4%BA%86%E7%BB%93%E6%9E%9C%EF%BC%9A)

断言工厂
我们在配置文件中写的断言规则只是字符串,这些字符串会被Predicate Factory读取并处理,转变为路由判断的条件
例如Path=/user/**是按照路径匹配,这个规则是由org.springframework.cloud.gateway.handler.predicate.PathRoutePredicateFactory类来处理的,像这样的断言工厂在SpringCloudGateway还有十几个:
| 名称 | 说明 | 示例 |
|---|---|---|
| After | 是某个时间点后的请求 | - After=2037-01-20T17:42:47.789-07:00[America/Denver] |
| Before | 是某个时间点之前的请求 | - Before=2031-04-13T15:14:47.433+08:00[Asia/Shanghai] |
| Between | 是某两个时间点之前的请求 | - Between=2037-01-20T17:42:47.789-07:00[America/Denver], 2037-01-21T17:42:47.789-07:00[America/Denver] |
| Cookie | 请求必须包含某些cookie | - Cookie=chocolate, ch.p |
| Header | 请求必须包含某些header | - Header=X-Request-Id, \d+ |
| Host | 请求必须是访问某个host(域名) | - Host=.somehost.org,.anotherhost.org |
| Method | 请求方式必须是指定方式 | - Method=GET,POST |
| Path | 请求路径必须符合指定规则 | - Path=/red/{segment},/blue/** |
| Query | 请求参数必须包含指定参数 | - Query=name, Jack或者- Query=name |
| RemoteAddr | 请求者的ip必须是指定范围 | - RemoteAddr=192.168.1.1/24 |
| Weight | 权重处理 |
过滤器工厂
GatewayFilter是网关中提供的一种过滤器,可以对进入网关的请求和微服务返回的响应做处理
- 对路由的请求或响应做加工处理,比如添加请求头
- 配置在路由下的过滤器只对当前路由的请求生效
路由过滤器的种类
Spring提供了31种不同的路由过滤器工厂。例如:
| 名称 | 说明 |
|---|---|
| AddRequestHeader | 给当前请求添加一个请求头 |
| RemoveRequestHeader | 移除请求中的一个请求头 |
| AddResponseHeader | 给响应结果中添加一个响应头 |
| RemoveResponseHeader | 从响应结果中移除有一个响应头 |
| RequestRateLimiter | 限制请求的流量 |
请求头过滤器
下面我们以AddRequestHeader 为例来讲解。
需求:给所有进入userservice的请求添加一个请求头:Truth=dreaife is freaking awesome!
只需要修改gateway服务的application.yml文件,添加路由过滤即可:
spring: cloud: gateway: routes: - id: user-service uri: lb://userservice predicates: - Path=/user/** filters: # 过滤器 - AddRequestHeader=Truth, dreaife is freaking awesome! # 添加请求头当前过滤器写在userservice路由下,因此仅仅对访问userservice的请求有效。
默认过滤器
如果要对所有的路由都生效,则可以将过滤器工厂写到default下。格式如下:
spring: cloud: gateway: routes: - id: user-service uri: lb://userservice predicates: - Path=/user/** default-filters: # 默认过滤项 - AddRequestHeader=Truth, dreaife is freaking awesome!全局过滤器
全局过滤器作用
全局过滤器的作用也是处理一切进入网关的请求和微服务响应,与GatewayFilter的作用一样。区别在于GatewayFilter通过配置定义,处理逻辑是固定的;而GlobalFilter的逻辑需要自己写代码实现。
定义方式是实现GlobalFilter接口。
public interface GlobalFilter { /** * 处理当前请求,有必要的话通过{@link GatewayFilterChain}将请求交给下一个过滤器处理 * * @param exchange 请求上下文,里面可以获取Request、Response等信息 * @param chain 用来把请求委托给下一个过滤器 * @return {@code Mono<Void>} 返回标示当前过滤器业务结束 */ Mono<Void> filter(ServerWebExchange exchange, GatewayFilterChain chain);}在filter中编写自定义逻辑,可以实现下列功能:
- 登录状态判断
- 权限校验
- 请求限流等
自定义全局过滤器
需求:定义全局过滤器,拦截请求,判断请求的参数是否满足下面条件:
- 参数中是否有authorization,
- authorization参数值是否为admin
如果同时满足则放行,否则拦截
package cn.itcast.gateway.filters;
import org.springframework.cloud.gateway.filter.GatewayFilterChain;import org.springframework.cloud.gateway.filter.GlobalFilter;import org.springframework.core.annotation.Order;import org.springframework.http.HttpStatus;import org.springframework.stereotype.Component;import org.springframework.web.server.ServerWebExchange;import reactor.core.publisher.Mono;
@Order(-1)@Componentpublic class AuthorizeFilter implements GlobalFilter { @Override public Mono<Void> filter(ServerWebExchange exchange, GatewayFilterChain chain) { // 1.获取请求参数 MultiValueMap<String, String> params = exchange.getRequest().getQueryParams(); // 2.获取authorization参数 String auth = params.getFirst("authorization"); // 3.校验 if ("admin".equals(auth)) { // 放行 return chain.filter(exchange); } // 4.拦截 // 4.1.禁止访问,设置状态码 exchange.getResponse().setStatusCode(HttpStatus.FORBIDDEN); // 4.2.结束处理 return exchange.getResponse().setComplete(); }}过滤器执行顺序
请求进入网关会碰到三类过滤器:当前路由的过滤器、DefaultFilter、GlobalFilter
请求路由后,会将当前路由过滤器和DefaultFilter、GlobalFilter,合并到一个过滤器链(集合)中,排序后依次执行每个过滤器
排序的规则是什么呢?
- 每一个过滤器都必须指定一个int类型的order值,order值越小,优先级越高,执行顺序越靠前。
- GlobalFilter通过实现Ordered接口,或者添加@Order注解来指定order值,由我们自己指定
- 路由过滤器和defaultFilter的order由Spring指定,默认是按照声明顺序从1递增。
- 当过滤器的order值一样时,会按照 defaultFilter > 路由过滤器 > GlobalFilter的顺序执行。
跨域问题
跨域:域名不一致就是跨域,主要包括:
- 域名不同: www.taobao.com 和 www.taobao.org 和 www.jd.com 和 miaosha.jd.com
- 域名相同,端口不同:localhost:8080和localhost8081
跨域问题:浏览器禁止请求的发起者与服务端发生跨域ajax请求,请求被浏览器拦截的问题
解决方案:CORS
在gateway服务的application.yml文件中,添加下面的配置:
spring: cloud: gateway: globalcors: # 全局的跨域处理 add-to-simple-url-handler-mapping: true # 解决options请求被拦截问题 corsConfigurations: '[/**]': allowedOrigins: # 允许哪些网站的跨域请求 - "<http://localhost:8090>" allowedMethods: # 允许的跨域ajax的请求方式 - "GET" - "POST" - "DELETE" - "PUT" - "OPTIONS" allowedHeaders: "*" # 允许在请求中携带的头信息 allowCredentials: true # 是否允许携带cookie maxAge: 360000 # 这次跨域检测的有效期
Understanding Microservices
Monolithic Architecture
Develop all business functionality in a single project and deploy as a single package.
Advantages:
- Simple architecture
- Low deployment cost
Disadvantages:
- High coupling (maintenance and upgrade are difficult)
Distributed Architecture
Split the system by business function, with each business function module developed as an independent project, called a service.
Advantages:
- Reduces service coupling
- Facilitates service upgrades and scalability
Disadvantages:
- The calling relationships between services become intricate
Although distributed architecture reduces service coupling, there are many questions to consider when partitioning services:
- How to define the granularity of service decomposition?
- How do services call each other?
- How to manage the calling relationships between services?
People need to establish a practical and effective set of standards to constrain distributed architectures.
Microservices
Characteristics of a microservice architecture:
- Single Responsibility: Microservice decomposition is smaller; each service corresponds to a unique business capability, achieving single responsibility
- Autonomy: Teams, technologies, and data are independent, with independent deployment and delivery
- Service-Oriented: Services provide standardized interfaces, independent of language and technology
- Strong isolation: Service calls are isolated, fault-tolerant, and degradable to avoid cascading issues
The above characteristics of microservices are essentially setting a standard for distributed architectures, further reducing coupling between services and providing independence and flexibility. Achieve high cohesion, low coupling.
Therefore, one can regard microservices as a well-architected distributed architecture solution.
SpringCloud
SpringCloud is currently the most widely used microservice framework in China. Official website: https://spring.io/projects/spring-cloud。
SpringCloud integrates various microservice functionality components and, based on SpringBoot, provides auto-configuration for these components, delivering a good out-of-the-box experience.
Components include:
- Service registration and discovery:
Eureka,Nacos,Consul - Remote service invocation:
OpenFeign,Dubbo - Service tracing/monitoring:
Zipkin,Sleuth - Unified configuration management:
SpringCloudConfig,Nacos - Unified gateway routing:
SpringCloudGateway,Zuul - Traffic control, degradation, protection:
Hystix,Sentinel
Service Decomposition and Remote Calls
Service decomposition principles:
- Different microservices should not duplicate the same business
- Microservice data should be independent; do not access other microservices’ databases
- A microservice can expose its own business as interfaces for other microservices to call
Inter-service Remote Calls
Implemented by calling RestTemplate
-
Register a RestTemplate instance in the startup item
@Beanpublic RestTemplate restTemplate() {return new RestTemplate();} -
Calls within services
@Autowiredprivate RestTemplate restTemplate;public Order queryOrderById(Long orderId) {// 1. Query the orderOrder order = orderMapper.findById(orderId);// 2. Remote query UserString url = "<http://localhost:8081/user/>" + order.getUserId();User user = restTemplate.getForObject(url, User.class);// 3. Put into orderorder.setUser(user);// 4. Returnreturn order;}
Providers and Consumers
In the service invocation relationship, there are two distinct roles:
Service Provider: In a business flow, the service that is called by other microservices. (Provides interfaces to other microservices)
Service Consumer: In a business flow, the service that calls other microservices. (Calls interfaces provided by other microservices)
Eureka Registry Center
Eureka Structure and Role
The registry center is used to solve the problem of consumers calling providers that have multiple instances deployed.

- Question 1: How does order-service know the instance addresses of user-service?
- After the user-service instance starts, it registers its information to the eureka-server (Eureka server). This is service registration.
- The eureka-server maintains a mapping from service names to the list of instance addresses.
- order-service pulls the instance address list by service name. This is service discovery or service pulling.
- Question 2: How does order-service pick a specific instance among multiple user-service instances?
- order-service uses a load-balancing algorithm on the instance list to select an address.
- It makes a remote call to that address.
- Question 3: How does order-service know whether a user-service instance is still healthy or down?
- The user-service sends heartbeats to the eureka-server at regular intervals (default every 30 seconds) to report its status.
- If heartbeats are not received for a certain period, the eureka-server marks the microservice instance as failed and removes it from the service list.
- When order-service pulls the service list, faulty instances are excluded.
Building Eureka-Server
- Create the Eureka-Server service
Create a submodule under the parent project, a Maven project
- Import Eureka dependency - server
<dependency> <groupId>org.springframework.cloud</groupId> <artifactId>spring-cloud-starter-netflix-eureka-server</artifactId></dependency>- Write the startup class
Add @EnableEurekaServer to enable Eureka registry center functionality
@SpringBootApplication@EnableEurekaServerpublic class EurekaApplication { public static void main(String[] args) { SpringApplication.run(EurekaApplication.class, args); }}- Write the configuration file
server: port: 10086spring: application: name: eureka-servereureka: client: service-url: defaultZone: <http://127.0.0.1:10086/eureka>- Start the service
Access the configured Eureka service path

Service Registration
- Dependency import - client
<dependency> <groupId>org.springframework.cloud</groupId> <artifactId>spring-cloud-starter-netflix-eureka-client</artifactId></dependency>- Configuration file
spring: application: name: userserviceeureka: client: service-url: defaultZone: <http://127.0.0.1:10086/eureka>- Start multiple service instances
In SpringBoot, duplicate the startup configuration; configure -Dserver.port=8082 in VM options
Service Discovery
As a consumer, order-service follows the same first two steps as the provider.
- Service pulling and load balancing
Load balancing: simply add @LoadBalanced to the RestTemplate bean
@Bean@LoadBalancedpublic RestTemplate restTemplate(){ return new RestTemplate();}Getting the service:
public Order queryOrderById(Long orderId) { // 1. Query the order Order order = orderMapper.findById(orderId); // 2. Remote query User// String url = "<http://localhost:8081/user/>" + order.getUserId(); String url = "<http://userservice/user/>" + order.getUserId(); User user = restTemplate.getForObject(url, User.class); // 3. Put into order order.setUser(user); // 4. Return return order;}Spring will automatically help us fetch the instance list from the eureka-server side based on the service name userservice, and then perform load balancing.
Ribbon Load Balancing
Load Balancing Principle
Spring Cloud uses a component named Ribbon under the hood to implement load balancing.

SpringCloud Implementation
SpringCloudRibbon uses an interceptor that intercepts requests sent by RestTemplate and modifies the address.
Basic workflow:
- Intercept RestTemplate requests to http://userservice/user/1
RibbonLoadBalancerClientextracts the service name from the request URL, i.e. user-serviceDynamicServerListLoadBalancerpulls the service list from Eureka based on user-service- Eureka returns the list, e.g., localhost:8081, localhost:8082
IRuleuses built-in load balancing rules to select one from the list, e.g., localhost:8081RibbonLoadBalancerClientrewrites the request URL, replacinguserservicewith localhost:8081, yielding http://localhost:8081/user/1, and makes the real request

Load Balancing Strategies
The rules for load balancing are defined in the IRule interface, and there are many different implementations.
| Built-in load balancing rule classes | Description |
|---|---|
| RoundRobinRule | Simply round-robin over the service list. It is Ribbon’s default load balancing rule. |
| AvailabilityFilteringRule | Excludes servers that are down: (1) By default, if this server fails 3 times, it will be put into a “circuit” state. The circuit state lasts 30 seconds; if another failure occurs, the circuit duration increases geometrically. (2) Servers with too many concurrent connections. If a server’s concurrent connections are too high, clients configured with AvailabilityFilteringRule will also ignore it. The maximum concurrent connections can be configured via the client property |
| WeightedResponseTimeRule | Assigns a weight to each server. The longer a server’s response time, the smaller its weight. This rule randomly selects a server; the weight influences the choice. |
| ZoneAvoidanceRule | Choose servers based on zone availability. Classify servers by zone (e.g., a data center, a rack), then round-robin among multiple services within the zone. |
| BestAvailableRule | Ignores those in circuit state and selects the server with the lowest concurrency. |
| RandomRule | Randomly select an available server. |
| RetryRule | Logic for retry behavior |
Custom Load Balancing Policy
There are two ways to modify the load balancing rules by implementing IRule:
- Code approach: In the order-service’s
OrderApplicationclass, define a new IRule:
@Beanpublic IRule randomRule(){ return new RandomRule();}- Configuration file approach: In the order-service’s application.yml, add new configuration to modify the rule:
userservice: # Configure load balancing rule for a specific microservice ribbon: NFLoadBalancerRuleClassName: com.netflix.loadbalancer.RandomRule # Load balancing ruleHungry Loading
Ribbon defaults to lazy loading, meaning the LoadBalanceClient is created on first use, which can make the first request take longer.
Hungry loading creates the client at startup, reducing the latency of the first request. Enable hungry loading with the following config:
ribbon: eager-load: enabled: true clients: userserviceNacos Registry Center
Nacos is Alibaba’s product and is now a component in SpringCloud. It is more feature-rich than Eureka and is quite popular domestically.
Refer to the official docs Nacos Quick Start for installation.
Nacos is a component of SpringCloudAlibaba, and SpringCloudAlibaba also follows the service registration and discovery conventions defined in SpringCloud. Therefore using Nacos or Eureka has no fundamental difference for microservices.
Main differences:
- Different dependencies
- Different service addresses
Services registration to Nacos
Import dependencies
In the cloud-demo parent project’s pom.xml, under
<dependency> <groupId>com.alibaba.cloud</groupId> <artifactId>spring-cloud-alibaba-dependencies</artifactId> <version>2.2.6.RELEASE</version> <type>pom</type> <scope>import</scope></dependency>Then in the user-service and order-service pom files, import nacos-discovery dependency:
<dependency> <groupId>com.alibaba.cloud</groupId> <artifactId>spring-cloud-starter-alibaba-nacos-discovery</artifactId></dependency>Configure Nacos address
In the user-service and order-service application.yml, add the Nacos address:
spring: cloud: nacos: server-addr: localhost:8848Restart
After restarting the microservices, log in to the Nacos management page to see the microservice information.
Service Hierarchical Storage Model
A service can have multiple instances. If these instances are distributed across different data centers nationwide, Nacos groups the instances within the same data center into a cluster.
When microservices communicate with each other, they should try to access the same cluster’s instances as much as possible because local access is faster. If the current cluster is unavailable, access other clusters.
- Configuration
Modify application.yml to add cluster configuration:
spring: cloud: nacos: server-addr: localhost:8848 discovery: cluster-name: HZ # cluster nameNacos provides a NacosRule implementation that can prefer selecting instances from the same cluster.
userservice: ribbon: NFLoadBalancerRuleClassName: com.alibaba.cloud.nacos.ribbon.NacosRule # 负载均衡规则- Weight configuration
In actual deployments, you may encounter situations like:
Servers have different hardware performance; some machines are more capable, others less so. You want the higher-performing machines to handle more user requests.
But by default, NacosRule selects randomly within the same cluster and does not consider machine performance.
Therefore, Nacos provides weight configuration to control access frequency; higher weight means higher access frequency.
- Environment isolation
Nacos provides namespaces to achieve environment isolation.
-
nacos can have multiple namespaces
-
within a namespace there can be groups, services, etc.
-
different namespaces are isolated from each other; services in different namespaces are not visible to each other
-
Service instances
Nacos service instances come in two types:
- Ephemeral (temporary): If an instance goes down for a period, it will be removed from the service list; this is the default type.
- Non-ephemeral: If an instance goes down, it will not be removed from the service list and can be considered permanent.
Configure a service instance as non-ephemeral:
spring: cloud: nacos: discovery: ephemeral: false # set to non-ephemeralDifferences Between Nacos and Eureka
Nacos and Eureka have similar overall structures—service registration, service pulling, and heartbeat waiting—but there are some differences:
- Common points
- Both support service registration and service pulling
- Both support heartbeat-based health checks for service providers
- Differences
- Nacos supports server-side active monitoring of provider status: ephemeral instances use heartbeat mode; non-ephemeral instances use active checks
- Ephemeral instances with abnormal heartbeats will be removed; non-ephemeral instances will not be removed
- Nacos supports push-based notifications for service list changes, making updates more timely
- Nacos clusters default to AP; when non-ephemeral instances exist, CP mode is used; Eureka uses AP mode
Nacos Configuration Management
As microservice instances scale to dozens or hundreds, editing each microservice’s configuration individually becomes maddening and error-prone. We need a unified configuration management solution to centrally manage all instances’ configurations.
Nacos can centrally manage configurations and immediately notify microservices of configuration changes to enable hot updates.
Pulling Configuration from Microservices
Microservices pull configurations managed in Nacos and merge them with local application.yml configurations to complete startup.
But if application.yml has not yet been read, how to determine the Nacos address?
Therefore Spring introduces a new configuration file: bootstrap.yaml, which is read before application.yml.
- Importing nacos-config dependency
<!--nacos配置管理依赖--><dependency> <groupId>com.alibaba.cloud</groupId> <artifactId>spring-cloud-starter-alibaba-nacos-config</artifactId></dependency>- Add bootstrap.yml
spring: application: name: userservice # service name profiles: active: dev # development environment; here it's dev cloud: nacos: server-addr: localhost:8848 # Nacos address config: file-extension: yaml # file extensionHere the Nacos address will be obtained from spring.cloud.nacos.server-addr, and then
${spring.application.name}-${spring.profiles.active}.${spring.cloud.nacos.config.file-extension} is used as the file id to read configurations.
- Reading Nacos configuration
@Value("${pattern.dateformat}")private String dateformat;
@GetMapping("now")public String now(){ return LocalDateTime.now().format(DateTimeFormatter.ofPattern(dateformat));}Configuration Hot Update
After changing configurations in Nacos, microservices can apply the changes without restarting, i.e., configuration hot updating.
-
Method 1: add
@RefreshScopeannotation -
Method 2
Use
@ConfigurationPropertiesinstead of@Valueannotations.- In the user-service, add a class to read the
pattern.dateformatproperty:
package cn.itcast.user.config;import lombok.Data;import org.springframework.boot.context.properties.ConfigurationProperties;import org.springframework.stereotype.Component;@Component@Data@ConfigurationProperties(prefix = "pattern")public class PatternProperties {private String dateformat;}- In
UserController, use this class instead of @Value:
@Autowiredprivate PatternProperties patternProperties;@GetMapping("now")public String now(){return LocalDateTime.now().format(DateTimeFormatter.ofPattern(patternProperties.getDateformat()));} - In the user-service, add a class to read the
Configuration Sharing
In fact, when the microservice starts, it will read multiple configuration files from Nacos, for example:
[spring.application.name]-[spring.profiles.active].yaml, e.g., userservice-dev.yaml[spring.application.name].yaml, e.g., userservice.yaml
And [spring.application.name].yaml does not include an environment, so it can be shared across environments.
Configuration sharing priority:
When the same property appears in both Nacos and the service’s local configuration, the priority differs:

Nacos Clusters
Proxy multiple Nacos servers via Nginx
Configure cluster.conf in Nacos’s conf, adding Nacos cluster addresses.
Feign Remote Calls
Code for initiating remote calls with RestTemplate has the following problems:
- Poor readability and inconsistent programming experience
- Complex URLs make maintenance difficult
Feign is a declarative HTTP client whose purpose is to help us elegantly implement HTTP requests, solving the above issues.
Feign Replaces RestTemplate
-
Import dependencies
<dependency><groupId>org.springframework.cloud</groupId><artifactId>spring-cloud-starter-openfeign</artifactId></dependency> -
Add annotation
Add
@EnableFeignClientsin the startup class -
Create Feign client
In the service, create an interface:
@FeignClient("userservice")public interface UserClient {@GetMapping("/user/{id}")User findById(@PathVariable("id") Long id);}This client is mainly based on Spring MVC annotations to declare remote call details, such as:
- Service name: userservice
- HTTP method: GET
- Path: /user/{id}
- Parameter: Long id
- Return type: User
In this way, Feign can help us send HTTP requests without manually using RestTemplate.
-
Usage
In the service class, call the method:
@Autowiredprivate UserClient userClient;public Order queryOrderById(Long orderId) {// 1. Query the orderOrder order = orderMapper.findById(orderId);// 2. Remote query UserUser user = userClient.findById(order.getUserId());// 3. Put into orderorder.setUser(user);// 4. Returnreturn order;}
Custom Configuration
Feign supports a lot of custom configurations, as shown in the table below:
| Type | Purpose | Description |
|---|---|---|
| feign.Logger.Level | Change log level | Four levels: NONE, BASIC, HEADERS, FULL |
| feign.codec.Decoder | Response parser | Parses the result of HTTP remote calls, e.g., parsing JSON strings into Java objects |
| feign.codec.Encoder | Request parameter encoding | Encodes request parameters for transmission via HTTP |
| feign.Contract | Supported annotation formats | Defaults to SpringMVC annotations |
| feign.Retryer | Failure retry mechanism | Retry logic for failed requests; by default there is none, though Ribbon may retry |
Generally, the defaults are sufficient; if you want to customize, simply create your own @Bean to override the default beans.
Customization via configuration
Modifying Feign’s log level via configuration can target a single service:
feign: client: config: userservice: # configuration for a specific microservice loggerLevel: FULL # log levelYou can also apply it to all services:
feign: client: config: default: # default is global; if you specify a service name, it's for a single microservice loggerLevel: FULL # log levelAnd the log levels are four:
- NONE: Do not log any information; this is the default.
- BASIC: Log only the request method, URL, and the response status code and execution time
- HEADERS: In addition to BASIC, also log request and response headers
- FULL: Log all details of requests and responses, including headers, body, and metadata.
Code-based approach
You can also modify the log level via Java code by declaring a class and then returning a Logger.Level object:
public class DefaultFeignConfiguration { @Bean public Logger.Level feignLogLevel(){ return Logger.Level.BASIC; // log level is BASIC }}If you want global effect, apply it by using the startup class annotation:
@EnableFeignClients(defaultConfiguration = DefaultFeignConfiguration .class)If you want it to be local to a specific Feign client, apply:
@FeignClient(value = "userservice", configuration = DefaultFeignConfiguration .class)Feign Usage Optimization
Feign’s underlying HTTP requests rely on other frameworks. Their underlying client implementations include:
- URLConnection: default implementation, does not support connection pooling
- Apache HttpClient: supports connection pooling
- OKHttp: supports connection pooling
Thus, the main way to improve Feign performance is to use a connection pool instead of the default URLConnection.
Here we demonstrate using Apache HttpClient.
- Import dependencies
In the order-service pom, include Apache HttpClient dependency:
<!--httpClient dependency --><dependency> <groupId>io.github.openfeign</groupId> <artifactId>feign-httpclient</artifactId></dependency>- Configure the connection pool
In the order-service application.yml, add configuration:
feign: client: config: default: # global default loggerLevel: BASIC # log level; BASIC is the basic request/response info httpclient: enabled: true # enable Feign's support for HttpClient max-connections: 200 # maximum connections max-connections-per-route: 50 # maximum connections per routeIn short, Feign optimization:
- Prefer BASIC log level when possible
- Use HttpClient or OKHttp instead of URLConnection
- Include feign-httpClient dependency
- Enable HttpClient in the configuration and set pool parameters
Best Practice
The Feign client and the service provider’s controller code are very similar. Here is a method to reduce repetitive coding:
Inheritance approach
Shared code can be reused via inheritance:
- Define an API interface, declare methods using Spring MVC annotations.
- Have the Feign client and the Controller both implement this interface
Advantages:
- Simple
- Enables code sharing
Disadvantages:
- Tight coupling between the provider and consumer
- Annotations in the parameter list are not inherited, so the Controller must re-declare methods, parameter lists, and annotations
Extraction approach
Extract Feign’s Client into a separate module, and place related POJOs and default Feign configurations into this module for all consumers to use.
For example, extract UserClient, User, and Feign’s default configuration into a feign-api package; all microservices can reference this dependency package and use it directly.
Best practices for extraction-based implementation
-
Extract
Create a module, feign-api
Add OpenFeign dependency
Copy methods from the service
-
Use feign-api in order-service
Add dependency:
<dependency><groupId>cn.itcast.demo</groupId><artifactId>feign-api</artifactId><version>1.0</version></dependency> -
Package scanning considerations
-
Option 1:
Specify the packages Feign should scan:
@EnableFeignClients(basePackages = "cn.itcast.feign.clients") -
Option 2:
Specify the Client interfaces to load:
@EnableFeignClients(clients = {UserClient.class})
-
Gateway Service Gateway
Spring Cloud Gateway is a brand-new project within Spring Cloud. It is developed based on Spring 5.0, Spring Boot 2.0, and Project Reactor and other reactive programming and event-driven technologies. It aims to provide a simple and effective unified API routing management approach for microservice architectures.
Why a Gateway is Needed
The Gateway is the gatekeeper of our services, the single entry point for all microservices.
Core capabilities of the gateway:
- Access control: The gateway, as the entry to microservices, should verify whether the user has permission to request; if not, intercept.
- Routing and load balancing: All requests must pass through the gateway, but the gateway does not process business logic. It forwards requests to a microservice based on certain rules; when there are multiple target services, load balancing is required.
- Rate limiting: When request traffic is high, the gateway releases requests at a rate that downstream microservices can handle, preventing service pressure.
In SpringCloud, there are two gateway implementations:
- gateway
- zuul
Zuul is servlet-based (blocking). SpringCloudGateway is built on WebFlux provided by Spring 5, a reactive programming implementation with better performance.
Quick Start
-
Create a SpringBoot project gateway and include gateway dependencies
<!--网关--><dependency><groupId>org.springframework.cloud</groupId><artifactId>spring-cloud-starter-gateway</artifactId></dependency><!--nacos服务发现依赖--><dependency><groupId>com.alibaba.cloud</groupId><artifactId>spring-cloud-starter-alibaba-nacos-discovery</artifactId></dependency> -
Write the startup class
@SpringBootApplicationpublic class GatewayApplication {public static void main(String[] args) {SpringApplication.run(GatewayApplication.class, args);}} -
Write basic configuration and routing rules
Routing configuration includes:
- Route id: the unique identifier of the route
- Route target (uri): the route’s target address; http represents a fixed address, lb represents load balancing by service name
- Route predicates: the rules to determine routing
- Route filters: process requests or responses
server:port: 10010 # gateway portspring:application:name: gateway # service namecloud:nacos:server-addr: localhost:8848 # nacos addressgateway:routes: # gateway route configuration- id: user-service # route id, unique# uri: <http://127.0.0.1:8081> # route target address; http is fixeduri: lb://userservice # route target address; lb indicates load balancing, followed by service namepredicates: # route predicates, i.e., conditions that determine routing- Path=/user/** # path-based matching; matches any path that starts with /user/ -
Start the gateway service for testing
Restart the gateway; visiting http://localhost:10010/user/1 matches the /user/** rule and the request is forwarded to uri: http://userservice/user/1, yielding the result:
Predicate Factory
What we write in the configuration as assertion rules are strings; these strings are read and processed by Predicate Factory to become route decision conditions.
For example, Path=/user/** matches by path, and this rule is handled by the class org.springframework.cloud.gateway.handler.predicate.PathRoutePredicateFactory. There are a dozen or so such assertion factories in SpringCloudGateway:
| Name | Description | Example |
|---|---|---|
| After | Request after a certain time | - After=2037-01-20T17:42:47.789-07:00[America/Denver] |
| Before | Request before a certain time | - Before=2031-04-13T15:14:47.433+08:00[Asia/Shanghai] |
| Between | Request between two times | - Between=2037-01-20T17:42:47.789-07:00[America/Denver], 2037-01-21T17:42:47.789-07:00[America/Denver] |
| Cookie | Request must contain certain cookies | - Cookie=chocolate, ch.p |
| Header | Request must contain certain headers | - Header=X-Request-Id, \d+ |
| Host | Request must be for a particular host (domain) | - Host=.somehost.org,.anotherhost.org |
| Method | Request method must be a specific one | - Method=GET,POST |
| Path | Request path must match specified rules | - Path=/red/{segment},/blue/** |
| Query | Request parameters must include specified parameters | - Query=name, Jack or - Query=name |
| RemoteAddr | Requester’s IP must fall within a specified range | - RemoteAddr=192.168.1.1/24 |
| Weight | Weight handling |
Filter Factory
GatewayFilter is a filter provided by the gateway that can process incoming requests and responses from microservices
- Process requests or responses for routes, such as adding headers
- Filters defined under a route only apply to the current route’s requests
Types of Route Filters
Spring provides 31 different route filter factories. For example:
| Name | Description |
|---|---|
| AddRequestHeader | Add a request header to the current request |
| RemoveRequestHeader | Remove a header from the request |
| AddResponseHeader | Add a response header to the response |
| RemoveResponseHeader | Remove a response header from the response |
| RequestRateLimiter | Rate limit requests |
Request Header Filter
Here we use AddRequestHeader as an example.
Requirement: Add a request header Truth=dreaife is freaking awesome! to all requests entering userservice.
Just modify gateway service’s application.yml and add a routing filter:
spring: cloud: gateway: routes: - id: user-service uri: lb://userservice predicates: - Path=/user/** filters: # filters - AddRequestHeader=Truth, dreaife is freaking awesome! # add headerThe current filter is defined under the userservice route, so it only affects requests to userservice.
Default Filters
If you want the filter to apply to all routes, you can place the filter factory under default. The format is:
spring: cloud: gateway: routes: - id: user-service uri: lb://userservice predicates: - Path=/user/** default-filters: # default filters - AddRequestHeader=Truth, dreaife is freaking awesome!Global Filters
Global Filter Purpose
Global filters also process all requests entering the gateway and responses from microservices, similar to GatewayFilter. The difference is that GatewayFilter is defined via configuration with fixed logic, while GlobalFilter’s logic must be implemented in code.
Global filters are defined by implementing the GlobalFilter interface.
public interface GlobalFilter { /** * Process the current request; if necessary, pass the request to the next filter * * @param exchange the request context, where you can access Request, Response, etc. * @param chain used to delegate the request to the next filter * @return {@code Mono<Void>} indicates the end of this filter’s processing */ Mono<Void> filter(ServerWebExchange exchange, GatewayFilterChain chain);}In the filter, you can implement custom logic to achieve the following:
- Login status check
- Permission validation
- Request rate limiting, etc.
Custom Global Filter
Example: Define a global filter that intercepts requests and checks whether the request parameters satisfy:
- The parameter authorization exists
- The authorization parameter value is admin
If both are satisfied, let the request pass; otherwise block it
package cn.itcast.gateway.filters;
import org.springframework.cloud.gateway.filter.GatewayFilterChain;import org.springframework.cloud.gateway.filter.GlobalFilter;import org.springframework.core.annotation.Order;import org.springframework.http.HttpStatus;import org.springframework.stereotype.Component;import org.springframework.web.server.ServerWebExchange;import reactor.core.publisher.Mono;
@Order(-1)@Componentpublic class AuthorizeFilter implements GlobalFilter { @Override public Mono<Void> filter(ServerWebExchange exchange, GatewayFilterChain chain) { // 1. Get request parameters MultiValueMap<String, String> params = exchange.getRequest().getQueryParams(); // 2. Get authorization parameter String auth = params.getFirst("authorization"); // 3. Validate if ("admin".equals(auth)) { // Let through return chain.filter(exchange); } // 4. Block // 4.1. Deny access, set status code exchange.getResponse().setStatusCode(HttpStatus.FORBIDDEN); // 4.2. End handling return exchange.getResponse().setComplete(); }}Filter Execution Order
Requests entering the gateway encounter three kinds of filters: the current route’s filters, DefaultFilter, and GlobalFilter.
After the route is determined, the route’s filters, DefaultFilter, and GlobalFilter are merged into a filter chain (collection) and executed in order.
What determines the order?
- Each filter must specify an int order value; the smaller the value, the higher the priority, and the earlier it executes.
- GlobalFilter order is specified by implementing the Ordered interface or by adding the @Order annotation.
- The order of route filters and defaultFilter is determined by Spring; by default, it increments from 1 in the declaration order.
- When filter orders are equal, the execution order is defaultFilter > route filters > GlobalFilter.
Cross-Origin (CORS) Issues
Cross-origin means different domains; examples include:
- Different domains: http://www.taobao.com/ vs http://www.taobao.org/ vs http://www.jd.com/ vs http://miaosha.jd.com/
- Same domain, different ports: localhost:8080 vs localhost:8081
Cross-origin issues occur when the browser blocks cross-origin AJAX requests initiated by the client.
Solution: CORS
In the gateway service’s application.yml, add the following configuration:
spring: cloud: gateway: globalcors: # Global cross-origin handling add-to-simple-url-handler-mapping: true # Solve options requests being blocked corsConfigurations: '[/**]': allowedOrigins: # Which websites are allowed to make cross-origin requests - "<http://localhost:8090>" allowedMethods: # Allowed cross-origin AJAX request methods - "GET" - "POST" - "DELETE" - "PUT" - "OPTIONS" allowedHeaders: "*" # Headers that are allowed in requests allowCredentials: true # Whether to allow credentials (cookies) maxAge: 360000 # This cross-origin check's validity period
マイクロサービスの理解
モノリシックアーキテクチャ
ビジネスのすべての機能を1つのプロジェクトに集中して開発し、1つのパッケージとしてデプロイする。
利点:
- アーキテクチャが単純
- デプロイコストが低い
欠点:
- 結合度が高い(保守が難しい、アップグレードが難しい)
分散アーキテクチャ
ビジネス機能に基づいてシステムを分割し、各ビジネス機能モジュールを独立したプロジェクトとして開発します。これを1つのサービスと呼ぶ。
利点:
- サービス間の結合を低減
- サービスのアップグレードと拡張に有利
欠点:
- サービス呼び出し関係が複雑になる
分散アーキテクチャは確かにサービスの結合を低減しますが、サービスを分割する際には考えるべき問題が多くあります:
- サービス分割の粒度をどう定義するか?
- サービス間はどう呼び出すのか?
- サービスの呼び出し関係をどう管理するのか?
人々は分散アーキテクチャを制約するための実効的な標準を制定する必要があります。
マイクロサービス
マイクロサービスのアーキテクチャの特徴:
- 単一責務:マイクロサービスは粒度がより小さく、各サービスが唯一のビジネス能力を持ち、単一責務を実現します
- 自治:チーム独立、技術独立、データ独立、独立デプロイとデリバリー
- サービス指向:サービスは統一された標準インターフェースを提供し、言語や技術に依存しない
- 隔離性が高い:サービス呼び出しは隔離・フォールトトレランス・降格を適切に実施し、連鎖的な問題を回避
上述の特性は、分散アーキテクチャに対して標準を設定し、サービス間の結合をさらに低減し、サービスの独立性と柔軟性を提供することを目的としています。高い内聚、低い結合を実現します。
したがって、マイクロサービスは、良好なアーキテクチャ設計を経た、分散アーキテクチャのソリューションとみなすことができます。
SpringCloud
SpringCloudは現在国内で最も広く使われているマイクロサービスフレームワークです。公式サイト:https://spring.io/projects/spring-cloud。
SpringCloudはさまざまなマイクロサービス機能コンポーネントを統合し、SpringBootを基盤としてこれらのコンポーネントの自動設定を実現することで、良好な「箱から出してすぐ使える」体験を提供します。
コンポーネントには:
- サービス登録・発見:
Eureka、Nacos、Consul - サービスリモート呼び出し:
OpenFeign、Dubbo - サービストレースモニタリング:
Zipkin、Sleuth - 統一設定管理:
SpringCloudConfig、Nacos - 統一ゲートウェイルーティング:
SpringCloudGateway、Zuul - レート制御、降格、保護:
Hystix、Sentinel
サービスの分割と遠隔呼び出し
サービス分割の原則:
- 異なるマイクロサービス間で同じビジネスを重複して開発しない
- マイクロサービスごとにデータを独立させ、他のマイクロサービスのデータベースへアクセスしない
- マイクロサービスは自分のビジネスをインターフェースとして公開し、他のマイクロサービスから呼び出せるようにする
サービス間の遠隔呼び出し
RestTemplateを呼び出して実現します
-
起動時にRestTemplateのインスタンスを登録する
@Beanpublic RestTemplate restTemplate() {return new RestTemplate();} -
サービス側の呼び出し
@Autowiredprivate RestTemplate restTemplate;public Order queryOrderById(Long orderId) {// 1.注文を取得Order order = orderMapper.findById(orderId);// 2. ユーザーをリモート照会String url = "<http://localhost:8081/user/>" + order.getUserId();User user = restTemplate.getForObject(url, User.class);// 3. orderに格納order.setUser(user);// 4. 返却return order;}
提供者と消費者
サービス呼び出し関係には2つの異なる役割があります:
サービス提供者:他のマイクロサービスから呼び出されるサービス。(他のマイクロサービスへ接口を提供)
サービス消費者:他のマイクロサービスを呼び出すサービス。(他のマイクロサービスが提供するインターフェースを呼び出す)
Eureka登録センター
Eurekaの構成と役割
登録センターは、消費者がリモート呼び出しを行う際、複数のインスタンスとして実行されているサービス提供者を解決するために使用します。

- 問題1:order-serviceはuser-serviceのインスタンスアドレスをどう知るのか?
- user-serviceのインスタンスが起動すると、自分の情報をeureka-server(Eurekaサーバ)に登録します。これをサービス登録と呼ぶ
- eureka-serverはサービス名とサービスインスタンスアドレスのリストの対応を保持します
- order-serviceはサービス名に基づいてインスタンスアドレスリストを取得します。これをサービス発見またはサービスプルと呼ぶ
- 問題2:order-serviceは複数のuser-serviceインスタンスのうちどの具体的なインスタンスを選ぶのか?
- order-serviceはインスタンスリストからロードバランシングアルゴリズムを用いて1つのインスタンスアドレスを選ぶ
- そのインスタンスアドレスに対してリモート呼び出しを行う
- 問題3:order-serviceはあるuser-serviceインスタンスが依然として健全か、落ちていないかをどう知るのか?
- user-serviceは一定の間隔(デフォルト30秒)でeureka-serverに心拍を送信して自分の状態を報告する
- 心拍が一定時間受信されない場合、eureka-serverはマイクロサービスインスタンスを故障とみなし、サービスリストから除外する
- サービスを取得する際、故障したインスタンスは除外される
Eureka-Serverの構築
- Eureka-Serverサービスを作成
親プロジェクトの下にサブモジュールを作成し、Mavenプロジェクトとする
- Eureka依存を導入 - server
<dependency> <groupId>org.springframework.cloud</groupId> <artifactId>spring-cloud-starter-netflix-eureka-server</artifactId></dependency>- 起動クラスを作成
@EnableEurekaServerアノテーションを付与して、Eureka登録センター機能を有効化する
@SpringBootApplication@EnableEurekaServerpublic class EurekaApplication { public static void main(String[] args) { SpringApplication.run(EurekaApplication.class, args); }}- 設定ファイルを作成
server: port: 10086spring: application: name: eureka-servereureka: client: service-url: defaultZone: <http://127.0.0.1:10086/eureka>- サービスを起動
設定したEurekaサービスパスにアクセス

サービス登録
- 依存導入 - client
<dependency> <groupId>org.springframework.cloud</groupId> <artifactId>spring-cloud-starter-netflix-eureka-client</artifactId></dependency>- 設定ファイル
spring: application: name: userserviceeureka: client: service-url: defaultZone: <http://127.0.0.1:10086/eureka>- 複数のサービスインスタンスを起動
SpringBootの起動設定を複製し、VMオプションで-Dserver.port=8082を設定
サービス発見
消費者であるorder-serviceの前述2点は提供者と同様です。
- サービス取得とロードバランシング
ロードバランシング:restTemplateのBeanに@LoadBalancedアノテーションを追加すればよい
@Bean@LoadBalancedpublic RestTemplate restTemplate(){ return new RestTemplate();}取得するサービス:
public Order queryOrderById(Long orderId) { // 1.注文を取得 Order order = orderMapper.findById(orderId); // 2. 远程查询User// String url = "<http://localhost:8081/user/>" + order.getUserId(); String url = "<http://userservice/user/>" + order.getUserId(); User user = restTemplate.getForObject(url, User.class); // 3. 存入order order.setUser(user); // 4.返回 return order;}springは自動的にeureka-server端からuserserviceというサービス名のインスタンスリストを取得し、その後ロードバランシングを実行します。
Ribbonロードバランシング
ロードバランシングの原理
SpringCloudの下層はRibbonと呼ばれるコンポーネントを利用してロードバランシング機能を実現しています。

SpringCloudの実装
SpringCloudRibbonの下層はインターセプターを用いて、RestTemplateが発行するリクエストを横取りし、アドレスを変更します。
基本的な流れは次のとおりです:
- 私たちの
RestTemplateリクエスト http://userservice/user/1 をインターセプト RibbonLoadBalancerClientはリクエストのurlからサービス名を取得、つまりuser-serviceDynamicServerListLoadBalancerはuser-serviceに基づいてeurekaからサービスリストを取得- eurekaがリストを返す、localhost:8081、localhost:8082
IRuleは内蔵のロードバランシングルールを用いてリストから1つを選択、例えば localhost:8081RibbonLoadBalancerClientはリクエストURLを修正し、localhost:8081をuserserviceの代わりに置換して、http://localhost:8081/user/1 にして実際のリクエストを送信

ロードバランシング戦略
ロードバランシングのルールはすべてIRuleインタフェースに定義されており、IRuleにはさまざまな実装クラスがあります。
| 内蔵ロードバランス規則クラス | 規則の説明 |
|---|---|
| RoundRobinRule | サービスリストを単純に循環させてサーバを選択します。Ribbonのデフォルトのロードバランシング規則です。 |
| AvailabilityFilteringRule | 以下の2つのサーバを無視します: (1)デフォルトでは、このサーバが3回接続失敗すると「回避」状態に設定されます。回避状態は30秒継続し、再接続失敗時には回避の継続時間が幾何的に増加します。 (2)同時接続数が過大なサーバ。もしサーバの同時接続数が過大であれば、AvailabilityFilteringRule規則を適用しているクライアントもそれを無視します。並列接続数の上限は、クライアントの |
| WeightedResponseTimeRule | 各サーバに重みを割り当て、サーバの応答時間が長いほどそのサーバの重みを小さくします。この規則はサーバをランダムに選択しますが、重みが選択に影響します。 |
| ZoneAvoidanceRule | 利用可能なゾーンを基にサーバを選択します。ゾーンを機房やラックなどとして分類し、ゾーン内の複数のサービスを循環させます。 |
| BestAvailableRule | 回避済みのサーバを除外し、並列数が最も低いサーバを選択します。 |
| RandomRule | 使用可能なサーバをランダムに選択します。 |
| RetryRule | リトライ機構の選択ロジック |
カスタムロードバランシング戦略
IRuleを実装することでロードバランシング規則を変更できます。2つの方法:
- コード方式:order-serviceの
OrderApplicationクラスで新しいIRuleを定義します。
@Beanpublic IRule randomRule(){ return new RandomRule();}- 設定ファイル方式:order-serviceのapplication.ymlファイルに新しい設定を追加して規則を変更します:
userservice: # 負荷均衡規則を設定するマイクロサービス、この場合はuserservice ribbon: NFLoadBalancerRuleClassName: com.netflix.loadbalancer.RandomRule # ロードバランス規則餓死ロード(先読みロード)
Ribbonはデフォルトでレイジーロードを採用しており、初回アクセス時にLoadBalanceClientを作成するため、リクエスト時間が長くなることがあります。
一方、先読みロードはプロジェクト起動時に作成され、初回アクセス時の待機を軽減します。以下の設定で有効化します:
ribbon: eager-load: enabled: true clients: userserviceNacos登録センター
Nacosは阿里巴巴の製品で、現在はSpringCloudの1つのコンポーネントです。国内ではEurekaより機能豊富で、人気も高いです。
公式文書Nacos 快速開始を参照して導入します。
NacosはSpringCloudAlibabaのコンポーネントであり、SpringCloudAlibabaもSpringCloudで定義されているサービス登録・サービス発見の規範に従います。したがってNacosの使用とEurekaの使用にはマイクロサービスにとって大きな違いはありません。
主な相違点は次のとおりです:
- 依存関係が異なる
- サービスアドレスが異なる
Nacosへのサービス登録
依存関係の導入
cloud-demoプロジェクトのpom.xmlの<dependencyManagement>でSpringCloudAlibabaの依存を導入します:
<dependency> <groupId>com.alibaba.cloud</groupId> <artifactId>spring-cloud-alibaba-dependencies</artifactId> <version>2.2.6.RELEASE</version> <type>pom</type> <scope>import</scope></dependency>次にuser-serviceとorder-serviceのpomにnacos-discovery依存を導入します:
<dependency> <groupId>com.alibaba.cloud</groupId> <artifactId>spring-cloud-starter-alibaba-nacos-discovery</artifactId></dependency>nacosアドレスの設定
user-serviceとorder-serviceのapplication.ymlにnacosアドレスを追加します:
spring: cloud: nacos: server-addr: localhost:8848再起動
マイクロサービスを再起動すると、nacos管理画面にマイクロサービス情報が表示されます。
サービス分級ストレージモデル
1つのサービスには複数のインスタンスがあり、これらのインスタンスが全国各地の異なるデータセンターに分布している場合、Nacosは同一データセンター内のインスタンスを1つのクラスターとして区分します。
マイクロサービス同士のアクセスは、可能な限り同じクラスターのインスタンスへアクセスするべきです。なぜならローカルアクセスの方が速いためです。もし同一クラスター内で利用不能になった場合にのみ、他のクラスターへアクセスします。
- 設定
application.ymlファイルを修正し、クラスター設定を追加します:
spring: cloud: nacos: server-addr: localhost:8848 discovery: cluster-name: HZ # クラスター名Nacosには同一クラスターからインスタンスを優先的に選ぶNacosRuleの実装が用意されています。
userservice: ribbon: NFLoadBalancerRuleClassName: com.alibaba.cloud.nacos.ribbon.NacosRule # ロードバランス規則- ウェイト設定
実際のデプロイでは、サーバ機器の性能差などがあり、性能の良い機械がより多くのユーザーリクエストを処理することを望みます。
ただしデフォルトではNacosRuleは同一クラスター内でランダムに選択され、機械の性能を考慮しません。
したがって、Nacosはアクセス頻度を制御するウェイト設定を提供します。ウェイトが大きいほどアクセス頻度が高くなります。
-
環境分離
Nacosはnamespaceを使って環境分離を実現します。
- Nacosには複数のnamespaceを持つことができます
- namespaceにはgroup、serviceなどを含むことができます
- 異なるnamespace同士は互いに見えません
-
サービスインスタンス
Nacosのサービスインスタンスは2種類のタイプに分かれます:
- 一時インスタンス:インスタンスが停止して一定時間経過するとサービスリストから除外されます(デフォルトのタイプ)。
- 永続インスタンス:インスタンスが停止してもサービスリストから除外されません(永久インスタンスとも呼ばれます)。
サービスインスタンスを永久インスタンスとして設定する:
spring: cloud: nacos: discovery: ephemeral: false # 非一時インスタンスに設定NacosとEurekaの違い
NacosとEurekaの全体的な構造は概要としては似ており、サービス登録、サービス取得、心拍待機といった点は共通です。
- NacosとEurekaの共通点
- サービス登録とサービス取得をサポート
- サービス提供者の心拍を用いた健全性検知をサポート
- NacosとEurekaの違い
- Nacosはサーバ側が提供者の状態をアクティブに検出します:一時インスタンスは心拍モード、非一時インスタンスは能動的検出モードを採用
- 一時インスタンスの心拍が異常だと除外されるが、非一時は除外されない
- Nacosはサービスリスト変更のプッシュ通知モードを提供し、サービスリストの更新がよりタイムリー
- NacosクラスターはデフォルトでAPモードを採用します。クラスター内に非一時インスタンスが存在する場合はCPモードを採用します。EurekaはAPモード
Nacos設定管理
マイクロサービスのインスタンスが増え、数十・数百となると、個別に設定を変更するのは大変です。統一的な設定管理ソリューションが必要です。集中管理されたすべてのインスタンスの設定を管理でき、設定変更時にはマイクロサービスに通知して設定をホット更新できる仕組みが求められます。
Nacosは、一方で設定を集中管理し、他方で設定変更時にマイクロサービスへ通知して設定のホット更新を実現します。
マイクロサービスから設定を取得
マイクロサービスはNacosで管理されている設定を取得し、ローカルのapplication.yml設定とマージしてプロジェクト開始を完了します。
ただし application.yml をまだ読んでいない場合、どうやってNacosアドレスを知ることができるのでしょうか?
そこでSpringは新しい設定ファイル bootstrap.yaml を導入します。これは application.yml の前に読み込まれます。
- nacos-config依存を導入
<!--nacos設定管理依存--><dependency> <groupId>com.alibaba.cloud</groupId> <artifactId>spring-cloud-starter-alibaba-nacos-config</artifactId></dependency>- bootstrap.ymlを追加
spring: application: name: userservice # サービス名 profiles: active: dev #開発環境、ここはdev cloud: nacos: server-addr: localhost:8848 # Nacosアドレス config: file-extension: yaml # ファイル拡張子ここでは spring.cloud.nacos.server-addr からNacosアドレスを取得し、${spring.application.name}-${spring.profiles.active}.${spring.cloud.nacos.config.file-extension} をファイルIDとして設定を読み込みます。
- Nacos設定を読み取る
@Value("${pattern.dateformat}")private String dateformat;
@GetMapping("now")public String now(){ return LocalDateTime.now().format(DateTimeFormatter.ofPattern(dateformat));}設定のホット更新
Nacosの設定を変更しても、マイクロサービスを再起動せずに設定を有効にできる、つまり設定のホット更新です。
-
方法1:
@RefreshScopeを追加 -
方法2
@Valueの代わりに@ConfigurationPropertiesを使います。- user-service に、
patterrn.dateformat属性を読み取るクラスを追加:
- user-service に、
package cn.itcast.user.config;
import lombok.Data;import org.springframework.boot.context.properties.ConfigurationProperties;import org.springframework.stereotype.Component;
@Component@Data@ConfigurationProperties(prefix = "pattern")public class PatternProperties { private String dateformat;}1. `UserController` でこのクラスを `@Value` の代わりに使う:@Autowiredprivate PatternProperties patternProperties;
@GetMapping("now")public String now(){ return LocalDateTime.now().format(DateTimeFormatter.ofPattern(patternProperties.getDateformat()));}設定の共有
実際には、マイクロサービス起動時にはNacosから複数の設定ファイルを読み込みます。例えば:
[spring.application.name]-[spring.profiles.active].yaml、例:userservice-dev.yaml[spring.application.name].yaml、例:userservice.yaml
[spring.application.name].yamlは環境情報を含まないため、複数の環境間で共有できます。
設定の共有の優先順位:
Nacosとサービスローカルの両方に同じ属性がある場合、優先順位には違いがあります:

Nacosクラスタ
Nginxで複数のNacosサーバをロードバランシングする
Nacosのconfにあるcluster.confを設定し、Nacosクラスタのアドレスを追加します。
Feign遠隔呼出
RestTemplateを使った遠隔呼出のコードには次の問題があります:
- コードの可読性が低く、統一的なプログラミング体験ではない
- パラメータが多いURLの保守が難しい
Feignは宣言的なHTTPクライアントで、HTTPリクエストの送信を優雅に実現するためのものです。上記の問題を解決します。
FeignをRestTemplateの代替として
- 依存関係を導入
<dependency> <groupId>org.springframework.cloud</groupId> <artifactId>spring-cloud-starter-openfeign</artifactId></dependency>- アノテーションを追加
起動クラスに@EnableFeignClientsを追加
- Feignクライアントを作成
サービス内にインターフェースを新規作成:
@FeignClient("userservice")public interface UserClient { @GetMapping("/user/{id}") User findById(@PathVariable("id") Long id);}このクライアントは、サービス名:userservice、リクエスト方法:GET、リクエストパス:/user/{id}、リクエストパラメータ:Long id、戻り値タイプ:User など、SpringMVCのアノテーションを用いてリモート呼出情報を宣言します。こうしてFeignは、RestTemplateを使わずにHTTPリクエストを送信するのを支援します。
- 呼出
サービスクラスからこのメソッドを呼び出します:
@Autowiredprivate UserClient userClient;
public Order queryOrderById(Long orderId) { // 1.注文を取得 Order order = orderMapper.findById(orderId); // 2. 远程查询User User user = userClient.findById(order.getUserId()); // 3. 存入order order.setUser(user); // 4.返回 return order;}カスタム設定
Feignには多くのカスタム設定があり、以下の表のとおりです:
| 種類 | 効能 | 説明 |
|---|---|---|
| feign.Logger.Level | ログレベルの変更 | NONE、BASIC、HEADERS、FULL の4段階を含む |
| feign.codec.Decoder | 応答結果のデコーダ | HTTPリモート呼出の結果を解析、例えばJSON文字列をJavaオブジェクトへ |
| feign.codec.Encoder | リクエストパラメータのエンコード | リクエストパラメータをエンコードし、HTTPリクエストで送信しやすくする |
| feign. Contract | サポートする注釈形式 | デフォルトはSpringMVCの注釈 |
| feign. Retryer | 失敗時のリトライ機構 | リクエスト失敗時のリトライ機構、デフォルトはなし、ただしRibbonのリトライを使用する場合があります |
一般的にはデフォルト値で十分なことが多いですが、カスタム時には@Beanを作成してデフォルトBeanを上書きするだけで済みます。
設定ファイルによるカスタマイズ
設定ファイルを用いてFeignのログレベルを個別のサービスに適用します:
feign: client: config: userservice: # 特定のマイクロサービスに対する設定 loggerLevel: FULL # ログレベルまたはすべてのサービスに適用するには:
feign: client: config: default: # ここに書くとグローバル設定、サービス名を指定すれば特定のマイクロサービス向け loggerLevel: FULL # ログレベルログレベルは以下の4段階です:
- NONE:ログ情報を一切記録しない。デフォルト値。
- BASIC:リクエストのメソッド、URL、レスポンスのステータスコード、実行時間のみ記録
- HEADERS:BASICに加え、リクエストとレスポンスのヘッダ情報を追加で記録
- FULL:ヘッダ情報、リクエストボディ、メタデータを含む、すべてのリクエストとレスポンスの詳細を記録。
コード方式
Javaコードでログレベルを変更するには、まずクラスを宣言し、次にLogger.Levelのオブジェクトを宣言します:
public class DefaultFeignConfiguration { @Bean public Logger.Level feignLogLevel(){ return Logger.Level.BASIC; // ログレベルはBASIC }}全体で有効にしたい場合は、起動クラスの@EnableFeignClientsにこの設定を適用します:
@EnableFeignClients(defaultConfiguration = DefaultFeignConfiguration .class)局所的に有効にしたい場合は、対応する@FeignClientアノテーションに適用します:
@FeignClient(value = "userservice", configuration = DefaultFeignConfiguration .class)Feignの利用最適化
FeignはHTTPリクエストを発行する下位層が他のフレームワークに依存します。その下位クライアント実装には以下のものがあります:
- URLConnection:デフォルト実装、接続プールをサポートしません
- Apache HttpClient:接続プールをサポート
- OKHttp:接続プールをサポート
したがって、Feignの性能を向上させる主な手段は、デフォルトのURLConnectionの代わりに接続プールを使用することです。
ここではApacheのHttpClientを用いて説明します。
- 依存関係を導入
order-serviceのpomにApacheのHttpClient依存を導入します:
<!--httpClientの依存 --><dependency> <groupId>io.github.openfeign</groupId> <artifactId>feign-httpclient</artifactId></dependency>- 接続プールを設定
order-serviceのapplication.ymlに設定を追加します:
feign: client: config: default: # defaultはグローバル設定 loggerLevel: BASIC # ログレベル、BASICは基本的なリクエストとレスポンス情報 httpclient: enabled: true # FeignによるHttpClientのサポートを有効化 max-connections: 200 # 最大コネクション数 max-connections-per-route: 50 # ルートごとの最大コネクション数要約すると、Feignの最適化は以下の点です。
- ログレベルはできるだけBASICを用いる
- HttpClientまたはOKHttpを用いてURLConnectionを置換する
- feign-httpClient依存を導入
- 設定ファイルでhttpClient機能を有効化し、コネクションプールのパラメータを設定
最適な実装
Feignのクライアントとサービス提供者のコントローラのコードは非常に似ており、このような重複したコードを簡略化する方法は以下のとおりです。
継承方式
同じコードを継承で共有できます:
- APIインターフェースを定義し、定義したメソッドをSpring MVCのアノテーションで宣言します。
- Feignクライアントとコントローラはこのインターフェースを統合します
利点:
- シンプル
- コードの共有を実現
欠点:
- サービス提供者とサービス消費者は密結合
- パラメータリストの注釈のマッピングは継承されないため、コントローラ側で再度メソッド・パラメータリスト・注釈を宣言する必要があります
抽出方式
FeignのClientを独立モジュールとして抽出し、インターフェースに関するPOJOやデフォルトのFeign設定をこのモジュールに集約して、すべての消費者に提供します。
例えば、UserClient、User、Feignのデフォルト設定を1つのfeign-apiパッケージに抽出し、すべてのマイクロサービスがこの依存パッケージを参照すれば直接使用できます。
抽出に基づくベストプラクティスの実装
-
抽出
モジュールfeign-apiを作成
OpenFeign依存を追加
サービス内のメソッドをコピー
-
order-serviceでfeign-apiを使用
依存関係を追加:
<dependency> <groupId>cn.itcast.demo</groupId> <artifactId>feign-api</artifactId> <version>1.0</version></dependency>- パッケージスキャンの問題
-
方法1:
Feignがスキャンするパッケージを指定します:
-
@EnableFeignClients(basePackages = "cn.itcast.feign.clients")-
方法2:
読み込むClientインターフェースを指定します:
@EnableFeignClients(clients = {UserClient.class})Gatewayサービスゲートウェイ
Spring Cloud GatewayはSpring Cloudの全新プロジェクトで、Spring 5.0、Spring Boot 2.0、Project Reactor などのリアクティブプログラミングとイベントストリーム技術を基盤として開発されたゲートウェイです。マイクロサービスアーキテクチャに対して、統一的で簡便なAPIルーティング管理を提供することを目的としています。
なぜゲートウェイが必要か
Gatewayは私たちのサービスの守護神で、すべてのマイクロサービスの統一エントリポイントです。
ゲートウェイのコア機能特性:
- 認可制御:ゲートウェイはマイクロサービスの入口として、リクエスト許可があるかを検証します。なければ遮断します。
- ルーティングとロードバランシング:すべてのリクエストはゲートウェイを経由しますが、ゲートウェイはビジネスを処理せず、何らかのルールに基づいてリクエストを特定のマイクロサービスへ転送します。この過程をルーティングと呼びます。ルーティング先サービスが複数ある場合は、ロードバランシングが必要です。
- レート制御:リクエストの流量が多すぎる場合、ゲートウェイは下位のマイクロサービスが処理できる速度に応じてリクエストを通すように制御します。
SpringCloudにはゲートウェイの実装として2つがあります:
- gateway
- zuul
ZuulはServletベースの実装で、ブロッキング型です。一方、SpringCloudGatewayはSpring5が提供するWebFluxをベースとしたリアクティブ実装で、より高いパフォーマンスを実現します。
入門
- SpringBootプロジェクトgatewayを作成し、ゲートウェイの依存関係を導入
<!--网关--><dependency> <groupId>org.springframework.cloud</groupId> <artifactId>spring-cloud-starter-gateway</artifactId></dependency><!--nacosサービス发现依存--><dependency> <groupId>com.alibaba.cloud</groupId> <artifactId>spring-cloud-starter-alibaba-nacos-discovery</artifactId></dependency>- 起動クラスを作成
@SpringBootApplicationpublic class GatewayApplication {
public static void main(String[] args) { SpringApplication.run(GatewayApplication.class, args); }}- 基礎設定とルーティング規則を作成
ルーティング設定には以下が含まれます:
- ルートID:ルートの一意識別子
- ルーティング先(uri):ルーティングのターゲット先。httpは固定アドレス、lbはサービス名に基づくロードバランシング
- ルート述語(predicates):ルートの条件
- ルーティングフィルター(filters):リクエストやレスポンスを処理する
server: port: 10010 # ゲートウェイポートspring: application: name: gateway # サービス名 cloud: nacos: server-addr: localhost:8848 # nacosアドレス gateway: routes: # ゲートウェイルーティング設定 - id: user-service # ルートID、任意で唯一であればOK uri: lb://userservice # ルーティング先、lbはロードバランシング、後にサービス名を続ける predicates: # ルーティング述語、ルーティングルールの条件 - Path=/user/** # パスに従ったマッチング、/user/で始まる場合に一致- ゲートウェイサービスを起動してテスト
ゲートウェイを再起動し、http://localhost:10010/user/1 にアクセスすると、/user/**ルールに一致し、リクエストは uri: http://userservice/user/1 に転送され、結果を得られます。

断言ファクトリ
設定ファイルに書かれた断言ルールは文字列として扱われ、Predicate Factoryによって読み取られ、ルート判断の条件に変換されます。
例:Path=/user/** はパス照合であり、このルールはorg.springframework.cloud.gateway.handler.predicate.PathRoutePredicateFactoryクラスが処理します。SpringCloudGatewayにはこのような断言ファクトリが他にも十数種類あります:
| 名称 | 説明 | 例 |
|---|---|---|
| After | 指定時間以降のリクエスト | - After=2037-01-20T17:42:47.789-07:00[America/Denver] |
| Before | 指定時間以前のリクエスト | - Before=2031-04-13T15:14:47.433+08:00[Asia/Shanghai] |
| Between | 2つの時間点の間のリクエスト | - Between=2037-01-20T17:42:47.789-07:00[America/Denver], 2037-01-21T17:42:47.789-07:00[America/Denver] |
| Cookie | リクエストには特定のcookieが含まれている必要がある | - Cookie=chocolate, ch.p |
| Header | リクエストには特定のヘッダが含まれている必要がある | - Header=X-Request-Id, \d+ |
| Host | 要求は特定のホスト(ドメイン)へアクセスする必要がある | - Host=.somehost.org,.anotherhost.org |
| Method | リクエスト方式が特定のもの | - Method=GET,POST |
| Path | リクエストパスが指定のルールに適合 | - Path=/red/{segment},/blue/** |
| Query | リクエストパラメータが特定のパラメータを含む | - Query=name, Jackまたは- Query=name |
| RemoteAddr | リクエスタのIPが指定範囲内 | - RemoteAddr=192.168.1.1/24 |
| Weight | 重み処理 |
フィルター・ファクトリ
GatewayFilterはゲートウェイに提供されるフィルターで、ゲートウェイに入るリクエストとマイクロサービスから返ってくるレスポンスを処理します
- ルートのリクエストやレスポンスを加工して、例えばリクエストヘッダを追加する
- ルート下のフィルター設定は、そのルートのリクエストにのみ有効
ルートフィルターの種類
Springは31種類のルートフィルター・ファクトリを提供します:
| 名称 | 説明 |
|---|---|
| AddRequestHeader | 現在のリクエストに1つのリクエストヘッダを追加 |
| RemoveRequestHeader | リクエストから1つのヘッダを削除 |
| AddResponseHeader | レスポンス結果に1つのレスポンスヘッダを追加 |
| RemoveResponseHeader | レスポンス結果から1つのレスポンスヘッダを削除 |
| RequestRateLimiter | リクエストの流量を制限 |
リクエストヘッダーフィルター
以下ではAddRequestHeaderを例に説明します。
要件:すべてのuserserviceへのリクエストに対して1つのリクエストヘッダを追加します:Truth=dreaife is freaking awesome!
ルーティングのgatewayサービスのapplication.ymlを修正してルートフィルターを追加します:
spring: cloud: gateway: routes: - id: user-service uri: lb://userservice predicates: - Path=/user/** filters: # フィルター部 - AddRequestHeader=Truth, dreaife is freaking awesome! # リクエストヘッダを追加このフィルターは現在userserviceルートに書かれているため、userserviceへアクセスするリクエストにのみ有効です。
デフォルトフィルター
すべてのルートに適用したい場合は、フィルター工場をdefaultに書くことができます。フォーマットは以下のとおりです:
spring: cloud: gateway: routes: - id: user-service uri: lb://userservice predicates: - Path=/user/** default-filters: # デフォルトのフィルター項目 - AddRequestHeader=Truth, dreaife is freaking awesome!グローバルフィルター
グローバルフィルターの作用
グローバルフィルターの役割も、ゲートウェイに入るすべてのリクエストとマイクロサービスのレスポンスを処理します。違いは、GatewayFilterは設定によって定義され、処理ロジックは固定ですが、GlobalFilterのロジックは自分でコードを書いて実現します。
GlobalFilterを実装するには、GlobalFilterインターフェースを実装します。
public interface GlobalFilter { /** * 現在のリクエストを処理する。必要に応じて`{@link GatewayFilterChain}` を使ってリクエストを次のフィルターへ渡します * * @param exchange リクエストのコンテキスト。Request、Responseなどの情報を取得可能 * @param chain リクエストを次のフィルターへ委譲するためのチェーン * @return {@code Mono<Void>} 現在のフィルターの処理を終了することを示す */ Mono<Void> filter(ServerWebExchange exchange, GatewayFilterChain chain);}フィルター内でカスタムロジックを書くことで、以下の機能を実現できます:
- ログイン状態の判定
- 権限チェック
- リクエストのレート制御など
カスタムグローバルフィルター
要件:グローバルフィルターを定義し、リクエストをインターセプトして、リクエストのパラメータが以下の条件を満たすかを判断します:
- パラメータにauthorizationが含まれているか
- authorizationの値がadminか
いずれも満たせば通過、それ以外は遮断します
package cn.itcast.gateway.filters;
import org.springframework.cloud.gateway.filter.GatewayFilterChain;import org.springframework.cloud.gateway.filter.GlobalFilter;import org.springframework.core.annotation.Order;import org.springframework.http.HttpStatus;import org.springframework.stereotype.Component;import org.springframework.web.server.ServerWebExchange;import reactor.core.publisher.Mono;
@Order(-1)@Componentpublic class AuthorizeFilter implements GlobalFilter { @Override public Mono<Void> filter(ServerWebExchange exchange, GatewayFilterChain chain) { // 1.リクエストパラメータ取得 MultiValueMap<String, String> params = exchange.getRequest().getQueryParams(); // 2. authorizationパラメータを取得 String auth = params.getFirst("authorization"); // 3.検証 if ("admin".equals(auth)) { // 通過 return chain.filter(exchange); } // 4.遮断 // 4.1.アクセス禁止、ステータスコードを設定 exchange.getResponse().setStatusCode(HttpStatus.FORBIDDEN); // 4.2.処理を終了 return exchange.getResponse().setComplete(); }}フィルターの実行順序
リクエストがゲートウェイに入ると、現在のルートのフィルター、DefaultFilter、GlobalFilterの3種類のフィルターに遭遇します。
リクエストがルートに従って処理されると、現在のルートフィルターとDefaultFilter、GlobalFilterを組み合わせて1つのフィルター連鎖(コレクション)を作成し、順番に実行します。
順序付けのルールは次のとおりです:
- 各フィルターはint型のorder値を指定する必要があります。order値が小さいほど優先度が高く、実行順が前になります。
- GlobalFilterはOrderedインターフェースを実装するか、
@Orderアノテーションを付与してorder値を指定します。 - ルートフィルターとdefaultFilterのorderはSpringによって指定され、デフォルトは宣言順に1ずつ増加します。
- フィルターのorder値が同じ場合は、defaultFilter > ルートフィルター > GlobalFilter の順に実行されます。
クロスオリジン問題
クロスオリジン:ドメイン名が異なる場合を指します。主に以下を含みます:
- 異なるドメイン名: www.taobao.com、www.taobao.org、www.jd.com、miaosha.jd.com
- 同一ドメイン、ポートが異なる場合:localhost:8080 と localhost:8081
クロスオリジン問題は、ブラウザがサービスへ送るクロスドメインのAjaxリクエストを禁止することで、リクエストがブラウザでブロックされる問題です。
解決策:CORS
gatewayサービスのapplication.ymlに以下の設定を追加します:
spring: cloud: gateway: globalcors: # グローバルのクロスオリジン処理 add-to-simple-url-handler-mapping: true # optionsリクエストのブロックを回避 corsConfigurations: '[/**]': allowedOrigins: # 許可するクロスオリジンリクエスト先サイト - "<http://localhost:8090>" allowedMethods: # 許可するクロスオリジンのAjaxリクエスト方式 - "GET" - "POST" - "DELETE" - "PUT" - "OPTIONS" allowedHeaders: "*" # リクエストで許可されるヘッダ情報 allowCredentials: true # クッキーの送受を許可するか maxAge: 360000 # このクロスオリジン検出の有効期限部分信息可能已经过时


